(04/07)
|
|
|
- Emma Hansson
- för 9 år sedan
- Visningar:
Transkript
1 9243-ExpressSteriLft_GBEUcov.qxd 5/6/07 09:30 Page 2 GB FR DE NL NO g) SE h) i) Philips of Holland. All logos brands and product names are trademarks or registered trademarks of their respective holders and are hereby recognised as such (04/07) 2

2 SE 90ml 9) Sterilisatorn måste få svalna i minst 10 minuter innan du använder den igen, så att termostaten kan återställas. 10) Efter varje användning, häll ur allt kvarvarande vatten, skölj och torka torrt. Diskmaskinskorg (se bilderna under F) 1) Den övre och undre korgen kan knäppas ihop för förvaring av små föremål som dinappar, bröstpumpsdelar, tröstnappar etc. när de diskas i diskmaskinen, före steriliseringen. 2) För att knäppa ihop korgarna, rikta in dem så att markeringarna ligger mittemot varandra. Knäpp ihop. För att öppna och dela på korgarna, stick ner fingrarna i fördjupningarna på sidorna. Öppna. Varning: Om din barnmatsutrustning från Philips AVENT diskas i diskmaskin tillsammans med annan disk med rester av starka såser, t.ex. tomatsås, kan den missfärgas med tiden. Skötselanvisning Avkalka sterilisatorn var fjärde vecka, så att den fungerar till 100% även i fortsättningen. Det kan vara en fördel att använda förkokt eller filtrerat vatten i sterilisatorn, för att förhindra kalkbildning. ANTINGEN: 1) Blanda 10 g citronsyra med 2 dl vatten. Häll det i den tomma sterilisatorn. Sätt inte på locket. Kör sterilisatorn i 1-2 minuter, dvs. inte en hel omgång. Dra ur kontakten ur vägguttaget och låt stå i 30 minuter med vätskan i. Häll ut och skölj apparaten. Kör ett fullt program med locket på och exakt 90 ml vatten i, men utan föremål. Torka ur apparaten. (Citronsyra finns att köpa i livsmedelsbutiker undvik att få det i ögonen. De kan bli irriterade. Förvara utom räckhåll för barn.) ELLER: 2) Häll 1 dl ättika blandat med 2 dl kallt vatten i sterilisatorn. Låt stå tills alla avlagringar är borta. Töm ur apparaten och skölj noggrant. Varning 1) Under inga omständigheter får något annat än citronsyra eller ättika användas för avkalkning. Sterilisatorn kan skadas så att den inte går att reparera. 2) Använd inte blekmedel eller andra kemiska lösningsmedel i din sterilisator eller på produkter som ska steriliseras, endast citonsyra eller ättika. 3) Använd inte slipmedel eller bakteriedödande medel och skrapa inte på beläggningen i apparaten. 4) Använd inte destillerat vatten i apparaten, endast kranvatten. 5) Sladden som hör till sterilisatorn får inte användas till någon annan apparat, och ingen annan sladd bör användas till Express elektriska ångsterilisator. 6) Denna apparat ska bara användas av personer som kan ta ansvar för den. Förvara apparaten utom syn- och räckhåll för små barn och äldre. 7) Denna apparat är inte avsedd att användas av fysiskt eller psykiskt handikappade personer, eller av personer som inte har erfarenhet av eller kunskap om apparaten, såvida de inte fått instruktioner om användningen, eller övervakning, av någon som kan ansvara för säkerheten. Garanti Om Express elektriska ångsterilisator skulle gå sönder inom tolv månader efter inköpsdatum, garanterar Philips AVENT att du under denna tid får en ny utan kostnad. Lämna tillbaka sterilisatorn till återförsäljaren där du köpt den. Spara kvittot som köpbevis samt uppgift om när och var du köpt apparaten. För att garantin ska gälla ber vi dig observera följande: Express elektriska ångsterilisator måste användas i enlighet med instruktionerna i denna bruksanvisning och anslutas till lämpligt elnät. Orsaken till reklamationen får inte vara olyckshändelse, felhantering, nedsmutsning, misskötsel eller rent slitage. Dina lagstadgade rättigheter påverkas inte av detta. Philips AVENT finns till din hjälp SE: Felsöknings schema Sterilisatorn sätter inte i gång. Kontrollera så att båda sladdarna är i. Både i maskinen och i väggen. Ånga strömmar ut under locket. Maskinen är inte rätt laddad. Se bild C och D. Flaskorna har fläckar på sig när man tar ut dem. Sterilisatorn tar för lång tid på sig. Sterilisatorn behöver avkalkas. Se under stycket Avkalkning. Har ni för mycket vatten i behållaren? Använd exakt 90 ml eller: Lastad med lite saker mindre saker tar längre tid
 För att knäppa ihop korgarna, rikta in dem så att markeringarna ligger mittemot varandra. Knäpp ihop.")
3 5
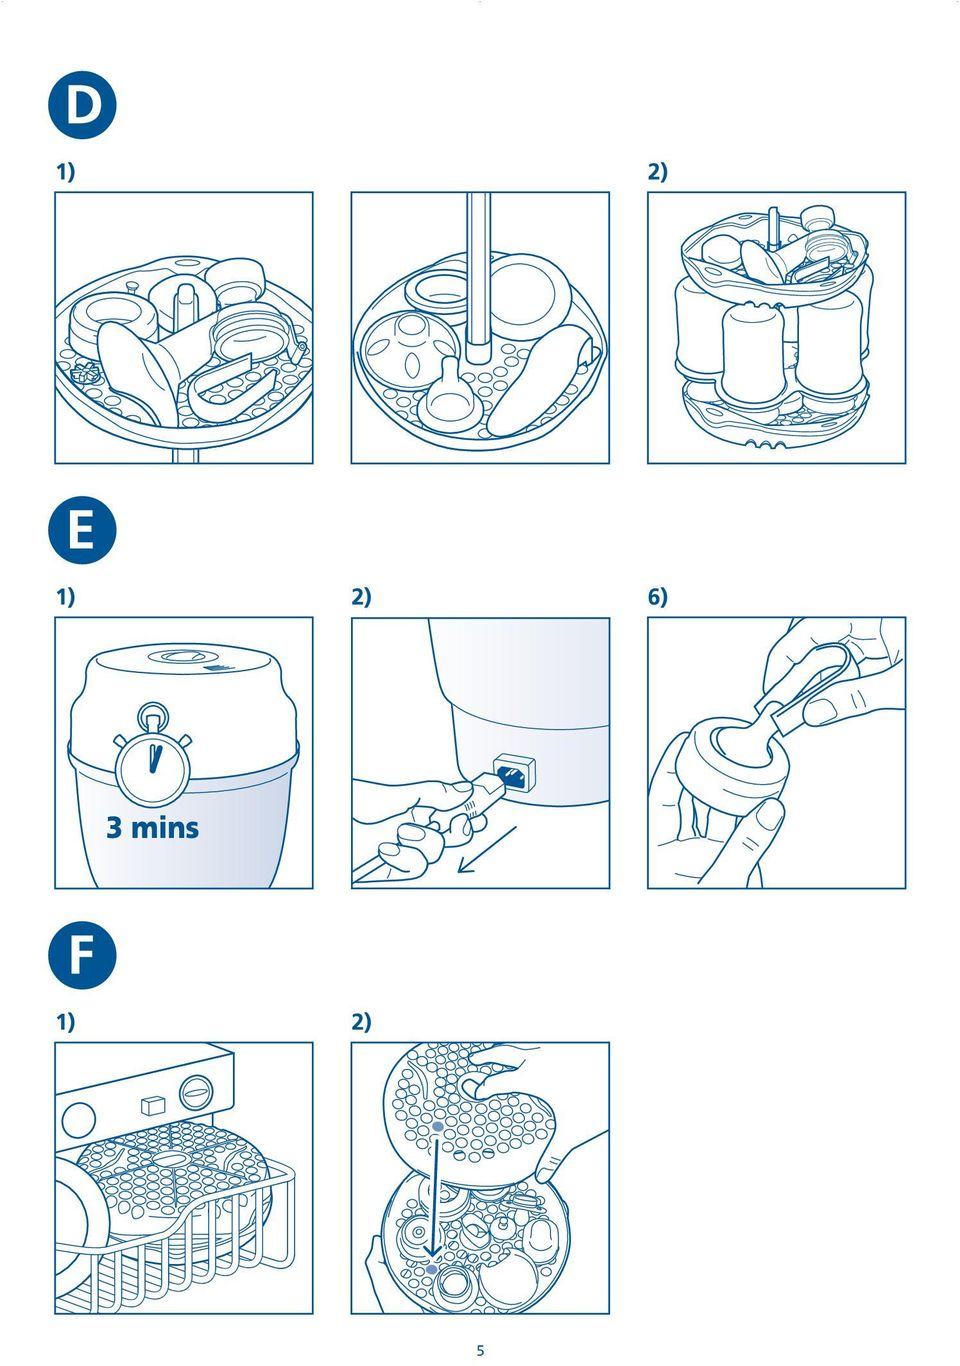
4 GB Philips AVENT Express Electric Steam Steriliser Please take 5 minutes to read through the whole of this leaflet before you use your Philips AVENT Express Electric Steam Steriliser for the first time. As well as bottles and breastfeeding accessories, you can sterilise any other boilable items (please refer to the manufacturer s instructions regarding sterilisation). Please keep these instructions safe for future use. These instructions are also available on our website. Hazard Warning When in use, the steriliser contains boiling water and steam escapes from the vent in the lid. Ensure the steriliser is placed on a firm level surface when in use. Never open the unit when in use. Always keep out of reach of children. Always unplug from the mains when not in use. Never place items on top of the steriliser. To stop the steriliser during the cycle, unplug at the mains. Take care when opening as steam can burn. Never immerse the steriliser in water. Never use the steriliser without water. Failure to follow de-scaling instructions may cause irreparable damage. There are no servicable parts inside the Express Electric Steam Steriliser. Do not attempt to open, service or repair the Express Electric Steam Steriliser yourself. Contents (see diagram A) a) Lid b) 2 x Upper basket c) Bottle rack d) Lower basket e) Central stem f) Steriliser body g) Measuring cup h) Lead and plug i) Tongs NB: Upper and lower baskets are identical Before using your steriliser for the first time (see diagram B) Remove all items from inside the steriliser body. 1) Pour in exactly 90ml of tap water. 2) Assemble all the blue components (baskets, stem and bottle rack). Place the assembled components in the steriliser and put the lid on. 3) Connect the lead into the back of the steriliser and plug into the mains supply. The light should come on automatically. If it does not, press down on the steriliser switch. 4) At the end of the cycle the unit will switch off automatically and the light will go out. 5) Allow unit to cool, turn off at the mains, unplug and disconnect the lead from the back of the steriliser. 6) Remove baskets and bottle rack, pour away any remaining water and wipe dry. Before each use 1) Before sterilising, wash all items in mild soapy water and rinse. 2) Pour exactly 90ml of water into the steriliser body. If you add more than 90ml you will prolong the cycle time. If you use less than 90ml, your items may not be properly sterilised. NB: When loading, always ensure that the steam can effectively circulate around all surfaces and that any water can drain off easily. To sterilise up to six 260ml, 125ml or 330ml AVENT Bottles (see diagram C) 1) Slide the lower basket onto the central stem. 2) Thread 2 screw rings onto the central stem. 3) Slide the bottle rack down the central stem, with the neck facing down, until it rests on the top screw ring. 4) Place the teats through the centre of the holes in the bottle rack onto the lower basket. 5) Thread 4 screw rings onto the central stem. 6) Place the 6 inverted bottles in the bottle rack. 7) Push the upper basket onto the central stem until it rests on the catch. Place the 6 dome caps and tongs into the upper basket. 8) The upper basket is not required when sterilising 330ml bottles (see diagram C8). 9) Place the assembled unit into the steriliser body and put the lid on. 10) Put the lead into the back of the steriliser body and plug into the mains supply. Switch on. 11) Cycle times will vary depending on the load. After each cycle the unit will switch off automatically and the light will go out (approx. cycle time: 8 minutes). To sterilise the Philips AVENT ISIS Manual Breast Pump (see diagram D) 1) Click the ISIS Breast Pump body into the slot in the upper basket and arrange the other breast pump components as shown. Assemble remaining components of the ISIS Breast Pump in the lower basket. 2) Up to six bottles (not including screw rings, teats or dome caps) can be sterilised with the pump. 3) Place assembled unit into the steriliser body, put the lid on. 4) Put the lead into the back of the steriliser body and plug into the mains supply. Switch on. To sterilise narrow neck bottles and other feeding items Teats should be placed around the central stem in the lower basket and screw rings in the top basket, as they are too narrow for the stem. Always ensure items are positioned within baskets /racks to ensure effective circulation of steam. The bottle rack and/or upper basket can be removed to make more room. After sterilisation (see diagram E) 1) Do not remove the lid straight away. Let the steriliser cool down for 3 minutes. 2) Turn off at the mains, unplug and disconnect the lead from the back of the steriliser. 3) Wash your hands thoroughly before removing the sterilised items. 4) Remove the lid. 5) If necessary, shake excess water from items before assembling. 6) The tongs can be used to remove small items and to pull the sterile teats through the screw rings of the bottles. 7) The contents will remain sterile for up to six hours, following the end of the cycle, provided the lid is not removed. 6

5 GB 8) Removed items must be used/assembled immediately or re-sterilised. Expressed milk can be stored in a sterile breast milk container in the refrigerator for up to 48 hours (not in the door) or in the freezer for up to 3 months. Infant formula should be made up fresh for each feed. 9) The steriliser must be left to cool for at least 10 minutes between each use to allow the thermostat to reset. 10) After each use, pour away any remaining water, rinse and wipe dry. Dishwasher Basket (see diagram F) 1) The upper and lower baskets can be clipped together to hold small items such as teats, breast pump parts, soothers, etc for washing in the top rack of your dishwasher prior to sterilisation. 2) To clip together, align the two baskets so that the indicators are opposite each other and snap the baskets together. To open basket, pull apart with fingers using side recesses. Warning: If your Philips AVENT items are washed in the dishwasher with dirty items covered with remnants of strong sauces, such as tomato sauce, they may discolour over time. Care of your steriliser You should de-scale your steriliser every four weeks to ensure it continues to work 100% effectively. It may be advantageous to use pre-boiled or filtered water in your steriliser in order to reduce limescale build up. EITHER: 1) Mix one sachet of citric acid (10gms) with 200ml of water. Pour into the empty steriliser. Do not put lid on. Switch on for 1-2 minutes, i.e. do not run a full cycle. Switch off at mains and leave to stand for 30 minutes. Drain and rinse out the steriliser. Run a full cycle empty with the lid on, using exactly 90ml of water. Wipe out the steriliser. (Citric Acid is available from most chemists avoid contact with eyes as this may cause irritation. Keep out of reach of children.) OR: 2) Pour 100ml vinegar mixed with 200ml cold water into steriliser. Allow to stand in the unit until any limescale has dissolved. Empty the unit and rinse thoroughly. Warnings 1) Under no circumstances should anything other than citric acid or vinegar be used for de-scaling as it may cause irreparable damage. 2) Do not use bleach or chemical sterilising solutions/tablets in your steam steriliser or on products to be sterilised. 3) Do not use abrasive, anti-bacterial materials or scourers to clean the steriliser. 4) Do not use softened water in the steriliser. 5) The lead supplied must not be used on any other appliance and no other lead should be used with the Express Electric Steam Steriliser. 6) This appliance is intended for use by responsible persons, Keep out of reach of small children and the infirm. 7) This appliance is not intended for use by persons with reduced physical, sensory or mental capabilities, or lack of experience or knowledge, unless they have been given supervision or instruction concerning use of the appliance by a person responsible for their safety. Guarantee Philips AVENT guarantees that should the Express Electric Steam Steriliser become faulty during twelve months from the date of purchase, it will be replaced free of charge during this time. Please return it to the retailer where it was purchased. Please keep your receipt as a proof of purchase, together with a note of when and where purchased. For the guarantee to be valid, please note: The Express Electric Steam Steriliser must be used according to the instructions in this leaflet and connected to suitable electricity supply. The claim must not be a result of accident, misuse, dirt, neglect or fair wear and tear. This does not affect your statutory rights. Philips AVENT is here to help GB: Call FREE on IRL: Call FREE on AU: Troubleshooting guide Steriliser will not work Excessive steam escaping from under the lid Bottles come out with marks Check that the mains lead is connected to the steriliser as well as plugged into the mains. Check fuse in plug. Parts incorrectly loaded. Refer to diagrams C/D. Steriliser needs de-scaling (see section headed Care of your steriliser ). Steriliser takes too long to switch off Too much water is being used. Use exactly 90ml of water, OR: The steriliser is loaded with only a few items light loads will take longer to cycle. 7
 After each use, pour away any remaining water, rinse and wipe dry.")
IMPORTANT! RETAIN FOR FUTURE REFERENCE PLEASE READ CAREFULLY VIKTIGT! BEHÅLL FÖR FRAMTIDA REFERENS LÄS IGENOM INSTRUKTIONSMANUALEN
 Heart & Stripes Junior Bed Instructions Manual Instruktions Manual IMPORTANT! RETAIN FOR FUTURE REFERENCE PLEASE READ CAREFULLY VIKTIGT! BEHÅLL FÖR FRAMTIDA REFERENS LÄS IGENOM INSTRUKTIONSMANUALEN Thank
ARC 32. Tvättställsblandare/Basin Mixer. inr.se
 ARC 32 Tvättställsblandare/Basin Mixer inr.se SE Användning och skötsel Manualen är en del av produkten. Bevara den under hela produktens livscykel. Vi rekommenderar er att noggrant läsa igenom manualen
SAFETY PRECAUTIONS SPECIFICATIONS
 SAFETY PRECAUTIONS Read the instructions carefully before use and save them for future reference. Before you connect the appliance: Ensure that the voltage rating on the type plate corresponds to your
VASSVIK FIXED STAND SE / ENG
 VASSVIK FIXED STAND SE / ENG SE VIKTIGT Läs noga igenom instruktionerna före användning och spar dessa för framtida bruk. VARNING: Barnets huvud bör inte ligga lägre än barnets kropp. Lägg inte till ytterligare
Your No. 1 Workout. MANUAL pro
 Your No. 1 Workout MANUAL pro Innehåll/Contents Svenska Viktigt om säkerhet Specifikationer & delar Rekommenderade övningar 3 5 6-7 2 English Safety instructions Specifications & parts Recommended exercises
IMPORTANT! RETAIN FOR FUTURE REFERENCE PLEASE READ CAREFULLY VIKTIGT! BEHÅLL FÖR FRAMTIDA REFERENSLÄS IGENOM INSTRUKTIONSMANUALEN NOGGRANT
 13060 Basic Cot One Instruction Manual Instruktion Manual IMPORTANT! RETAIN FOR FUTURE REFERENCE PLEASE READ CAREFULLY VIKTIGT! BEHÅLL FÖR FRAMTIDA REFERENSLÄS IGENOM INSTRUKTIONSMANUALEN NOGGRANT Thank
Windlass Control Panel v1.0.1
 SIDE-POWER Windlass Systems 86-08950 Windlass Control Panel v1.0.1 EN Installation manual Behåll denna manual ombord! S Installations manual SLEIPNER AB Kilegatan 1 452 33 Strömstad Sverige Tel: +46 525
SAFETY PRECAUTIONS SPECIFICATIONS
 SAFETY PRECAUTIONS Read the instructions carefully before use and save them for future reference. Before you connect the appliance: Ensure that the voltage rating on the type plate corresponds to your
manual Facial spa Art nr: 48682 Rubicson 2016-06-08
 manual Facial spa Art nr: 8682 EN NO SV 2016-06-08 Rubicson ENGLISH Overview Use Fill the container ENGLISH 1. Make sure that the power cord is not connected to a wall socket. 1 2 2. Remove the funnel
Boiler with heatpump / Värmepumpsberedare
 Boiler with heatpump / Värmepumpsberedare QUICK START GUIDE / SNABBSTART GUIDE More information and instruction videos on our homepage www.indol.se Mer information och instruktionsvideos på vår hemsida
LINC 23. Tvättställsblandare/Basin Mixer. inr.se 130226A
 LINC 23 Tvättställsblandare/Basin Mixer 130226A inr.se S Användande och skötsel Manualen är en del av produkten. Bevara den under hela produktens livscykel. Vi rekommenderar att noggrant läsa igenom manualen
Spotlight Set Spotlightset / Spotlightsett
 Manual / Bruksanvisning / Bruksanvisning Spotlight Set Spotlightset / Spotlightsett ENG SE NO Item. No/Art. nr./art. nr. 995-9 ENG Thank you for choosing to purchase a product from Rusta! Read through
BBT057/ BBC057 BBCD057/ BBT057-NL HOLDEN COLORADO 9/2016+ HOLDEN TRAILBLAZER WD & 4WD Models
 INSTALLATION GUIDE BBT057/ BBC057 BBCD057/ BBT057-NL HOLDEN COLORADO 9/2016+ HOLDEN TRAILBLAZER 2017+ 2WD & 4WD Models Ironman 4x4 BBT/ BBC/ BBCD/BBT057-NL Bull Bars fit to a Holden Colorado 9/2016+ It
LINC MODELL 13. INR SVERIGE AB Kosterögatan 15 SE-211 24 Malmö 13 EN 1428:2005+A1:2008
 LINC MODELL 13 151005 Produkten är anpassad till branschregler Säker Vatteninstallation. INR garanterar produktens funktion om branschreglerna och monteringsanvisningen följs. INR SVERIGE AB Kosterögatan
Instruction Manual. Svenska, English. Power Bank. Model: PRBN
 Instruction Manual Svenska, English Power Bank Model: PRBN Innehåll / Content Innehåll Säkerhetsföreskrifter... 4 Delar... 5 Specifikationer... 6 Miljö / Lag och säkerhet / Förbehåll... 7 Content Safety
BOW. Art.nr
 190412 BOW Art.nr 80000637-80000642 SE INNEHÅLL Komponenter 3 Produktfakta 3 Montering 4 Kontakt 8 EN CONTENTS Components 3 Product facts 3 Installation 4 Contact 8 KOMPONENTER COMPONENTS x 3 x 3 PRODUKTFAKTA
Isolda Purchase - EDI
 Isolda Purchase - EDI Document v 1.0 1 Table of Contents Table of Contents... 2 1 Introduction... 3 1.1 What is EDI?... 4 1.2 Sending and receiving documents... 4 1.3 File format... 4 1.3.1 XML (language
SAFETY PRECAUTIONS SPECIFICATIONS
 SAFETY PRECAUTIONS Read the instructions carefully before use and save them for future reference. Before you connect the appliance: Ensure that the voltage rating on the type plate corresponds to your
Support Manual HoistLocatel Electronic Locks
 Support Manual HoistLocatel Electronic Locks 1. S70, Create a Terminating Card for Cards Terminating Card 2. Select the card you want to block, look among Card No. Then click on the single arrow pointing
Ringmaster RM3 - RM 5 RM3 RM 4 RM 5
 RM3 - RM 5 Ringmaster We offer ball pickers in 5 different sizes with a picking width of up to 6 m. RM3 - RM5 has a self-supporting chassis so that the collected balls do not place a load on the picking
PRESS FÄLLKONSTRUKTION FOLDING INSTRUCTIONS
 PRESS FÄLLKONSTRUKTION FOLDING INSTRUCTIONS Vänd bordet upp och ner eller ställ det på långsidan. Tryck ner vid PRESS och fäll benen samtidigt. OBS! INGA STORA KRAFTER KRÄVS!! Om benen sitter i spänn tryck
Nathi Skötbord Changing unit Table à langer murale Wickeltisch Verschoontafel Puslebord Cambiador de pared Přebalovací pult Fasciatoio
 Nathi Skötbord Changing unit Table à langer murale Wickeltisch Verschoontafel Puslebord Cambiador de pared Přebalovací pult Fasciatoio Пеленальный стол Tested and approved according to SS-EN 12221:2008+A1_2013
Plain A262. För T16 (T5) lysrör. Innehåll. Monteringsanvisning. A. Instruktion för rampmontering
 lysrör. Innehåll. Monteringsanvisning. A. Instruktion för rampmontering") Plain A262 För T16 (T5) lysrör Innehåll Ramparmatur: ändmodul En stängd gavel/ en öppen gavel Plint i båda ändarna Överkopplingssladd 1 rampgavel 1 lysrörsbytare Ramparmatur: mellanmodul Plint i en ände
Plain A262 För T16 (T5) lysrör Innehåll Ramparmatur: ändmodul En stängd gavel/ en öppen gavel Plint i båda ändarna Överkopplingssladd 1 rampgavel 1 lysrörsbytare Ramparmatur: mellanmodul Plint i en ände
BATH MIXER 160 LINC 21. incl. HAND SHOWER. inr.se
 LINC 21 BATH MIXER 150 BATH MIXER 160 incl. HAND SHOWER 110309 inr.se Innan montering Vi förordar en sakkunnig VVS-installatör vid installation och service. Ledningarna ska renspolas innan installation.
LINC Modell 17 130624A
 LINC Modell 17 130624A Denna produkt är anpassad till Branschregler Säker Vatteninstallation. INR garanterar produktens funktion om branschregler och monteringsanvisning följs. INR SVERIGE AB Kosterögatan
INSTALLATION INSTRUCTIONS
 INSTALLATION - REEIVER INSTALLATION INSTRUTIONS RT0 RF WIRELESS ROOM THERMOSTAT AND REEIVER MOUNTING OF WALL MOUTING PLATE - Unscrew the screws under the - Pack contains... Installation - Receiver... Mounting
VASSVIK ROCKING STAND
 VASSVIK ROCKING STAND SE / ENG SE VIKTIGT Läs noga igenom instruktionerna före användning och spar dessa för framtida bruk. VARNING: Barnets huvud bör inte ligga lägre än barnets kropp. Lägg inte till
Installation Instructions
 Installation Instructions (Cat. No. 1794-IE8 Series B) This module mounts on a 1794 terminal base unit. 1. Rotate keyswitch (1) on terminal base unit (2) clockwise to position 3 as required for this type
BEAM. Product Manual Produktmanual
 BEAM Product Manual Produktmanual BEAM Technical Specifications Tekniska Specifikationer Description Product number Mode Voltage Current Vehicle interface Cable length Encapsulation Operating temperature
INNEHÅLL / CONTENT. Svenska Säkerhetsföreskrifter...4-5 Användning...6-7 Elschema... 8 Specifikationer... 9 Information...10
 party cooler INNEHÅLL / CONTENT Svenska Säkerhetsföreskrifter...4-5 Användning...6-7 Elschema... 8 Specifikationer... 9 Information...10 English Safety Precautions...12-13 Operation...14-15 Electrical
LÄNKHJUL S3. Monteringsanvisning för: Länkhjul S3
 MONTERINGSANVISNING LÄNKHJUL S3 Art.no. 8822117 Rev.2018-01 Link to english Monteringsanvisning för: Länkhjul S3 art.nr. 2002010 Länkhjul S3 90 mm art.nr. 2002020 Länkhjul S3 120 mm art.nr. 2002030 Länkhjul
Dokumentnamn Order and safety regulations for Hässleholms Kretsloppscenter. Godkänd/ansvarig Gunilla Holmberg. Kretsloppscenter
 1(5) The speed through the entire area is 30 km/h, unless otherwise indicated. Beware of crossing vehicles! Traffic signs, guardrails and exclusions shall be observed and followed. Smoking is prohibited
 INSTALLATION INSTRUCTIONS Accessory S P/N 08E12-SZT-100 Application CR-Z Publications No. Issue Date SEP PARTS LIST Left illuminated door sill trim Right illuminated door sill trim Illumination harness
Christmas tree lighting Julgransbelysning / Juletrebelysning
 Manual / Bruksanvisning / Bruksanvisning Christmas tree lighting Julgransbelysning / Juletrebelysning ENG SE NO Item. No 772701090101 ENG Thank you for choosing to purchase a product from Rusta! Read through
Molift Raiser 75135G Etac Box 203, Anderstorp Sweden Tel Fax
 7G 8-0-07 SE SE EN EN Till och med serienummer 0900 Från serienummer 0900 Up to serial number 0900 From serial number 0900.... Etac Box 0, Anderstorp Sweden Tel + 7 8 7 00 Fax + 7 8 7 90 www.etac.com Svenska
Percolatorbryggare PKE210
 Percolatorbryggare PKE210 Innan användning Innan percolatorbryggare tas i bruk för första gången bör bruksanvisningen läsas igenom noggrant och sparas för framtida bruk. Innan bryggaren används för första
IRAB Mottagare sida 2-5 Tele Radio AB Mottagare sida 6
 IRAB Mottagare sida -5 Tele Radio AB Mottagare sida 6 Installation of receiver type smd 700 4 RELAY FUNCTIONS / -4 VAC/DC PCB TYPE NO: LWEG 4L Rev: 95-09 Installation: Install the receivers in a protected
SAFETY PRECAUTIONS SPECIFICATIONS
 SAFETY PRECAUTIONS Read the instructions carefully before use and save them for future reference. Before you connect the appliance: Ensure that the voltage rating on the type plate corresponds to your
Par m 328 feet. Lång höger sväng. Korgen står placerad i en skogsglänta OB-linje på vänster sida.
 1 100 m 328 feet Lång höger sväng. Korgen står placerad i en skogsglänta -linje på vänster sida. Long right turn. Basket are placed in a forrest glade. -line on the left side. Snälla, skräpa ej ner vår
PRESS FÄLLKONSTRUKTION FOLDING INSTRUCTIONS
 PRESS FÄLLKONSTRUKTION FOLDING INSTRUCTIONS Vänd bordet upp och ner eller ställ det på långsidan. Tryck ner vid PRESS och fäll benen samtidigt. Om benen sitter i spänn tryck benen mot kortsidan före de
POSH. Art.nr
 POSH Art.nr 80000628 190412 SE INNEHÅLL Produktöversikt 3 Innan montering 4 Montering 5 Skötselråd 7 Kontakt 8 CONTTS Product overview 3 Before installation 4 Installation 5 Maintenance 7 Contact 8 PRODUKTÖVERSIKT
Glass fence Glasräcke / Glassrekkverk
 Manual/Bruksanvisning/Bruksanvisning Glass fence Glasräcke / Glassrekkverk ENG SE NO Item. No 6210 1155 0101 59 0101 ENG Thank you for choosing to purchase a product from Rusta! Read through the entire
 BÄNKVÅG / BENCH SCALE Modell : SW-III / Model : SW-III ANVÄNDARMANUAL / USER MANUAL SW-III WWW.LIDEN-WEIGHING.SE 2014-03-26 OBS! Under vågen sitter en justerbar skruv (se bild). Standardinställning är
Verktyg som behövs. LX HD Sit-Stand Desk Mount LCD Arm SVENSKA. 20" (508 mm) 14-30 lbs (6.35-13.61 kg)
 14-30 lbs (6.35-13.61 kg)") ASSEMBLY INSTRUCTIONS LX HD Sit-Stand Desk Mount LCD Arm 14-30 lbs (6.35-13.61 kg) Maximal skärmstorlek * = 46 * Begränsat till max 30 lbs (13,61 kg) 0.78"-2.56" (20-65mm) 0.78-2.25 (20-57mm) 0.5"-2.5"
ASSEMBLY INSTRUCTIONS LX HD Sit-Stand Desk Mount LCD Arm 14-30 lbs (6.35-13.61 kg) Maximal skärmstorlek * = 46 * Begränsat till max 30 lbs (13,61 kg) 0.78"-2.56" (20-65mm) 0.78-2.25 (20-57mm) 0.5"-2.5"
Preschool Kindergarten
 Preschool Kindergarten Objectives CCSS Reading: Foundational Skills RF.K.1.D: Recognize and name all upper- and lowercase letters of the alphabet. RF.K.3.A: Demonstrate basic knowledge of one-toone letter-sound
Contents / Innehållsförteckning
 Contents / Innehållsförteckning Copyright This manual is the copyright of CI no 55650-4137. No part of this manual may be revised, copied or transmitted in any way without written permission from CI no
00-1595. Fiat 500 2007» Fiat Panda / 4x4 2003» Fiat Panda 4x4 Climbing / 4x4 Cross 20033» 619-0300
 00-1595 120 Fiat 500 2007» Fiat Panda / 4x4 2003» Fiat Panda 4x4 Climbing / 4x4 Cross 20033» 619-0300 rev. 2014-04-04 DC Congratulations on purchasing an ATS towbar Alexo Towbars Sweden offer quality towbars
Questionnaire for visa applicants Appendix A
 Questionnaire for visa applicants Appendix A Business Conference visit 1 Personal particulars Surname Date of birth (yr, mth, day) Given names (in full) 2 Your stay in Sweden A. Who took the initiative
BBT042/ BBC042/ BBCD042 NISSAN NAVARA D40 V STX & PATHFINDER R WD & 4WD Models
 INSTALLATION GUIDE BBT042/ BBC042/ BBCD042 NISSAN NAVARA D40 V6 2010+ STX & PATHFINDER R51 2010+ 2WD & 4WD Models Ironman 4x4 BBT/ BBC/ BBCD042 Bull Bars fit to a Nissan Navara D40 STX & Pathfinder R51.
Quick Start. English Svenska PRIMACY. Printing settings and winsign
 Quick Start English Svenska PRIMACY Printing settings and winsign 2016-05-26 Before Printing Quick Start Primacy Install the printer according to the supplier s instructions, please see the PRIMACY user
Make a speech. How to make the perfect speech. söndag 6 oktober 13
 Make a speech How to make the perfect speech FOPPA FOPPA Finding FOPPA Finding Organizing FOPPA Finding Organizing Phrasing FOPPA Finding Organizing Phrasing Preparing FOPPA Finding Organizing Phrasing
SUZUKI GRAND VITARA 3P CITY 2011»
 00-2082 120 SUZUKI GRAND VITARA 3P CITY 2011» 661-0830 rev. 2014-04-04 DC Congratulations on purchasing an ATS towbar Alexo Towbars Sweden offer quality towbars produced as a result of direct market research.
Får endast utföras av behörig personal. May only be carried out by authorized electrician
 Instruktion för DMIS Instruction for DMIS FLE400FC, FLE850MP, W3400H, W4400H/W4600H (-980/1287) W3850H/W31100H, W4850/W41100H (-1220/636) Clarus Control 471 1530-75 2016.05.04 Får endast utföras av behörig
Webbregistrering pa kurs och termin
 Webbregistrering pa kurs och termin 1. Du loggar in på www.kth.se via den personliga menyn Under fliken Kurser och under fliken Program finns på höger sida en länk till Studieöversiktssidan. På den sidan
Lösenordsportalen Hosted by UNIT4 For instructions in English, see further down in this document
 Lösenordsportalen Hosted by UNIT4 For instructions in English, see further down in this document Användarhandledning inloggning Logga in Gå till denna webbsida för att logga in: http://csportal.u4a.se/
 BÄNKVÅG / BENCH SCALE ANVÄNDARMANUAL / USER MANUAL SW-III www.liden-weighing.com Svenska OBS! Under vågen sitter en justerbar skruv (se bild). Standardinställning är den för vägning. Om ni vill rengöra
Beijer Electronics AB 2000, MA00336A, 2000-12
 Demonstration driver English Svenska Beijer Electronics AB 2000, MA00336A, 2000-12 Beijer Electronics AB reserves the right to change information in this manual without prior notice. All examples in this
Materialplanering och styrning på grundnivå. 7,5 högskolepoäng
 Materialplanering och styrning på grundnivå Provmoment: Ladokkod: Tentamen ges för: Skriftlig tentamen TI6612 Af3-Ma, Al3, Log3,IBE3 7,5 högskolepoäng Namn: (Ifylles av student) Personnummer: (Ifylles
A TASTE OF THE FUTURE
 A TASTE OF THE FUTURE Servicemanual SE Rostfri Värmehäll för glaskanna COFFEE QUEEN V2 S SE/GB Din återförsäljare / Your retail dealer GB Stainless Warmer for glasspot Rev. 071017 1. Innehåll / Table of
ASSEMBLY INSTRUCTIONS
 ASSEMBLY INSTRUCTIONS Unite XL2 EXTEND COMPONENTS End tabletop 190/260 cm Middle tabletop 140/210 cm 1 Assemble all the legs, start by putting a foot into an inner leg. Slide the outer leg over the inner
Quick Start Guide Snabbguide
 Quick Start Guide Snabbguide C Dictionary Quick Start Thank you for choosing C Dictionary and C-Pen as your translation solution. C Dictionary with its C-Pen connection will make translation easy and enable
Accepterad monteringsanvisning 2016:1. Metris (RSK: ) Metris S (RSK: ) Metris (RSK: )
 Metris S (RSK: ) Metris (RSK: )") EN Table of contents 1 Instructions for use / assembly instructions 2 Assembly 4-5 Adjustment 6 Operation 7 Dimensions 8-9 Flow diagram 8-9 Spare parts 10-12 Cleaning 13 Test certificate 14 Contact information
EN Table of contents 1 Instructions for use / assembly instructions 2 Assembly 4-5 Adjustment 6 Operation 7 Dimensions 8-9 Flow diagram 8-9 Spare parts 10-12 Cleaning 13 Test certificate 14 Contact information
UV-C TECH 16 WATT 40 WATT 75 WATT 130 WATT AMALGAM. UV-C and Pool equipment MEMBER OF:
 UV-C TECH UV-C and Pool equipment 16 WATT 40 WATT 75 WATT 130 WATT AMALGAM MEMBER OF: 2 BLUE LAGOON UV-C TECH UV-C and Pool equipment MANUAL BLUE LAGOON UV-C TECH BLUE LAGOON UV-C TECH EN 6-8 BLUE LAGOON
81152 TRANSFER CASE SHIFT HANDLE
 Installation Instructions for TRANSFER CASE SHIFT HANDLE for 2007 2018 JEEP JK WRANGLER 1 2 3 ITEM NO. PART NO. DESCRIPTION QTY. 1 4101359 SHIFT KNOB, JEEP WRANGLER JK, MOLDED 1 2 1794720 JAM NUT, 3/8
55R Kia Carens 2013»
 55R-013714 60 Kia Carens 2013» 630-0810 rev. 2014-06-09 DC Congratulations on purchasing an ATS towbar Alexo Towbars Sweden offer quality towbars produced as a result of direct market research. Every towbar
Consumer attitudes regarding durability and labelling
 Consumer attitudes regarding durability and labelling 27 april 2017 Gardemoen Louise Ungerth Konsumentföreningen Stockholm/ The Stockholm Consumer Cooperative Society louise.u@konsumentforeningenstockholm.se
Joki Joki Air. JCD70-xx JAD90-xx. lasiesta.com. Manual. Betriebsanleitung. Manuel. Manual. Manuale. Gebruiksaanwijzing.
 lasiesta.com LA SIESTA GmbH Im Wiesenweg 4 55270 Jugenheim Germany Tel: +49 6130 9119-19 LA SIESTA Inc. 7355 S.W. 87 th Ave., Ste. 100 Miami, FL 33173 USA Tel: +1 786 401-1138 EN DE FR ES IT NL DA SV FI
STRICT Art.nr ,
 170209 STRICT Art.nr 800 004 91, 800 005 66 SE INNEHÅLLSFÖRTECKNING Produktöversikt Sida 3 Innan montering Sida 4 Montering Sida 5-6 Skötselråd Sida 7 Kontakt Sida 8 TABLE OF CONTTS Product overview Page
Monteringsanvisning Podie T 4100 K
 Monteringsanvisning Podie T 4100 K Monteringsanvisning Förbered fundamentet 1. Montera ställfötterna. Montera tvättmaskin SV 1. Fäst gaffelbeslagen i bakkant med brickor och skruv. OBS! Placera beslagen
Bruksanvisning Directions for use
 Bruksanvisning Directions for use KOMBIDON OUTSIDE WALL HOOD SVENSK/ENGLISH VERSION SVENSKA Denna montageanvisning omfattar produkten KOMBIDON. BESKRIVNING/ ANVÄNDNING Kombidon från AB C.A. Östberg är
Digital Personvåg MANUAL H
 Digital Personvåg MANUAL H151-00-1 www. Specifikationer Kapacitet & Noggrannhet Strömförsörjning Arbetsmiljö 250kg / 0.1kg Adapter 120VAC-9VDC-50Hz / 230VAC 9VDC 50Hz Arbetstemperatur: 10 C to 35 C Förvaring,
CUSTOMER READERSHIP HARRODS MAGAZINE CUSTOMER OVERVIEW. 63% of Harrods Magazine readers are mostly interested in reading about beauty
 79% of the division trade is generated by Harrods Rewards customers 30% of our Beauty clients are millennials 42% of our trade comes from tax-free customers 73% of the department base is female Source:
TEXTURED EASY LOCK BLOCK INSTALLATION GUIDE. australianpaving.com.au
 TEXTURED EASY LOCK BLOCK INSTALLATION GUIDE 1800 191 131 australianpaving.com.au TEXTURED EASY LOCK BLOCK The Textured Easy Lock Block retaining wall system is the premium retaining wall product for near
Installation Instruction Monteringsinstruktion JK400
 Installation Instruction Monteringsinstruktion JK400 Tools: 2pcs of spanner 13 and 17mm or 2pcs of adjustable spanner, cross slotted screwdriver PZ 2 Warning: Plates can be sharp in the edges and corners,
CTC VT 80. Installations- och skötselanvisning/ Installation- and Maintenance Manual. Providing sustainable energy solutions worldwide
 162 201 89-2 2019-04-03 Providing sustainable energy solutions worldwide Installations- och skötselanvisning/ Installation- and Maintenance Manual CTC VT 80 Svenska Installations- och skötselanvisning
GB ASSEMBLY INSTRUCTION MANUAL SE MONTERINGSANVISNING DUNK YOUTH ART. NO
 www.stigagames.com GB ASSEMBLY INSTRUCTION MANUAL SE MONTERINGSANVISNING DUNK YOUTH ART. NO. 61-4810-24 GB ENGLISH STIGA Dunk Youth - Art.no. 61-4810-24 OWNER S MANUAL 1. Read this manual carefully before
INKOPPLINGSANVISNING ELTRYCKSLÅS WIRING DIAGRAM SOLENOID LOCK
 INKOPPLINGSANVISNING ELTRYCKSLÅS WIRING DIAGRAM SOLENOID LOCK SE EN S. 2-4 P. 5-7 SL 510/511 SL 520/521 SL 530-50/531-50 2013 11 07 SE TEKNISK SPECIFIKATION Driftspänning. Ström. Reed relä. Drifttemperatur.
55R Volvo XC » Volvo XC » Volvo S » Volvo V » Volvo XC » Volvo V »
 55R-01 3687 90 Volvo XC60 2008-2013» Volvo XC60 2013» Volvo S60 2010» Volvo V60 2010» Volvo XC70 2007» Volvo V70 2007» 668-0312 rev. 2014-05-07 RG Congratulations on purchasing an ATS towbar Alexo Towbars
This manual should be saved! EcoFlush Manual
 This manual should be saved! EcoFlush Manual ENGLISH Important! This manual should be saved by the owner! Read the whole manual before installation. The flush volumes are factory set at 2.5 / 0.3 liters.
2.1 Installation of driver using Internet Installation of driver from disk... 3
 &RQWHQW,QQHKnOO 0DQXDOÃ(QJOLVKÃ'HPRGULYHU )RUHZRUG Ã,QWURGXFWLRQ Ã,QVWDOOÃDQGÃXSGDWHÃGULYHU 2.1 Installation of driver using Internet... 3 2.2 Installation of driver from disk... 3 Ã&RQQHFWLQJÃWKHÃWHUPLQDOÃWRÃWKHÃ3/&ÃV\VWHP
Anvisning för Guide for
 Anvisning för Guide for PRISMA SENSOR 1 96243235zPC Montering i tak/installation in the ceiling Byte av kupa/change of diffuser 2 Installation Installation från gavel / Installation from the end Installationskabel
BRIC MODELL A
 BRIC MODELL 3 150123A 2,5 & 4mm 1 2a 3 4 x 2 x 2 5a 2b 6 5b 5c 5d 5e x 1 x 1 x 1 x 1 1 x 1 x 1 x 4 x 1 x 3 x 4 ~20mm Alternativ placering av mittenstöd. Alternative placement of centre support 75-95mm
This manual should be saved! EcoFlush Manual. Wostman 2018:2
 This manual should be saved! EcoFlush Manual Wostman 2018:2 ENGLISH Important! This manual should be saved by the owner! It s important to read the whole manual before installation. EcoFlush gives the
Användarmanual User manual THERMOS OFFICE
 Användarmanual User manual THERMOS OFFICE SE Energisnål kaffebryggare. Kapacitet 1,9 liter Lätt att installera och använda EN Power saving coffee machines. Capacity 1,9 litres Simple installation and easy
BOENDEFORMENS BETYDELSE FÖR ASYLSÖKANDES INTEGRATION Lina Sandström
 BOENDEFORMENS BETYDELSE FÖR ASYLSÖKANDES INTEGRATION Lina Sandström Frågeställningar Kan asylprocessen förstås som en integrationsprocess? Hur fungerar i sådana fall denna process? Skiljer sig asylprocessen
Instruktioner för Service / Instructions for Service
 Allmän Serviceinformation Varje deltagare har fått tilldelat 6 x 10m serviceplats på Rocklunda. För de som beställt extra utrymme framgår ytan av skissen över serviceområdet. Endast servicefordon som har
A TASTE OF THE FUTURE Användarmanual User manual COFFEE QUEEN M-2 U SE/GB
 A TASTE OF THE FUTURE Användarmanual User manual SE Svenska COFFEE QUEEN M-2 U SE/GB GB English Energisnål kaffebryggare. Kapacitet 1,8 liter eller 2 x 1,8 liter. Lätt att installera och använda Power
Information technology Open Document Format for Office Applications (OpenDocument) v1.0 (ISO/IEC 26300:2006, IDT) SWEDISH STANDARDS INSTITUTE
 v1.0 (ISO/IEC 26300:2006, IDT) SWEDISH STANDARDS INSTITUTE") SVENSK STANDARD SS-ISO/IEC 26300:2008 Fastställd/Approved: 2008-06-17 Publicerad/Published: 2008-08-04 Utgåva/Edition: 1 Språk/Language: engelska/english ICS: 35.240.30 Information technology Open Document
SVENSK STANDARD SS-ISO/IEC 26300:2008 Fastställd/Approved: 2008-06-17 Publicerad/Published: 2008-08-04 Utgåva/Edition: 1 Språk/Language: engelska/english ICS: 35.240.30 Information technology Open Document
Om oss DET PERFEKTA KOMPLEMENTET THE PERFECT COMPLETION 04 EN BINZ ÄR PRECIS SÅ BRA SOM DU FÖRVÄNTAR DIG A BINZ IS JUST AS GOOD AS YOU THINK 05
 Om oss Vi på Binz är glada att du är intresserad av vårt support-system för begravningsbilar. Sedan mer än 75 år tillverkar vi specialfordon i Lorch för de flesta olika användningsändamål, och detta enligt
BBT014/ BBC014/ BBCD014 PJ & PK FORD RANGER WD & 4WD Models
 INSTALLATION GUIDE BBT014/ BBC014/ BBCD014 PJ & PK FORD RANGER 2007+ 2WD & 4WD Models Ironman 4x4 BBT/ BBC/ BBCD014 Bull Bars fit to a Ford Ranger. It will take about 3 hours to install. NOTE: This product
LX Desk Mount LCD Arm
 ASSEMBLY INSTRUCTIONS LX Desk Mount LCD Arm * Den vertikala hissens lägsta rörelseomfång minskas upp till 3 tum (76 mm) när armen justeras för att kunna stödja över 20 lbs (9 kg). 8.5 (216 mm) 5-25 lbs*
FORTA M315. Installation. 218 mm.
 1 Installation 2 1 2 1 218 mm. 1 2 4 5 6 7 8 9 2 G, G0= Max 100 m 1.5 mm² (AWG 15) X1, MX, Y, VH, VC = Max 200 m 0.5 mm² (AWG 20) Y X1 MX VH VC G1 G0 G 0 V 24 V~ IN 0-10 0-5, 2-6 60 s OP O 1 2 4 5 6 7
ASSEMBLY INSTRUCTIONS SCALE - SYSTEM
 ASSEMBLY INSTRUCTIONS 60 mm 00 mm 600 mm 000 mm R50 mm ALL COMPONENTS Metal profile 60 mm (start and end of system) Metal profile connection Wire Felt square Metal profile 00 mm Metal profile connection
A TASTE OF THE FUTURE
 A TASTE OF THE FUTURE Användarmanual User manual SE Energisnål kaffebryggare. Kapacitet 2,2 liter Lätt att installera och använda COFFEE QUEEN Termos M U SE/GB GB Power saving coffee machines. Capacity
InstalationGuide. English. MODEL:150NHighGain/30NMiniUSBAdapter
 miraclebox miraclewifi InstalationGuide English MODEL:150NHighGain/30NMiniUSBAdapter ENGLISH MIRACLE WIFI 150N & 300N USERMANUAL MIRACLEBOX.SE 1 ENGLISH Table of Contents Package Contents... 3 System Requirements
INSTRUCTION BRUKSANVISNING. 7 Day Wine Kit 7 Dagars Vinsats. 23 Lit. - 6 US Gallons - 5 Imperial Gallons
 INSTRUCTION BRUKSANVISNING 7 Day Wine Kit 7 Dagars Vinsats 23 Lit. - 6 US Gallons - 5 Imperial Gallons BELVINO WINE KITS are based on dried fruit, herbs and berries. Fermentation and clearing are both
Accepterad monteringsanvisning 2016:1. Focus (RSK: ) 1 (12)
 1 (12)") EN Table of contents 1 Instructions for use / assembly instructions 2 Assembly 4 Adjustment 5 Dimensions 6 Flow diagram 6 Operation 7 Spare parts 8 Cleaning 9 Test certificate 10 Contact information 12
EN Table of contents 1 Instructions for use / assembly instructions 2 Assembly 4 Adjustment 5 Dimensions 6 Flow diagram 6 Operation 7 Spare parts 8 Cleaning 9 Test certificate 10 Contact information 12
USER INSTRUCTIONS. Smart-Splitter A Smart-Line Product
 USER INSTRUCTIONS BRUKSANVISNING I ORIGINAL. USER INSTRUCTIONS IN ORIGINAL FORMAT. ARTIKELNR. / ARTICLE NO: 0458-395-2800 Smart-Splitter A Smart-Line Product Patented 1 2 Greppyta Grip area 10 3 4 5 6
Storlek/ Size. Modell/ Model. Effekt/ Effect. Vattenmängd/ Water amount T30 63W T30 87W T30 67W T30 76W T30 108W T30 121W
 HANDDUKSTORK 101641 HANDDUKSTORK Glow 110/260 95 65/205 CC Shine 400/500 80 345/445 CC 750/1200 40 117 41 630/1080 CC Joy 500 80 445 CC 100 690/1000/1400 540/850/1250 CC 78 27 1200 1140 CC x2 101659x1