T To Contact Us. c Copyright , NITGEN Co., Ltd. All rights reserved
|
|
|
- Lars-Göran Bergqvist
- för 6 år sedan
- Visningar:
Transkript
1
2 c Copyright , NITGEN Co., Ltd. All rights reserved Features and specifications are subject to change without notice. No part of this guide may be copied or reproduced for any purpose without the prior written authorization from NITGEN. NITGEN holds the copyright on the brands NITGEN and NITGEN logo. T To Contact Us Tel (Toll Free) Fax customer@nitgen.com URL:
3 Table of Contents Chapter 1 Before You Start 1.1 About the product Features and specifications Product details LCD screen How to input fingerprint Authentication types Chapter 2 Environment Setup 2.1 Menu configuration Fingerprint Option UI (User Interface) Option Door Option System Option Network Factory Initialization Extension Opt Chapter 3 How to Use the Terminal 3.1 User Manager Information Appendix Ⅰ Network Connection Problems Appendix Ⅱ Terminal Initialization Problems Appendix Ⅲ Sound Modification Guide Appendix Ⅳ Direct Sunlight problems Appendix Ⅴ FAQ (Frequently Asked Question) Appendix ⅤI Wiegand Protocol Format Appendix ⅤII EMERGENCY Display Appendix ⅤⅢ Firmware Update Problems
4 Chapter 1 Before You Start 1.1 About the product Features and specifications Product details LCD screen How to input fingerprint Authentication types
5 1.1 About the product Overview Biometric systems are recently used in various authentication systems. They are increasingly used not only in environments that require high level of security but also in many other places because they are convenient and economical. Among various biometric systems, the fingerprint recognition system takes up most of the market because it is easy to use as well as economical and capable of developing various types of applications. NITGEN, a global leader in the fingerprint recognition industry, provides various fingerprint authentication solutions such as PC security, knowledge management, vaulting service, access control, electronic approval, and financial payment. NITGEN actively responds to customer needs through continuous research, development and quality management. The NITGEN access control system is an advanced product in which core technologies of NITGEN recognized worldwide such as fingerprint recognition algorithm, optical sensors, embedded design technology, and software application technology are organically combined and optimized. In addition, unlike other existing access control systems that use passwords or ID cards only, it is free from such risks as loss of password and abuse or duplication of card, providing excellent convenience and security. It is designed to maximize operational efficiency, enabling integrated monitoring and systematic management of terminals which have been operated independently on a remote location via the network. The NITGEN access control system can use various combinations of RF card, password and fingerprint authentication. Designed to meet both universal uses and specific uses, it can be used in various customer environments including enterprises and - 5 -
6 government agencies due to such convenient built-in features as group ID, short ID, 1:N authentication, interphone and voice instruction. This manual describes how to use NITGEN s access control terminal (NAC-3000). System configuration Access Server Server PC Client PC Remote Manager Remote Monitor Network Terminal NAC-3000 Component Server PC Client PC Main Features 1. Server software: Access Sever 2. Terminal communication and log data collection 3. User information and log database 4. Performing authentication 1. Client software: Remote Manager/Remote Monitor 2. User registration and management 3. Monitoring terminal status and events - 6 -
7 Terminal (NAC-3000) 1. Performing user authentication 2. Door control You can use all features with the NITGEN access control terminal (NAC-3000) only. If you use it with the management programs (Access Server, Remote Manager and Remote Monitor ) in network environment, you can manage a number of terminals more easily and efficiently. You can use the server and client software in one PC
8 1.2 Features and specifications Product features The NITGEN access control system (NAC-3000) has the following features: 1 Control and manage access of a large number of people. 2 Combine several authentication types (fingerprint, password, and RF card). 3 Control multiple access control terminals via the network. 4 Manage remote systems easily (running server and client PCs independently). 5 Provide various additional features including user access lookup and interphone. 6 Real-time monitoring of access status. 7 Access control by period and time. 8 SDK (Software Developer s Kit) is provided for development of various applications such as time & attendance (not supplied). 9 High speed 1:N authentication is available. 10 Enhanced user convenience (short ID/group ID authentication and Auto-on). System specifications (when connected with the server) Section Access terminal Remote management Content Connection allowed up to 255 terminals Simultaneous server access up to 8-8 -
9 Number of users to register Network Authentication type 10,000 users (2 fingerprints per 1 user) 10,000 users (1 fingerprint per 1 user) 10 Mbps, TCP/IP Fingerprint, password and RF card (optional: 125Khz, 13.56Mhz), Livefinger detection (optional) Terminal specifications Section Size Display Language Model Type Sensor Resolution Additional Speed Authentication Algorithm Content 128 * 64 Dots LCD English, Korean OPP01 Optical 500 DPI Auto on / Latent Image Check / Intelli Capture / LFD Capture (optional) 1:1 mode: T < 1sec. 1:N mode -Avg. 2.5sec(1,000FP, Server) -Avg. 2sec (500FP, Terminal) -Avg. 1sec (300FP, Terminal) PentiumⅣ 1GHz, 512MB RAM - LFD authentication : 3sec (in case of terminal authentication) FRR: 0.1 % or less, FAR: % or less - 9 -
10 Number of users to register Communication Size Supported doors Power Terminal TCP/IP RS-232C Wiegand Case Bracket 2,000 users (2 FP per 1 user) 4,000 users (1 FP 1 user) 10 base-t Ethernet Max bps (optional) 26 bit, 34 bit mode(output only) ID Length : 4digit If you use LFD terminal, you must to set OFF 135 (W)*45 (L)*202.5 (H) mm 102.4(W)*26.6(L)*157.5(H) mm Deadbolt / Strike / EM Lock / Auto door Adaptor Input: AC 100 V ~ 240 V, 50/60 Hz Output: DC 12 V, 3 A (Option : 24V) Interphone MIC and Speaker included Additional features Voice instruction (English / Korean) Downloading Logo / Firmware Variable ID length (4 ~ 15 digit) Option RF Module (HID,Mifare) UPS (12V / 2.9Ah) Temperature Storage -25 ~
11 Humidity Operation Storage Operation -20 ~ 60 (With no icing or condensation) 15% ~ 90% RH 25% ~ 85% RH

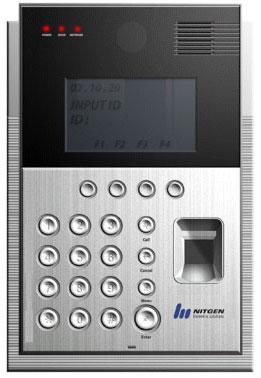
12 1.3 Product details LED lamps: They indicate the terminal operation status. The below table shows what they mean from the left: Lamp Operation Status Color Power Power status. The LED is on while the power is supplied. Red Network Door Network connection status. The LED is on while connected to the network. Open/close status of the door. The LED is on while the door is open. Green Green 2 LCD screen: It displays menus and options for all operations. 3 Keypad: It is used to enter user ID or set up environment. For each key description, please see the following table:
13 Keys 0 ~ 9 Number keys. *, # Enter Cancel Call Description Direction keys. Move the cursor up and down when selecting menu items. *(Backward), # (Forward) Press this key to complete such operation as ID input or environment setup. Delete the entered numbers one by one, or move to the upper-level of the menu. A guest can use it to talk to someone inside with the interphone. Menu F1 ~ F4 Set or modify the settings. Define time & attendance features: arriving, leaving, going out for outside duty and coming back from outside duty. You can freely set the function keys in accordance with the requirements of the related software. 4 Speaker: For voice instruction, interphone communication, and alarms. 5 Fingerprint input sensor: Put the fingerprint here. 6 Auto-On switch: No keyboard operation is required. Fingerprint is automatically read in when placing the finger on the fingerprint input sensor. 7 Microphone: It is connected to the internal interphone. 8 Reset Switch : In case the terminal is halted during operation
14 cause of unknown reason, you can push this switch to reset terminal
15 1.4 LCD screen Initial screen The initial screen of the terminal is as below. The icons in the upper part of the LCD screen indicate the status of the terminal. The logo in the middle of the screen can be defined by the manager, and current date and time are displayed at bottom J A N 0 9 : 2 5 : 3 4 Initial screen The below table describes the icons in the LCD screen. Icon Description The door is connected to the door lock device. The door is open after the user authentication is validated. The display language is English. The display language is Korean. Terminal mode SO (Stand Alone): All operations take place in the terminal alone. NS (Network Server): Authentication is done in the server. This mode will not supported on Enterprise version or FW ver 2.5 or later
16 NL (Network Local): Authentication is done in the terminal and the log is saved in the server. The terminal is connected to the server. The terminal is not connected to the server


17 1.5 How to input fingerprint When you enroll and authenticate user fingerprint, do the followings to avoid authentication error: 5. Press your finger evenly to maximize the input area. If we say the weakest push as 0%, and the strongest push as 100%, apply 50~70% of force. 2 Make sure that the core of the fingerprint is at the center of the fingerprint input window. In general, the core of the fingerprint is on the same line as the lunula of the fingernail. So locate the lunula of the fingernail at the center of the fingerprint input window
18 1.6 Authentication types With the NITGEN access control system, you can use fingerprints, passwords, and RF cards (optional) for authentication. Depending on customer environment, you can use one of the following authentication types as you need. Fingerprint authentication Use fingerprints to validate access authentication with the following types: 1:1 authentication In this mode, enter a pre-registered ID first and then a fingerprint. The enrolled fingerprint corresponding to the ID will be compared to the entered fingerprint on a 1:1 basis. The 1:1 authentication type takes a short time regardless of the number of users. There is no need to make any special settings in the system. After entering the ID, enter the fingerprint to perform authentication. 1:N authentication Only enrolled fingerprints are used for authentication. Though the authentication procedure is simple, this method will take a little longer than the 1:1 authentication if there are many users. There is no need to make any special settings in the system. But because there were many users, so it takes too much time to authenticate, use 1:N Timeout. The user who wasn t authenticated in timeout will have fail message. Refer to the 1:N Timeout for more information. Short ID (SID) authentication The user ID can be 4 15 digits long depending on the initial setting. This method simplifies ID input procedure. Instead of entering the entire registered ID, you can enter only the first part
19 of the ID for authentication. For example, if the user ID is , enter 12 only and then the fingerprint. Then the system will perform 1:N authentication for all Ids that start with 12xxxxx. There is no need to make any special settings in the system. Group authentication For group authentication, you can specify a group ID of 1 4 digits long for each user group. You will enter a group ID and a fingerprint for authentication. For example, you can use the unit number for public housing like an apartment as a group ID. You can specify a group ID when you register a user. Unlike other methods, you must enter the group ID, and then press F1 before entering the fingerprint to perform group authentication. T/A authentication (Time & attendance) Using the function keys (F1~F4), you can use the T/A mode. If you press any function key before authentication, a T/A authentication log will be saved. The T/A authentication log has the ID and the function key code. For example, if your ID is 1234 and you press the F1 key before authentication, the authentication log would be 1234+F1. Password authentication A password of 4 8 digits long is used to validate access authentication. You can use this method in such a special case as when the fingerprints are damaged. RF card authentication (optional) The RF card of a user is used to identify the user. You can register the RF card number to the system in advance to provide against loss or theft of the RF card
20 Auto T&A (time & attendance) Mode In this mode, 1:N identification will give you log data of the T&A without pressing the function Keys (F1~F4). In Auto T&A Mode, the initial screen will be change as below. In this mode, even though you try just 1:N identification, you ll successfully get the log data that you want. You don t have to press any function key. F1 INPUT ID : 11-JUL 09:25:34 1) How to get in the Auto T&A Mode At first, you should select the T&A mode in the menu of the Function Mode and select the USE mode in the Auto T&A mode in the menu of the Extension Opt. And then go to the initial screen and press the function key (F1~F4) you want. 2) How to get out of the Auto T&A Mode Press the cancel key. Press another Function key to change current function mode. For example, you can change current mode from F1 to F2 by pressing F2 key. * TIP : You don t have to input group ID during user registing, if a terminal is used in T&A Mode
21 Multi T&A Mode This function is supported on FW ver or later. In FW ver2.520 and 1.180, you can select mode about use or not use of this function in MENU OPTION. First, you select Multi T&A mode in the menu of the SYSTEM OPTION. And then you can extend <Function key number> to 40 using * and # buttons. F1 INPUT ID : 11-JUL 09:25:34 You can enter T&A mode issuing F1 key. And then you can use extended T&A mode using * and # buttons. The [*] button means decreasing number and the [#] button means increasing number. F11 INPUT ID : 11-JUL 09:25:34 This is an example. In this case, the log in the Access manager will show F11. Auto T&A mode will work in the same way
22 LFD (Live Finger Detection) Authentication (Optional) This function will be supported only when you use NAC-3000 LFD terminal and LFD firmware at the same time. The LFD is the function to detect fake FP (or replica). You can change the LFD level. The higher the level is, the more difficult to fake. The LFD uses 3 images to detect fake FP. (diffusion type/ absorption type/ external light) If the fake is detected, the terminal shows presume fake message. It is strongly recommended that the user place his FP on the top of the prism and remain still until the capture finishes. This is to get the best image for LFD function. You can choose LFD function in the menu like below. Capture mode Normal / Latent / Intelli / LFD You can choose LFD level. LFD Level Low / Middle / High
23 This is the message when the fake FP is detected! PRESUME FAKE!
24 Chapter 2 Environment Setup 2.1 Menu Configuration Fingerprint Option UI Option Door Option System Option Gate Permission Network Factory Initialization
25 2.1 Menu Configuration Features The terminal menu is configured as follows. You can use this menu to set the initial environment, register users, and set the fingerprint recognition device and the network. You can use the menu button on the terminal keypad. For more information on how to register, modify and delete users, and check the version, please refer to Chapter 3. Menu User Manager FP Option UI Option Door Option System Option 1. Register User 2. Modify User 3. Delete User 4. Delete All Command 5. Sensor Option 6. Secu. Level 7. Capture Mode 8. Sensor Timeout 9. Auto-On Check 10. 1:N Timeout 11. LFD Level (Optional) 1. Language 2. Voice 3. Beep 1. Open Duration 2. Warn. Duration 1. Encryption 2. Log 3. RF Card 4. WIEGAND 5. Function Mode
26 6. Terminal Mode 7. Time Setting 8. Timezone Mode Network Information Factory Ini. Extension Opt. 1. Terminal ID 2. TCP/IP 3. N/W Timeout 4. Port Number 1. # of User 2. F/W Version 1. DB Format 2. FP Number 3. ID Length 4. Reset Term 1. Use F-Scan? 2. Use Auto-T&A? 3. T&A Disp.Mode Master authentication When you install the terminal for the first time, you can set the environment without master authentication. But after the master has been registered, you should pass master authentication to change the terminal settings with menu
27 In standalone mode without the network connection, the first registered user will be the master. For more information on how to register users, refer to "Register users" in Chapter 3. When you register the first user, the default user type becomes Master. In network environment, you can choose either Normal or Master for the first registered user. In other words, the registration procedure of the first user is the same with other normal procedure. If you press the menu button to show the menu, the following screen will appear for master authentication. Enter the Master ID and proceed with the pre-defined authentication type (fingerprint, password and RF) to display the menu. Input Master ID :1234 Jan :27 Result screen If you succeed, the following message will appear, followed by the menu screen. Success!
28 If you fail, the following message will appear and you will go back to the initial screen. This failure message means that the changes you made have not been applied. Fail! 2.2 Fingerprint Option Use this menu to set the operation environment of the fingerprint input sensor. It has the following 7 submenus. Move to the submenu you want to choose with the direction keys and press the Enter key. FP Option 1.Sensor Option 2.Secu. Level 3.C ap t u r e M o d e 4.Sensor Timeout 5.Auto-On Check 6.1:N Timeout 7. LFD Level - LFD level menu will be supported only when you use LFD firmware. Sensor Option Set the sensor options to get a clear fingerprint image. The sensor
29 option values are the internal settings of the CMOS image sensor. You can set gain, brightness and contrast. The defaults of Gain, Brightness and Contrast are 2, 40 and 20 respectively. These values can largely affect the fingerprint recognition performance because they are very sensitive. So it is highly recommended that default values be used without any modification if possible. Gain (1 / 2 / 4 / 8) Defautl Value 2 Sensor Option 1.Gain (1/2/4/8):2 Enter a gain value and press the Enter key. Then the brightness setup screen will appear. Brightness (0~100) Default Value 45 (40) Sensor Option 1.Brightness (0-100):45 (40)
30 Default Value is different according to firmware version. In case of version xx before, Default value is 40 In case of version xx after, Default value is 45 Enter a brightness value and press the Enter key. Then contrast setup screen will appear. Contrast (0~100) Sensor Option 1.Contrast (0-100):20 If the recognition performance is decreased because it is very dry (i.e. in winter), adjust Brightness between 20 and 30 (recommendation: 20). If the recognition performance is decreased because it is very wet (i.e. in summer), adjust Brightness between 50 and 80 (recommendation: 60). Security Level Specify security level if you use fingerprint authentication. You can choose a level between 1 and 9. The greater the number is, the higher the security level is. You can specify security levels for 1:1 mode and 1:N mode separately to use the system more efficiently. In general, set the 1:N mode security level higher than the 1:1 mode one
31 If a high level of security is required, you will need to specify a high security level. But a high security level can increase the false rejection rate (fail to authenticate the right person) depending on the status of the fingerprint. In contrast, a low security level may increase the false acceptance rate (allow authentication for the wrong person). 1:1 mode In this mode, you should input ID first and then your fingerprint. The enrolled fingerprint corresponding to the ID will be compared to the entered fingerprint on a 1:1 basis. So you can set lower security level in this mode than in 1:N mode without degrading security. Secu. Level 1.1:1 Mode (1-9): 5 1:N mode In this mode, you need to input fingerprint only without ID. It is recommended to set a higher security level in this mode than in 1:1 mode. The default is 8. Secu. Level 2.1:N Mode (1-9):
32 In the 1:N mode, if you set the security level too low, the false acceptance rate may increase, resulted in degrading security. On the other hand, if you set it too high, the false rejection rate may increase, resulted in inconvenience. Capture Mode Latent prevents recognition error possibly caused by latent fingerprint image in the fingerprint input window because of sweat or sebum. Intelli increases recognition performance against dry finger or wet finger. The initial setting is Latent. Move to the value you want to choose with the direction keys and press the Enter key. C a p t u r e M o d e Normal / Latent / Intelli / LFD - LFD level menu will be supported only when you use LFD firmware. The default value is LFD
33 This feature can increase security but it may slow down authentication time. So if high level of security is required, you can use this feature. But you'd better not use this feature in an environment where convenience and quickness are more important (i.e. when used for attendance management). Sensor Timeout (1 ~ 30 seconds) Set the timeout of fingerprint input. The LED blinks and the terminal waits for fingerprint input during the specified seconds. After that time, the LED will be turned off. The default is 5. Use the number keys to enter the value and press the Enter key. Sensor Timeout (1-30): 5 Auto-On Check Auto-On check is an automatic finger detection function. If someone place finger on the sensor, it detects finger and simuates pressing Enter Key. The initial setting is ON. Move to the value you want to choose with the direction keys and press the Enter key. Auto-On Check ON / OFF
34 1:N Timeout Setting In case of 1:N identification, FAIL message will occur if identification is not completed within time that specified in Option menu. This is for avoiding making users wait too long. Decide whether to use 1:N Timeout. The initial setting is ON. Move to the value you want to choose with the direction keys and press the Enter key. 1:N TIMEOUT 1. Use Timeout ON / OFF Next, you can set timeout value. If you choose OFF, this menu won t appear. The initial setting is 3 sec. 1:N TIMEOUT 2. Set Timeout ( 2 9 ) : 3 LFD Level You can decide the Live Finger Detection Level. The higher level you choose the higher fake detection ratio you can get. This function is only for LFD terminal and LFD firmware
35 And, you can only set LFD Level when CAPTUER MODE is LFD. The Default value is [LOW]. LFD Level Low / Middle / High 2.2 UI (User Interface) Option Use this menu to set the user environment such as display language, voice instruction and alarm. The following three submenus are provided. Move to the submenu you want to choose with the direction keys and press the Enter key. UI Option 1.Language 2.Voice 3.Warn. Beep Language Select either ENG (English) or KOR (Korean) to set the language for LCD screen display. Move to the value you want to choose with the direction keys and press the Enter key. Laguage KOR / ENG
36 Voice Provide voice instruction on how to use the terminal for fingerprint authentication. Move to the value you want to choose with the direction keys and press the Enter key. Voice ON / OFF Button Beep Decide whether to use button beep. Move to the value you want to choose with the direction keys and press the Enter key. Beep ON / OFF
37 2.3 Door Option Use this menu to set the door open and close behaviors operated by the terminal. Move to the submenu you want to choose with the direction keys and press the Enter key. Door Option 1.Open Duration 2.Warn. Duration Open Duration Specify how long the door will be open after user authentication is validated. You can specify a value between 1 and 20. Use the number keys to enter the value and press the Enter key. Open Duration (1-20) : 5 Warning Duration It gives an alarm if the door is still open after the specified time elapses. If the alarm sounds, check why the door is not closed and take necessary steps to make sure that the door closes normally. Specify a value between 1 and 20, but it should be greater than the door open time. Use the number keys to enter the value and press the Enter key. To disable this function, set this time
38 Warn. Duration (0-20) : 10 These features may not work in some types of doors. Please use the door having door monitor sensor. D O O R O P E N WARN! J U L 0 9 : 2 5 : 3 4 If the door remains open longer than the time that is setting in the [warn. Duration], the message above is displayed. So when you see the message, close the door or check the Door warning function. If you set the warning duration time 0, this message won t display
39 2.4 System Option Use this menu to set the terminal system. The following 7 submenus are provided. Move to the submenu you want to choose with the direction keys and press the Enter key. System Option 1.Encryption 2.Log 3.RF Card 4.WIEGAND 5.Function Mode 6.Terminal Mode 7.Time Seting 8.Time z o n e M o d e From xx version, terminal does not support Timezone Mode. Encryption Decide whether to encrypt incoming and outgoing content of terminal in network communication. Move to the value you want to choose with the direction keys and press the Enter key. Encryption No Use/DES
40 If you use encryption, security and system stability will be enhanced. On the other hand, it will take longer to perform encryption and decryption. Log Decide whether to save access information. If the terminal is connected to the network, access information is transferred to the server in real-time, whereas if it is in standalone mode without network connection, information is saved within the terminal. Move to the value you want to choose with the direction keys and press the Enter key. Log ON / OFF In case of v2.522 after, you can save up to 15,000 latest events in a terminal. In case of v2.520 before, you can save up to 3,000 latest events in a terminal. RF Card Decide whether to use RF card for user authentication. Move to the value you want to choose with the direction keys and press the Enter key
41 RF Card OFF / 26bit / 34bit RF is optional. If the terminal is not equipped with RF module, this feature is not available. Wiegand Decide whether to use wiegand protocol for transmission authentication result and user ID to sever. LFD Terminal does not set up. Default value is OFF. WIEGAND OFF/26bit/34bit OFF You don t want to use wiegand protocol. SUCCESS!
42 26bit When you select 26bit protocol, you can set up the Facility Code (1-255). Facility Code (1-255) : 0 34bit 선택 When you select 26bit protocol, you can set up the Facility Code ( ). Facility Code ( ) : 0 Wiegand communication works only if the length of user ID is 4 digit. Please refer to Appendix Vi about wiegand protocol in detail. Wiegand communicaton can not set up in LFD Terminal. Function Mode Set the function keys of the keypad (F1 ~ F4) either for access control (AC) or for time & attendance (T&A). If you choose AC, F1 will be used for group authentication. If you choose T&A,
43 Multi T&A function keys from F1 to F4 will be used for time & attendance - arriving, leaving, going out for outside duty and coming back from outside duty (inter-operating with the time & attendance software is required). Move to the value you want to choose with the direction keys and press the Enter key. Function Mode AC / T&A / Multi T&A This function is supported FW version 2.50 and after. If you select Multi T&A mode, you can use Multi T&A function. (for using method, refer to 19 page) Notice) T&A Mode supports T&A Disp.Mode of Extension Opt, but Multi T&A Mode not supports T&A Disp.Mode. Terminal mode The terminal can be used in one of the following three modes. Move to the value you want to choose with the direction keys and press the Enter key. SO (Standalone Only): One terminal is used independently. All settings such as user registration, deletion, and access control are performed in the terminal alone. Event log information is saved within the terminal. NL (terminal authentication): User authentication is done by the terminal while various log events are sent to the server in real-time instead of being saved within the terminal
44 NS (server authentication): User authentication is done by the server. This mode is supported on Access manager standard version. Access manager enterprise and FW ver 2.5 (later) will not support this way. Please refer to the authentication modes described above and choose the proper one. Terminal Mode SO / NL / NS Time Setting Set the current date and time to be displayed in the LCD screen. Use the number keys to enter the date and time. When you enter the year and press the Enter key, the cursor moves to month, and so on (year month day hour minute second). Use the 24 hour format for hour setting. Time Setting 2003 / 04 / : 37 : 13 Timezone Mode Set the current timezone mode. There are 2 kinds of Timezone Mode
45 You must select one of them in this menu. The initial value is the Complex mode. 1) Simple mode Please refer to Gate Permission. 2) Complex mode In this mode, you can control the permission of a terminal and each user separately. For setting in detail, you have to use the Access Manager software. Refer to the software manual for more information. You cannot control the complex timezone in detail on the Terminal Menu. T i m e z o n e M o d e Simple / Complex When firmware version is after, you can not set timezone mode
46 2.6 Network Use this menu to set the network environment to connect the terminal to the network. The following four submenus are provided. Move to the submenu you want to choose with the direction keys and press the Enter key. Network 1.Terminal ID 2.TCP/IP 3.N/W Timeout 4.Port Number Terminal ID Set a unique ID for the terminal. Considering that several terminals can be connected to the server via the network, make sure that the ID matches the one specified in the management program. In case the IP address conflict with each other, the terminal won t work properly. Terminal ID (1-255) : 1 TCP/IP Set TCP/IP of the terminal. 1 DHCP You can decide whether to use DHCP that automatically assigns IP addresses to network clients. If you choose to use DHCP by
47 selecting ON, you can skip step 2 and 3. TCP/IP 1.DHCP ON / OFF 2 Terminal IP An IP address consists of 4 numbers and each of the number has 3 digits. Entering all 3 digits for a number will move the cursor to the next field so that you can start to enter the next number. But you should press the Enter key to move to the next field if a number has less than 3 digits. 2.Terminal IP Subnet Mask The first two numbers of Subnet Mask are fixed as Enter the rest numbers with the same way as you enter the terminal IP address. 3.Subnet Mask
48 4 Gateway Enter the Gateway address with the same way as you enter the terminal IP address. 4.Gateway Whenever Gateway address changed, Terminal would be reset. This helps reconnecting of network. 5 Server IP Enter the server IP address with the same way as you enter the terminal IP address. 4.Sever IP
49 Network Timeout When the terminal communicates with the server via the network, it will be assumed that the network connection is disabled if there is no response within the specified time. You can specify a value between 2 and 20. If the network environment is not stable, start with 5 seconds and then increase the value gradually. N/W Timeout (2-20) : 10 If the server communication cycle is too short, it may cause too much communication burden on the networking. If it is too long, the real-time monitoring system may not work well. So set the value properly for your environment. Port Number Set the port number for when the terminal communicates with the server via the network. You can specify a value between 1 and The default value is Port Number :
50 2.5 Factory Initialization Use this menu to initialize the current settings to factory defaults. To use FP Number or ID Length, you must delete all users because they are not available if there is left any one registered user. Factory Ini. 1.DB Format 2.FP Number 3.ID Length 4.R e s e t T e r m DB Format Format the flash memory where user information is stored and the memory where the timezone and the option information. If you select DB Format, the following message appears. In this mode, Authentication log cannot format. If you completly want to format all DB, please contect A/S center. DB Format YES / NO Choose YES to start formatting. The following message will appear, showing you that formatting is in progress. Formating
51 When formatting is complete, you will return to the initial screen. Factory Ini. 1.DB Format 2.FP Number 3.ID Length 4.R e s e t T e r m Fingerprint Number Choose the number of fingerprints you can enroll for each user ID. Move to the value you want to choose with the direction keys and press the Enter key. Fixed Option FP Number 1 / 2 If you choose 1, you can register up to 4,000 users, and if you choose 2, you can register up to 2,000 users
52 ID Length Specify the user ID length between 4 and 15. Fixed Option ID Length (4-15) : 4 You can't change the ID length if there is left any one registered user. Reset Terminal Resetting the Terminal without disassembling. When following message appear, choose YES to reset Are You Sure? Y E S / N O
53 2.3 Extension Opt This function is supported Fw ver xx and ver xx and after version. This function consists of three menus about Extension Option menu. Extension Opt. 1. Use F-Scan? 2.Use Auto-T&A? 3.T&A Disp.Mode Use F-Scan? F-Scan(Free Scan) function is supported 1:1 authenticaion. If you contacts Auto-On Sensor or inputs Enter Button in the initial screen in case of use mode in this function, terminal not capure. That is; this function is operate when you input full ID. Use F-Scan? Use /Not use % F-Scasn is only support 1:1 Matching, so user try to authenticate after input full ID
54 Use Auto-T&A? Auto T&A function is added menu setting option in original function, you can use T&A function even though you are not always input function key. To setting Auto T&A function, you select T&A mode of system in the menu of the SYSTEM OPTION. Use Auto-T&A? Use /Not use After setting, you go to the initial screen and then when input Fucntion key. If you want cancel this mode, you can press cancel button more than 5sec. T&A display Mode This function can select display mode of T&A. T&A Disp.mode Default / Mode 1 / Mode
55 If you select default mode, terminal displays like below screen. F1 Input ID : 11-JUL 09:25:34 Each function keys display like F1, F2, F3, F4. If you select Mode1, terminal displays like below screen. F1 Going Work Input ID : 11-JUL 09:25:34 Each function keys display like F1- Going Work, F2- Leave Work, F3-Going Out, F4- Return Work. If you select Mode2, terminal displays like below screen. F1 Check In Input ID : 11-JUL 09:25:34 Each function keys display like F1- Check In, F2- Check Out, F3, F
56 Chapter 3 How to Use the Terminal 3.1 User Manager Information
57 3.1 User Manager Use this menu to manage the database where user information is stored. You can access this menu only through master authentication. (Refer to "Master authentication" in Chapter 2.) Four submenus are provided: Register User, Modify User, Delete User and Delete All. Move to the submenu you want to choose with the direction keys and press the Enter key. User Manager 1.Register User 2.Modify User 3.Delete User 4.Delete All If the terminal mode is NL or NS, only Register User will be displayed on the screen. The other features are available only in the server. Register User Register users who will use the access control system. User information will be stored in the database. After you pass master authentication, use the following procedure to register users
58 In SO terminal mode, user registration is performed in the terminal. In NL or NS terminal mode, it is done in the terminal or the server. In the NL or NS mode, however, you can register users as long as the network works well. If the terminal is disconnected, you can't register users. If you want to change the SO terminal mode to NL or NS, you must delete the entire users in the terminal database and re-register. 1 Input ID If you choose Register User, the below screen will appear so that you can input a user ID. Enter an ID and press the Enter key. If an identical ID already exists, an error message will appear and you will go back to the previous menu. Input ID : To modify the ID during the input process, use the Cancel button. Pressing the Cancel button will delete numbers one by one if there are any numbers entered. If there's nothing, you will return to the upper-level menu. 2 Input Group ID When you finish Input ID process, the next Group ID screen will appear so that you can specify the group where the user belongs to. If you do not want to use the group ID, press the
59 Enter key to move to the next step. Input a group ID in 4 or less digits, and press the Enter key. Inpur Group ID : 0 If you did not select group ID in the initial environment setup, the group ID input step will be skipped. If you use group ID that is not registered at server, when registering user in network mode, it will fail. Please use registered group ID that is registered at server. 3 User Type Choose Normal or Master user type. Use the direction keys to make a choice, and press the Enter key to finalize the setting. Normal: Normal users do not have the privilege to manage the terminal. They will have the access privilege only after they pass authentication. Master: As terminal managers, master users have door access privilege and can manage the user database and set the environment with corresponding menu items. User Type Normal / Master
60 4 Authentication Mode Choose one of user authentication modes - fingerprint, password, RF card and several combinations of the three. Move to the value you want to choose with the direction keys and press the Enter key. Authen. Mode FP PW RF FP / PW FP / RF PW / RF FP & PW FP & RF PW & RF FP & PW & RF If you did not select RF when you setup the system, any authentication modes including RF will not be displayed in the screen
61 How to use the authentication modes Legend: FP (fingerprint), PW (password), RF (RF card), Enter( ) / (OR combination), & (AND combination) Classification FP PW RF FP/PW Description Authenticate by fingerprint only. 1 ID + fingerprint (1:1 authentication) 2 fingerprint input (1:N authentication) Authenticate by password only. 1 ID + + PW + Authenticate by RF card only. 1 RF Authenticate by fingerprint or password. Try fingerprint first. If you input the ID first and fails in the fingerprint authentication, you can try password authentication. But if you fail in the fingerprint authentication without ID input, you can't try password authentication and authentication fails. 1 ID + FP (if FP fails, try PW + ) 2 FP (if FP fails, authentication fails)
62 FP/RF PW/RF FP&PW FP&RF PW&RF Authenticate by fingerprint or RF card. Try fingerprint first. If you input the ID first and fails in the fingerprint authentication, you can try RF card authentication. But if you fail in the fingerprint authentication without ID input, you can't try RF card authentication and authentication fails. 1 ID + FP (if FP fails, try RF) 2 FP (if FP fails, authentication fails) 3 RF Authenticate by password or RF card. 1 RF 2 ID + + PW + (if PW authentication fails, try RF) Authenticate by fingerprint and password. You should succeed in both. 1 FP + PW + 2 ID + FP + PW + You should succeed in both fingerprint and RF card. The following three methods are available. 1 RF + FP 2 FP(1:N authentication) + RF 3 ID + FP + RF You should succeed in both password and RF card. 1 RF + PW + 2 ID + + PW + + RF
63 FP&PW&RF You should succeed in fingerprint, password and RF card. 1 FP + PW + + RF 2 ID + FP + PW + + RF 3 RF + + FP + PW + When you try one of the above modes, short ID and group ID authentications are also available (refer to "1.6 Authentication types" in Chapter 1). 5 Input Fingerprint If you select fingerprint authentication mode or other one that includes fingerprint authentication, you must input your fingerprint. You should do it twice. After the first input, take your finger off, and then input the fingerprint again. Place the fingerprint on the sensor. Place FP 1 If the following screen appears after the first fingerprint input, take your finger off from the sensor. Remove FP
64 Place the same fingerprint again. Place FP 2 If the fingerprint input is successful, a success message will appear. If it fails, a failure message will appear and you will return to the initial registration screen. 6 Input password If you select password authentication mode or other one that includes password authentication, you must enter the password. Password can be 4-8 characters long. Input Passwd 1 : For security, password is displayed as *. Input Passwd 1 :* * * * Enter the password again for confirmation
65 Input Passwd 2 * * * * If the password input is successful, a success message will appear. If it fails, a failure message will appear and you will return to the initial registration screen. 7 Input RF card. If you chose to use RF card when you setup the system, use the RF card to register the user. Place the RF card near the fingerprint input sensor. If you did not choose the RF option when you setup the terminal environment, press the Enter key to go to the next step. Contact RF Card On Sensor If the RF input is successful, a success message will appear. If it fails, a failure message will appear and you will return to the initial registration screen. Modify User Use this feature to change the information on a registered user. You can change fingerprint, password, group ID, RF card, authentication mode and user type. If you select Modify User, the following screen will appear so that you can enter
66 the user ID whose information you want to modify. Input ID 1234 Enter the ID and press the Enter key, and you'll see the following items in the displayed screen. Move to the submenu you want to choose with the direction keys and press the Enter key. Modify User 1.FP 2.Authen. Mode 3.User Type 4.Group ID 5.Password 6.Change RF Fingerprint Change the fingerprint of each registered user. As you did in the first fingerprint enrollment, input the fingerprint twice. After the first input, take your finger off, and then input the fingerprint again. Place the fingerprint on the sensor. Place FP
67 If the following screen appears after the first fingerprint input, take your finger off from the sensor. Remove FP Place the same fingerprint again. Place FP 2 Password Change the password of each registered user. Enter a new password. Input Passwd 1 **** Enter the password again for confirmation. Input passwd
68 * * * * Group ID Change the group ID where the user belongs to. Enter a new group ID. If you don't want to use a group ID, press the Enter key to skip this step. Input Group ID : 0 Change RF Card Change the RF card of each registered user. Contact RF Card On Sensor Authentication Mode Change the authentication mode of each registered user. Select a new authentication mode you want to use. Authen. Mode FP
69 PW RF FP / PW FP / RF PW / RF FP & PW FP & RF PW & RF FP & PW & RF User Type Change a user type of each registered user. Choose either Normal or Master. User Type Normal / Master Delete User Enter the user ID you want to delete. Input ID :2222 The below confirmation screen will appear. Choose either YES or NO, and press the Enter key
70 Are You Sure? YES / NO Delete All Delete all registered users in the terminal. Choose either YES or NO, and press the Enter key. Are You Sure? YES / NO All registered users in the terminal will be deleted. Please use this feature very carefully
71 3.2 Information You can check the terminal information with this menu. Information 1.# of User 2.F/W Version Number of User It shows you the total number of users registered in the terminal. The number of normal and master users are displayed separately on the screen. # of User Normal: 124 Master: 4 Firmware Version It shows you the firmware version of the terminal. F/W Version
 Appendix Ⅴ - 80 (Frequently Asked Question) Appendix Ⅵ - 83 (Wiegand Protocol Format) Appendix Ⅶ - 84 (EMERGENCY Display) Appendix ⅤⅢ 86 (Firmware Update Problems) - 72")
72 Appendix Appendix Ⅰ - 73 (Network Connection Problems) Appendix Ⅱ - 76 (Terminal Initializing Problems) Appendix Ⅲ - 77 (Sound Modification Guide) Appendix Ⅳ - 78 (Direct Sunlight problems) Appendix Ⅴ - 80 (Frequently Asked Question) Appendix Ⅵ - 83 (Wiegand Protocol Format) Appendix Ⅶ - 84 (EMERGENCY Display) Appendix ⅤⅢ 86 (Firmware Update Problems)
73 Appendix Ⅰ - Network Connection Problems To solve the connection problem between Server and Terminal If terminal is not connected on server via network, please check the followings: Not registered terminal on server Please register the terminal on server 001 Contact Master Not Registered Invalid terminal ID After check the terminal ID, please set another valid one (1~255) 002 Contact Master Invalid TID Different user ID length of server and terminal Please set the same USER ID Length for server and terminal 003 Contact Master ID Length Err
74 Different number of fingerprint to register of server and terminal Please set the same number of fingerprint to register for sever and terminal. 004 Contact Master Finger Cnt Err Terminal ID confliction Please change Terminal ID with unregistered one 005 Contact Master TID Conflicted Invalid MAC address Please contact Customer Service Center ( ) 006 Contact Master MAC Addr Err
75 Invalid Firmware Version Please upgrade Firmware. If the versions of Access manager SW and Firmware don t match, the terminal won t work well. In this case, please feel free to contact us. Our office phone number is Contact Master I n v a l i d F W V e r
76 Appendix Ⅱ - Terminal Initializtion Problems To solve the error occurred during initializing Refer the countermeasures for possible malfunctions during initializing after supplying power to Terminal as followings ; Err. Code Description Countermeasure 001 Undefined Error Rebooting or A/S 002 FPGA Initialization Failure Rebooting or A/S 003 LCD Initialization Check LCD module connection Failure or A/S 004 RTC Initialization Failure A/S 005 Optic module error Check optic module connection or A/S 010 A/S 011 A/S 012 A/S 013 System Software Error A/S 014 A/S 015 Rebooting 016 A/S Error code 001,002 and 003 are not displayed on LCD screen, but recognized by Beep Error code 001 : 1 time beeping every 5 sec. Error code 002 : 2 times beeping every 5 sec. Error code 003 : 3 times beeping every 5 sec
77 Appendix Ⅲ How to control the volume of voicing guide How to connect with external speaker system A. Turnnig the volume up We have fit the volume of voicing guide the best condition. But in case the environment is noisy, you might not hear it. To turn it up, you have just only to connect jumper (J6) inside terminal. This may cause tone quality to degrade a little, because the speaker being used in terminal is small. B. Connection external speaker To meet your need of louder voicing guide, we prepare the connector for external speaker. Connecting with an external speaker having amplifier, you ll be able to get louder voice guide. Connect an external speaker with connector (J4) inside a terminal. This is the definition of connector 1th Pin : GND 2nd Pin : OUTPUT

78 Appendix Ⅳ Direct Sunlight problems How to improve decreased recognition rate due to direct sunlight 1) Why direct sunlight should be blocked during fingerprint authentication Like a camera, the fingerprint recognition device captures an image. If there is a large amount of light, the image gets darker and becomes hard to recognize. Unlike a camera, the device not have a shutter or an iris. So you should block direct sunlight yourself. 2) Where to install As all our products are optical products that can be affected by direct sunlight, avoid the following places when you install. 1 Next to the window likely to get direct sunlight 2 Outdoors where there is no awning 3) How to improve recognition rate in case direct sunlight cannot be avoided 1 Stand with the sun behind your back. (As shown in the figure, use your body to block direct sunlight.)
Support Manual HoistLocatel Electronic Locks
 Support Manual HoistLocatel Electronic Locks 1. S70, Create a Terminating Card for Cards Terminating Card 2. Select the card you want to block, look among Card No. Then click on the single arrow pointing
Beijer Electronics AB 2000, MA00336A, 2000-12
 Demonstration driver English Svenska Beijer Electronics AB 2000, MA00336A, 2000-12 Beijer Electronics AB reserves the right to change information in this manual without prior notice. All examples in this
Problem som kan uppkomma vid registrering av ansökan
 Problem som kan uppkomma vid registrering av ansökan Om du har problem med din ansökan och inte kommer vidare kan det bero på det som anges nedan - kolla gärna igenom detta i första hand. Problem vid registrering
NAC-2500 User Manual
 NAC-2500 User Manual c Copyright 2003-2008 NITGEN Co., Ltd. All rights reserved Reproduction of part or all of the contents in any form is prohibited other than in accordance with the permissions. Product
Schenker Privpak AB Telefon VAT Nr. SE Schenker ABs ansvarsbestämmelser, identiska med Box 905 Faxnr Säte: Borås
 Schenker Privpak AB Interface documentation for web service packageservices.asmx 2012-09-01 Version: 1.0.0 Doc. no.: I04304b Sida 2 av 7 Revision history Datum Version Sign. Kommentar 2012-09-01 1.0.0
2.45GHz CF Card Reader User Manual. Version /09/15
 2.45GHz CF Card Reader User Manual Version 2.0 2008/09/15 Install SYRD245-CF Card Reader to PDA: 1. Explorer SYRD245-CF folder of SYRIS Xtive CD-ROM 2. Check your PDA OS (Mobile5 or PPC2003) NETCF V2 currently
To Contact Us. c Copyright , NITGEN Co., Ltd. All rights reserved
 c Copyright 2003-2009, NITGEN Co., Ltd. All rights reserved Features and specifications are subject to change without notice. No part of this guide may be copied or reproduced for any purpose without the
Boiler with heatpump / Värmepumpsberedare
 Boiler with heatpump / Värmepumpsberedare QUICK START GUIDE / SNABBSTART GUIDE More information and instruction videos on our homepage www.indol.se Mer information och instruktionsvideos på vår hemsida
InstalationGuide. English. MODEL:150NHighGain/30NMiniUSBAdapter
 miraclebox miraclewifi InstalationGuide English MODEL:150NHighGain/30NMiniUSBAdapter ENGLISH MIRACLE WIFI 150N & 300N USERMANUAL MIRACLEBOX.SE 1 ENGLISH Table of Contents Package Contents... 3 System Requirements
electiaprotect GSM SEQURITY SYSTEM Vesta EZ Home Application SMART SECURITY SYSTEMS! SVENSKA ios... 2-4 Android... 5-7
 GSM SEQURITY SYSTEM Vesta EZ Home Application SVENSKA ios... 2-4 Android... 5-7 ENGLISH ios... 8-10 Android... 11-13 electiaprotect SMART SECURITY SYSTEMS! 1.1. Vesta EZ Home för ios Vesta EZ Home för
INSTALLATION INSTRUCTIONS
 INSTALLATION - REEIVER INSTALLATION INSTRUTIONS RT0 RF WIRELESS ROOM THERMOSTAT AND REEIVER MOUNTING OF WALL MOUTING PLATE - Unscrew the screws under the - Pack contains... Installation - Receiver... Mounting
Schenker Privpak AB Telefon 033-178300 VAT Nr. SE556124398001 Schenker ABs ansvarsbestämmelser, identiska med Box 905 Faxnr 033-257475 Säte: Borås
 Schenker Privpak AB Interface documentation for web service packageservices.asmx 2010-10-21 Version: 1.2.2 Doc. no.: I04304 Sida 2 av 14 Revision history Datum Version Sign. Kommentar 2010-02-18 1.0.0
2.1 Installation of driver using Internet Installation of driver from disk... 3
 &RQWHQW,QQHKnOO 0DQXDOÃ(QJOLVKÃ'HPRGULYHU )RUHZRUG Ã,QWURGXFWLRQ Ã,QVWDOOÃDQGÃXSGDWHÃGULYHU 2.1 Installation of driver using Internet... 3 2.2 Installation of driver from disk... 3 Ã&RQQHFWLQJÃWKHÃWHUPLQDOÃWRÃWKHÃ3/&ÃV\VWHP
Lösenordsportalen Hosted by UNIT4 For instructions in English, see further down in this document
 Lösenordsportalen Hosted by UNIT4 For instructions in English, see further down in this document Användarhandledning inloggning Logga in Gå till denna webbsida för att logga in: http://csportal.u4a.se/
Datasäkerhet och integritet
 Chapter 4 module A Networking Concepts OSI-modellen TCP/IP This module is a refresher on networking concepts, which are important in information security A Simple Home Network 2 Unshielded Twisted Pair
Webbregistrering pa kurs och termin
 Webbregistrering pa kurs och termin 1. Du loggar in på www.kth.se via den personliga menyn Under fliken Kurser och under fliken Program finns på höger sida en länk till Studieöversiktssidan. På den sidan
Alias 1.0 Rollbaserad inloggning
 Alias 1.0 Rollbaserad inloggning Alias 1.0 Rollbaserad inloggning Magnus Bergqvist Tekniskt Säljstöd Magnus.Bergqvist@msb.se 072-502 09 56 Alias 1.0 Rollbaserad inloggning Funktionen Förutsättningar Funktionen
Michael Q. Jones & Matt B. Pedersen University of Nevada Las Vegas
 Michael Q. Jones & Matt B. Pedersen University of Nevada Las Vegas The Distributed Application Debugger is a debugging tool for parallel programs Targets the MPI platform Runs remotley even on private
Styrteknik: Binära tal, talsystem och koder D3:1
 Styrteknik: Binära tal, talsystem och koder D3:1 Digitala kursmoment D1 Boolesk algebra D2 Grundläggande logiska funktioner D3 Binära tal, talsystem och koder Styrteknik :Binära tal, talsystem och koder
Quick Start Guide Snabbguide
 Quick Start Guide Snabbguide C Dictionary Quick Start Thank you for choosing C Dictionary and C-Pen as your translation solution. C Dictionary with its C-Pen connection will make translation easy and enable
Isolda Purchase - EDI
 Isolda Purchase - EDI Document v 1.0 1 Table of Contents Table of Contents... 2 1 Introduction... 3 1.1 What is EDI?... 4 1.2 Sending and receiving documents... 4 1.3 File format... 4 1.3.1 XML (language
Information technology Open Document Format for Office Applications (OpenDocument) v1.0 (ISO/IEC 26300:2006, IDT) SWEDISH STANDARDS INSTITUTE
 v1.0 (ISO/IEC 26300:2006, IDT) SWEDISH STANDARDS INSTITUTE") SVENSK STANDARD SS-ISO/IEC 26300:2008 Fastställd/Approved: 2008-06-17 Publicerad/Published: 2008-08-04 Utgåva/Edition: 1 Språk/Language: engelska/english ICS: 35.240.30 Information technology Open Document
SVENSK STANDARD SS-ISO/IEC 26300:2008 Fastställd/Approved: 2008-06-17 Publicerad/Published: 2008-08-04 Utgåva/Edition: 1 Språk/Language: engelska/english ICS: 35.240.30 Information technology Open Document
Webbreg öppen: 26/ /
 Webbregistrering pa kurs, period 2 HT 2015. Webbreg öppen: 26/10 2015 5/11 2015 1. Du loggar in på www.kth.se via den personliga menyn Under fliken Kurser och under fliken Program finns på höger sida en
 Bänkvåg LCW-6S Manual/Förenklat handhavande User Manual LCW-6S www.liden-weighing.se Knappfunktioner: ON/OFF Sätter på och stänger av vågen. UNIT Skiftar vägningsenhet ZERO/TARE Nollställer vågen Tarerar
 BÄNKVÅG / BENCH SCALE Modell : SW-III / Model : SW-III ANVÄNDARMANUAL / USER MANUAL SW-III WWW.LIDEN-WEIGHING.SE 2014-03-26 OBS! Under vågen sitter en justerbar skruv (se bild). Standardinställning är
Application Note SW
 TWINSAFE DIAGNOSTIK TwinSAFE är Beckhoffs safety-lösning. En översikt över hur TwinSAFE är implementerat, såväl fysiskt som logiskt, finns på hemsidan: http://www.beckhoff.se/english/highlights/fsoe/default.htm?id=35572043381
1. Unpack content of zip-file to temporary folder and double click Setup
 Instruktioner Dokumentnummer/Document Number Titel/Title Sida/Page 13626-1 BM800 Data Interface - Installation Instructions 1/8 Utfärdare/Originator Godkänd av/approved by Gäller från/effective date Mats
Viktig information för transmittrar med option /A1 Gold-Plated Diaphragm
 Viktig information för transmittrar med option /A1 Gold-Plated Diaphragm Guldplätering kan aldrig helt stoppa genomträngningen av vätgas, men den får processen att gå långsammare. En tjock guldplätering
Vässa kraven och förbättra samarbetet med hjälp av Behaviour Driven Development Anna Fallqvist Eriksson
 Vässa kraven och förbättra samarbetet med hjälp av Behaviour Driven Development Anna Fallqvist Eriksson Kravhantering På Riktigt, 16 maj 2018 Anna Fallqvist Eriksson Agilista, Go See Talents linkedin.com/in/anfaer/
Installationsguide. EG200 Multi WAN Residential Gateway. v
 Installationsguide v. 2018-11-29 1 STATUS 3 5 2 4 WAN INTERNET Ovansida WIFI ETHERNET Baksida 7 TELE 6 8 WPS EXT Den här installationsguiden hjälper dig att installera Inteno. kopplas in i ditt Ethernet-baserade
FÖRBERED UNDERLAG FÖR BEDÖMNING SÅ HÄR
 FÖRBERED UNDERLAG FÖR BEDÖMNING SÅ HÄR Kontrollera vilka kurser du vill söka under utbytet. Fyll i Basis for nomination for exchange studies i samråd med din lärare. För att läraren ska kunna göra en korrekt
 BÄNKVÅG / BENCH SCALE ANVÄNDARMANUAL / USER MANUAL SW-III www.liden-weighing.com Svenska OBS! Under vågen sitter en justerbar skruv (se bild). Standardinställning är den för vägning. Om ni vill rengöra
Installationsguide. DG200 Multi WAN Residential Gateway V
 Installationsguide Multi WAN Residential Gateway V. 2018-07-9 Multi WAN Residential Gateway Ovansida 1 3 5 7 STATUS INTERNET TELE 2 4 6 8 WAN WIFI WPS EXT Baksida USB DSL LAN1 LAN2 LAN3 LAN4 WAN TEL2 TEL1
Preschool Kindergarten
 Preschool Kindergarten Objectives CCSS Reading: Foundational Skills RF.K.1.D: Recognize and name all upper- and lowercase letters of the alphabet. RF.K.3.A: Demonstrate basic knowledge of one-toone letter-sound
WhatsApp finns för dessa plattformar:
 WhatsApp finns för dessa plattformar: Hur funkar det? WhatsApp Messenger is a cross-platform mobile messaging app which allows you to exchange messages without having to pay for SMS. WhatsApp Messenger
Product configurations Produire configuration Produkt konfigurationen Producto configuraciones Produkt konfigurationerna
 Product configurations Produire configuration Produkt konfigurationen Producto configuraciones Produkt konfigurationerna 1 2 3 Ref. 3800 2360, Ver 2005-09 2 1. Keypad K900; includes TOM-Net terminators.
Integritetspolicy på svenska Integrity policy in English... 5
 Innehållsförteckning / Table of content Integritetspolicy på svenska... 2 In Vino Veritas... 2 Vilka vi är... 2 Vilka personuppgifter vi samlar in och varför vi samlar in dem... 2 Namninsamlingen... 2
Får endast utföras av behörig personal. May only be carried out by authorized electrician
 Instruktion för DMIS Instruction for DMIS FLE400FC, FLE850MP, W3400H, W4400H/W4600H (-980/1287) W3850H/W31100H, W4850/W41100H (-1220/636) Clarus Control 471 1530-75 2016.05.04 Får endast utföras av behörig
HANTERING AV UPS CX
 HANTERING AV UPS CX2100-0904 Hantering av UPS-modulen CX2100-0904. I WES7 och TwinCAT 2. Inställning av UPS:en i WES7 UPS:ens konfigurationsflik Inställningsmöjligheterna för hur UPS:en beter sig finns
Installation Instructions
 Installation Instructions (Cat. No. 1794-IE8 Series B) This module mounts on a 1794 terminal base unit. 1. Rotate keyswitch (1) on terminal base unit (2) clockwise to position 3 as required for this type
81152 TRANSFER CASE SHIFT HANDLE
 Installation Instructions for TRANSFER CASE SHIFT HANDLE for 2007 2018 JEEP JK WRANGLER 1 2 3 ITEM NO. PART NO. DESCRIPTION QTY. 1 4101359 SHIFT KNOB, JEEP WRANGLER JK, MOLDED 1 2 1794720 JAM NUT, 3/8
802.11b Wireless router w. 4 port switch. StarTech ID: BR411BWDC
 802.11b Wireless router w. 4 port switch StarTech ID: BR411BWDC Share your Internet connection without being constrained by cables with StarTech.com s 802.11b wireless router. The BR411BWDC lets you share
6 th Grade English October 6-10, 2014
 6 th Grade English October 6-10, 2014 Understand the content and structure of a short story. Imagine an important event or challenge in the future. Plan, draft, revise and edit a short story. Writing Focus
Integrated Remote Commander
 2-588-610-11(1) Integrated Remote Commander Operating Instructions Bruksanvisning GB RM-AV2500T 2005 Sony Corporation 2GB Features The RM-AV2500T Remote Commander provides centralized control of all your
How to format the different elements of a page in the CMS :
 How to format the different elements of a page in the CMS : 1. Typing text When typing text we have 2 possible formats to start a new line: Enter - > is a simple line break. In a paragraph you simply want
Lehigh Valley Hospital Schuylkill Portal User Q&A
 Lehigh Valley Hospital Schuylkill Portal User Q&A 1. How do I get assistance if I have difficulty accessing the portal or navigating the portal? 2. How do I save information on the portal for my personal
Module 1: Functions, Limits, Continuity
 Department of mathematics SF1625 Calculus 1 Year 2015/2016 Module 1: Functions, Limits, Continuity This module includes Chapter P and 1 from Calculus by Adams and Essex and is taught in three lectures,
Quick-guide to Min ansökan
 Version 2015-05-12 Quick-guide to Min ansökan Before filling in the application To be able to fill in an application you need to create a user account (instructions on p. 3). If you have already created
Som ett led i vårt miljötänkande har vi motorvärmarstyrning på parkeringsplatserna. Det sparar energi och värnar om miljön.
 Motorvärmarstyrning Som ett led i vårt miljötänkande har vi motorvärmarstyrning på parkeringsplatserna. Det sparar energi och värnar om miljön. Engine Block Heater Control The control system for engine
Quick Start. English Svenska. Moca
 Quick Start English Svenska Moca 2015-08-20 Before Printing Install the printer according to the supplier s instructions, please see the Moca user guide (chapter 3-1) at the installation CD. Choose Moca
District Application for Partnership
 ESC Region Texas Regional Collaboratives in Math and Science District Application for Partnership 2013-2014 Applying for (check all that apply) Math Science District Name: District Contacts Name E-mail
Klicka här för att ändra format
 på 1 på Marianne Andrén General Manager marianne.andren@sandviken.se Sandbacka Park Högbovägen 45 SE 811 32 Sandviken Telephone: +46 26 24 21 33 Mobile: +46 70 230 67 41 www.isea.se 2 From the Off e project
Materialplanering och styrning på grundnivå. 7,5 högskolepoäng
 Materialplanering och styrning på grundnivå Provmoment: Ladokkod: Tentamen ges för: Skriftlig tentamen TI6612 Af3-Ma, Al3, Log3,IBE3 7,5 högskolepoäng Namn: (Ifylles av student) Personnummer: (Ifylles
Schenker Privpak AB Telefon 033-178300 VAT Nr. SE556124398001 Schenker ABs ansvarsbestämmelser, identiska med Box 905 Faxnr 033-257475 Säte: Borås
 Schenker Privpak AB Interface documentation for Parcel Search 2011-10-18 Version: 1 Doc. no.: I04306 Sida 2 av 5 Revision history Datum Version Sign. Kommentar 2011-10-18 1.0.0 PD First public version.
Wi-Fi travel router for ipad and mobile devices
 Wi-Fi travel router for ipad and mobile devices Product ID: R150WN1X1T This Wireless N travel router lets you create a portable wireless hot-spot from a wired network connection or an existing wireless
Översättning av galleriet. Hjälp till den som vill...
 Hjälp till den som vill... $txt['aeva_title'] = 'Galleri'; $txt['aeva_admin'] = 'Admin'; $txt['aeva_add_title'] = 'Titel'; $txt['aeva_add_desc'] = 'Beskrivning'; $txt['aeva_add_file'] = 'Fil att ladda
English Svenska. Installation. Guide. XG6846 Broadband Switch
 English Svenska Installation Guide Broadband Switch 2 Installation Guide English Svenska Broadband Switch Language Page English... 4 Svenska... 8 3 Broadband Switch USB (OPTIONAL) (OPTIONAL) Back/side
Module 6: Integrals and applications
 Department of Mathematics SF65 Calculus Year 5/6 Module 6: Integrals and applications Sections 6. and 6.5 and Chapter 7 in Calculus by Adams and Essex. Three lectures, two tutorials and one seminar. Important
SOLAR LIGHT SOLUTION. Giving you the advantages of sunshine. Ningbo Green Light Energy Technology Co., Ltd.
 2017 SOLAR LIGHT SOLUTION Address:No.5,XingYeMiddleRoad,NingboFreeTradeZone,China Tel:+86-574-86812925 Fax:+86-574-86812905 Giving you the advantages of sunshine SalesServiceE-mail:sales@glenergy.cn Tech.ServiceE-mail:service@glenergy.cn
Resurser. Visa sidan Hjälpguide. Menykarta. Phaser 4400 laserskrivare
 Phaser 4400 laserskrivare Resurser En stor mängd information finns samlad i skrivaren som utskrivbara sidor. På följande sidor visas Hjälpguiden, en utskrivbar sida över resurser för att få hjälp. P4400-77
Biblioteket.se. A library project, not a web project. Daniel Andersson. Biblioteket.se. New Communication Channels in Libraries Budapest Nov 19, 2007
 A library project, not a web project New Communication Channels in Libraries Budapest Nov 19, 2007 Daniel Andersson, daniel@biblioteket.se 1 Daniel Andersson Project manager and CDO at, Stockholm Public
Quick Start Guide. To switch the TV on. cable to connect the two units together. To select the TV broadcasts. To HDMI connection on.
 Quick Start Guide 1 Insert the batteries into the remote control Lift the cover on the back of the remote upward gently. Install two AAA batteries. Make sure to match the + and - ends of the batteries
BRUKSANVISNING. Oscilla 910
 BRUKSANVISNING Oscilla 910 C A TEGNÉR AB BOX 20003 161 02 BROMMA TEL 08-564 822 00 FAX 08-564 822 09 INTERNET: www.categner.se E-MAIL: info@categner.se OSCILLA SM910 INNEHÅLL FRONTPANEL... 3 BAKPANEL...
FORTA M315. Installation. 218 mm.
 1 Installation 2 1 2 1 218 mm. 1 2 4 5 6 7 8 9 2 G, G0= Max 100 m 1.5 mm² (AWG 15) X1, MX, Y, VH, VC = Max 200 m 0.5 mm² (AWG 20) Y X1 MX VH VC G1 G0 G 0 V 24 V~ IN 0-10 0-5, 2-6 60 s OP O 1 2 4 5 6 7
Installation av F13 Bråvalla
 Website: http://www.rbdesign.se Installation av F13 Bråvalla RBDESIGN FREEWARE - ESCK Norrköping-Bråvalla 1. Ladda ner och packa upp filerna i en mapp som du har skapat på ett lättöverskådligt ställe utanför
Quick Start. English Svenska PRIMACY. Printing settings and winsign
 Quick Start English Svenska PRIMACY Printing settings and winsign 2016-05-26 Before Printing Quick Start Primacy Install the printer according to the supplier s instructions, please see the PRIMACY user
Adding active and blended learning to an introductory mechanics course
 Adding active and blended learning to an introductory mechanics course Ulf Gran Chalmers, Physics Background Mechanics 1 for Engineering Physics and Engineering Mathematics (SP2/3, 7.5 hp) 200+ students
SWESIAQ Swedish Chapter of International Society of Indoor Air Quality and Climate
 Swedish Chapter of International Society of Indoor Air Quality and Climate Aneta Wierzbicka Swedish Chapter of International Society of Indoor Air Quality and Climate Independent and non-profit Swedish
Föreläsning 4 IS1300 Inbyggda system
 Föreläsning 4 IS1300 Inbyggda system Programutveckling Exempel PingPong Idé Tillståndsdiagram State machine Skapa projekt Testning av programvara Peripheral Library till STM32 Programmeringsuppgiften RS232
- den bredaste guiden om Mallorca på svenska! -
 - den bredaste guiden om Mallorca på svenska! - Driver du företag, har en affärsrörelse på Mallorca eller relaterad till Mallorca och vill nå ut till våra läsare? Då har du möjlighet att annonsera på Mallorcaguide.se
Manual. Video Tour:
 Manual Produkt: WIFI Group Controller (Enheten) Beskrivning Denna styrenhet har stöd för IOS 6.0 och Android 2.2 och senare operativsystem. Den kan fjärrstyra olika funktioner: tända ljus, justera ljusstyrka,
IPCorder KNR-412 Installation manual
 IPCorder KNR-412 Installation manual September 28, 2008 2 Contents 1 Installation 5 1.1 Package contents......................................... 5 1.2 Disk installation.........................................
PORTSECURITY IN SÖLVESBORG
 PORTSECURITY IN SÖLVESBORG Kontaktlista i skyddsfrågor / List of contacts in security matters Skyddschef/PFSO Tord Berg Phone: +46 456 422 44. Mobile: +46 705 82 32 11 Fax: +46 456 104 37. E-mail: tord.berg@sbgport.com
Every visitor coming to the this website can subscribe for the newsletter by entering respective address and desired city.
 Every visitor coming to the this website can subscribe for the newsletter by entering respective e-mail address and desired city. Latest deals are displayed at the home page, wheras uper right corner you
Authentication Context QC Statement. Stefan Santesson, 3xA Security AB stefan@aaa-sec.com
 Authentication Context QC Statement Stefan Santesson, 3xA Security AB stefan@aaa-sec.com The use case and problem User identities and user authentication is managed through SAML assertions. Some applications
1.1 Invoicing Requirements
 1.1 Invoicing Requirements Document name The document should clearly state INVOICE, DOWNPAYMENT REQUEST or CREDIT NOTE. Invoice lines and credit lines cannot be sent in the same document. Invoicing currency.
Workplan Food. Spring term 2016 Year 7. Name:
 Workplan Food Spring term 2016 Year 7 Name: During the time we work with this workplan you will also be getting some tests in English. You cannot practice for these tests. Compulsory o Read My Canadian
Instruction Manual. Svenska, English. Power Bank. Model: PRBN
 Instruction Manual Svenska, English Power Bank Model: PRBN Innehåll / Content Innehåll Säkerhetsföreskrifter... 4 Delar... 5 Specifikationer... 6 Miljö / Lag och säkerhet / Förbehåll... 7 Content Safety
BOENDEFORMENS BETYDELSE FÖR ASYLSÖKANDES INTEGRATION Lina Sandström
 BOENDEFORMENS BETYDELSE FÖR ASYLSÖKANDES INTEGRATION Lina Sandström Frågeställningar Kan asylprocessen förstås som en integrationsprocess? Hur fungerar i sådana fall denna process? Skiljer sig asylprocessen
Plain A262. För T16 (T5) lysrör. Innehåll. Monteringsanvisning. A. Instruktion för rampmontering
 lysrör. Innehåll. Monteringsanvisning. A. Instruktion för rampmontering") Plain A262 För T16 (T5) lysrör Innehåll Ramparmatur: ändmodul En stängd gavel/ en öppen gavel Plint i båda ändarna Överkopplingssladd 1 rampgavel 1 lysrörsbytare Ramparmatur: mellanmodul Plint i en ände
Plain A262 För T16 (T5) lysrör Innehåll Ramparmatur: ändmodul En stängd gavel/ en öppen gavel Plint i båda ändarna Överkopplingssladd 1 rampgavel 1 lysrörsbytare Ramparmatur: mellanmodul Plint i en ände
Service och bemötande. Torbjörn Johansson, GAF Pär Magnusson, Öjestrand GC
 Service och bemötande Torbjörn Johansson, GAF Pär Magnusson, Öjestrand GC Vad är service? Åsikter? Service är något vi upplever i vårt möte med butikssäljaren, med kundserviceavdelningen, med företagets
Adress 15. August 2014
 , Zollerstr. 1, 78567 Fridingen, Germany Adress 15. August 2014 Brådskande Säkerhetsmeddelande Urgent Safety Notice Bästa kund, Dear valued customer, med anledning av en incident på marknaden fick vi kännedom
Surfaces for sports areas Determination of vertical deformation. Golvmaterial Sportbeläggningar Bestämning av vertikal deformation
 SVENSK STANDARD SS-EN 14809:2005/AC:2007 Fastställd/Approved: 2007-11-05 Publicerad/Published: 2007-12-03 Utgåva/Edition: 1 Språk/Language: engelska/english ICS: 97.220.10 Golvmaterial Sportbeläggningar
Grafisk teknik IMCDP IMCDP IMCDP. IMCDP(filter) Sasan Gooran (HT 2006) Assumptions:
 Sasan Gooran (HT 2006) Assumptions:") IMCDP Grafisk teknik The impact of the placed dot is fed back to the original image by a filter Original Image Binary Image Sasan Gooran (HT 2006) The next dot is placed where the modified image has its
IMCDP Grafisk teknik The impact of the placed dot is fed back to the original image by a filter Original Image Binary Image Sasan Gooran (HT 2006) The next dot is placed where the modified image has its
Support for Artist Residencies
 1. Basic information 1.1. Name of the Artist-in-Residence centre 0/100 1.2. Name of the Residency Programme (if any) 0/100 1.3. Give a short description in English of the activities that the support is
Custom-made software solutions for increased transport quality and creation of cargo specific lashing protocols.
 Custom-made software solutions for increased transport quality and creation of cargo specific lashing protocols. ExcelLoad simulates the maximum forces that may appear during a transport no matter if the
Questionnaire for visa applicants Appendix A
 Questionnaire for visa applicants Appendix A Business Conference visit 1 Personal particulars Surname Date of birth (yr, mth, day) Given names (in full) 2 Your stay in Sweden A. Who took the initiative
3 rd October 2017
 3 rd October 2017 Failures of Scaffold False work Failures Form work Bursting Trench Support Failure Hoarding Failures Can be expensive and result in fatalities and serious injuries Cardiff
Calculate check digits according to the modulus-11 method
 2016-12-01 Beräkning av kontrollsiffra 11-modulen Calculate check digits according to the modulus-11 method Postadress: 105 19 Stockholm Besöksadress: Palmfeltsvägen 5 www.bankgirot.se Bankgironr: 160-9908
SUPPLIER EXTRANET. Manual. Institut für Interaktive Medien GmbH Spitalerstraße 10 D Hamburg T: F:
 SUPPLIER EXTRANET Manual Institut für Interaktive Medien GmbH Spitalerstraße 10 D-20095 Hamburg T: +49 40 33300-123 F: +49 40 3330099-123 info@iam-interactive.de www.iam-interactive.de Geschäftsführer:
Grafisk teknik IMCDP. Sasan Gooran (HT 2006) Assumptions:
 Assumptions:") Grafisk teknik Sasan Gooran (HT 2006) Iterative Method Controlling Dot Placement (IMCDP) Assumptions: The original continuous-tone image is scaled between 0 and 1 0 and 1 represent white and black respectively
Grafisk teknik Sasan Gooran (HT 2006) Iterative Method Controlling Dot Placement (IMCDP) Assumptions: The original continuous-tone image is scaled between 0 and 1 0 and 1 represent white and black respectively
This exam consists of four problems. The maximum sum of points is 20. The marks 3, 4 and 5 require a minimum
 Examiner Linus Carlsson 016-01-07 3 hours In English Exam (TEN) Probability theory and statistical inference MAA137 Aids: Collection of Formulas, Concepts and Tables Pocket calculator This exam consists
LK ICS.2 Quick Guides - Installation & Reset
 LK ICS.2 Quick Guides - Installation & Reset Installation English Installation Svenska Reset English Reset Svenska Back to start Installation of ICS.2 Systems V Connecting actuators and wired thermostats
Dokumentnamn Order and safety regulations for Hässleholms Kretsloppscenter. Godkänd/ansvarig Gunilla Holmberg. Kretsloppscenter
 1(5) The speed through the entire area is 30 km/h, unless otherwise indicated. Beware of crossing vehicles! Traffic signs, guardrails and exclusions shall be observed and followed. Smoking is prohibited
Windlass Control Panel v1.0.1
 SIDE-POWER Windlass Systems 86-08950 Windlass Control Panel v1.0.1 EN Installation manual Behåll denna manual ombord! S Installations manual SLEIPNER AB Kilegatan 1 452 33 Strömstad Sverige Tel: +46 525
Beslut om bolaget skall gå i likvidation eller driva verksamheten vidare.
 ÅRSSTÄMMA REINHOLD POLSKA AB 7 MARS 2014 STYRELSENS FÖRSLAG TILL BESLUT I 17 Beslut om bolaget skall gå i likvidation eller driva verksamheten vidare. Styrelsen i bolaget har upprättat en kontrollbalansräkning
Kvalitetsarbete I Landstinget i Kalmar län. 24 oktober 2007 Eva Arvidsson
 Kvalitetsarbete I Landstinget i Kalmar län 24 oktober 2007 Eva Arvidsson Bakgrund Sammanhållen primärvård 2005 Nytt ekonomiskt system Olika tradition och förutsättningar Olika pågående projekt Get the