Refrigerator Kühlgerät Køleskab Kylskåp Kjøleskap SSM Bedienungsanleitung
|
|
|
- Berit Lindberg
- för 10 år sedan
- Visningar:
Transkript
1 Refrigerator Kühlgerät Køleskab Kylskåp Kjøleskap SSM 1540 D Bedienungsanleitung

2 GB Index Safety first/1 Electrical requirements/2 Transportation instructions/2 Installation instructions/2-3 Getting to know your appliance/3 Suggested arrangement of food in the appliance/3 Temperature control and adjustment/4 Before operating/4 Storing frozen food/5 Freezing fresh food/5 Making ice cubes/5 Defrosting/6 Replacing the interior light bulb/6 Cleaning and care/6-7 Repositioning the door/7 Do s and don ts/7-8 Trouble - shooting/8 D Inhalt Sicherheit an erster stelle!/9 Voraussetzungen für den elektroanschluss/10 Transportvorschriften/10 Hinweise zur installation und zum aufstellungsort/11 Kennenlernen des geräts/11 Vorschläge für das einordnen von lebensmitteln/11-12 Einstellung und regelund der temperatur/12-13 Inbetriebnahme/13 Lagerung von tiefkühl ware/13 Frische Lebensmittel tiefkühlen/13-14 Herstellung von eiswürfeln/14 Abtauen/14 Auswechseln der glühlampe für die innenbeleuchtung/15 Reinigung und pflege/16 Wechseln des türanschlags/16 Was sie tun sollten und was auf keinen fall-einige hinweise/17-18 Was sie bei problemen tun können/18 Garantiebedingungen/19 S Register Säkerheten Framför Allt!/29 Elektriska Krav/30 Anvisningar för Transport/30 Installationsanvisningar/30-31 Att lära känna din enhet/31 Rekommenderad placering av livsmedel Kylskåp med en där/31 Kontroll och inställning av temperaturen/32 Start/32 Förvaring av frysta livsmedel/33 Infrysning av färska livsmedel/33 Göra isbitar/33 Avfrostning/34 Att byta glödlampa/34 Rengöring och underhåll/34-35 Omhängning av dörr/35 Anvisningar och allmänna råd/35-36 Tänk på att inte göra följande/36 Problemlösning/36 Bästa kund/37 N Indeks Sikkerhetsregler/38 Elektrisk tilkobling/39 Transport/39 Installasjon/39-40 Bli kjent med apparatet/40 Plassering av matvarene/40 Temperaturregulering/41 Igangsetting/41 Lagring av frosne matvarer/42 Frysing av ferske matvarer/42 Lag isbiter/42 Avising/43 Utskifting av pæren/43 Rengjøring og vedlikehold/43-44 Omhengsling av døren/44 Råd og advarsler/44-45 Feilsøkingsliste/45 Bästa kund/46 DK Inhold Sikkerhedsregler/20 Eltilslutning/21 Transport/21 Installation/21-22 Beskrivelse af apparatet/22 Guide til opbevaring af madvarer/22 Temperaturregulering/23 Igangsætning/23 Opbevaring af frosne varer/24 Frysning af friske madvarer/24 Fremstilling af isterninger/24 Afrimning/25 Udskiftning af pæren/25 Rengøring og vedligeholdelse/25-26 Vending af døren/26 Advarsler og generelle råd/26-27 Fejlfindingoversigt/27 Kære kunde/28

3

4
5 B C 6 A D F E

6 GB Instruction Manual Congratulations on your choice of a Quality Appliance, designed to give you many years of service. Safety first! Do not connect your appliance to the electricity supply until all packing and transit protectors have been removed. Leave to stand for at least 4 hours before switching on, to allow compressor oil to settle, if transported horizontally. If you are discarding an old appliance with a lock or latch fitted to the door, ensure that it is left in a safe condition to prevent the entrapment of children. This appliance must only be used for its intended purpose i.e the storing and freezing of edible foodstuff. Do not dispose of the appliance on a fire. Your appliance contains non CFC substances in the insulation which are flammable. We suggest you contact your local authority for information on disposal and available facilities. We do not recommend use of this appliance in an unheated, cold room. (e.g. garage, conservatory, annex, shed, out-house etc.) To obtain the best possible performance and trouble free operation from your appliance it is very important to read these instructions carefully. Failure to observe these instructions may invalidate your right to free service during the guarantee period. Please keep these instructions in a safe place for easy reference. 1

7 GB Instruction Manual Electrical requirements Before inserting the plug into the wall socket make sure that the voltage and the frequency shown in the rating plate inside the appliance corresponds to your electricity supply. We recommend that this appliance be connected to the mains supply via a suitably switched and fused socket in a readily accessible position Warning! This appliance must be earthed. Repairs to electrical equipment should only be performed by a qualified technician. Incorrect repairs carried out by an unqualified person are carry risks that may have critical consequences for the user of the appliance. Do not dispose of the appliance on a fire. At, the care and protection of our environment is an ongoing commitment. This appliance which is among the latest range introduced is particularly environment friendly. Your appliance contains non CFC/HFC natural substances in the cooling system (called R600a) and the insulation (called cyclopentane) which are potentially flammable if exposed to fire. Therefore, take care not to damage, the cooling circuit/ pipes of the appliance in transportation and in use. In case of a damage do not expose the appliance to fire, potential ignition source and immediately ventilate the room where the appliance is situated. We suggest you contact your local authority for disposal information and facitlities available. WARNING- Keep ventilation openings, in the appliance enclosure or in the built-in structure, clear of obstruction. WARNING- Do not use mechanical devices or other means to accelerate the defrosting process, other than those recommended by the manufacturer. WARNING- Do not damage the refrigerant circuit. WARNING- Do not use electrical appliances inside the food storage compartments of the appliance, unless they are of the type recommended by the manufacturer. Transportation instructions 1. The appliance should be transported only in a upright position. The packing as supplied must be intact during transportation. 2. If during the course of transport the appliance, has been positioned horizontally, it must not be operated for at least 4 hours, to allow the system tosettle. 3. Failure to comply with the above instructions could result in damage to the appliance, for which the manufacturer will not be held liable. 4. The appliance must be protected against rain, moisture and other atmospheric influences. Important! Care must be taken while cleaning/carrying the appliance not to touch the bottom of the condenser metal wires at the back of the appliance, as this could cause injury to fingers and hands. Do not attempt to sit or stand on top of your appliance as it is not designed for such use. You could injure yourself or damage the appliance. Make sure that the mains cable is not caught under the appliance during and after moving, as this could damage the cable. Do not allow children to play with the appliance or tamper with the controls. Installation instructions 1. Do not keep your appliance in a room where the temperature is likely to fall below 10 degrees C (50 degrees F) at night and/or especially in winter, as it is designed to operate in ambient temperatures between +10 and +32 degrees C (50 and 90 degrees F). At lower temperatures the appliance may not operate, resulting in a reduction in the storage life of the food. 2. Do not place the appliance near cookers or radiators or in direct sunlight, as this will cause extra strain on the appliance's functions. If installed next to a source of heat or freezer, maintain the following minimum side clearances: From Cookers 30 mm From Radiators 300 mm From Freezers 25 mm 2

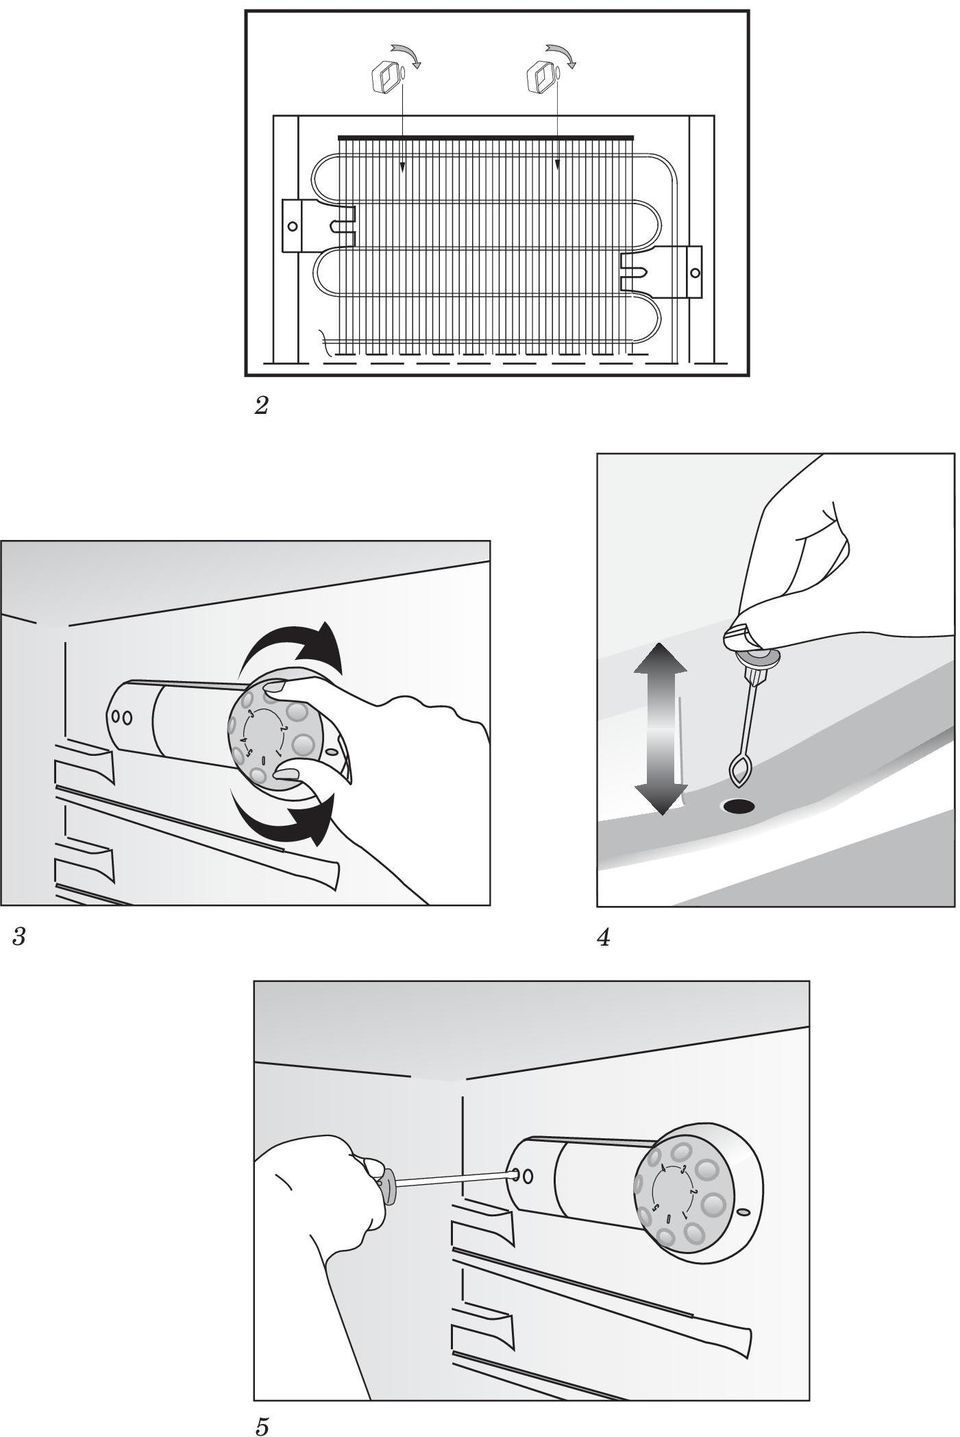
8 GB Instruction Manual 3. Make sure that sufficient room is provided around the appliance to ensure free air circulation. Fit the plastic wall spacer supplied withthe appliance rotating1/4 turn to the condenser at the back of the refrigerator (fig.2). 4. The appliance should be positioned on a smooth surface. The two front feet can be adjusted as required.to ensure that your appliance is standing upright adjust the two front feet by turning clockwise or anti-clockwise, until firm contact is secured with the floor. Correct adjustment of feet prevents excessive vibration and noise. 5. Refer to "Cleaning and Care" section to prepare your appliance for use. Getting to know your appliance (Fig. 1) Freezer compartment Light bulb and thermostat box Movable shelves Wine rack Crisper cover Crisper Adjustable front feet Adjustable door shelves Egg compartment Wire frame Bottle holder Bottle shelf Suggested arrangement of food in the appliance 2. The freezer compartment is rated and suitable for the freezing and storage of pre-frozen. The recommendation for storage as stated on the food packaging should be observed at all times. 3. Cooked dishes should be stored in airtight containers. 4. Fresh wrapped produce can be kept on the shelf. Fresh fruit and vegetables should be cleaned and stored in the crisper bins. 5. Bottles can be kept in the door section. 6. To store raw meat, wrap in polythene bags and place on the lowest shelf. Do not allow to come into contact with cooked food, to avoid contamination. For safety, only store raw meat for two to three days. 7. For maximum efficiency, the removable shelves should not be covered with paper or other materials to allow free circulation of cool air. 8. Do not keep vegetable oil on door shelves. Keep the food packed, wrapped or covered. Allow hot food and beverages to cool before refrigerating. Leftover canned food should not be stored in the can. 9. Fizzy drinks should not be frozen and products such as flavoured water ices should not be consumed too cold. 10. Some fruit and vegetables suffer damage if kept at temperatures near 0 C. Therefore wrap pineapples, melons, cucumbers, tomatoes and similar produce in polythene bags. 11. High-proof alcohol must be stored upright in tightly closed containers. Never store products that contain an inflammable propellant gas (e.g. cream dispensers, spray cans, etc.) or explosive substances. These are an explosion hazard. Guidelines for obtaining optimum storage and hygiene: 1. The fridge compartment is for the short-term storage of fresh food and drinks. 3

9 GB Instruction Manual Temperature control and adjustment Operating temperatures are controlled by the thermostat knob (Fig. 3) and may be set between 1 and 5, the coldest position. When the appliance is switched on for the first time, the thermostat should be adjusted so that, after 24 hours, the average fridge temperature is no higher than 5 C (41 F ). We recommend setting the thermostat half-way between the 1 and 5 setting and monitoring to obtain the desired temperature i. e. towards 5 you will obtain a lower temperature and vice versa. Some sections of the fridge may be cooler or warmer ( such as the salad crisper and the top part of the cabinet ) which is quite normal. In ambient temperatures above 25 C (77 F), especially in summer, turn the thermostat knob towards 5. In ambient temperatures below 25 C (77 F) turn the thermostat knob to a half way position. Frequent door opening causes internal temperatures to rise, so it is advisable to close as soon as possible after use. Before operating Final Check Before you start using the appliance check that: 1. The feet have been adjusted for perfect levelling. 2. The interior is dry and air can circulate freely at the rear. 3. The interior is clean as recommended under "Cleaning and care. 4. The plug has been inserted into the wall socket and the electricity is switched on. When the door is open the interior light will come on. And note that: 5. You will hear a noise as the compressor starts up. The liquid and gases sealed within the refrigeration system may also make some (noise), whether the compressor is running or not. This is quite normal. 6. Slight undulation of the top of the cabinet is quite normal due to the manufacturing process used; it is not a defect. 7. We recommend setting the thermostat knob midway and monitor the temperature to ensure the appliance maintains desired storage temperatures (See section Temperature Control and Adjustment). 8. Do not load the appliance immediately it is switched on. Wait until the correct storage temperature has been reached. We recommend checking the temperature with an accurate thermometer (see; Temperature Control and Adjustment). 4
 which is quite normal.")
10 GB Instruction Manual Storing frozen food Your freezer is suitable for the long-term storage of commercially frozen foods and also can be used to freeze and store fresh food. If there is a power failure, do not open the door. Frozen food should not be affected if the failure lasts for less than 16 hrs. If the failure is longer, then the food should be checked and either eaten immediately or cooked and then re-frozen Freezing fresh food Please observe the following instructions to obtain the best results. Do not freeze too large a quantity at any one time. The quality of the food is best preserved when it is frozen right through to the core as quickly as possible. Do not exceed the freezing capacity of your appliance in 24 h. Placing warm food into the freezer compartment causes the refrigeration machine to operate continously until the food is frozen solid. This can temporarily lead to excessive cooling of the refrigeration compartment. When freezing fresh food, keep the thermostat knob at medium position. Small quantities of food up to 1/2 kg. (1 lb) can be frozen without adjusting the temperature control knob. Take special care not to mix already frozen food and fresh food. Defrosting A) Fridge compartment The fridge compartment defrosts automatically. The defrost water runs to the drain tube via a collection container at the back of the appliance (Fig. 4). During defrosting, water droplets may form at the back of the fridge compartment where a concealed evaporator is located. Some droplets may remain on the liner and refreeze when defrosting is completed. Do not use pointed or sharp-edged objects such as knives or forks to remove the droplets which have refrozen. If, at any time, the defrost water does not drain from the collection channel, check that no food particles have blocked the drain tube. The drain tube can be cleared with a pipe-cleaner or similar implement. Making ice cubes Fill the ice-cube tray 3/4 full with water and place it in the frozen food compartment. Loosen frozen trays with a spoon handle or a similar implement. Never use sharp-edged objects such as knives or forks. 5

11 GB Instruction Manual B) Freezer compartment Defrosting is very straightforward and without mess, thanks to a special defrost collection basin. Defrost twice a year or when a frost layer of around 7 (1/4") mm has formed. To start the defrosting procedure, switch off the appliance at the socket outlet and pull out the mains plug. All food should be wrapped in several layers of newspaper and stored in a cool place (e.g. fridge or larder). Containers of warm water may be placed carefully in the freezer to speed up the defrosting. Do not use pointed or sharp-edged objects, such as knives or forks to remove the frost. Never use hairdryers, electrical heaters or other such electrical appliances for defrosting. Sponge out the defrost water collected in the bottom of the freezer compartment. After defrosting, dry the interior thoroughly. Insert the plug into the wall socket and switch on the electricity supply. Replacing the interior light bulb Should the light fail, switch off at the socket outlet and pull out the mains plug. Then ensure the bulb is screwed securely in the bulb holder. Replace the plug and switch on. If the light still fails, obtain a replacement E14 screw-cap type 15 Watt (Max) bulb from your local electrical store and then fit it (Fig. 5).Carefully dispose of the burnt-out light bulb immediately. Cleaning and care 1. We recommend that you switch off the appliance at the socket outlet and pull out the mains plug before cleaning. 2. Never use any sharp instruments or abrasive substances, soap, household cleaner, detergent or wax polish for cleaning. 3. Use luke warm water to clean the cabinet of the appliance and wipe it dry. 4. Use a damp cloth wrung out in a solution of one teaspoon of bicarbonate of soda to one pint of water to clean the interior and wipe it dry. 5. Make sure that no water enters the temperature control box. 6. If the appliance is not going to be used for a long period of time, switch it off, remove all food, clean it and leave the door ajar. 7. We recommend that you polish the metal parts of the product (i.e. door exterior, cabinet sides) with a silicone wax (car polish) to protect the high quality paint finish. 8. Any dust that gathers on the condenser, which is located at the back of the appliance, should be removed once a year with a vacuum cleaner. 9. Check door seals regularly to ensure they are clean and free from food particles. 10. Never: Clean the appliance with unsuitable material; eg petroleum based products. Subject it to high temperatures in any way, Scour, rub etc., with abrasive material. 11. Removal of dairy cover and door tray : To remove the dairy cover, first lift the cover up by about an inch and pull it off from the side where there is an opening on the cover. To remove a door tray, remove all the contents and then simply push the door tray upwards from the base. 12. Make sure that the special plastic container at the back of the appliance which collects defrost water is clean at all times. If you want to remove the tray to clean it, follow the instructions below: Switch off at the socket outlet and pull out the mains plug Gently uncrimp the stud on the compressor, 6

12 GB Instruction Manual using a pair of pliers, so that the tray can be removed Lift it up. Clean and wipe it dry Reassemble, reversing the sequence and operations Repositioning the door Proceed in numerical order (Fig. 6). Do s and don ts Do- Do- Do- Do- Do- Do- Do- Do- Do- Do- Do- Do- Do- Do- Do- Do- Do- Clean and defrost your appliance regularly (See "Defrosting") Keep raw meat and poultry below cooked food and dairy products. Take off any unusable leaves on vegetables and wipe off any soil. Leave lettuce, cabbage, parsley and cauliflower on the stem. Wrap cheese firstly in greaseproof paper and then in a polythene bag, excluding as much air as possible. For best results, take out of the fridge compartment an hour before eating. Wrap raw meat and poultry loosely in polythene or aluminium foil. This prevents drying. Wrap fish and offal in polythene bags. Wrap food with a strong odour or which may dry out, in polythene bags, or aluminium foil or place in airtight container. Wrap bread well to keep it fresh. Chill white wines, beer, lager and mineral water before serving. Check contents of the freezer every so often. Keep food for as short a time as possible and adhere to "Best Before" and "Use by" etc. dates. Store commercially frozen food in accordance with the instructions given on the packets. Always choose high quality fresh food and be sure it is thoroughly clean before you freeze it. Prepare fresh food for freezing in small portions to ensure rapid freezing. Wrap all food in aluminium foil or freezer quality polythene bags and make sure any air is excluded. Wrap frozen food immediately after purchasing and put it in to the freezer as soon as possible. 7

13 GB Instruction Manual Defrost food in the fridge compartment. Store bananas in your fridge compartment. Store melon in your fridge. It can be chilled for short periods as long as it is wrapped to prevent it flavouring other food. Cover the shelves with any protective materials which may obstruct air circulation. Store poisonous or any dangerous substances in your appliance. It has been designed for the storage of edible foodstuffs only. Consume food which has been refrigerated for an excessive length of time. Store cooked and fresh food together in the same container. They should be packaged and stored separately. Let defrosting food or food juices drip onto food. Leave the door open for long periods, as this will make the appliance more costly to run and cause excessive ice formation. Use sharp edged objects such as knives or forks to remove the ice. Put hot food into the appliance. Let it cool down first. Put liquid-filled bottles or sealed cans containing carbonated liquids into the freezer, as they may burst. Exceed the maximum freezing loads when freezing fresh food. Give children ice-cream and water ices direct from the freezer. The low temperature may cause 'freezer burns' on lips. Do- Don't- Don't- Don't- Don't- Don't- Don't- Don't- Don't- Don't- Don't- Don't- Don't- Don't- Don't- Don't- Don't- Freeze fizzy drinks. Try to keep frozen food which has thawed; it should be eaten within 24 hours or cooked and refrozen. Remove items from the freezer with wet hands. Trouble - shooting If the appliance does not operate when switched on, check; That the plug is inserted properly in the socket and that the power supply is on. (To check the power supply to the socket, plug in another appliance) Whether the fuse has blown/circuit breaker has tripped/main distribution switch has been turned off. That the temperature control has been set correctly. That the new plug is wired correctly, if you have changed the fitted, moulded plug. If the appliance is still not operating at all after above checks, contact the dealer from whom you purchased the unit. Please ensure that above checks have been done, as a charge will be made if no fault is found. 8

14 D Bedienungsanleitung Wir beglückwünschen Sie dazu, daß Sie sich für ein Haushaltsgerät von entschieden haben - ein Produkt von hoher Qualität, das Ihnen sicher viele Jahre lang wertvolle Dienste leisten wird. S cherheit an erster Stelle! Schließen Sie Ihr Gerät NICHT an die Stromversorgung an, bevor Sie die gesamte Verpackung und alle Transportschutzvorrichtungen entfernt haben. Lassen Sie das Gerät vor dem Einschalten für mindestens 4 Stunden aufrecht stehen, damit sich nach einem waagerechten Transport zunächst das Kompressoröl sammeln kann. Falls Sie ein Altgerät entsorgen und sich an dessen Tür ein Schloß oder eine Verriegelung befindet, dann achten Sie darauf, daß Sie letztere in einem sicheren Zustand hinterlassen, so daß sich Kinder nicht versehentlich im Gerät einschließen können. Dieses Haushaltgerät darf nur für seinen vorgesehenen Verwendungszweck eingesetzt werden. Bei der Entsorgung des Geräts darf kein Feuer zum Einsatz kommen. Die Isolierung des Geräts enthält FCKW-freie Stoffe, die jedoch entflammbar sind und daher nicht mit Feuer in Berührung kommen dürfen. Bitte informieren Sie sich bei den vor Ort zuständigen Behörden über die vorhandenen Entsorgungsmöglichkeiten und -einrichtungen. Vom Einsatz dieses Geräts in einem ungeheizten bzw. kühlen Raum wird abgeraten (z.b. Garage, Wintergarten, Abstellraum, Schuppen, Nebengebäude usw.). Um eine optimale Leistung und einen störungsfreien Betrieb des Geräts zu erreichen, sollten Sie sich die vorliegende Bedienungsanleitung unbedingt genau durchlesen. Die Nichtbeachtung dieser Bedienungsanleitung kann den Verlust Ihres Rechts auf kostenlosen Service während der Garantiezeit zur Folge haben. Bitte bewahren Sie diese Bedienungsanleitung gut auf, damit Sie sie bei Bedarf jederzeit zur Hand haben. 9

15 D Bedienungsanleitung Voraussetzungen für den Elektroanschluss Bevor Sie das Gerät mit einer Steckdose verbinden, sollten Sie sich vergewissern, daß Spannung und Frequenz der Stromversorgung mit den Angaben auf dem Typenschild übereinstimmen, das sich im Innenraum des Geräts befindet. Das Gerät sollte an einer ordnungsgemäß installierten und leicht zugänglichen Steckdose angeschlossen werden, die mit einer Sicherung abgesichert ist. Achtung! Dieses Gerät muß über einen ordnungsgemäßen Erdanschluß verfügen! Reparaturen an elektrischen Geräten dürfen ausschließlich von einem hierfür qualifizierten Fachmann ausgeführt werden. Eine falsch bzw. nicht fachgerecht ausgeführte Reparatur kann Gefahren mit möglicherweise gravierenden Folgen für den Benutzer herbeiführen. Entsorgen Sie das Gerät nicht durch Verbrennen. Wir bei haben uns nachhaltig dem Umweltschutz verschrieben und betrachten ihn als langfristige Aufgabe. Dieses Gerät, das zu der Serie von den erst kürzlich auf den Markt gebrachten Geräten zählt, ist speziell umweltfreundlich. Ihrem Gerät enthält nicht CFC/HFC-haltige, natürliche Substanzen (R600a genannt) im Kühlsystem und in der Isolierung (Zyklonpentan genannt), die, wenn Sie mit Feuer in Verbindung kommen, brennen können. Achten Sie daher darauf, dass der Kühlzyklus/die Kühlschläuche des Geräts sowohl beim Transport wie auch beim Betrieb nicht beschädigt werden. Im Falle einer Beschädigung setzen Sie das Gerät keinem Feuer und entzündlichen Stoffen aus, und belüften Sie den Raum in welchem das Gerät steht sofort. Kontaktieren Sie bitte Ihre Kommunalbehörde bezüglich Informationen zu Entsorgungsstellen. WARNUNG! Luftöffnungen an Geräteum- und einbauten dürfen nicht abgedeckt werden. WARNUNG! Verwenden Sie außer der vom Hersteller empfohlenen, keine mechanischen oder anderen Hilfsmittel um den Abtauprozess zu beschleunigen. WARNUNG! Beschädigen Sie den Kühlkreislauf nicht. WARNUNG! Verwenden Sie im Lebensmittelaufbewahrungsbereich Ihres Geräts nur vom Hersteller empfohlene elektrische Geräte. Transportvorschriften 1. Das Gerät sollte wenn möglich ausschließlich senkrecht transportiert werden. Während eines Transports muß sich die mitgelieferte Verpackung komplett am Gerät befinden. 2. Wenn sich das Gerät während eines Transports in waagerechter Lage befunden hat, darf es danach für einen Zeitraum von 4 Stunden nicht in Betrieb genommen werden, damit sich das Kühlsystem wieder stabilisieren kann. 3. Die Nichtbeachtung der obengenannten Vorschriften kann zu einer Beschädigung des Geräts führen. Der Hersteller kann nicht zur Verantwortung gezogen werden, wenn diese Vorschriften mißachtet werden. 4. Das Gerät muß so transportiert werden, daß es vor Regen, Feuchtigkeit und anderen Witterungseinflüssen geschützt ist. Wichtiger Hinweis! Achten Sie beim Reinigen / Tragen des Geräts darauf, daß Sie die unteren Enden des Kondensator-Drahtgitters an der Rückseite des Geräts nicht berühren, da Sie sich dabei an den Fingern / Händen verletzen könnten. Sie sollten sich auf keinen Fall auf das Gerät stellen oder setzen, da es nicht für eine solche Belastung ausgelegt ist. Sie könnten sich hierdurch verletzen oder das Gerät beschädigen. Stellen Sie sicher, daß sich das Anschlußkabel beim Tragen / Verrücken des Geräts bzw. danach nicht unter diesem verfängt und dadurch abgetrennt oder anderweitig beschädigt wird. Achten Sie darauf, daß Kinder nicht mit dem Gerät spielen oder sich an den Bedienelementen zu schaffen machen. 10

16 D Bedienungsanleitung Hinweise zur Installation und zum Aufstellungsort 1. Stellen Sie das Gerät nicht in einem Raum auf, wo die Temperaturen nachts bzw. besonders im Winter leicht unter 10 C (50 F) fallen können. Das Gerät ist für einen Betrieb bei einer Umgebungstemperatur zwischen +10 C und +32 C (bzw. 50 bis 90 F) ausgelegt. Wenn Sie das Gerät in einem ungeheizten / kühlen Raum (z.b. Wintergarten, Abstellraum, Schuppen, Garage usw.) aufstellen, dann beeinträchtigt dies die Funktion und kann zu einer Verkürzung der Lagerungszeit von Tiefkühlware führen. 2. Stellen Sie das Gerät nicht in der Nähe eines Herds, eines Heizkörpers oder im Bereich direkter Sonneneinstrahlung auf, da das Kühlaggregat dann stärker arbeiten muß. Wenn die Aufstellung in der Nähe einer Wärmequelle oder eines Gefrierschranks erfolgt, dann sind die folgenden seitlichen Mindestabstände einzuhalten: von Herden von Heizkörpern: von Gefriergeräten: 30 mm 300 mm 25 mm das Gerät überall fest auf dem Boden steht. Durch ein korrektes Einstellen der Füße lassen sich darüber hinaus überflüssige Schwingungen und Geräusche vermeiden. 5. Lesen Sie vor einer ersten Benutzung des Geräts den Abschnitt Reinigung und Pflege. Kennenlernen des Geräts (Abb. 1) Gefrierfach bzw. Gefrierabteil Thermostateinheit Eisablagerung Verstellbare Ablagen Flaschenrack Deckplatte Obst- und Gemüsekorb Höhenverstellbare Vorderfüße Verstellbare Türablagen Eierfach Flaschenhalter Fixierer Flaschenkonsolen 3. Achten Sie darauf, daß um das Gerät herum genügend Platz verbleibt, so daß für eine ausreichende Luftzirkulation gesorgt ist. Bringen Sie an der Rückseite des Gerätes die mitgelieferten Plastikteile an und drehen diese um 90, um den Abstand zwischen dem Kühlschrank und der Wand zu bestimmen (Abb.2). 4. Das Gerät sollte auf einer ebenen Fläche stehen. Die beiden vorderen Füße sind je nach Bedarf höhenverstellbar. Um eine genau senkrechte Stellung zu erzielen, können Sie die beiden vorderen Füße durch Drehen im Uhrzeigersinn oder umgekehrt so einstellen, bis 11 Vorschläge für das Einordnen von Lebensmitteln Zur Erzielung bestmöglicher Ergebnisse und zur Einhaltung der Lebensmittelhygiene berücksichtigen Sie bitte die folgenden Regeln und Hinweise: 1. Das Kühlabteil dient dem kurzzeitigen Lagern von frischen Lebensmitteln und Getränken.
 aufstellen, dann beeinträchtigt dies die Funktion und kann zu einer Verkürzung der Lagerungszeit von Tiefkühlware führen. 2.")
17 D Bedienungsanleitung 2. Das Gefrierfach ist ein Fach und eignet sich zum Einfrieren und für die Lagerung von Tiefkühlware, wie sie im Handel erhältlich ist. Beachten Sie in jedem Falle die Empfehlungen für Lagerung, wie sie auf der Lebensmittelverpackung angegeben sind. 3. Gekochte Speisen müssen in luftdicht verschlossenen Behältern aufbewahrt werden. 4. Frische, noch verpackte Lebensmittel können auf einer Ablage eingeordnet werden. Frisches Obst und Gemüse sollten Sie säubern und in den dafür vorgesehenen Körben lagern. 5. Flaschen können im Türbereich eingeordnet werden. 6. Rohes Fleisch sollten Sie in Polyethylenbeutel wickeln und auf der untersten Ablage verstauen, wobei Sie darauf achten sollten, daß es nicht mit gekochten Speisen in Berührung kommt, um eine Übertragung von Keimen zu verhindern. Rohes Fleisch sollte sicherheitshalber nicht länger als zwei bis drei Tage gelagert werden. 7. Zur maximalen Ausnutzung der Kühlleistung sollten Sie die herausnehmbaren Ablagen nicht mit Papier oder anderen Materialien bedecken, so daß für eine gute Zirkulation der Kaltluft gesorgt ist. 8. Stellen Sie keine Behälter mit Pflanzenöl auf die Ablageborde in der Tür. Lagern Sie die Lebensmittel in ihrer Verpackung bzw. eingewickelt oder abgedeckt. Lassen Sie heiße Speisen und Getränke abkühlen, bevor Sie sie in das Gerät stellen. Lagern Sie keine explosiven Stoffe ein. Hochprozentiger Alkohol muß in aufrecht stehenden, dicht verschlossenen Behältern gelagert werden. Reste von Lebensmitteln, die in Konservendosen geliefert werden, sollten nicht in der Dose selbst aufbewahrt werden. 9. Kohlensäurehaltige Getränke dürfen nicht eingefroren werden, und Produkte wie Eissorbetts sollten Sie nicht zu kühl genießen. 10. Bei einigen Obst- und Gemüsesorten tritt eine Qualitätsminderung ein, wenn sie bei einer Temperatur nahe 0 C gelagert werden. Bewahren Sie daher Ananas, Melonen, Gurken, Tomaten und ähnliche Erzeugnisse in Polyethylenbeuteln auf. 11. Lebensmittel, bei denen ein brennbares Treibgas verwendet wird (Sahnespender, Sprühdosen usw.), oder explosive Stoffe sollten niemals im Gerät aufbewahrt werden - Explosionsgefahr! Einstellung und regelung der temperatur Die Einstellung der Betriebstemperatur kann mit dem Thermostatknopf (Temperaturwahlschalter) - (Abb. 3) vorgenommen werden. Die Einstellungen reichen von 1 bis 5, wobei 5 dem kältesten Wert entspricht. Bei der ersten Inbetriebnahme des Geräts sollte der Thermostat so eingestellt werden, daß die Durchschnittstemperatur im Kühlabteil nach 24 Stunden nicht mehr als +5 C (+41 F) beträgt. Normalerweise sollten Sie dazu den Thermostat auf einen mittleren Wert zwischen 1 und 5 einstellen und kontrollieren, ob die gewünschte Temperatur erreicht wird. Ein Wert nahe des 5 bewirkt eine niedrigere Temperatur und umgekehrt. Dabei können bestimmte Bereiche des Kühlraums kälter und andere wärmer sein (wie etwa der Gemüsekorb und der obere Bereich des Kühlabteils), was aber eine normale Erscheinung darstellt. Bei Umgebungstemperaturen von über 25 C (77 F), also besonders im Sommer, sollten Sie den Thermostatknopf auf einen Wert in Richtung 5 einstellen. Bei Umgebungstemperaturen von unter 25 C (77 F) sollte sich der Thermostatknopf etwa in Mittelstellung befinden. 12

18 D Bedienungsanleitung Ein häufiges Öffnen der Tür führt zu einer höheren Innentemperatur, deswegen sollten Sie die Tür jedesmal möglichst bald wieder schließen. Inbetriebnahme Abschließende Kontrolle Kontrollieren Sie die folgenden Punkte, bevor Sie das Gerät in Betrieb nehmen: Die Füße müssen so eingestellt sein, daß das Gerät genau waagerecht steht. Der Innenraum muß trocken sein, und die Luft muß hinter dem Gerät ungehindert zirkulieren können. Reinigen Sie den Innenraum gemäß den Hinweisen im Abschnitt Reinigung und Pflege. Verbinden Sie den Netzstecker mit der Steckdose und schalten Sie die Stromversorgung ein. Sofern die Tür geöffnet ist, sollte nun die Beleuchtung angehen. Beim Einschalten des Kompressors ist ein Geräusch zu hören. Darüber hinaus können die im Kühlsystem enthaltenen flüssigen und gasförmigen Stoffe bestimmte Geräusche erzeugen, und zwar unabhängig davon, ob der Kompressor gerade läuft oder nicht. Auch hierbei handelt es sich um eine normale Erscheinung. Eine leicht gewellte Oberfläche der Deckplatte ist normal und steht mit dem Herstellungsprozeß im Zusammenhang. Diese Erscheinung stellt keinen Schaden dar und sollte daher kein Anlaß zur Beunruhigung sein. Es wird empfohlen, den Thermostatknopf auf eine mittlere Position einzustellen und zu kontrollieren, ob die jeweils gewünschte Lagertemperatur eingehalten wird (vgl. hierzu den Abschnitt Einstellung und Regelung der Temperatur ). Beladen Sie das Gerät nicht schon unmittelbar nach dem Einschalten, sondern warten Sie solange, bis die richtige Lagertemperatur erreicht ist. Die Überprüfung der Temperatur mit einem gut geeichten Thermometer wird empfohlen (siehe Abschnitt Einstellung und Regelung der Temperatur ). Lagerung von Tiefkühlkost Ihr Gefrierabteil ist für die langfristige Lagerung handelsüblicher Tiefkühlkost geeignet und kann auch dazu benutzt werden, frische Lebensmittel einzufrieren. Bei Stromausfall nicht die Kühlschranktüre öffnen. Tiefgekühlte Lebensmittel sollten von Stromausfällen von weniger als 16 Stunden nicht in Mitleidenschaft gezogen werden. Sollte der Stromausfall länger dauern, sollten die Lebensmittel überprüft werden und entweder sofort verzehrt oder gekocht und danach wieder tiefgekühlt werden. Frische Lebensmittel tiefkühlen Sehen Sie hierzu die Anweisungen um beste Resultate zu erhalten. Niemals zu große Mengen auf einmal tiefkühlen. Die Qualität der Lebensmittel bleibt am besten erhalten, wenn sie so schnell als möglich bis in den Kern tiefgekühlt werden. Überschreiten Sie die Tiefkühlkapazität Ihres Geräts innerhalb von 24 Stunden nicht. Wenn Sie noch warme Speisen in den Tiefkühlbereich stellen, verursachen Sie damit, dass die Kühlmaschine ununterbrochen arbeitet bis die Speisen komplett tiefgekühlt sind. Dies kann zu einer vorübergehenden stärkeren Kühlung im Kühlschrankbereich führen. Lassen Sie den Thermostatdrehknopf in der mittleren Position, wenn Sie frische Speisen tiefkühlen. Kleine Speisenmengen bis zu 1/2 kg (1 lb) können tiefgekühlt werden, ohne dass eine Temperaturanpassung mittels des Temperaturkontrollknopfes vorgenommen wird. Achten Sie speziell darauf, nicht bereits tiefgekühlte und frische Speisen zu vermischen. 13

19 D Bedienungsanleitung Herstellung von eiswürfeln Füllen Sie die Eiswürfelschale zu zwei Dritteln mit Wasser, und stellen Sie sie dann in das Tiefkühllagerfach. Eine festgefrorene Schale mittels eines Löffelstiels o.ä. lösen, aber hierzu niemals scharfkantige Gegenstände verwenden, wie etwa Messer oder Gabel. Abtauen A) Kühlabteil Das Kühlabteil verfügt über eine Abtau- Automatik. Das Tauwasser läuft über einen Sammelbehälter an der Rückwand in die Tauwasserablaufleitung (Abb. 4). Während des Abtauens können sich an der Rückwand des Kühlabteils, hinter dem der Verdampfer verborgen ist, Wassertropfen bilden. Dabei können einige Tropfen auf der Verkleidung der Rückwand verbleiben und nach dem Abtauen wieder gefrieren. Verwenden Sie zum Entfernen solcher gefrorenen Tropfen niemals einen spitzen oder scharfkantigen Gegenstand, wie etwa ein Messer oder eine Gabel. Sollte das Tauwasser einmal nicht aus dem Sammelkanal ablaufen, so überprüfen Sie, ob evtl. die Tauwasserablaufleitung durch Reste von Lebensmitteln o.ä. verstopft wurde. Zum Reinigen der Ablaufleitung kann man ein geeignetes Werkzeug hindurchführen, z.b. einen Pfeifenputzer o.ä. - vgl. B) Gefrierabteil Durch den eingebauten Tauwassersammelbehälter gestaltet sich das Abtauen sehr einfach und unkompliziert. Sie sollten etwa zweimal pro Jahr abtauen, bzw. wenn sich eine Eisschicht von etwa 7 mm (1/4 ) Stärke gebildet hat. Schalten Sie zum Abtauen das Gerät ggf. an der Steckdose ab und ziehen Sie den Netzstecker. Wickeln Sie die Lebensmittel in mehrere Lagen Zeitungspapier und verstauen Sie dann alles an einem kühlen Ort (z.b. Kühlschrank oder Speisekammer). Um das Abtauen zu beschleunigen, können Sie vorsichtig Behälter mit warmem Wasser in das Gefrierabteil stellen. 14

20 D Bedienungsanleitung Verwenden Sie zum Entfernen des Eises niemals einen spitzen oder scharfen Gegenstand, wie etwa ein Messer oder eine Gabel. Verwenden Sie zum Abtauen niemals einen Haartrockner, ein elektrisches Heizgerät oder ähnliche Elektroapparate. Wischen Sie das Tauwasser auf, das sich am Boden des Gefrierabteils angesammelt hat, und trocknen Sie den Innenraum nach dem Abtauen gründlich ab. Verbinden Sie den Netzstecker mit der Steckdose und schalten Sie den Strom wieder an. Auswechseln der Glühlampe für die Innenbeleuchtung Sollte die im Innenraum vorhandene Glühlampe nicht funktionieren, dann ziehen Sie den Netzstecker. Überprüfen Sie dann zunächst, ob die Glühlampe fest in die Fassung eingeschraubt ist; verbinden Sie den Netzstecker, und schalten Sie das Gerät wieder an. Wenn das Licht dann immer noch nicht funktioniert, dann erwerben Sie im örtlichen Elektrohandel eine Ersatzbirne mit Gewindesockel und maximal 15 Watt vom Typ E14, und schrauben Sie diese in die Fassung (Abb. 5). Die defekte Birne sollten Sie sofort vorsichtig entsorgen. 15

ARC 32. Tvättställsblandare/Basin Mixer. inr.se
 ARC 32 Tvättställsblandare/Basin Mixer inr.se SE Användning och skötsel Manualen är en del av produkten. Bevara den under hela produktens livscykel. Vi rekommenderar er att noggrant läsa igenom manualen
SAFETY PRECAUTIONS SPECIFICATIONS
 SAFETY PRECAUTIONS Read the instructions carefully before use and save them for future reference. Before you connect the appliance: Ensure that the voltage rating on the type plate corresponds to your
IMPORTANT! RETAIN FOR FUTURE REFERENCE PLEASE READ CAREFULLY VIKTIGT! BEHÅLL FÖR FRAMTIDA REFERENS LÄS IGENOM INSTRUKTIONSMANUALEN
 Heart & Stripes Junior Bed Instructions Manual Instruktions Manual IMPORTANT! RETAIN FOR FUTURE REFERENCE PLEASE READ CAREFULLY VIKTIGT! BEHÅLL FÖR FRAMTIDA REFERENS LÄS IGENOM INSTRUKTIONSMANUALEN Thank
SAFETY PRECAUTIONS SPECIFICATIONS
 SAFETY PRECAUTIONS Read the instructions carefully before use and save them for future reference. Before you connect the appliance: Ensure that the voltage rating on the type plate corresponds to your
IMPORTANT! RETAIN FOR FUTURE REFERENCE PLEASE READ CAREFULLY VIKTIGT! BEHÅLL FÖR FRAMTIDA REFERENSLÄS IGENOM INSTRUKTIONSMANUALEN NOGGRANT
 13060 Basic Cot One Instruction Manual Instruktion Manual IMPORTANT! RETAIN FOR FUTURE REFERENCE PLEASE READ CAREFULLY VIKTIGT! BEHÅLL FÖR FRAMTIDA REFERENSLÄS IGENOM INSTRUKTIONSMANUALEN NOGGRANT Thank
SERVICEINSTRUKTION Tider. SERVICE INSTRUCTION Times. Zeiten SIT SE/GB/DE 0612-1 M10401 FIGHTER 2005/2010
 SIT SE/GB/DE 061-1 M10401 FIGHTER 005/010 SE GB DE SERVICEINSTRUKTION Tider SERVICE INSTRUCTION Times SERVICEINSTRUKTION Zeiten NIBE AB - Villavärme Box 14, 85 1 Markaryd Tel 0433-73 000 Fax 0433-73 190
WALLMEK i Kungälv AB Special tools for auto repairs
 Handhavandeinstruktion till sats 01-00014 för byte av bakvagnsbussningar på Hyundai Santa Fe. Bakaxeln demonteras från sina infästningar och sänks ned med en lyft tills de fasta bultarna i golvet släpper
LINC 23. Tvättställsblandare/Basin Mixer. inr.se 130226A
 LINC 23 Tvättställsblandare/Basin Mixer 130226A inr.se S Användande och skötsel Manualen är en del av produkten. Bevara den under hela produktens livscykel. Vi rekommenderar att noggrant läsa igenom manualen
Tariff Kit. Installatörshandbok Tariff Kit för NIBE F1330 LEK. Installer manual Tariff Kit for NIBE F1330
 Tariff Kit SE Installatörshandbok Tariff Kit för NIBE F1330 LEK GB DE Installer manual Tariff Kit for NIBE F1330 Installateurhandbuch Tariff Kit für NIBE F1330 IHB 1116-1 031517 Svenska, Installatörshandbok
Refrigerator Kühlgerät Køleskab Kylskåp Kjøleskap SSM Bedienungsanleitung
 Refrigerator Kühlgerät Køleskab Kylskåp Kjøleskap SSM 1550 D Bedienungsanleitung GB Index 1-8 Safety first/1 Electrical requirements/2 Transportation instructions/2 Installation instructions/2-3 Suggested
4.2 Konstantes Fördervolumen Doppelpume
 4.2 Konstantes Fördervolumen Doppelpume Inhalt PVF101 Bestellschlüssel 4.2.1 Konstantes Fördervolumen Technische Informationen 4.2.2 Kenngrößen 4.2.3 Hydraulikflüssigkeiten 4.2.4 Viskositätsbereich 4.2.5
BÄTTRE ÄN NÅGONSIN. Bäste medarbetare
 BÄTTRE ÄN NÅGONSIN Bäste medarbetare Det känns verkligen underbart att se tillbaka på ett fantastiskt framgångsrikt verksamhetsår. Jag är verkligen tacksam och uppskattar det fina arbete ni alla gjort
SAFETY PRECAUTIONS SPECIFICATIONS
 SAFETY PRECAUTIONS Read the instructions carefully before use and save them for future reference. Before you connect the appliance: Ensure that the voltage rating on the type plate corresponds to your
WALLMEK i Kungälv AB Special tools for auto repairs
 Handhavandeinstruktion till sats 02-00006 för byte av bakhjulslager på Mercedes-Benz Vito (W639). Demontering 1. Demontera bromsok, bromsskiva samt handbromsbackar. 2. Ersätt bromssköldens torxskruvar
F1220, F1230, F1120, F1130
 SIT SE/GB/DE 0608-1 M10379 F1220, F1230, F1120, F1130 SE GB DE SERVICEINSTRUKTION Oljepanna dockning 3 SERVICE INSTRUCTION Oil-fired boiler docking 3 SERVICEINSTRUKTION Ölkessel anschluss 3 NIBE AB - Villavärme
manual Facial spa Art nr: 48682 Rubicson 2016-06-08
 manual Facial spa Art nr: 8682 EN NO SV 2016-06-08 Rubicson ENGLISH Overview Use Fill the container ENGLISH 1. Make sure that the power cord is not connected to a wall socket. 1 2 2. Remove the funnel
INSTALLATION INSTRUCTIONS
 INSTALLATION - REEIVER INSTALLATION INSTRUTIONS RT0 RF WIRELESS ROOM THERMOSTAT AND REEIVER MOUNTING OF WALL MOUTING PLATE - Unscrew the screws under the - Pack contains... Installation - Receiver... Mounting
CTC Rumsdisplay... 2. CTC Roomdisplay... 4. Installations- och skötselanvisning. Installation and maintenance instructions
 161 501 40-2 2007-11-12 Installations- och skötselanvisning CTC Rumsdisplay... 2 Installation and maintenance instructions CTC Roomdisplay... 4 Installations- und Wartungsanleitung CTC Raumdisplay... 6
PRESS FÄLLKONSTRUKTION FOLDING INSTRUCTIONS
 PRESS FÄLLKONSTRUKTION FOLDING INSTRUCTIONS Vänd bordet upp och ner eller ställ det på långsidan. Tryck ner vid PRESS och fäll benen samtidigt. OBS! INGA STORA KRAFTER KRÄVS!! Om benen sitter i spänn tryck
Logik für Informatiker
 Logik für Informatiker Vorlesung 7: Resolution Babeş-Bolyai Universität, Department für Informatik, Cluj-Napoca csacarea@cs.ubbcluj.ro 16. November 2017 1/47 ZUSAMMENFASSUNG Algorithmische Entscheidung
BBT057/ BBC057 BBCD057/ BBT057-NL HOLDEN COLORADO 9/2016+ HOLDEN TRAILBLAZER WD & 4WD Models
 INSTALLATION GUIDE BBT057/ BBC057 BBCD057/ BBT057-NL HOLDEN COLORADO 9/2016+ HOLDEN TRAILBLAZER 2017+ 2WD & 4WD Models Ironman 4x4 BBT/ BBC/ BBCD/BBT057-NL Bull Bars fit to a Holden Colorado 9/2016+ It
Support Manual HoistLocatel Electronic Locks
 Support Manual HoistLocatel Electronic Locks 1. S70, Create a Terminating Card for Cards Terminating Card 2. Select the card you want to block, look among Card No. Then click on the single arrow pointing
LINC MODELL 13. INR SVERIGE AB Kosterögatan 15 SE-211 24 Malmö 13 EN 1428:2005+A1:2008
 LINC MODELL 13 151005 Produkten är anpassad till branschregler Säker Vatteninstallation. INR garanterar produktens funktion om branschreglerna och monteringsanvisningen följs. INR SVERIGE AB Kosterögatan
Veranda. DE Installationshandbuch V17/16
 Veranda DE Installationshandbuch V17/16 E nstalla onshandbuch Veranda Handbuch für den Endnutzer und den Monteur Sehr geehrter Kunde, vielen Dank für die Anscha ung der eranda Dieses Handbuch enthält alle
WALLMEK i Kungälv AB Special tools for auto repairs
 Arbetsinstruktion till 1090-39 för byte av bakvagnsbussning på Golf IV, Audi A3 mfl. 1090-39-05-01 Satsen används med hydraulcylinder samt pressbygel med öppen underdel (1090-69) 1090-39-05-02 1, Rengör
VASSVIK FIXED STAND SE / ENG
 VASSVIK FIXED STAND SE / ENG SE VIKTIGT Läs noga igenom instruktionerna före användning och spar dessa för framtida bruk. VARNING: Barnets huvud bör inte ligga lägre än barnets kropp. Lägg inte till ytterligare
Joki Joki Air. JCD70-xx JAD90-xx. lasiesta.com. Manual. Betriebsanleitung. Manuel. Manual. Manuale. Gebruiksaanwijzing.
 lasiesta.com LA SIESTA GmbH Im Wiesenweg 4 55270 Jugenheim Germany Tel: +49 6130 9119-19 LA SIESTA Inc. 7355 S.W. 87 th Ave., Ste. 100 Miami, FL 33173 USA Tel: +1 786 401-1138 EN DE FR ES IT NL DA SV FI
PRESS FÄLLKONSTRUKTION FOLDING INSTRUCTIONS
 PRESS FÄLLKONSTRUKTION FOLDING INSTRUCTIONS Vänd bordet upp och ner eller ställ det på långsidan. Tryck ner vid PRESS och fäll benen samtidigt. Om benen sitter i spänn tryck benen mot kortsidan före de
Instruction Manual. Svenska, English. Power Bank. Model: PRBN
 Instruction Manual Svenska, English Power Bank Model: PRBN Innehåll / Content Innehåll Säkerhetsföreskrifter... 4 Delar... 5 Specifikationer... 6 Miljö / Lag och säkerhet / Förbehåll... 7 Content Safety
Gebrauchsanweisung. Bure. Gehwagen. Bure XL 56-315
 Gebrauchsanweisung Bure Gehwagen Bure XL 56-315 Liebe Benutzer Bruksanvisning Bure Gratulation! Sie haben einen Bure Gehwagen erworben. In dieser Gebrauchsanweisung finden Sie wichtige Informationen, Höjning/sänkning
PPV-Serie. DIN Axialkolben Verstellpumpe für LKW Nebenabtrieb mit Load Sensing-Regler. Erstinbetriebnahme: Saugstutzen muß separat bestellt werden
 IN AxialkolbenVerstelllpumpen ruckregler Anfang IN Axialkolben Verstellpumpe für LKW Nebenabtrieb mit Load Sensing-Regler PPV-Serie PPV PPV 9 - PPV11 Födervolumen in cm³/u linksdrehend rechtsdrehend auerdruck
Installation Instructions
 Installation Instructions (Cat. No. 1794-IE8 Series B) This module mounts on a 1794 terminal base unit. 1. Rotate keyswitch (1) on terminal base unit (2) clockwise to position 3 as required for this type
Your No. 1 Workout. MANUAL pro
 Your No. 1 Workout MANUAL pro Innehåll/Contents Svenska Viktigt om säkerhet Specifikationer & delar Rekommenderade övningar 3 5 6-7 2 English Safety instructions Specifications & parts Recommended exercises
SAFETY PRECAUTIONS SPECIFICATIONS
 SAFETY PRECAUTIONS Read the instructions carefully before use and save them for future reference. Before you connect the appliance: Ensure that the voltage rating on the type plate corresponds to your
Metallmaßstäbe RL. Inhaltsverzeichnis
 Metallmaßstäbe RL Inhaltsverzeichnis Metallmaßstäbe RL 2 Technische Daten für Metallmaßstäbe RL 3 RL-100-1 3 RL-100-1-LED 4 RL-100-2 4 RL-100-2-LED 5 RL-212-1 5 RL-212-1-LED 6 RL-212-2 6 RL-212-2-LED 7
Manual. SE Control Omni Dockningsstation GB Control Omni Docking station DE Control Omni Dockstation
 Manual SE Control Omni Dockningsstation GB Control Omni Docking station DE Control Omni Dockstation Innehållsförteckning/Content/Inhalt 1 SVENSKA... 3 1.1 BESKRIVNING... 3 1.2 ANSLUTNING... 3 1.3 MONTERING...
Boiler with heatpump / Värmepumpsberedare
 Boiler with heatpump / Värmepumpsberedare QUICK START GUIDE / SNABBSTART GUIDE More information and instruction videos on our homepage www.indol.se Mer information och instruktionsvideos på vår hemsida
81152 TRANSFER CASE SHIFT HANDLE
 Installation Instructions for TRANSFER CASE SHIFT HANDLE for 2007 2018 JEEP JK WRANGLER 1 2 3 ITEM NO. PART NO. DESCRIPTION QTY. 1 4101359 SHIFT KNOB, JEEP WRANGLER JK, MOLDED 1 2 1794720 JAM NUT, 3/8
Rajd Instruction. Svenska Deutsch English
 Rajd Instruction Rajd innehåller shelter, staglinor och 10 markpinnar inga stänger eftersom du kan använda 2 vandringsstavar eller grenar. Tältstänger (längd 115 cm) och extra skyddsgolv säljs separat
Windlass Control Panel v1.0.1
 SIDE-POWER Windlass Systems 86-08950 Windlass Control Panel v1.0.1 EN Installation manual Behåll denna manual ombord! S Installations manual SLEIPNER AB Kilegatan 1 452 33 Strömstad Sverige Tel: +46 525
INNEHÅLL / CONTENT. Svenska Säkerhetsföreskrifter...4-5 Användning...6-7 Elschema... 8 Specifikationer... 9 Information...10
 party cooler INNEHÅLL / CONTENT Svenska Säkerhetsföreskrifter...4-5 Användning...6-7 Elschema... 8 Specifikationer... 9 Information...10 English Safety Precautions...12-13 Operation...14-15 Electrical
Bathtub Filler CN EN. TBP02201 Type / TBP02202 Type. Installation Manual. Continued on the back cover
 03N74E Installation Manual 207.8 Bathtub Filler TBP0220 Type / TBP02202 Type For best results, install the product correctly according to the instructions in this Installation Manual. After installation,
#1230 RÖKLÅDA SMOKING OVEN RÄUCHEROFEN.
 #1230 RÖKLÅDA SMOKING OVEN RÄUCHEROFEN www.fladenfishing.se Innehåll Röklåda: 2st brännare Rostfri röklåda Lock med ventilationsreglage Tvåvånings rökgaller Rostfri dropp-plåt Vindskydd för brännare The
INKOPPLINGSANVISNING ELTRYCKSLÅS WIRING DIAGRAM SOLENOID LOCK
 INKOPPLINGSANVISNING ELTRYCKSLÅS WIRING DIAGRAM SOLENOID LOCK SE EN S. 2-4 P. 5-7 SL 510/511 SL 520/521 SL 530-50/531-50 2013 11 07 SE TEKNISK SPECIFIKATION Driftspänning. Ström. Reed relä. Drifttemperatur.
301 Tage, Deutschland
 301 Tage, Deutschland Die Familie 300 und 1 Tag, Deutschland! Hejsan, jag heter Elin Vorbrodt och jag bor i den lilla staden Blosswitz som ligger här i Tyskland och jag går och pluggar på ett gymnasium
Original- Bedienungsanleitung WineSafe 12 black
 Original- Bedienungsanleitung WineSafe 12 black Artikel-Nr. 624 Braukmann GmbH Raiffeisenstraße 9 D-59757 Arnsberg Service-Hotline International: Tel.: +49 (0) 29 32 / 80 55 4 99 Fax: +49 (0) 29 32 / 80
Remote control Fjärrströmbrytare / Fjernstrømbryter
 Manual / Bruksanvisning / Bruksanvisning Remote control Fjärrströmbrytare / Fjernstrømbryter ENG SE NO Item. No. 9220-1070 ENG Thank you for choosing to purchase a product from Rusta! Read through the
Mycket formellt, mottagaren har en speciell titel som ska användas i stället för namnet
 - Öppning Svenska Tyska Bäste herr ordförande, Sehr geehrter Herr Präsident, Mycket formellt, mottagaren har en speciell titel som ska användas i stället för namnet Bäste herrn, Formellt, manlig mottagare,
Dokumentnamn Order and safety regulations for Hässleholms Kretsloppscenter. Godkänd/ansvarig Gunilla Holmberg. Kretsloppscenter
 1(5) The speed through the entire area is 30 km/h, unless otherwise indicated. Beware of crossing vehicles! Traffic signs, guardrails and exclusions shall be observed and followed. Smoking is prohibited
Akademiker Öppning. Öppning - Introduktion. I denna uppsats kommer jag att undersöka/utreda/utvärdera/analysera...
 - Introduktion I denna uppsats kommer jag att undersöka/utreda/utvärdera/analysera... Allmän öppning för en uppsats/avhandling In diesem Aufsatz / dieser Abhandlung / dieser Arbeit werde ich... untersuchen
Christmas tree lighting Julgransbelysning / Juletrebelysning
 Manual / Bruksanvisning / Bruksanvisning Christmas tree lighting Julgransbelysning / Juletrebelysning ENG SE NO Item. No 772701090101 ENG Thank you for choosing to purchase a product from Rusta! Read through
HANDPUMP H-11 DIRECTIONS FOR USE BRUKSANVISNING GEBRAUCHANWEISUNG
 E-417 HANDPUMP H-11 DIRECTIONS FOR USE BRUKSANVISNING GEBRAUCHANWEISUNG HAND PUMP H-11 Detta är en 2-stegs hydraulpump med ett inbyggt kombinerat låg- och hög- tryckssystem som automatiskt växlar från
Nathi Skötbord Changing unit Table à langer murale Wickeltisch Verschoontafel Puslebord Cambiador de pared Přebalovací pult Fasciatoio
 Nathi Skötbord Changing unit Table à langer murale Wickeltisch Verschoontafel Puslebord Cambiador de pared Přebalovací pult Fasciatoio Пеленальный стол Tested and approved according to SS-EN 12221:2008+A1_2013
Consumer attitudes regarding durability and labelling
 Consumer attitudes regarding durability and labelling 27 april 2017 Gardemoen Louise Ungerth Konsumentföreningen Stockholm/ The Stockholm Consumer Cooperative Society louise.u@konsumentforeningenstockholm.se
Om oss DET PERFEKTA KOMPLEMENTET THE PERFECT COMPLETION 04 EN BINZ ÄR PRECIS SÅ BRA SOM DU FÖRVÄNTAR DIG A BINZ IS JUST AS GOOD AS YOU THINK 05
 Om oss Vi på Binz är glada att du är intresserad av vårt support-system för begravningsbilar. Sedan mer än 75 år tillverkar vi specialfordon i Lorch för de flesta olika användningsändamål, och detta enligt
SERVICEINSTRUKTION Värmeproduktion. SERVICE INSTRUCTION Heat production. Wärmeerzeugung SIT SE/GB/DE M10383 FIGHTER 1320
 SIT SE/GB/DE 0608-1 M10383 FIGHTER 1320 SE GB DE SERVICEINSTRUKTION Värmeproduktion SERVICE INSTRUCTION Heat production SERVICEINSTRUKTION Wärmeerzeugung NIBE AB - Villavärme Box 14, 285 21 Markaryd Tel
Refrigerator Kühlgerät Réfrigérateur Koelkast Køleskab Kylskåp Kjøleskap Jääkaappi Frigorifero Frigorífico SOM 9750 A+ Bedienungsanleitung
 Refrigerator Kühlgerät Réfrigérateur Koelkast Køleskab Kylskåp Kjøleskap Jääkaappi Frigorifero Frigorífico SOM 9750 A+ D Bedienungsanleitung en-index 1-9 Safety first.../1 Transport instructions.../2 Disposal.../2
Spotlight Set Spotlightset / Spotlightsett
 Manual / Bruksanvisning / Bruksanvisning Spotlight Set Spotlightset / Spotlightsett ENG SE NO Item. No/Art. nr./art. nr. 995-9 ENG Thank you for choosing to purchase a product from Rusta! Read through
Bruksanvisning Badrumsvåg Modell: PG220
 Bruksanvisning Badrumsvåg Modell: PG220 INNAN DU ANVÄNDER VÅGEN 1. Ta bort allt emballage. 2. Öppna batterifacket och lägg i 1 st CR2032-batteri i batterifacket. Stäng batterifacket. 3. Ställ vågen på
ARBETSBLAD. KORTFILMSKLUBBEN TYSKA Bamboule
 ARBETSBLAD PEDAGOG: JOHAN POPPEN PROJEKTLEDARE: GABRIELLA THINSZ BESTÄLLNINGSNUMMER: 101546/TV39 KORTFILMSKLUBBEN TYSKA Bamboule Vokabeln und Phrasen (lätt) Wähle 10 von den Vokabeln/Phrasen aus und schreibe
LINC Modell 17 130624A
 LINC Modell 17 130624A Denna produkt är anpassad till Branschregler Säker Vatteninstallation. INR garanterar produktens funktion om branschregler och monteringsanvisning följs. INR SVERIGE AB Kosterögatan
Parasol base stand granite Parasollfot granit / Parasollfot granitt / Sonnenschirmfuß Granit / Aurinkovarjon jalka, graniittia
 Manual/Bruksanvisning/Gebrauchsanweisung/Käyttöohje Parasol base stand granite Parasollfot granit / Parasollfot granitt / Sonnenschirmfuß Granit / Aurinkovarjon jalka, graniittia 30 KG ENG SE NO DE FI
KF 3000 NF EN SV. User guide. Bruksanvisning
 KF 3000 NF EN SV User guide Bruksanvisning WARNING! In order to ensure a normal operation of your fridge/freezing appliance, which uses a completely environmentally friendly refrigerant the R600a (Flammable
WALLMEK i Kungälv AB Special tools for auto repairs
 Handhavandeinstruktion till verktyg 01-00018 för demontering av kompakthjullager 01-00018 är ett universalverktyg för demontering av den nya typen av kompakthjullager, med eller utan låsring. Verktyget
Anvisning för Guide for
 Anvisning för Guide for PRISMA SENSOR 1 96243235zPC Montering i tak/installation in the ceiling Byte av kupa/change of diffuser 2 Installation Installation från gavel / Installation from the end Installationskabel
BOW. Art.nr
 190412 BOW Art.nr 80000637-80000642 SE INNEHÅLL Komponenter 3 Produktfakta 3 Montering 4 Kontakt 8 EN CONTENTS Components 3 Product facts 3 Installation 4 Contact 8 KOMPONENTER COMPONENTS x 3 x 3 PRODUKTFAKTA
MCP-16RC, Air Purification
 Kompakt patronfilter med tryckstötsrensning. MCP-16RC Air Purification Tower är ett kompakt patronfilter för decentraliserad luftrening inomhus, där luft återåtervinning är möjlig. Den kompakta filterenheten
TYSKA, KORT LÄROKURS, skriftlig del
 TYSKA, KORT LÄROKURS, skriftlig del 3.10.2016 Innehållet i dessa exempel på fullpoängssvar är inte bindande vid studentexamensnämndens bedömning. Den slutgiltiga bedömningen fastställs av examensämnets
ARBETSBLAD KORTFILMSKLUBBEN TYSKA. Durch die Blumen (lätt) Ordkunskap Välj ut 10 av orden/fraserna nedan och sätt ihop en dialog på tyska!
 Ordkunskap Välj ut 10 av orden/fraserna nedan och sätt ihop en dialog på tyska!") ARBETSBLAD PEDAGOG: JOHAN POPPEN PROJEKTLEDARE: GABRIELLA THINSZ KORTFILMSKLUBBEN TYSKA Durch die Blumen (lätt) Ordkunskap Välj ut 10 av orden/fraserna nedan och sätt ihop en dialog på tyska! Deutsch etwas
ARBETSBLAD PEDAGOG: JOHAN POPPEN PROJEKTLEDARE: GABRIELLA THINSZ KORTFILMSKLUBBEN TYSKA Durch die Blumen (lätt) Ordkunskap Välj ut 10 av orden/fraserna nedan och sätt ihop en dialog på tyska! Deutsch etwas
F1220, F1230, F1120, F1130
 SIT SE/GB/DE 0608-1 M10382 F1220, F1230, F1120, F1130 SE GB DE SERVICEINSTRUKTION Pool SERVICE INSTRUCTION Pool SERVICEINSTRUKTION Pool NIBE AB - Villavärme Box 14, 285 21 Markaryd Tel 0433-73 000 Fax
FORTA M315. Installation. 218 mm.
 1 Installation 2 1 2 1 218 mm. 1 2 4 5 6 7 8 9 2 G, G0= Max 100 m 1.5 mm² (AWG 15) X1, MX, Y, VH, VC = Max 200 m 0.5 mm² (AWG 20) Y X1 MX VH VC G1 G0 G 0 V 24 V~ IN 0-10 0-5, 2-6 60 s OP O 1 2 4 5 6 7
BEAM. Product Manual Produktmanual
 BEAM Product Manual Produktmanual BEAM Technical Specifications Tekniska Specifikationer Description Product number Mode Voltage Current Vehicle interface Cable length Encapsulation Operating temperature
säkerhetsutrustning / SAFETY EQUIPMENT
 säkerhetsutrustning / SAFETY EQUIPMENT Hastighetsvakt / Speed monitor Kellves hastighetsvakter används för att stoppa bandtransportören när dess hastighet sjunker under beräknade minimihastigheten. Kellve
TEXTURED EASY LOCK BLOCK INSTALLATION GUIDE. australianpaving.com.au
 TEXTURED EASY LOCK BLOCK INSTALLATION GUIDE 1800 191 131 australianpaving.com.au TEXTURED EASY LOCK BLOCK The Textured Easy Lock Block retaining wall system is the premium retaining wall product for near
Arctic. Design by Rolf Fransson
 Arctic Design by Rolf Fransson 2 Endless possibilities of combinations. Oändliga kombinationsmöjligheter. 3 4 5 If you are looking for a range of storage furniture which limits of combination is set by
Einstufungstest Välkomna! Aufgabenblätter
 Einstufungstest Välkomna! Aufgabenblätter Mit Hilfe dieser Bögen können Sie jetzt in einen Schwedischkurs eingestuft werden, der Ihrem Kenntnisstand entspricht. Zum Einstufungstest gehören Aufgabenblätter
ENN2812BOW... DE KÜHL - GEFRIERSCHRANK BENUTZERINFORMATION 2 SV KYL-FRYS BRUKSANVISNING 22
 ENN2812BOW...... DE KÜHL - GEFRIERSCHRANK BENUTZERINFORMATION 2 SV KYL-FRYS BRUKSANVISNING 22 2 www.electrolux.com INHALT 1. SICHERHEITSHINWEISE.................................................. 3 2. BETRIEB...............................................................
Plain A262. För T16 (T5) lysrör. Innehåll. Monteringsanvisning. A. Instruktion för rampmontering
 lysrör. Innehåll. Monteringsanvisning. A. Instruktion för rampmontering") Plain A262 För T16 (T5) lysrör Innehåll Ramparmatur: ändmodul En stängd gavel/ en öppen gavel Plint i båda ändarna Överkopplingssladd 1 rampgavel 1 lysrörsbytare Ramparmatur: mellanmodul Plint i en ände
Plain A262 För T16 (T5) lysrör Innehåll Ramparmatur: ändmodul En stängd gavel/ en öppen gavel Plint i båda ändarna Överkopplingssladd 1 rampgavel 1 lysrörsbytare Ramparmatur: mellanmodul Plint i en ände
Accepterad monteringsanvisning 2016:1. Metris (RSK: ) Metris S (RSK: ) Metris (RSK: )
 Metris S (RSK: ) Metris (RSK: )") EN Table of contents 1 Instructions for use / assembly instructions 2 Assembly 4-5 Adjustment 6 Operation 7 Dimensions 8-9 Flow diagram 8-9 Spare parts 10-12 Cleaning 13 Test certificate 14 Contact information
EN Table of contents 1 Instructions for use / assembly instructions 2 Assembly 4-5 Adjustment 6 Operation 7 Dimensions 8-9 Flow diagram 8-9 Spare parts 10-12 Cleaning 13 Test certificate 14 Contact information
UV-C TECH 16 WATT 40 WATT 75 WATT 130 WATT AMALGAM. UV-C and Pool equipment MEMBER OF:
 UV-C TECH UV-C and Pool equipment 16 WATT 40 WATT 75 WATT 130 WATT AMALGAM MEMBER OF: 2 BLUE LAGOON UV-C TECH UV-C and Pool equipment MANUAL BLUE LAGOON UV-C TECH BLUE LAGOON UV-C TECH EN 6-8 BLUE LAGOON
(SV) Installationsmanual för duschkabiner och ångbastukabiner (EN) Installation manual for shower cabins and steam cabins
 Installationsmanual för duschkabiner och ångbastukabiner (EN) Installation manual for shower cabins and steam cabins") Arrow Skandinavien AB Tel: +46 (0)31 330 00 10 www.arrowshower.com (SV) Installationsmanual för duschkabiner och ångbastukabiner (EN) Installation manual for shower cabins and steam cabins 6004 6005 6006
Arrow Skandinavien AB Tel: +46 (0)31 330 00 10 www.arrowshower.com (SV) Installationsmanual för duschkabiner och ångbastukabiner (EN) Installation manual for shower cabins and steam cabins 6004 6005 6006
Users manual Bruksanvisning Gebrauchanweisung Guide d instructions
 Multi-pressure bucket pump Bärbar fettpump hochdruck abschmierpumpe distributeur manuel de graisse Users manual Bruksanvisning Gebrauchanweisung Guide d instructions 11018-1 - 815850 R02/03 IMPORTANT:
Allaskaappi Asennusohje. Sink cabinet Assembly instruction. Skab til vask Monteringsvejledning. tvättställsskåp Monteringsanvisning
 GB IE Sink cabinet Assembly instruction FI Allaskaappi Asennusohje SE tvättställsskåp Monteringsanvisning DK Skab til vask Monteringsvejledning DE AT Waschbeckenschrank Montageanleitung CH / 9 0.. / 9
INDUKTIV SLINGDETEKTOR INDUCTIVE LOOP DETECTOR
 INDUKTIV SLINGDETEKTOR INDUCTIVE LOOP DETECTOR Slingdetektorn används som ett alternativ till mekaniska gränslägen, momentbrytare eller annat gränsläge i gödselrännor. Detektorn är kopplad till en trådslinga
VARIOBARRIER S/M MIMSAFE BY CHOICE
 VAROBARRR S/M MMSA BY CHOC K L A B D M C H A B C D 522 K 524 Right leg Right leg 514L 514R 510L 510R L 526L M 526R S508 S509 521 6X 521 + H 527 529 528 8X/1 18X 8X/1 M-460641AL M-SM6X14A M-460641B M-M37202_2014
VASSVIK ROCKING STAND
 VASSVIK ROCKING STAND SE / ENG SE VIKTIGT Läs noga igenom instruktionerna före användning och spar dessa för framtida bruk. VARNING: Barnets huvud bör inte ligga lägre än barnets kropp. Lägg inte till
The thermostatic head must be mounted in a horizontal position.
 EN INSTRUCTION Installation The thermostatic head must be mounted in a horizontal position. 2. Turn the knob to position (fully closed). 3. The thermostatic head is now fixed to the valve and can be adjusted
SkillGuide. Bruksanvisning. Svenska
 SkillGuide Bruksanvisning Svenska SkillGuide SkillGuide är en apparat utformad för att ge summativ återkoppling i realtid om hjärt- och lungräddning. www.laerdal.com Medföljande delar SkillGuide och bruksanvisning.
BATH MIXER 160 LINC 21. incl. HAND SHOWER. inr.se
 LINC 21 BATH MIXER 150 BATH MIXER 160 incl. HAND SHOWER 110309 inr.se Innan montering Vi förordar en sakkunnig VVS-installatör vid installation och service. Ledningarna ska renspolas innan installation.
 INSTALLATION INSTRUCTIONS Accessory S P/N 08E12-SZT-100 Application CR-Z Publications No. Issue Date SEP PARTS LIST Left illuminated door sill trim Right illuminated door sill trim Illumination harness
94 Planungshandbuch Raumheizung
 Badheizkörper Thermocon bhe / BHC 9 Planungshandbuch Raumheizung www.stiebel-eltron.de Badheizkörper Thermocon BHE Produktbeschreibung Die Bad-/Handtuch-Heizkörper BHE thermocon sind elektrische Direktheizgeräte.
Shower cabins / Steam cabins
 Installation manual for Shower cabins / Steam cabins Arrow Skandinavien AB Tel: +46 (0)31 330 00 10 www.arrowshower.com Models: 6030 6130 2 3 (SE) Lås upp brunnen. (UK) Unlock. 4 (SE) På karets undersida,
Scala DESIGN RUUD EKSTRAND
 Scala DESIGN RUUD EKSTRAND Scala Scala, design Ruud Ekstrand är en miljöskärm i trä för offentliga miljöer. Klara former och ett brett materialval gör Scala till en flexibel rumsavskiljare i många inredningar.
BERG AeroWall 2x2. User manual Gebruikshandleiding Gebrauchsanweisung Mode d emploi Instruktionsbok Brugermanual. Sheetnr.: Rev.
 User manual Gebruikshandleiding Gebrauchsanweisung Mode d emploi Instruktionsbok Brugermanual Sheetnr.: 49.90.30.51 Rev. 1 Go to the BERG toys channel on for installation instruction video s www.youtube.com/bergtoys
Användarhandbok. MHL to HDMI Adapter IM750
 Användarhandbok MHL to HDMI Adapter IM750 Innehåll Inledning...3 MHL to HDMI Adapter-översikt...3 Komma igång...4 Smart Connect...4 Uppgradera Smart Connect...4 Använda MHL to HDMI Adapter...5 Ansluta
Monteringsanvisning Podie T 4100 K
 Monteringsanvisning Podie T 4100 K Monteringsanvisning Förbered fundamentet 1. Montera ställfötterna. Montera tvättmaskin SV 1. Fäst gaffelbeslagen i bakkant med brickor och skruv. OBS! Placera beslagen
Ringmaster RM3 - RM 5 RM3 RM 4 RM 5
 RM3 - RM 5 Ringmaster We offer ball pickers in 5 different sizes with a picking width of up to 6 m. RM3 - RM5 has a self-supporting chassis so that the collected balls do not place a load on the picking
Accepterad monteringsanvisning 2016:1. Focus (RSK: ) 1 (12)
 1 (12)") EN Table of contents 1 Instructions for use / assembly instructions 2 Assembly 4 Adjustment 5 Dimensions 6 Flow diagram 6 Operation 7 Spare parts 8 Cleaning 9 Test certificate 10 Contact information 12
EN Table of contents 1 Instructions for use / assembly instructions 2 Assembly 4 Adjustment 5 Dimensions 6 Flow diagram 6 Operation 7 Spare parts 8 Cleaning 9 Test certificate 10 Contact information 12
SOLAR LIGHT SOLUTION. Giving you the advantages of sunshine. Ningbo Green Light Energy Technology Co., Ltd.
 2017 SOLAR LIGHT SOLUTION Address:No.5,XingYeMiddleRoad,NingboFreeTradeZone,China Tel:+86-574-86812925 Fax:+86-574-86812905 Giving you the advantages of sunshine SalesServiceE-mail:sales@glenergy.cn Tech.ServiceE-mail:service@glenergy.cn
I got the idea for Frozzypack a cold January morning.
 Frozzypack produces and sells a unique lunchbox whit integrated cooling in the lid. Frozzypack was created by Carolina Sundberg who solved a problem she ran into in everyday life. Frozzypack tillverkar