Calypso F 150K, F 160K, F 170K
|
|
|
- Birgitta Isaksson
- för 9 år sedan
- Visningar:
Transkript
1 Calypso F 150K, F 160K, F 170K

2

3 SV Bästa kund! Tack för att du har valt denna förstklassiga köksfläkt tillverkad av Cylinda. Läs igenom denna bruksanvisning noga. Här finns viktig information som hjälper dig installera och använda köksfläkten korrekt, vilket i sin tur ger pålitlig drift i lång tid framöver. Symbolerna som används i bruksanvisningen betyder följande: Viktig information om korrekt användning av köksfläkten och om din säkerhet. Miljöinformation Modell ansluten till ventilationskanal Modell med kolfilter Läs igenom denna bruksanvisning noga innan du börjar använda köksfläkten! Denna bruksanvisning gäller följande produkter: Calypso E , E , E F 150K E F 160K E F 170K E Kåpans utseende kan skilja sig från illustrationerna i bruksanvisningen. Anvisningarna för användning, underhåll och installation är dock desamma för samtliga modeller. Följ noga anvisningarna. Vi frånsäger oss allt ansvar för eventuella problem, skador eller bränder till följd av att denna bruksanvisning inte har följts. Köksfläkten är endast avsedd för användning i privata hushåll. Spara denna bruksanvisning för framtida användning. Kom ihåg att låta bruksanvisningen medfölja köksfläkten i händelse av försäljning, överlåtelse eller flyttning. Läs noga igenom anvisningarna. De innehåller viktig information om installation, användning och säkerhet. Utför inte elektriska eller mekaniska ändringar på produkten eller utsuget. Observera: Delarna märkta med symbolen (*) är valfria tillbehör som endast ingår i leveransen av vissa modeller eller är delar som kan köpas till och inte ingår i leveransen. Se sidan 6 för teknisk ritning till din produkt. 3

4 SV Före installation Var försiktig VARNING! Anslut inte köksfläkten till elnätet förrän installation har slutförts. Bryt strömmen till köksfläkten före all form av rengöring eller underhåll genom att dra ur stickkontakten eller stänga av huvudbrytaren. Bär alltid arbetshandskar vid installation och underhåll. Denna köksfläkt är inte avsedd för användning av barn eller personer med nedsatt fysisk eller psykisk funktionsförmåga, eller som saknar erfarenhet och kunskap, såvida inte de övervakas eller har instruerats i användningen av köksfläkten av en person som ansvarar för deras säkerhet. Denna köksfläkt är avsedd att användas av vuxna. Barn bör hållas under uppsikt så att de inte leker med köksfläkten. Använd aldrig kåpan utan korrekt monterat galler! Kåpan får ALDRIG användas som avställnings-/stödyta om det inte anges särskilt. Lokalen där köksfläkten är installerad måste vara väl ventilerad om köksfläkten används tillsammans med spis och annan utrustning som drivs av gas eller annat bränsle. Köksfläktens ventilationskanal får inte vara anslutet till en ventilationssystem som används för annat ändamål, t.ex. skorstenskanal eller rökkanal. Undvik öppen eld och flambering under spiskåpan. Öppen eld förstör filtren och utgör en brandrisk och måste därför undvikas under alla omständigheter. 4

5 Mat som tillagas i matfett ska övervakas konstant så att matfettet inte överhettas och börjar brinna. Delar av kåpan kan bli varma vid användning av spisen. Följ alltid myndigheternas gällande tekniska föreskrifter och säkerhetsföreskrifter för utsläpp av förorenad luft. Kåpan måste rengöras regelbundet på både in- och utsidan (MINST EN GÅNG I MÅNADEN). Rengöringen ska utföras enligt underhållsanvisningarna i denna bruksanvisning. Underlåtelse att följa anvisningarna för rengöring av kåpan och filtren kan medföra brandrisk. Använd inte köksfläkten eller lämna den inte utan uppsikt om lampan inte är korrekt monterad. Annars finns det risk för elektriska stötar. Vi frånsäger oss allt ansvar för fel, skador och bränder orsakade av köksfläkten till följd av att bruksanvisningen inte har följts. Denna köksfläkt är märkt i enlighet med EU:s direktiv 2002/96/ EG om insamling och återvinning av elektriska och elektroniska produkter (WEEE). Genom att kassera köksfläkten korrekt förhindrar du eventuella negativa konsekvenser för miljön och människors hälsa, som annars kan uppstå vid felaktig avfallshantering av denna produkt. SV Symbolen på produkten, eller i dokumenten som medföljer produkten, betyder att denna produkt inte får slängas i de vanliga hushållssoporna utan ska lämnas in på en återvinningsstation för elektriska och elektroniska produkter. Kasseringen måste ske i enlighet med gällande föreskrifter för avfallshantering. Kontakta kommunen eller återförsäljaren för ytterligare information om insamling och återvinning av denna produkt. Härmed försäkrar tillverkaren att denna produkt överensstämmer med följande EU-direktiv: - lågspänningsdirektivet 2006/95/EG - direktivet om elektromagnetisk kompatibilitet 2004/108/EG 5

6 SV

7 SV
8 SV
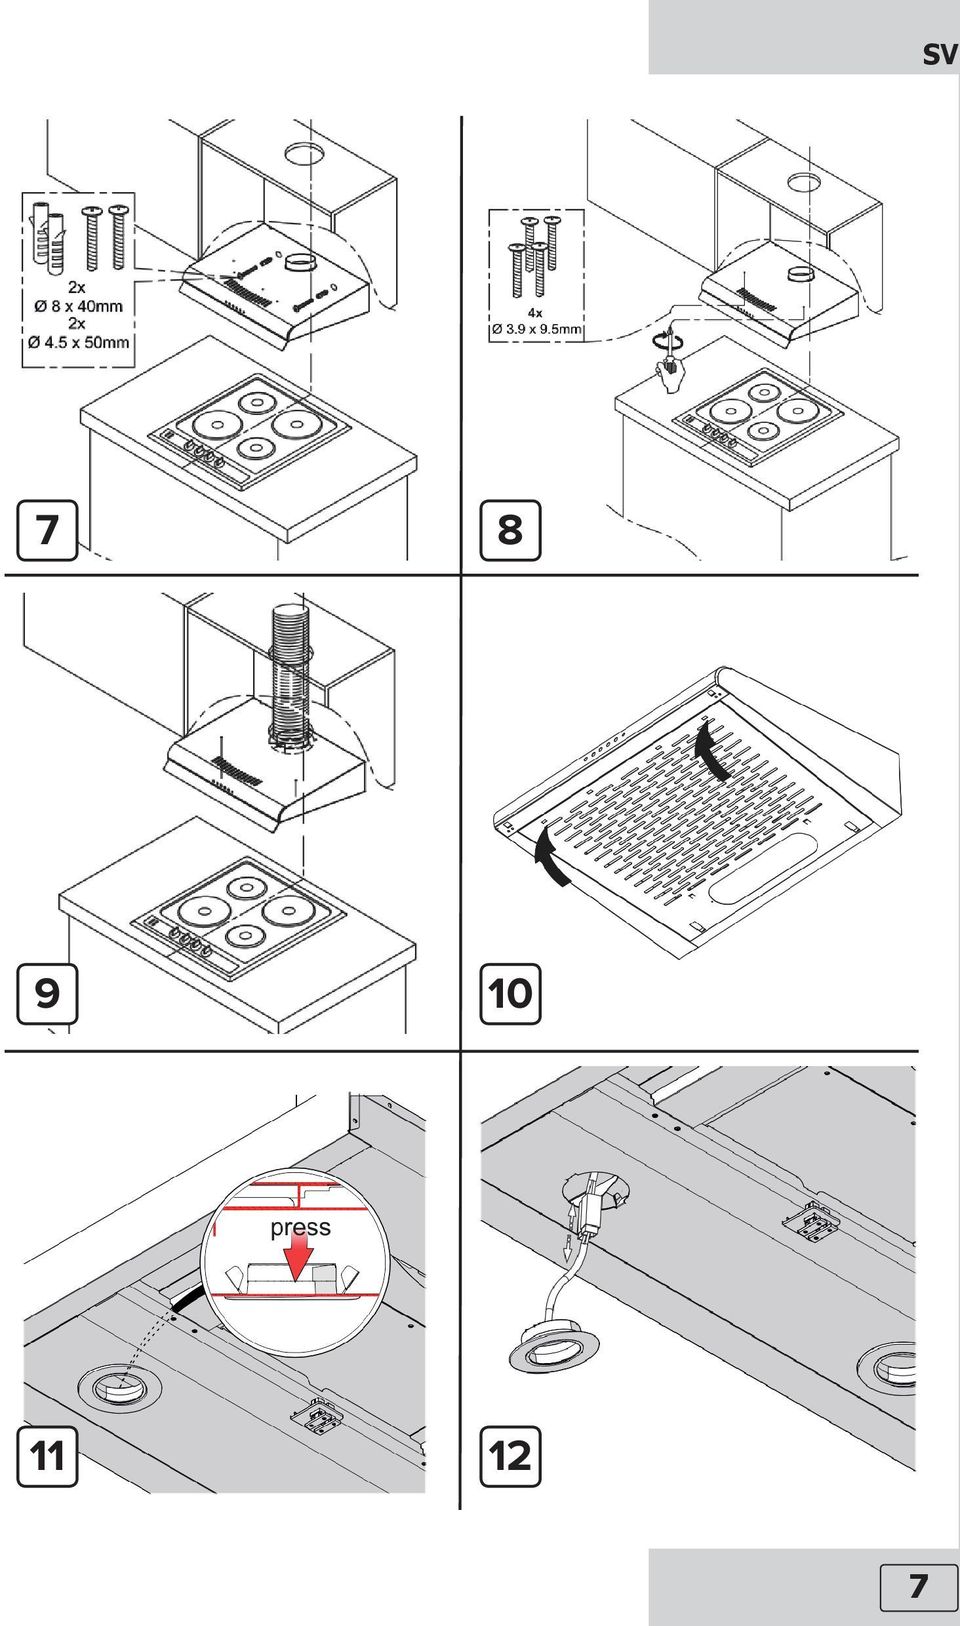
9 SV Minsta tillåtna avstånd från spishällen upp till köksfläktens nedersta del är 50 cm vid elspis och 65 cm vid gasspis eller kombinerad gas- och elspis. Om installationsanvisningarna för en gasspis anger ett större avstånd gäller det större avståndet. Installation Elanslutning Kontrollera att nätspänningen överensstämmer med den angivna spänningen på köksfläktens typskylt. Om köksfläkten är försedd med en stickkontakt ska den anslutas till ett eluttag som uppfyller gällande föreskrifter och som är lättåtkomligt. Om köksfläkten inte är försedd med en stickkontakt (anslutning direkt till elnätet), eller om eluttaget är svåråtkomligt efter installationen av köksfläkten, ska det installeras en tvåpolig brytare som fungerar som överströmsskydd och bryter strömmen i händelse av att gränsvärdena överskrids. Brytaren ska installeras i enlighet med anvisningarna. Varning! Kontrollera alltid att huvudkabeln är korrekt monterad innan du ansluter köksfläkten till elnätet och kontrollerar dess funktion. Köksfläkten är försedd med en specialkabel. Om kabeln är skadad, ska du skaffa en ny från vår tekniska avdelning. Expansionspluggar medföljer och med dem kan köksfläkten fästas i de flesta typer av väggar/tak. Dock bör en behörig installatör kontrollera att väggen/taket tål upphängning av en köksfläkt och klarar dess vikt. Kakla inte in eller foga köksfläkten mot väggen med cementbruk eller silikon. Endast utanpåliggande montering. Montering Denna köksfläkt är avsedd att anslutas till ventilationskanal eller användas med kolfilter (återcirkulation). Modellerna utan fläktmotor kan endast fungera om de är anslutna till en ventilationskanal och måste anslutas till ett externt utsug (ingår ej i leveransen). Anslutningsanvisning medföljer det externa utsuget. Användning 9

10 SV Modell ansluten till ventilationskanal På modeller anslutna till ventilationskanal leds osen från spisen ut i det fria via ett särskilt rör anslutet ovanpå kåpan med en fläns. Observera! Utblåsröret ingår inte i leveransen utan måste köpas separat. Utblåsrörets diameter måste vara densamma som flänsens. När utblåsröret dras horisontellt måste det ha en lätt lutning (ca 10 ) uppåt för att luften lätt ska ledas ut ur rummet. Observera! Om köksfläkten är försedd med ett aktivt kolfilter måste det tas bort. Anslut köksfläkten till ventilationshålet i väggen med en anslutningsfläns med en diameter som passar luftutloppet. Rör och ventilationshål i väggen med mindre diameter försämrar fläktens prestanda och ökar bullret avsevärt. Vi frånsäger oss allt ansvar för problem och fel som uppstår vid användning av felaktiga diametrar. Använd kortast möjliga kanal. Använd en kanal med så få böjar som möjligt (maximal vinkel på böj: 90 ). Undvik drastiska ändringar av kanalens tvärsnitt. Använd en kanal som är så slät som möjligt på insidan. Kanalen måste vara tillverkad av certifierat material. Modell med kolfilter Den här modellen suger in luften från köket, filtrerar den och skickar sedan ut luften i köket igen. För att köksfläkten ska fungera korrekt måste ett filter (eller flera filter) installeras. Filtret innehåller aktivt kol som renar luften och kan köpas hos närmaste återförsäljare. Filtret filtrerar bort fett och os från luften innan den skickas tillbaka ut i köket via gallret upptill. Drift Köksfläkten styrs via manöverpanelen. Manöverpanelens utseende varierar beroende på vilken modell du har köpt. 10

11 SV 1. Diod (finns endast på vissa modeller) lyser om köksfläkten är igång. 2. Stänger av köksfläkten oavsett hastighet. 3. Hastighetsinställningar 1 låg hastighet, 2 medelhastighet, 3 hög hastighet. 4. Knapp för tändning/släckning av lampor. OBSERVERA! Före all form av underhåll ska strömmen till köksfläkten brytas via huvudbrytaren och säkringen ska tas ur. Om köksfläkten är ansluten till elnätet via stickkontakt och eluttag måste kontakten dras ur uttaget. Underhåll Rengör spiskåpan regelbundet (minst lika ofta som du rengör fettfiltren) både in- och utvändigt. Använd en fuktad mjuk trasa med lite neutralt rengöringsmedel. Använd inte repande medel. ANVÄND INTE ALKOHOL VARNING: Om spiskåpan inte rengörs enligt anvisningarna och fettfiltren inte byts ut finns det risk för brand. Därför rekommenderar vi att du följer dessa anvisningar. Tillverkaren frånsäger sig allt ansvar för skador på motorn eller brandskador orsakade av bristfälligt underhåll eller underlåtelse att följa ovanstående säkerhetsåtgärder. Rengöring Fångar in fettpartiklar från matlagningen. Fettfiltret måste rengöras en gång i månaden (eller när indikeringslampan för mättat filter tänds om din fläktmodell är försedd med denna funktion). Diska filtret för hand eller i diskmaskin (med låg vattentemperatur och kort diskcykel) och använd endast milt diskmedel. Om filtret maskindiskas kan det bli lätt missfärgat, men det påverkar inte dess filtreringsförmåga. Lossa filtret genom att dra i snäpplåset. Fettfilter 11
 både in- och utvändigt. Använd en fuktad mjuk trasa med lite neutralt rengöringsmedel. Använd inte repande medel.")
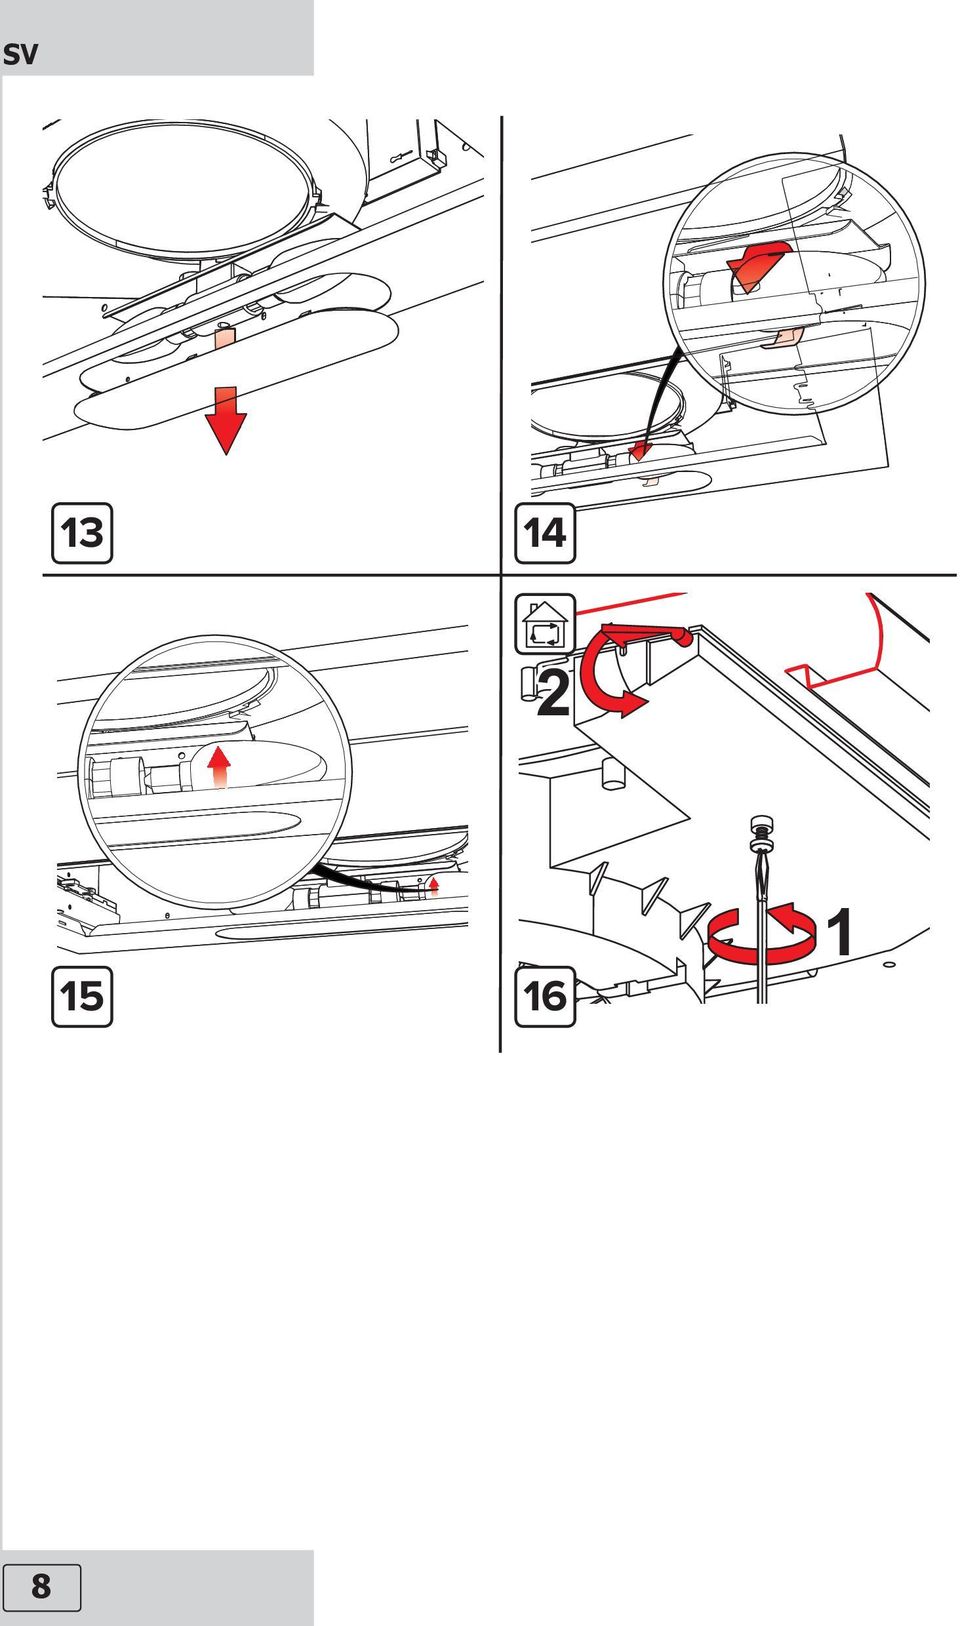
12 SV Cirkulationsläge Med denna inställning släpps filtrerad luft tillbaka in i rummet genom öppningar i kåpan. I detta läge måste kolfilter användas, se instruktion 16 på sida 8: 1. Fläkten är inställd på cirkulations läge (skruven måste lossas). 2. Följande inställningar måste vara utförda för cirkulationsläget: Ta bort det nedre metallhöljet genom att skifta plastreglagen. Öppna upp fläktens främre luftöppning genom att ställa reglaget i nedersta läget. Montera kolfiltret. Montera tillbaka det nedre metallhöljet. Anslut fläkten till vägguttaget. Byte av lampor Calypsomodellerna är försedda med 2 x 20 W-halogenlampor. Byte av lampor: se sidan 7, figurerna Ta bort kåpan och tryck sedan ner lampan uppifrån. Ta emot lampan underifrån med den andra handen. Koppla ur hela enheten och byt ut den mot en ny. Upprepa momenten i omvänd ordningsföljd för att sätta i den nya lampan. Modellerna i F-serien är försedda med en 28 W-halogenlampa. Byte av lampa: se sidan 8, figurerna Ta bort aluminiumfiltren. Ta bort den trasiga lampan och sätt i en ny. Använd en bit tyg eller hushållspapper för att hålla i lampan. Sätt tillbaka aluminiumfiltren. VIKTIGT! Använd alltid samma typ av lampa som installerats av tillverkaren. Om du är osäker på vilken typ av lampa det ska vara, kan du kontakta närmaste återförsäljare av Cylinda. 12

13 EN Dear Customer, Thank you for choosing this high quality cooker hood made by Cylinda. Please read this manual carefully. In it you will find important information that will help you to install and use this appliance in a proper manner resulting in long-term reliable operation of the device. Symbols appearing in these instructions have the following meaning: Important information concerning proper operation of the appliance and your personal safety. Information on how to protect the environment. Ducting version Filter version Before using the appliance, please carefully read this manual! This manual applies to the following products: Calypso E , E , E F 150K E F 160K E F 170K E The hood can look different to that illustrated in the drawings in this booklet. The instructions for use, maintenance and installation, however, remain the same. Closely follow the instructions set out in this manual. All responsibility, for any eventual inconveniences, damages or fires caused by not complying with the instructions in this manual, is declined. The extractor hood has been designed exclusively for domestic use. It is important to conserve this booklet for reference at any moment. In case of sale, cession or move, make sure it is together with the product. Read the instructions carefully: there is important information about installation, use and safety. Do not carry out electrical or mechanical variations on the product or on the discharge conduits. Note: the elements marked with the symbol (*) are optional accessories supplied only with some models or elements to purchase, not supplied. For technical drawings please turn to page 6 to find your product 13

14 EN Before the installation Caution WARNING! Do not connect the appliance to the mains until the installation is fully complete. Before any cleaning or maintenance operation, disconnect the device from the power supply by removing the plug or switching off the power circuit. Always wear work gloves for all installation and maintenance operations. The appliance is not intended for use by children or persons with impaired physical, sensorial or mental abilities, or if lacking in experience or knowledge, unless they are under supervision or have been trained in the use of the appliance by a person responsible for their safety. This appliance is designed to be operated by adults, children should be monitored to ensure that they do not play with the appliance. Never use the hood without effectively mounted grating! The hood must NEVER be used as a support surface unless specifically indicated. The premises where the appliance is installed must be sufficiently ventilated when the kitchen hood is used together with other gas combustion devices or other fuels. The ducting system for this appliance must not be connected to any existing ventilation system which is being used for any other purpose such as discharging exhaust fumes from appliances burning gas or other fuels. The flaming of foods beneath the hood itself is strictly prohibited. The use of exposed flames is detrimental to the filters and may cause a fire risk, and 14

15 must therefore be avoided in all circumstances. Any frying must be done with care in order to make sure that the oil does not overheat and ignite. Accessible parts of the hood may became hot when used with the cooking appliance. With regards to the technical and safety measures to be adopted for fume discharging it is important to closely follow the regulations provided by the local authorities. The hood must be regularly cleaned both on the inside and outside (AT LEAST ONCE A MONTH). This must be completed in accordance with the maintenance instructions provided in this manual. Failure to follow the instructions provided in this user guide regarding the cleaning of the hood and filters will lead to the risk of fires. Do not use or leave the hood without the lamp correctly mounted due to the possible risk of electric shocks. We will not accept any responsibility for any faults, damage or fires caused to the appliance as a result of the non observance of the instructions included in this manual. This appliance is marked according to the European directive 2002/96/EC on Waste Electrical and Electronic Equipment (WEEE). By ensuring this product is disposed of correctly, you will help prevent potential negative consequences for the environment and human health, which could otherwise be caused by inappropriate waste handling of this product. EN The symbol on the product, or on the documents accompanying the product, indicates that this appliance may not be treated as household waste. Instead it should be taken to the appropriate collection point for the recycling of electrical and electronic equipment. Disposal must be carried out in accordance with local environmental regulations for waste disposal. For further detailed information regarding the process, collection and recycling of this product, please contact the appropriate department of your local authorities or the local department for household waste or the shop where you purchased this product. The manufacturer hereby declares that the appliance fulfills the requirements of the following European Directives: - Low Voltage Directive 2006/95/EC - Electromagnetic Compatibility Directive 2004/108/EC This device is marked with mark and the appropriate declaration of conformity is available to the market supervising authorities. 15
. This must be completed in accordance with the maintenance instructions provided in this manual.")
16 EN

17 EN

18 EN

19 EN The minimum distance between the supporting surface for the cooking equipment on the hob and the lowest part of the range hood must not be less than 50cm from electric cookers and 65cm from gas or mixed cookers. If the instructions for installation for the gas hob specify a greater distance, this must be adhered to. Installation Electrical connection The mains power supply must correspond to the rating indicated on the plate located inside the hood. If provided with a plug connect the hood to a socket which is in compliance with current regulations and located in an easily accessible area. If it is not fitted with a plug (direct mains connection) or if after installation the plug is not located in an accessible area, apply a double pole switch in accordance with standards which assures the complete disconnection of the mains under conditions relating to over-current category III, in accordance with installation instructions. Warning! Before re-connecting the hood circuit to the mains supply and checking the efficient function, always check that the mains cable is correctly assembled. The hood is provided with a special power cable; if the cable is damaged, request a new one from Technical Service. Expansion wall plugs are provided to secure the hood to most types of walls/ceilings. However, a qualified technician must verify suitability of the materials in accordance with the type of wall/ceiling. The wall/ceiling must be strong enough to take the weight of the hood. Do not tile, grout or silicone this appliance to the wall. Surface mounting only. Mounting This appliance is designed to be used either for exhausting or filter version. The models with no suction motor only operate in ducting mode, and must be connected to an external suction device (not supplied). The connecting instructions are supplied with the peripheral suction unit. Use 19

20 EN Ducting version In this case the fumes are conveyed outside of the building by means of a special pipe connected with the connection ring located on top of the hood. Attention! The exhausting pipe is not supplied and must be purchased separately. Diameter of the exhausting pipe must be equal to that of the connection ring. In the horizontal runs the exhausting pipe must be slightly slanted (about 10 ) and directed upwards to vent the air easily from the room to the outside. Attention! If the hood is supplied with active charcoal filter, then it must be removed. Connect the hood and discharge holes on the walls with a diameter equivalent to the air outlet (connection flange). Using the tubes and discharge holes on walls with smaller dimensions will cause a diminution of the suction performance and a drastic increase in noise. Any responsibility in the matter is therefore declined. Use a duct of the minimum indispensible length. Use a duct with as few elbows as possible (maximum elbow angle: 90 ). Avoid drastic changes in the duct cross-section. Use a duct with an as smooth as possible inside. The duct must be made of certified material. Filter version In this work mode the hood extracts and cleans the air from the kitchen and after that the air is sent back to the room. In order for the device to work properly an additional filter (or filters) must be installed. The filter utilizes active charcoal for air purification and can be obtained from your nearest retailer. The filter removes the grease and smells from the extracted air before sending it back into the room through the upper outlet grid. Operation The cooker hood is operated by mechanical buttons. 20
.")
21 EN 1. Diode (available in selected models only) - indicates if the appliance is in operation. 2. Switches off the appliance from any speed. 3. Avaiable speed settings, 1 - low speed, 2 - medium speed, 3 - high speed. 4. Light on/off switch. ATTENTION! Before performing any maintenance operation, disconnect the hood from the electrical supply by switching off at the connector and removing the connector fuse. Alternatively if the appliance has been connected through a plug and socket, then the plug must be removed from the socket. Maintenance The cooker hood should be cleaned regularly (at least with the same frequency with which you carry out maintenance of the fat filters) internally and externally. Clean using the cloth dampened with neutral liquid detergent. Do not use abrasive products. DO NOT USE ALCOHOL! WARNING: Failure to carry out the basic cleaning recommendations of the cooker hood and replacement of the filters may cause fire risks. Therefore, we recommend observing these instructions. The manufacturer declines all responsibility for any damage to the motor or any fire damage linked to inappropriate maintenance or failure to observe the above safety recommendations. Cleaning 21
22 EN Grease filter Traps cooking grease particles. This must be cleaned once a month using non aggressive detergents, either by hand or in the dishwasher, which must be set to a low temperature and a short cycle. When washed in a dishwasher, the grease filter may discolour slightly, but this does not affect its filtering ability. To remove the grease filter, pull the spring release handle Re-circulation mode In this option filtered air returns to the room through openings in the front of the hood. In this setting it is necessary to install the carbon filter. Refer to the drawing 16 on page 18: 1. The cooker hood is implicitly set to the the re-circulation mode (the bolt is screwed up). 2. The following adjustment must be made for the re-circulation mode: By shifting the plastic stoppers, demount the appliance s bottom metal cover. By tilting the clack into the bottom limit position, open the air output in the appliance upper front section. Remount the appliance s bottom metal cover. Place the fat retention (or also the carbon) filter. Plug the supply cable into the wall outlet Replacing lamps The Calypso models are equipped with 2 x 20W halogen lights. To replace the lamps refer to the drawings 10 through 12 on page 7. Remove the decorative bottom cover then using your hand push the lighting downwards. Grab the lighting with your other hand. Disconnect the complete element and replace it with a new part. proceed in reverse order to finish the replacement of the lighting. The F-series models are equipped with a single 28W halogen bulb. To replace the bulb refer to the drawings 13 through 15 on page 8. Remove the aluminium filters, replace the bulb using a piece of cloth or paper and reinstall the aluminium filters. IMPORTANT Always use the lighting of the same type as installed by the manufacturer. If you are not sure which part to use contact your nearest Cylinda dealer. 22
23 EN Namn Name Tekniska ritningar Technical drawings Calypso K 50, 60, F 150K, F 160K 25 F 170K 26 23
24 24
25 25
26
27
28
Apollo Trend, Astro Trend, Nova Trend Sirius Trend, Classic Trend
 Apollo Trend, Astro Trend, Nova Trend Sirius Trend, Classic Trend SV Bästa kund! Tack för att du har valt denna förstklassiga köksfläkt tillverkad av Cylinda. Läs igenom denna bruksanvisning noga. Här
Stella Trend, Triton Trend Thea Trend, Nova Trend
 Stella Trend, Triton Trend Thea Trend, Nova Trend Bästa kund! Tack för att du har valt denna förstklassiga köksfläkt tillverkad av Cylinda. Läs igenom denna bruksanvisning noga. Här finns viktig information
ARC 32. Tvättställsblandare/Basin Mixer. inr.se
 ARC 32 Tvättställsblandare/Basin Mixer inr.se SE Användning och skötsel Manualen är en del av produkten. Bevara den under hela produktens livscykel. Vi rekommenderar er att noggrant läsa igenom manualen
Classic Trend, Stella Trend Triton Trend, Thea Trend Nova Trend, Pollux Trend
 Classic Trend, Stella Trend Triton Trend, Thea Trend Nova Trend, Pollux Trend Bästa kund! Tack för att du har valt denna förstklassiga köksfläkt tillverkad av Cylinda. Läs igenom denna bruksanvisning
Instruction Manual. Svenska, English. Power Bank. Model: PRBN
 Instruction Manual Svenska, English Power Bank Model: PRBN Innehåll / Content Innehåll Säkerhetsföreskrifter... 4 Delar... 5 Specifikationer... 6 Miljö / Lag och säkerhet / Förbehåll... 7 Content Safety
SAFETY PRECAUTIONS SPECIFICATIONS
 SAFETY PRECAUTIONS Read the instructions carefully before use and save them for future reference. Before you connect the appliance: Ensure that the voltage rating on the type plate corresponds to your
Spotlight Set Spotlightset / Spotlightsett
 Manual / Bruksanvisning / Bruksanvisning Spotlight Set Spotlightset / Spotlightsett ENG SE NO Item. No/Art. nr./art. nr. 995-9 ENG Thank you for choosing to purchase a product from Rusta! Read through
IMPORTANT! RETAIN FOR FUTURE REFERENCE PLEASE READ CAREFULLY VIKTIGT! BEHÅLL FÖR FRAMTIDA REFERENS LÄS IGENOM INSTRUKTIONSMANUALEN
 Heart & Stripes Junior Bed Instructions Manual Instruktions Manual IMPORTANT! RETAIN FOR FUTURE REFERENCE PLEASE READ CAREFULLY VIKTIGT! BEHÅLL FÖR FRAMTIDA REFERENS LÄS IGENOM INSTRUKTIONSMANUALEN Thank
Plain A262. För T16 (T5) lysrör. Innehåll. Monteringsanvisning. A. Instruktion för rampmontering
 lysrör. Innehåll. Monteringsanvisning. A. Instruktion för rampmontering") Plain A262 För T16 (T5) lysrör Innehåll Ramparmatur: ändmodul En stängd gavel/ en öppen gavel Plint i båda ändarna Överkopplingssladd 1 rampgavel 1 lysrörsbytare Ramparmatur: mellanmodul Plint i en ände
Plain A262 För T16 (T5) lysrör Innehåll Ramparmatur: ändmodul En stängd gavel/ en öppen gavel Plint i båda ändarna Överkopplingssladd 1 rampgavel 1 lysrörsbytare Ramparmatur: mellanmodul Plint i en ände
SAFETY PRECAUTIONS SPECIFICATIONS
 SAFETY PRECAUTIONS Read the instructions carefully before use and save them for future reference. Before you connect the appliance: Ensure that the voltage rating on the type plate corresponds to your
Windlass Control Panel v1.0.1
 SIDE-POWER Windlass Systems 86-08950 Windlass Control Panel v1.0.1 EN Installation manual Behåll denna manual ombord! S Installations manual SLEIPNER AB Kilegatan 1 452 33 Strömstad Sverige Tel: +46 525
VASSVIK FIXED STAND SE / ENG
 VASSVIK FIXED STAND SE / ENG SE VIKTIGT Läs noga igenom instruktionerna före användning och spar dessa för framtida bruk. VARNING: Barnets huvud bör inte ligga lägre än barnets kropp. Lägg inte till ytterligare
IMPORTANT! RETAIN FOR FUTURE REFERENCE PLEASE READ CAREFULLY VIKTIGT! BEHÅLL FÖR FRAMTIDA REFERENSLÄS IGENOM INSTRUKTIONSMANUALEN NOGGRANT
 13060 Basic Cot One Instruction Manual Instruktion Manual IMPORTANT! RETAIN FOR FUTURE REFERENCE PLEASE READ CAREFULLY VIKTIGT! BEHÅLL FÖR FRAMTIDA REFERENSLÄS IGENOM INSTRUKTIONSMANUALEN NOGGRANT Thank
SkillGuide. Bruksanvisning. Svenska
 SkillGuide Bruksanvisning Svenska SkillGuide SkillGuide är en apparat utformad för att ge summativ återkoppling i realtid om hjärt- och lungräddning. www.laerdal.com Medföljande delar SkillGuide och bruksanvisning.
Nathi Skötbord Changing unit Table à langer murale Wickeltisch Verschoontafel Puslebord Cambiador de pared Přebalovací pult Fasciatoio
 Nathi Skötbord Changing unit Table à langer murale Wickeltisch Verschoontafel Puslebord Cambiador de pared Přebalovací pult Fasciatoio Пеленальный стол Tested and approved according to SS-EN 12221:2008+A1_2013
SAFETY PRECAUTIONS SPECIFICATIONS
 SAFETY PRECAUTIONS Read the instructions carefully before use and save them for future reference. Before you connect the appliance: Ensure that the voltage rating on the type plate corresponds to your
LINC 23. Tvättställsblandare/Basin Mixer. inr.se 130226A
 LINC 23 Tvättställsblandare/Basin Mixer 130226A inr.se S Användande och skötsel Manualen är en del av produkten. Bevara den under hela produktens livscykel. Vi rekommenderar att noggrant läsa igenom manualen
Installation Instructions
 Installation Instructions (Cat. No. 1794-IE8 Series B) This module mounts on a 1794 terminal base unit. 1. Rotate keyswitch (1) on terminal base unit (2) clockwise to position 3 as required for this type
Spiskåpa till aggregat Smarty 2R Cooker hood for Smarty 2R unit
 Spiskåpa till aggregat Smarty 2R Cooker hood for Smarty 2R unit SV Bruksanvisning Säkerhetsföreskrifter... 3 Installation... 4 Användning... 5 Service och garanti... 6 EN Operating instructions Safety
BRUKSANVISNING Nova Trend
 BRUKSANVISNING Nova Trend INNEHÅLLSFÖRTECKNING I Generella upplysningar II Delar III Tekniska data IV Driftsvillkor V Montering 1. Montering av väggbeslag 2. Montering av spiskåpa 3. Anslutning till elnätet
Beijer Electronics AB 2000, MA00336A, 2000-12
 Demonstration driver English Svenska Beijer Electronics AB 2000, MA00336A, 2000-12 Beijer Electronics AB reserves the right to change information in this manual without prior notice. All examples in this
Monteringsanvisning Nödutrymningsbeslag ASSA 179E
 Monteringsanvisning Nödutrymningsbeslag ASSA 179E Denna monteringsanvisning avser nödutrymningsbeslag ASSA 179E med artikelnummer 364371 i kombination med låshus Abloy EL580 med artikelnummer EL580100011.
SAFETY PRECAUTIONS SPECIFICATIONS
 SAFETY PRECAUTIONS Read the instructions carefully before use and save them for future reference. Before you connect the appliance: Ensure that the voltage rating on the type plate corresponds to your
PRESS FÄLLKONSTRUKTION FOLDING INSTRUCTIONS
 PRESS FÄLLKONSTRUKTION FOLDING INSTRUCTIONS Vänd bordet upp och ner eller ställ det på långsidan. Tryck ner vid PRESS och fäll benen samtidigt. Om benen sitter i spänn tryck benen mot kortsidan före de
BBT057/ BBC057 BBCD057/ BBT057-NL HOLDEN COLORADO 9/2016+ HOLDEN TRAILBLAZER WD & 4WD Models
 INSTALLATION GUIDE BBT057/ BBC057 BBCD057/ BBT057-NL HOLDEN COLORADO 9/2016+ HOLDEN TRAILBLAZER 2017+ 2WD & 4WD Models Ironman 4x4 BBT/ BBC/ BBCD/BBT057-NL Bull Bars fit to a Holden Colorado 9/2016+ It
PRESS FÄLLKONSTRUKTION FOLDING INSTRUCTIONS
 PRESS FÄLLKONSTRUKTION FOLDING INSTRUCTIONS Vänd bordet upp och ner eller ställ det på långsidan. Tryck ner vid PRESS och fäll benen samtidigt. OBS! INGA STORA KRAFTER KRÄVS!! Om benen sitter i spänn tryck
INSTALLATION INSTRUCTIONS
 INSTALLATION - REEIVER INSTALLATION INSTRUTIONS RT0 RF WIRELESS ROOM THERMOSTAT AND REEIVER MOUNTING OF WALL MOUTING PLATE - Unscrew the screws under the - Pack contains... Installation - Receiver... Mounting
Dokumentnamn Order and safety regulations for Hässleholms Kretsloppscenter. Godkänd/ansvarig Gunilla Holmberg. Kretsloppscenter
 1(5) The speed through the entire area is 30 km/h, unless otherwise indicated. Beware of crossing vehicles! Traffic signs, guardrails and exclusions shall be observed and followed. Smoking is prohibited
Nov N a o vt a r e T n r d e n Ö d Ö
 Nova Trend Ö Ö BRUKSANVISNING Nova Trend Ö 3 INNEHÅLLSFÖRTECKNING I Generella upplysningar II Delar III Tekniska data IV Driftsvillkor V Montering 1. Montering av väggbeslag 2. Montering av spiskåpa 3.
INNEHÅLL. Din spisfläkt. Säkerhet. Användning. Underhåll. Installation. Bilaga. Beskrivning 4 Inledning 4
 INNEHÅLL Din spisfläkt Beskrivning 4 Inledning 4 Säkerhet Användning Underhåll Installation Försiktighetsåtgärder som du måste vidta 5 Utsugningssystem 6 Reglage 7 Rengöring 9 Fettfilter 10 Kolfilter 10
81152 TRANSFER CASE SHIFT HANDLE
 Installation Instructions for TRANSFER CASE SHIFT HANDLE for 2007 2018 JEEP JK WRANGLER 1 2 3 ITEM NO. PART NO. DESCRIPTION QTY. 1 4101359 SHIFT KNOB, JEEP WRANGLER JK, MOLDED 1 2 1794720 JAM NUT, 3/8
Remote control Fjärrströmbrytare / Fjernstrømbryter
 Manual / Bruksanvisning / Bruksanvisning Remote control Fjärrströmbrytare / Fjernstrømbryter ENG SE NO Item. No. 9220-1070 ENG Thank you for choosing to purchase a product from Rusta! Read through the
SVENSK STANDARD SS-ISO :2010/Amd 1:2010
 SVENSK STANDARD SS-ISO 14839-1:2010/Amd 1:2010 Fastställd/Approved: 2010-11-08 Publicerad/Published: 2010-11-30 Utgåva/Edition: 1 Språk/Language: engelska/english ICS: 01.040.17; 17.160 Vibration och stöt
BOW. Art.nr
 190412 BOW Art.nr 80000637-80000642 SE INNEHÅLL Komponenter 3 Produktfakta 3 Montering 4 Kontakt 8 EN CONTENTS Components 3 Product facts 3 Installation 4 Contact 8 KOMPONENTER COMPONENTS x 3 x 3 PRODUKTFAKTA
BATH MIXER 160 LINC 21. incl. HAND SHOWER. inr.se
 LINC 21 BATH MIXER 150 BATH MIXER 160 incl. HAND SHOWER 110309 inr.se Innan montering Vi förordar en sakkunnig VVS-installatör vid installation och service. Ledningarna ska renspolas innan installation.
Användarhandbok. MHL to HDMI Adapter IM750
 Användarhandbok MHL to HDMI Adapter IM750 Innehåll Inledning...3 MHL to HDMI Adapter-översikt...3 Komma igång...4 Smart Connect...4 Uppgradera Smart Connect...4 Använda MHL to HDMI Adapter...5 Ansluta
INSTALLATION, UNDERHÅLL OCH ANVÄNDNING AV KÖKSFLÄKT
 INSTALLATION, UNDERHÅLL OCH ANVÄNDNING AV KÖKSFLÄKT DU 85446 W SE - Instruktioner för montering och användning Följ noga instruktionerna i denna bruksanvisning. Tillverkaren tar inte ansvar för eventuella
BRUKSANVISNING. Designkapa. Nova Trend 90 EXTM
 Nova Trend 90 EXTM BRUKSANVISNING Designkapa Nova Trend 90 EXTM 2 INNEHÅLLSFÖRTECKNING I Generella upplysningar II Delar III Tekniska data IV Driftsvillkor V Montering 1. Montering av väggbeslag 2. Montering
manual Facial spa Art nr: 48682 Rubicson 2016-06-08
 manual Facial spa Art nr: 8682 EN NO SV 2016-06-08 Rubicson ENGLISH Overview Use Fill the container ENGLISH 1. Make sure that the power cord is not connected to a wall socket. 1 2 2. Remove the funnel
Your No. 1 Workout. MANUAL pro
 Your No. 1 Workout MANUAL pro Innehåll/Contents Svenska Viktigt om säkerhet Specifikationer & delar Rekommenderade övningar 3 5 6-7 2 English Safety instructions Specifications & parts Recommended exercises
GOLD SD 14-40. Med styrenhet/with control unit. Fläkt/ Fan. Utan filter/ Without filter. Fläkt/Fan. Fläkt/ Fan. Med filter/ With filter.
 GOLD SD 4-40 Med styrenhet/with control unit Skiss visar styrenhet för aggregat med inspektionssida vänster, styrenhet för aggregat med inspektionssida höger ser något annorlunda ut, men principen är lika./
Anvisning för Guide for
 Anvisning för Guide for PRISMA SENSOR 1 96243235zPC Montering i tak/installation in the ceiling Byte av kupa/change of diffuser 2 Installation Installation från gavel / Installation from the end Installationskabel
Om oss DET PERFEKTA KOMPLEMENTET THE PERFECT COMPLETION 04 EN BINZ ÄR PRECIS SÅ BRA SOM DU FÖRVÄNTAR DIG A BINZ IS JUST AS GOOD AS YOU THINK 05
 Om oss Vi på Binz är glada att du är intresserad av vårt support-system för begravningsbilar. Sedan mer än 75 år tillverkar vi specialfordon i Lorch för de flesta olika användningsändamål, och detta enligt
 BÄNKVÅG / BENCH SCALE Modell : SW-III / Model : SW-III ANVÄNDARMANUAL / USER MANUAL SW-III WWW.LIDEN-WEIGHING.SE 2014-03-26 OBS! Under vågen sitter en justerbar skruv (se bild). Standardinställning är
VASSVIK ROCKING STAND
 VASSVIK ROCKING STAND SE / ENG SE VIKTIGT Läs noga igenom instruktionerna före användning och spar dessa för framtida bruk. VARNING: Barnets huvud bör inte ligga lägre än barnets kropp. Lägg inte till
Montageanvisning Airway system 1000/1500 Assembly instruction Airway system 1000/1500
 S.Det är lämpligt att denna information överlämnas till användaren av anläggningen. GB. It is appropriate that this information is passed on to the user of the installation. D. Diese informationen sind
GOLD SD 50-80. Fläkt 2/ Fan 2. Fläkt 1/ Fan 1. Fläkt/ Fan. Utan filter/ Without filter. Fläkt 1/ Fan 1. Fläkt 2/ Fan 2. Med filter/ With filter Filter
 SE/G.ELSD5080.0803 GOLD SD 50-80 Med styrenhet/with control unit Skiss visar styrenhet för aggregat med inspektionssida vänster, styrenhet för aggregat med inspektionssida höger ser något annorlunda ut,
säkerhetsutrustning / SAFETY EQUIPMENT
 säkerhetsutrustning / SAFETY EQUIPMENT Hastighetsvakt / Speed monitor Kellves hastighetsvakter används för att stoppa bandtransportören när dess hastighet sjunker under beräknade minimihastigheten. Kellve
ASSEMBLY INSTRUCTIONS SCALE - SYSTEM
 ASSEMBLY INSTRUCTIONS 60 mm 00 mm 600 mm 000 mm R50 mm ALL COMPONENTS Metal profile 60 mm (start and end of system) Metal profile connection Wire Felt square Metal profile 00 mm Metal profile connection
Monteringsanvisning Installation instructions
 Monteringsanvisning Installation instructions TAKGENOMFÖRING med överbeslag TGÖ/THÖ och underbeslag TGU ROOF CURB with mounting plate TGÖ/THÖ and bottom fixing plate TGU Denna bruksanvisning omfattar följande
DECOR 810/830 PRODUKTENS DELAR PRODUKTENS DELAR. 1 - Inre skorstensdel 2 - Yttre skorstensdel 3 - Kontrollpanel 4 - Belysning 5 - Delad kantsugsplåt
 DECOR 810/830 PRODUKTENS DELAR PRODUKTENS DELAR 2 1 3 4 5 2 1 3 4 5 1 - Inre skorstensdel 2 - Yttre skorstensdel 3 - Kontrollpanel 4 - Belysning 5 - Delad kantsugsplåt 32 Svenska VARNINGAR OCH SÄKERHETSFÖRESKRIFTER
Libretto di Istruzioni Instructions Manual Manuel d Instructions Bedienungsanleitung Manual de instrucciones Manual de Instruções Gebruiksaanwijzing
 Libretto di Istruzioni Instructions Manual Manuel d Instructions Bedienungsanleitung Manual de instrucciones Manual de Instruções Gebruiksaanwijzing Bruksanvisning Руководство по эксплуатации 1700583
Support Manual HoistLocatel Electronic Locks
 Support Manual HoistLocatel Electronic Locks 1. S70, Create a Terminating Card for Cards Terminating Card 2. Select the card you want to block, look among Card No. Then click on the single arrow pointing
Libretto di Istruzioni Instructions Manual Manuel d Instructions Bedienungsanleitung Manual de instrucciones Manual de Instruções Gebruiksaanwijzing
 Libretto di Istruzioni Instructions Manual Manuel d Instructions Bedienungsanleitung Manual de instrucciones Manual de Instruções Gebruiksaanwijzing Bruksanvisning Руководство по эксплуатации SÄKERHETSFÖRESKRIFTER
InstalationGuide. English. MODEL:150NHighGain/30NMiniUSBAdapter
 miraclebox miraclewifi InstalationGuide English MODEL:150NHighGain/30NMiniUSBAdapter ENGLISH MIRACLE WIFI 150N & 300N USERMANUAL MIRACLEBOX.SE 1 ENGLISH Table of Contents Package Contents... 3 System Requirements
Får endast utföras av behörig personal. May only be carried out by authorized electrician
 Instruktion för DMIS Instruction for DMIS FLE400FC, FLE850MP, W3400H, W4400H/W4600H (-980/1287) W3850H/W31100H, W4850/W41100H (-1220/636) Clarus Control 471 1530-75 2016.05.04 Får endast utföras av behörig
English Svenska. Installation. Guide. XG6846 Broadband Switch
 Guide CE Declaration of Conformity For the following equipment: Ethernet Switch Product name: Hereby, Inteno Broadband Technology AB declares that the radio equipment type Ethernet Switch is in compliance
Contents / Innehållsförteckning
 Contents / Innehållsförteckning Copyright This manual is the copyright of CI no 55650-4137. No part of this manual may be revised, copied or transmitted in any way without written permission from CI no
IT Istruzioni di montaggio e d'uso EN Instruction on mounting and use FR Prescriptions de montage et mode d emploi DE Montage- und Gebrauchsanweisung
 IT Istruzioni di montaggio e d'uso EN Instruction on mounting and use FR Prescriptions de montage et mode d emploi DE Montage- und Gebrauchsanweisung PT Instruções para montagem e utilização ES Montaje
INKOPPLINGSANVISNING ELTRYCKSLÅS WIRING DIAGRAM SOLENOID LOCK
 INKOPPLINGSANVISNING ELTRYCKSLÅS WIRING DIAGRAM SOLENOID LOCK SE EN S. 2-4 P. 5-7 SL 510/511 SL 520/521 SL 530-50/531-50 2013 11 07 SE TEKNISK SPECIFIKATION Driftspänning. Ström. Reed relä. Drifttemperatur.
Verktyg som behövs. LX HD Sit-Stand Desk Mount LCD Arm SVENSKA. 20" (508 mm) 14-30 lbs (6.35-13.61 kg)
 14-30 lbs (6.35-13.61 kg)") ASSEMBLY INSTRUCTIONS LX HD Sit-Stand Desk Mount LCD Arm 14-30 lbs (6.35-13.61 kg) Maximal skärmstorlek * = 46 * Begränsat till max 30 lbs (13,61 kg) 0.78"-2.56" (20-65mm) 0.78-2.25 (20-57mm) 0.5"-2.5"
ASSEMBLY INSTRUCTIONS LX HD Sit-Stand Desk Mount LCD Arm 14-30 lbs (6.35-13.61 kg) Maximal skärmstorlek * = 46 * Begränsat till max 30 lbs (13,61 kg) 0.78"-2.56" (20-65mm) 0.78-2.25 (20-57mm) 0.5"-2.5"
 BÄNKVÅG / BENCH SCALE ANVÄNDARMANUAL / USER MANUAL SW-III www.liden-weighing.com Svenska OBS! Under vågen sitter en justerbar skruv (se bild). Standardinställning är den för vägning. Om ni vill rengöra
Boiler with heatpump / Värmepumpsberedare
 Boiler with heatpump / Värmepumpsberedare QUICK START GUIDE / SNABBSTART GUIDE More information and instruction videos on our homepage www.indol.se Mer information och instruktionsvideos på vår hemsida
English Svenska. Installation. Guide. XG6846 Broadband Switch
 English Svenska Installation Guide Broadband Switch 2 Installation Guide English Svenska Broadband Switch Language Page English... 4 Svenska... 8 3 Broadband Switch USB (OPTIONAL) (OPTIONAL) Back/side
Manual MODEL 8310 PATENTS PENDING. Importör Kaminexperten Sverige AB +46 36 290 64 00 www.kaminexperten.se www.caframo.com www.thermologi.
 Manual MODEL 8310 PATENTS PENDING Importör Kaminexperten Sverige AB +46 36 290 64 00 www.kaminexperten.se www.caframo.com www.thermologi.com IMPORTANT VIKTIGA ISTRUKTIONER INSTRUCTIONS SPARAS SAVE THESE
Ringmaster RM3 - RM 5 RM3 RM 4 RM 5
 RM3 - RM 5 Ringmaster We offer ball pickers in 5 different sizes with a picking width of up to 6 m. RM3 - RM5 has a self-supporting chassis so that the collected balls do not place a load on the picking
Blandningstunna. Bruksanvisning - maskin, LVD och EMC-direktiven s. 1 av 10 140 / 190 L BRUKSANVISNING. Säkerhet Montering Underhåll och felsökning
 s. 1 av 10 Blandningstunna 140 / 190 L BRUKSANVISNING Säkerhet Montering Underhåll och felsökning Bruksanvisning i original reviderad 2014-09-02 s. 2 av 10 Före montering, idrifttagande eller underhåll,
LINC Modell 17 130624A
 LINC Modell 17 130624A Denna produkt är anpassad till Branschregler Säker Vatteninstallation. INR garanterar produktens funktion om branschregler och monteringsanvisning följs. INR SVERIGE AB Kosterögatan
Köksfläkt E601WH/E602WH
 Köksfläkt E601WH/E602WH HN 10164/10165 Bruksanvisning Läs bruksanvisningen noga innan köksfläkten monteras och används. Montering Denna köksfläkt kan användas antingen med utsug eller recirkulation. Köksfläkten
Lösenordsportalen Hosted by UNIT4 For instructions in English, see further down in this document
 Lösenordsportalen Hosted by UNIT4 For instructions in English, see further down in this document Användarhandledning inloggning Logga in Gå till denna webbsida för att logga in: http://csportal.u4a.se/
Användarhandbok. USB Charging Dock DK52
 Användarhandbok USB Charging Dock DK52 Innehåll Inledning...3 Om DK52 USB Charging Dock...3 Använda DK52 USB Charging Dock...4 Använda tillbehören...4 Ladda...4 Juridisk information...6 Declaration of
BEAM. Product Manual Produktmanual
 BEAM Product Manual Produktmanual BEAM Technical Specifications Tekniska Specifikationer Description Product number Mode Voltage Current Vehicle interface Cable length Encapsulation Operating temperature
Bruksanvisning Directions for use
 Bruksanvisning Directions for use KOMBIDON OUTSIDE WALL HOOD SVENSK/ENGLISH VERSION SVENSKA Denna montageanvisning omfattar produkten KOMBIDON. BESKRIVNING/ ANVÄNDNING Kombidon från AB C.A. Östberg är
BBT042/ BBC042/ BBCD042 NISSAN NAVARA D40 V STX & PATHFINDER R WD & 4WD Models
 INSTALLATION GUIDE BBT042/ BBC042/ BBCD042 NISSAN NAVARA D40 V6 2010+ STX & PATHFINDER R51 2010+ 2WD & 4WD Models Ironman 4x4 BBT/ BBC/ BBCD042 Bull Bars fit to a Nissan Navara D40 STX & Pathfinder R51.
VIKTIGA SÄKERHETSANVISNINGAR FARA: VARNING:
 VIKTIGA SÄKERHETSANVISNINGAR DET ÄR MYCKET VIKTIGT ATT DU VÄRNAR OM DIN EGEN OCH ANDRAS SÄKERHET. Detta häfte innehåller en mängd viktiga säkerhetsanvisningar som även återfinns på apparaten. Läs och iaktta
(SV) Installationsmanual för duschkabiner och ångbastukabiner (EN) Installation manual for shower cabins and steam cabins
 Installationsmanual för duschkabiner och ångbastukabiner (EN) Installation manual for shower cabins and steam cabins") Arrow Skandinavien AB Tel: +46 (0)31 330 00 10 www.arrowshower.com (SV) Installationsmanual för duschkabiner och ångbastukabiner (EN) Installation manual for shower cabins and steam cabins 6030 6130 Ver:
Arrow Skandinavien AB Tel: +46 (0)31 330 00 10 www.arrowshower.com (SV) Installationsmanual för duschkabiner och ångbastukabiner (EN) Installation manual for shower cabins and steam cabins 6030 6130 Ver:
Shower cabins / Steam cabins
 Installation manual for Shower cabins / Steam cabins Arrow Skandinavien AB Tel: +46 (0)31 330 00 10 www.arrowshower.com Models: 6030 6130 2 3 (SE) Lås upp brunnen. (UK) Unlock. 4 (SE) På karets undersida,
Gaggenau Bruksanvisning. Frihängande fläkt AI 480
 Gaggenau Bruksanvisning Frihängande fläkt AI 480 Innehåll Säkerhetsanvisningar 4 Före första användningstillfället 5 Apropå användningen 5 Detta är din nya apparat 6 Frihängande fläkt AI 480 6 Kontrollpanel
LINC MODELL 13. INR SVERIGE AB Kosterögatan 15 SE-211 24 Malmö 13 EN 1428:2005+A1:2008
 LINC MODELL 13 151005 Produkten är anpassad till branschregler Säker Vatteninstallation. INR garanterar produktens funktion om branschreglerna och monteringsanvisningen följs. INR SVERIGE AB Kosterögatan
ASSEMBLY INSTRUCTIONS SCALE SQUARE - STANDARD
 ASSEMBLY INSTRUCTIONS ALL COMPONENTS Metal profile 0 mm Gripper Ceiling attachments Screws for ceiling attachements (not included) Wires Metal profile 60 mm Metal profile 00 mm Felt - Full Felt - Half
SVENSKA. Skärm Kapacitet Lyft luta Vrid Rotation VESA. 27-42 12-30 lbs (5.5-13.6 kg) 10 (25.4mm)
 10 (25.4mm)") Skärm Kapacitet Lyft luta Vrid Rotation VESA 27-42 12-30 lbs (5.5-13.6 kg) 10 (25.4mm) TV/skärm 10 TV/skärm 95 Förlängning 180 Ja 100 x 100 100 x 200 200 x 200 200 x 100 300 x 300 400 x 400 www.ergotron.com
Skärm Kapacitet Lyft luta Vrid Rotation VESA 27-42 12-30 lbs (5.5-13.6 kg) 10 (25.4mm) TV/skärm 10 TV/skärm 95 Förlängning 180 Ja 100 x 100 100 x 200 200 x 200 200 x 100 300 x 300 400 x 400 www.ergotron.com
2.1 Installation of driver using Internet Installation of driver from disk... 3
 &RQWHQW,QQHKnOO 0DQXDOÃ(QJOLVKÃ'HPRGULYHU )RUHZRUG Ã,QWURGXFWLRQ Ã,QVWDOOÃDQGÃXSGDWHÃGULYHU 2.1 Installation of driver using Internet... 3 2.2 Installation of driver from disk... 3 Ã&RQQHFWLQJÃWKHÃWHUPLQDOÃWRÃWKHÃ3/&ÃV\VWHP
Vanliga frågor om Duocom (för installatör eller reparatör) GB Frequently asked questions about Duocom (for installer or repairman)
 GB Frequently asked questions about Duocom (for installer or repairman)") Manual SE Vanliga frågor om Duocom (för installatör eller reparatör) GB Frequently asked questions about Duocom (for installer or repairman) 1 SE VANLIGA FRÅGOR OM DUCOM... 3 1.1 Det hörs inget ljud i
Manual SE Vanliga frågor om Duocom (för installatör eller reparatör) GB Frequently asked questions about Duocom (for installer or repairman) 1 SE VANLIGA FRÅGOR OM DUCOM... 3 1.1 Det hörs inget ljud i
P650 - Takscreen. Installationsguide EN
 P650 - Takscreen Installationsguide 1309-150507EN V650-Tallinn Installation manual Montera främre linhjul 12 13 Placera linan över linhjulet och skruva tillbaka täcklocket på linhjulhuset (7). Öppna linhjulshuset
Christmas tree lighting Julgransbelysning / Juletrebelysning
 Manual / Bruksanvisning / Bruksanvisning Christmas tree lighting Julgransbelysning / Juletrebelysning ENG SE NO Item. No 772701090101 ENG Thank you for choosing to purchase a product from Rusta! Read through
(SV) Installationsmanual för duschkabiner och ångbastukabiner (EN) Installation manual for shower cabins and steam cabins
 Installationsmanual för duschkabiner och ångbastukabiner (EN) Installation manual for shower cabins and steam cabins") Arrow Skandinavien AB Tel: +46 (0)31 330 00 10 www.arrowshower.com (SV) Installationsmanual för duschkabiner och ångbastukabiner (EN) Installation manual for shower cabins and steam cabins 6004 6005 6006
Arrow Skandinavien AB Tel: +46 (0)31 330 00 10 www.arrowshower.com (SV) Installationsmanual för duschkabiner och ångbastukabiner (EN) Installation manual for shower cabins and steam cabins 6004 6005 6006
Accepterad monteringsanvisning 2016:1. Metris (RSK: ) Metris S (RSK: ) Metris (RSK: )
 Metris S (RSK: ) Metris (RSK: )") EN Table of contents 1 Instructions for use / assembly instructions 2 Assembly 4-5 Adjustment 6 Operation 7 Dimensions 8-9 Flow diagram 8-9 Spare parts 10-12 Cleaning 13 Test certificate 14 Contact information
EN Table of contents 1 Instructions for use / assembly instructions 2 Assembly 4-5 Adjustment 6 Operation 7 Dimensions 8-9 Flow diagram 8-9 Spare parts 10-12 Cleaning 13 Test certificate 14 Contact information
00-1595. Fiat 500 2007» Fiat Panda / 4x4 2003» Fiat Panda 4x4 Climbing / 4x4 Cross 20033» 619-0300
 00-1595 120 Fiat 500 2007» Fiat Panda / 4x4 2003» Fiat Panda 4x4 Climbing / 4x4 Cross 20033» 619-0300 rev. 2014-04-04 DC Congratulations on purchasing an ATS towbar Alexo Towbars Sweden offer quality towbars
Kamrör / Ribbed pipe radiator
 Kamrör / Ribbed pipe radiator SE... 4 GB... 4 RU... 5 Kamrörsradiator / Ribbed pipe radiator Mått / Dimensions/Основные размеры A min 300 180 125 min 50 125 B 185 min 200 Typ/Type/Модель A [mm] B [mm]
Accepterad monteringsanvisning 2016:1. Focus (RSK: ) 1 (12)
 1 (12)") EN Table of contents 1 Instructions for use / assembly instructions 2 Assembly 4 Adjustment 5 Dimensions 6 Flow diagram 6 Operation 7 Spare parts 8 Cleaning 9 Test certificate 10 Contact information 12
EN Table of contents 1 Instructions for use / assembly instructions 2 Assembly 4 Adjustment 5 Dimensions 6 Flow diagram 6 Operation 7 Spare parts 8 Cleaning 9 Test certificate 10 Contact information 12
VARIOBARRIER S/M MIMSAFE BY CHOICE
 VAROBARRR S/M MMSA BY CHOC K L A B D M C H A B C D 522 K 524 Right leg Right leg 514L 514R 510L 510R L 526L M 526R S508 S509 521 6X 521 + H 527 529 528 8X/1 18X 8X/1 M-460641AL M-SM6X14A M-460641B M-M37202_2014
Tack för att du har köpt vår produkt. Vi hoppas att du får glädje av den under en lång tid. Thermex
 Innhold DANSK... 3 SVENSKA... 12 1. Beskrivning av hällen... 13 2. Beståndsdelar... 13 3. Specifikation... 14 4. Förutsättningar för användningen... 14 5. Installation... 15 5.1 Installera spiskåpan...
INSTALLATION. (SE) Duschkabin och ångbastu (UK) Shower cabins and steam cabins. Model
 Duschkabin och ångbastu (UK) Shower cabins and steam cabins. Model") 1 INSTALLATION (SE) Duschkabin och ångbastu (UK) Shower cabins and steam cabins Model 6004 6005 6006 6007 6015 6016 6025 6026 6030 6036 6106 6116 6126 6130 Arrow Skandinavien AB www.arrowshower.com Tel.
1 INSTALLATION (SE) Duschkabin och ångbastu (UK) Shower cabins and steam cabins Model 6004 6005 6006 6007 6015 6016 6025 6026 6030 6036 6106 6116 6126 6130 Arrow Skandinavien AB www.arrowshower.com Tel.
Garden Light Trädgårdsbelysning / Hagebelysning
 Manual / Bruksanvisning / Bruksanvisning Garden Light Trädgårdsbelysning / Hagebelysning Decklights 5-p 0,75 W Decklight 5-p 0,75 W / Decklight 5-p 0,75 W ENG SE NO Item. No 9130-1188 ENG Thank you for
Accepterad monteringsanvisning 2016:1. Talis S (RSK: ) Talis S (RSK: ) 1 (12)
 Talis S (RSK: ) 1 (12)") EN Table of contents 1 Instructions for use / assembly instructions 2 Assembly 4-5 Adjustment 6 Dimensions 7 Flow diagram 7 Operation 8 Spare parts 9 Cleaning 10 Test certificate 11 Contact information
EN Table of contents 1 Instructions for use / assembly instructions 2 Assembly 4-5 Adjustment 6 Dimensions 7 Flow diagram 7 Operation 8 Spare parts 9 Cleaning 10 Test certificate 11 Contact information
MCP-16RC, Air Purification
 Kompakt patronfilter med tryckstötsrensning. MCP-16RC Air Purification Tower är ett kompakt patronfilter för decentraliserad luftrening inomhus, där luft återåtervinning är möjlig. Den kompakta filterenheten
Accepterad monteringsanvisning 2016:1
 EN Table of contents 1 Instructions for use / assembly instructions 2 Assembly 4-6 Adjustment 7 Dimensions 8 Flow diagram 9 Test certificate 9 Operation 10 Spare parts 11 Cleaning 12 Contact information
Accepterad monteringsanvisning 2016:1. Talis S (RSK: ) Talis S 100 CoolStart (RSK: )
 Talis S 100 CoolStart (RSK: )") EN Table of contents 1 Instructions for use / assembly instructions 2 Assembly 4-5 Adjustment 6 Dimensions 7 Flow diagram 7 Operation 8 Spare parts 9 Cleaning 10 Test certificate 11 Contact information
EN Table of contents 1 Instructions for use / assembly instructions 2 Assembly 4-5 Adjustment 6 Dimensions 7 Flow diagram 7 Operation 8 Spare parts 9 Cleaning 10 Test certificate 11 Contact information
Viktig information för transmittrar med option /A1 Gold-Plated Diaphragm
 Viktig information för transmittrar med option /A1 Gold-Plated Diaphragm Guldplätering kan aldrig helt stoppa genomträngningen av vätgas, men den får processen att gå långsammare. En tjock guldplätering
REKOMMENDATIONER OCH TIPS
 REKOMMENDATIONER OCH TIPS Denna bruksanvisning är förutsedd för flera versioner av apparaten. Det är möjligt att vissa enskilda utrustningsdetaljer, inte berör din apparat. INSTALLATION Tillverkaren åtar