KND 9653 XA++ EN DA SV FI NO EL. Refrigerator Køleskab Kylskåp Jääkaappi Kjøleskap Ψυγείο
|
|
|
- Mats Johansson
- för 6 år sedan
- Visningar:
Transkript

1 Refrigerator Køleskab Kylskåp Jääkaappi Kjøleskap Ψυγείο KND 9653 XA++ EN DA SV FI NO EL Instruction for use Brugsvejledning Instruktionsmanual Käyttöohjekirja Bruksanvisning Οδηγίες χρήσης
2
3 WARNING! In order to ensure a normal operation of your refrigerating appliance, which uses a completely environmentally friendly refrigerant the R600a (flammable only under certain conditions) you must observe the following rules: Do not hinder the free circulation of the air around the appliance. Do not use mechanical devices in order to accelerate the defrosting, others than the ones recommended by the manufacturer. Do not destroy the refrigerating circuit. Do not use electric appliances inside the food keeping compartment, other than those that might have been recommended by the manufacturer. ADVARSEL! For at sikre køleapparatets normale funktion, som i øvrigt bruger den miljøvenlige kølervæske R600a (kun brandbar under visse omstændigheder), skal følgende forholdsregler følges: Bloker ikke den fri luftcirkulation omkring apparatet. Brug ikke andet mekanisk udstyr, end det der er anbefalet af fabrikanten for at accelerere afisningsprocessen. Ødelæg ikke kølekredsløbet. Brug ikke elektriske apparater inde i skabets opbevaringsafsnit, med mindre de er af en type, der er anbefalet af fabrikanten. VARNING! För att försäkra dig om en normal drift av din kylningsenhet, som använder ett miljövänligt kylmedel R600a (endast flambart under vissa förhållanden) måste du beakta följande regler: Förhindra inte att luften cirkulerar fritt runt enheten. Använd inte mekaniska enheter för att snabba på avfrostningsprocessen, förutom det som rekommenderas av tillverkaren. Skada inte kylningskretsen. Använd inte elektriska apparater inuti förvarningsfacket, förutom de som rekommenderas av tillverkaren. VAROITUS! Jäähdystyslaitteen, joka käyttää täysin ympäristöystävällistä jäähdytysainetta R600a (syttyy vain tietyissä olosuhteissa), normaalin toiminnan varmistamiseksi on noudatettava seuraavia ohjeita: Älä estää ilman vapaata kiertoa laitteen ympärillä. Älä käytä mekaanisia tai muita keinoja, joita valmistaja ei suosittele, sulatusprosessin nopeuttamiseen. Älä vahingoita jäähdytysvirtapiiriä. Älä käytä ruokalokeroissa laitteen sisällä sähkölaitteita, paitsi niitä joita valmistaja mahdollisesti on suositellut. ADVARSEL! For å sikre normal drift av kjøleapparatet, som bruker den miljøvennlige kjølevæsken R600a (brennbar bare under spesielle vilkår), må du følge disse reglene: Det må alltid være fri sirkulasjon av luft rundt apparatet. Bruk ikke andre mekaniske gjenstander for å gjøre avisingen raskere enn dem som anbefales av produsenten. Ødelegg ikke kjølekretsen. Bruk ikke andre elektriske apparater inne i apparatet enn dem som eventuelt anbefales av produsenten. ΠΡΟΕΙΔΟΠΟΙΗΣΗ! Για να εξασφαλίσετε κανονική λειτουργία της ψυκτικής σας συσκευής, η οποία χρησιμοποιεί ένα πλήρως φιλικό προς το περιβάλλον ψυκτικό μέσο, το R600a (εύφλεκτο μόνο υπό ορισμένες συνθήκες), πρέπει να τηρείτε τους ακόλουθους κανόνες: Μην εμποδίζετε την ελεύθερη κυκλοφορία του αέρα γύρω από τη συσκευή. Μη χρησιμοποιείτε μηχανικές διατάξεις για να επιταχύνετε την απόψυξη, εκτός από τα μέσα που συνιστά ο κατασκευαστής. Μην προκαλέσετε ζημιά στο ψυκτικό κύκλωμα. Μη χρησιμοποιείτε ηλεκτρικές συσκευές μέσα στο χώρο φύλαξης φαγητού, εκτός από αυτές που ενδεχομένως έχει συστήσει ο κατασκευαστής.
4 EN Index Safety comes first! /1 Transport instructions /2 Disposal; Device Setup; Electrical connections /2 Get to know your device /3 Prior to startup /3 Setting the operating temperature /3-5 Cooling /5 Freezing; Defrosting of the device /6 Changing the illumination lamp /7 Cleaning and care /7 Practical tips and notes /8 Examples of use /9 Placing the food /9 Setting recomandation /9 Normal operating noises /10 Practical advice concerning the reduction of the electricity consumption /10 What, if... /11 Reversing the doors /12 DA Register Sikkerheden først! /13 Transportinstruktioner /14 Opsætning af apparatet /14 Elektriske forbindelser /14 Lær dit apparat at kende /15 Inden igangsætning /15 Kontrolfunktioner /15 Køling /17 Frysning /18 Afrimning af apparatet /18 Udskiftning af belysningslampen/19 Rengøring og vedligeholdelse /19 Praktiske tips og bemærkninger /20 Eksempler på anvendelse /21 Placering af maden /21 Anbefalede indstillinger /21 Normal funktionsstøj /22 Praktiske råd om reduktion af strømforbrug /22 Hvad nu, hvis /23 Vende dørene /24 Garanti /25 SV Index Säkerheten först! /26 Transportinstruktioner /27 Installation av enhet /27 Elektrisk anslutning /27 Lär känna din enhet /28 Innan upstart /28 Ställ in driftstemperaturen /28 Kylning /30 Frysning /31 Avfrostning av enheten /31 Byta lampan /32 Rengöring och vård /32 Praktiska råd och anmärkningar /33 Exempel på användning /34 Placering av mat /34 Inställningsrekommendation /34 Normala driftsljud /35 Praktiska råd gällande reducering av elförbrukningen /35 Vad gör jag om /36 Byte av dörrar /37 Garanti /38 FI Sisältö Turvallisuus ensin! /39 Kuljetusohjeet /40 Laitteen asetukset /40 Sähköliitännät /40 Laitteen ominaisuudet /41 Ennen käynnistystä /41 Käyttölämpötilan asettaminen /41 Jäähdytys /43 Pakastaminen /44 Laitteen sulatus /44 Lampun vaihtaminen/45 Puhdistus ja huolto /45 Käytännöllisiä vihjeitä ja huomautuksia /46 Käyttöesimerkkejä /47 Elintarvikkeiden sijoittaminen /47 Asetussuositukset /47 Normaalit käyttöäänet /48 Käytännön neuvoja sähkönkulutuksen vähentämiseen /48 Entä jos /49 Ovien uudelleen sijoitus /50 Takuu /51 NO Innhold Sikkerheten kommer først! /52 Transportanvisninger /53 Innretning av apparatet /53 Elektriske tilkoplinger /53 Bli kjent med kjøleskapet /54 Før oppstart /54 Stille driftstemperaturen /54 Nedkjøling /56 Frysing /57 Avising av kjøleskapet /57 Skifte belysningslampen /58 Rengjøring og stell /58 Praktiske tips og merknader /59 Brukseksempler /60 Plassering av mat /60 Anbefalinger ang. Innstillinger /60 Normale driftslyder /61 Praktisk råd vedrørende reduksjon av strømforbruk /61 Hva om.. /62 Omhengsling av dørene /63 Garanti /64 EΛ Περιεχόμενα Η ασφάλεια προηγείται! /65 Οδηγίες για τη μεταφορά /66 Απόρριψη αποβλήτων; Αρχική ρύθμιση της συσκευής Ηλεκτρικές συνδέσεις /66 Γνωρίστε τη συσκευή σας /67 Πριν την έναρξη λειτουργίας /67 Ρύθμιση της θερμοκρασίας λειτουργίας /67-69 Ψύξη /69 Κατάψυξη Απόψυξη της συσκευής /70 Αντικατάσταση της λάμπας φωτισμού /71 Καθαρισμός και φροντίδα /71 Πρακτικές συμβουλές και παρατηρήσεις /72 Παραδείγματα χρήσης /73 Τοποθέτηση των τροφίμων /73 Συνιστώμενη ρύθμιση /73 Κανονικοί θόρυβοι λειτουργίας /74 Πρακτικές συμβουλές για τη μείωση της κατανάλωσης ηλεκτρικού ρεύματος /74 Τι να κάνω, εάν... /75 Αντιστροφή της φοράς ανοίγματος των πορτών /76


5 1 2 Figures that take place in this instruction manual are schematic and may not correspond exactly with your product. If the subject parts are not included in the product you have purchased, then it is valid for other models. Tallene i denne manual er skematiske og svarer måske ikke helt til dit produkt. Hvis delene ikke er indeholdt i det produkt, du har købt, findes de i andre modeller. Bilder som förekommer i den här bruksanvisningen är exempel och överensstämmer inte exakt med din produkt. Om delar inte medföljer produkten du har köpt så gäller det för andra modeller. Tämän ohjekirjan kuvitus on kaavakuviin perustuvaa eikä se ehkä vastaa täysin todellista tuotetta Jos jokin osa puuttuu ostamastasi tuotteesta, kuvaus koskee muita malleja. Illustrasjonene i denne veiledningen er skjematiske og kan derfor være litt forskjellige fra ditt produkt. Hvis noen deler ikke medfølger produktet du har kjøpt, gjelder den for andre modeller. Οι εικόνες σ' αυτό το εγχειρίδιο οδηγιών είναι σχηματικές και ενδέχεται να μην ανταποκρίνονται ακριβώς στο προϊόν σας. Αν ορισμένα εξαρτήματα δεν περιλαμβάνονται στο προϊόν που έχετε προμηθευτεί, τότε ισχύουν για άλλα.

6
7 EN Instruction for use Congratulations on your choice of our product which will certainly provide you with many years of good service. Safety comes first! Please read the operating manual carefully. It contains important information on how to use your device. If instructions are not adhered to, you may lose your right to service at no charge during the warranty period. Please keep this manual in a safe place and pass it on to later users if applicable. Do not connect your appliance to the power supply until all packing and transit protectors have been removed. Leave to stand upright for at least 4 hours before switching on to allow the system to settle if transported horizontally. This appliance must only be used for its intended purpose, i.e. the storing and freezing of edible foodstuff. We do not recommend use of this appliance in an unheated, cold room e.g. garage, conservatory, annex, shed, outdoors, etc. See Location. On delivery, check to make sure that the product is not damaged and that all the parts and accessories are in perfect condition. Do not operate a damaged appliance; if in doubt, check with your dealer. Do not allow children to play with the appliance. Do not sit or stand on or let the children sit or stand on the appliance or on the pull-out parts. Do not hang on the appliance door. Your device contains no fluoridated coolants (CFC/HFC), but contains the coolant isobutane (R600a), a natural gas which is highly compatible with the environment. (R600a) is easily flammable. Therefore, be sure that the cooling circuit is not damaged either during transport or during operations. In the event of damage; Avoid any open flame, sources of sparks and flammable substances. Immediately air the room in which the appliance is located. In case the coolant spraying out contacts your eyes it may cause eye injuries. The space in the room where the appliance is installed must not be smaller than 10 cubic metres. Do not dispose of the appliance in a fire. Your appliance contains non CFC substances in the insulation which are flammable. Please contact the local authority in your region for information on disposal methods and facilities available. Warning - Keep ventilation openings on the appliance enclosure or in the built-in structure, clear of obstruction. Warning - Do not use mechanical devices or other means to accelerate the defrosting process, other than those recommended by the manufacturer. Warning - Do not damage the refrigerant circuit. Warning - Do not use electrical appliances inside the food storage compartments of the appliance, unless they are of the type recommended by the manufacturer. Avoid touching the metal condenser wiring on the backside of the appliance; there is risk of injury. In the event of a possible malfunction, disconnect the appliance from the power supply first. Prior to cleaning the device always unplug the power supply or shut off the fuse. Do not pull from the cable - pull from the plug. Repairs to the electrical equipment may only be made by qualified experts. If the supply cord is damaged, it must be replaced by the manufacturer, its service agent or similarly qualified persons in order to avoid a hazard. 1
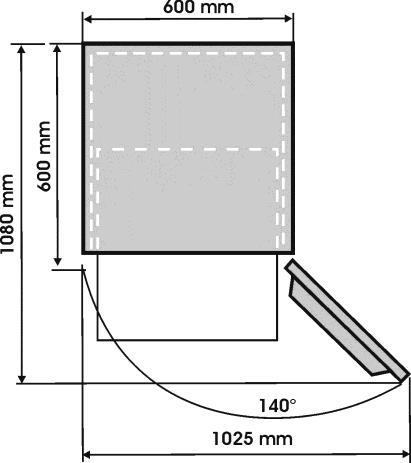
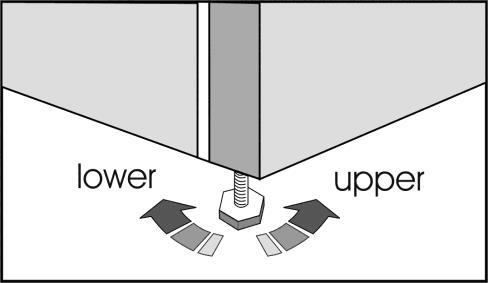
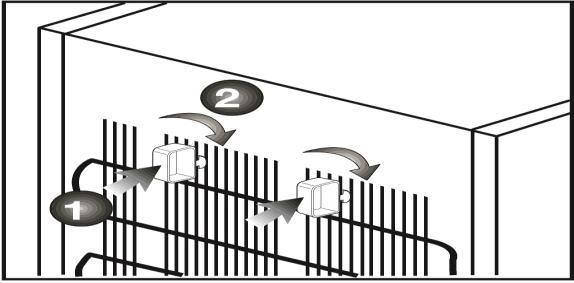
8 EN Transport instructions The appliance should be transported only in upright position. Before the performance of the working test in the shop, the packing of the appliance must be intact. After a transport in the horizontal position, the device may only be taken into operation 4 hours after being stood up vertically again. The appliance must be protected against rain, moisture and other atmospheric influences. The manufacturer assumes no liability if safety instructions are disregarded. Disposal Make the device unusable immediately. Pull out the mains plug and cut the power cable. Remove or destroy snap or latch locks before disposing of the device. In this manner you prevent children from locking themselves in and endangering their lives. Device setup Do not operate your appliance in a room where the temperature is likely to fall below 10 C at night and/or especially in winter. At lower temperatures the appliance may not operate, resulting in a reduction in the storage life of the food. The climate class rate of your appliance is given in Technical Features leaflet and written on the rating label inside the appliance. It specifies the appropriate operating ambient temperatures as explained below. Climatic class Ambient temperatures SN o C to 32 o C N o C to 32 o C ST o C to 38 o C T o C to 43 o C SN-ST o C to 38 o C SN-T o C to 43 o C Location Only place the appliance, as shown in the illustration in dry rooms which can be aired. Avoid direct sunlight or direct heat sources such as a stove or a heater. If this cannot be avoided, the following minimum distances should be maintained: Electric stoves: 3,00 cm Heater: 3,00 cm Cooling devices: 2,50 cm Ensure sufficient air circulation for your device. Make sure that sufficient room is provided around the appliance to ensure free air circulation (Item 3). Fit the two plastic wall spacers supplied with the appliance rotating 1/4 turn to the condenser at the back of the appliance (Item 4). The appliance should be located on a smooth surface. The two front feet can be adjusted as required (Item 5). To ensure that your appliance is standing upright adjust the two front feet by turning clockwise or counter-clockwise, until the product is in firm contact with the floor. Correct adjustment of feet avoids excessive vibration and noise. Electrical connections Instruction for use Warning This appliance must be grounded. Check whether the power type and voltage in your region corresponds to the one stated on the rating label inside the appliance. The electrical safety of the appliance is only assured when the grounding system in the house is installed in accordance with regulations. When placing the appliance, do not let the power cable get stuck under it; otherwise the cable will be damaged. Ensure that the plug remains readily accessible. Do not use a multiple adapter bar or an extension cable. 2
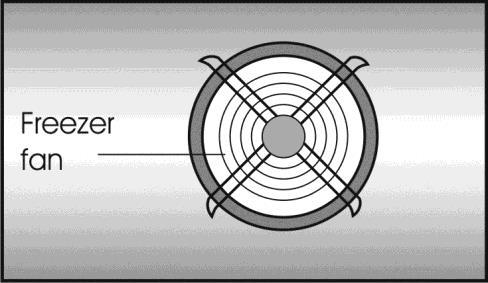
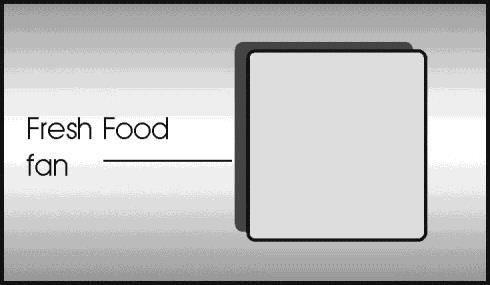
9 EN Get to know your device Waring Below information about accessories are supplied just for reference. Below accessories may not be exactly same as the accessories of your appliance. Fig Control panel 2. Interior light 3. Fresh Food fan 4. Wine rack 5. Movabale shelves 6. Fresh zone compartment 7. Crisper cover 8. Salad crisper 9. Ice tray support & ice tray 10. Compartment for quickly freezing 11. Compartments for frozen froods keeping 12. Adjustable front feet 13. Dairy Compartment 14. Egg tray 15. Shelf for jars 16. Shelf for bottles 17. Freezer fan The fans has the purpose to provide the circulation of the air in compartment. Instruction for use Setting the operating temperature Fresh Food and Freezer Compartment Temperature can be adjused by the electronic display (Item 2) Control Panel Control Functions Considering Figure 2, the following functions are implemented on the appliance. 1. Freezer Compartment Temperature Indicator 2. Freezer Compartment Temperature Setting Function 3. Quick Freeze Function 4. Quick Freeze Indicator 5. Fridge Compartment Temperature Indicator 6. Fridge Compartment Temperature Setting Function 7. Quick Fridge Function 8. Quick Fridge Indicator 9. Eco-Fuzzy (Special Economic Usage) Function 10. Eco-Fuzzy (Special Economic Usage) Indicator 11. Vacation Function 12. Vacation Function Indicator 13. Energy Efficiency Function 14. Energy Efficiency Indicator 15. Key Lock Function 16. Key Lock Indicator 17. Economic Usage Indicator 18. High Temperature/Error Warning Indicator Prior to startup Before you begin operating your device, the following points should be re-checked for safety: Is the device standing properly on the floor? Is there sufficient space for good air circulation? Is the interior clean? (Also see the section Cleaning and care ) Now connect the appliance to the mains. The compressor is turned on; the interior light comes on when the Fridge door is opened. Do not place foodstuff into the refrigerator until the temperature has reached the desired level. 3
10 EN Description of the Control Functions 1. Freezer Compartment Temperature Indicator Indicates the temperature set for Freezer Compartment. 2. Freezer Compartment Temperature Setting Function This function allows you to set the freezer compartment temperature. Press this button to set the temperature of the freezer compartment to -18, -20, -22 and -24 degrees, respectively. 3. Quick Freeze Function Quick Freeze indicator is illuminated when the Quick Freeze function is active. To cancel this function, press Quick Freeze button again. Quick Freeze indicator will turn off and return to its normal settings. If you do not cancel it, Quick Freeze will cancel itself automatically after 12 hours or when the freezer compartment reaches the required temperature. If you want to freeze large amounts of fresh food, press the Quick Freeze button before putting the food into the freezer compartment. If you press the Quick Freeze button repeatedly with short intervals, the electronic circuit protection will be activated and the compressor will not start up immediately. This function is not recalled when power restores after a power failure. 4. Quick Freeze Indicator This symbol flashes in an animated style when the Quick Freeze function is active. 5. Fridge Compartment Temperature Indicator Indicates the temperature set for the Fridge Compartment. 6. Fridge Compartment Temperature Setting Function This function allows you to set the fridge compartment s temperature. Press this button to set the temperature of the fridge compartment to 8, 6, 4, 2 degrees, respectively. Instruction for use 7. Quick Fridge Function When you press the Quick Fridge button, the temperature of the compartment will be colder than the adjusted values. This function can be used for food required to be cooled down rapidly in the fridge compartment. If you want to cool large amounts of fresh food, it is recommended to activate this function before putting the food into the fridge. Quick Fridge indicator is illuminated when the Quick Fridge function is active. To cancel this function, press Quick Fridge button again. Quick Fridge indicator will turn off and return to its normal settings. If you do not cancel it, Quick Fridge function will cancel itself automatically after 2 hours or when the fridge compartment reaches the required temperature. This function is not recalled when power restores after a power failure. 8. Quick Fridge Indicator This symbol flashes in an animated style when the Quick Fridge function is active. 9. Eco-Fuzzy (Special Economic Usage) Function When you press Eco-Fuzzy button, Eco Fuzzy Function will be activated and Eco-Fuzzy Indicator will illuminate. Refrigerator will start operating in the most economic mode at least 6 hours later and the economic usage indicator will turn on when the function is active. Press Eco Fuzzy button again to disable the Eco-Fuzzy function. 10. Eco-Fuzzy (Special Economic Usage) Indicator This symbol illuminates when the Eco-Fuzzy Function is active. 11. Vacation Function Press and hold Eco Fuzzy button for 3 seconds to activate Vacation Function and illuminate Vacation indicator. The cooling of Fridge Compartment is stopped and temperature of Fridge Compartment is fixed to 15 degrees to prevent bad odours. When this function is active, Fridge Compartment Temperature Indicator will not display the temperature. To deactivate Vacation Function, press and hold Eco-Fuzzy button for 3 seconds. 12. Vacation Function Indicator This indicator illuminates when Vacation Function is active. 4
11 EN 13. Energy Efficiency Function Energy saving icon will light up and Energy Saving Function will be activated automatically after 1 minute. If energy saving function is active, all icons on the display other than energy saving icon will turn off. When the Energy Saving Function is active, if press again the Energy Saving touch button or the door is opened, Energy Saving Function will be exited for a minute and the icons on display will return to normal. 14. Energy Efficiency Indicator This indicator illuminates when Energy Efficiency Function is selected. 15. Key Lock Function When you press and hold Key Lock button for 3 seconds, Key Lock Function will be activated and Key Lock Indicator will illuminate. No button will operate when this function is active. Press and hold Key Lock button for 3 seconds to deactivate this function. 16. Key Lock Indicator This indicator will illuminate when Key Lock Function is active. 17. Economic Usage Indicator Economic Usage Indicator illuminates when the Freezer Compartment is set to -18 C. When Quick Freeze or Quick Fridge is selected, Economic Usage Indicator will turn off. Cooling Food storage Instruction for use The fridge compartment is for the short-term storage of fresh food and drinks. Store milk products in the intended compartment in the refrigerator. Bottles can be stored in the bottle holder or in the bottle shelf of the door. Raw meat is best kept in a polyethylene bag at the second shelf from the top of the refrigerator. Allow hot foods and beverages to cool to room temperature prior to placing them in the refrigerator. It is suggested not to keep frozen food over crisper cover for thawing purposes. The other shelves can be used for thawing purposes. Attention Store concentrated alcohol only standing upright and tightly closed. Attention Do not store explosive substances or containers with flammable propellant gases (canned cream, spray cans etc.) in the appliance. There is a danger of explosion. 18. High Temperature/Error Warning Indicator This light illuminates during high temperature failures and error warnings. 5
12 EN Freezing Freezing food The freezing area is marked with symbol. You can use the appliance for freezing fresh food as well as for storing pre-frozen food Please refer to the recommendations given on the packaging of your food. Attention Do not freeze fizzy drinks, as the bottle may burst when the liquid in it is frozen. Be careful with frozen products such as coloured ice-cubes. Do not exceed the freezing capacity of your appliance in 24 hours. See Technical Features leaflet. In order to maintain the quality of the food, the freezing must be effected as rapidly as possible. Thus, the freezing capacity will not be exceeded, and the temperature inside the freezer will not rise. Attention Keep the already deep-frozen food always separated with freshly placed food. When deep-freezing hot food, the cooling compressor will work until the food is completely frozen. This can temporarily cause excessive cooling of the refrigeration compartment. If you find the freezer door difficult to open just after you have closed it, don t worry. This is due to the pressure difference which will equalize and allow the door to open normally after a few minutes. You will hear a vacuum sound just after closing the door. This is quite normal. Making ice cubes Fill the ice-cube tray 3/4 full with water and place it in the freezer. As soon as the water has turned into ice, you can take out the ice cubes. Never use sharp objects such as knives or forks to remove the ice cubes. There is a risk of injury! Let the ice cubes slightly thaw instead, or put the bottom of the tray in water for a short moment. Defrosting of the device Instruction for use The appliance is a frost free refrigerator. So there will not be any frost accumulation inside the food storage area. However there will be an automatic defrost at the evaporation area of the appliance when it needs. The water drams into reservoir at the back of the appliance and evaporates automatically through the compressor heat. Ensure that the reservoir is fixed properly above the compressor. Warnings! The fans inside the freezer and fresh food compartments circulates cold air. Never insert any object through the guard. Do not allow children to play with the fresh food andfreezer fan. Never store products that contain inflammable propellant gas (eg dispensers, spray cans etc.) or explosive substances. Don t cover the shelves with any protective materials, which may obstruct air circulation. Do not allow children to play with the appliance or tamper with the controls. Do not obstruct the fan guards to ensure that you obtain the best possible performance from your appliance. (Item 9 and Item 10) Warning! Your appliance is fitted with 2 circulating fans which are essential for the performance of the refrigerator. Please ensure the fans are not blocked (stopped) or impaired by food or packaging. Blocking (stopping) or impairing the fan can result in an increase of the internal freezer temperature (Thawing). 6
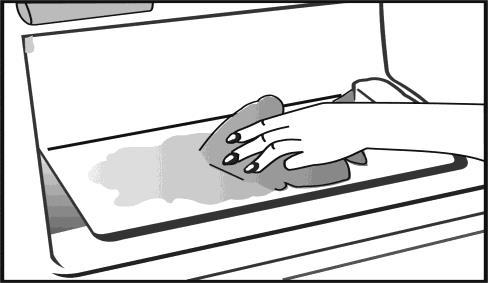
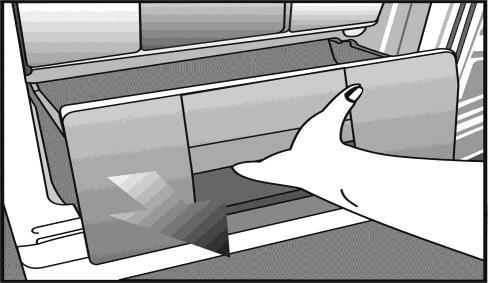
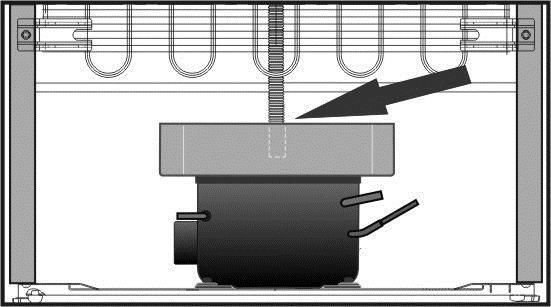
13 EN Instruction for use Changing the illumination lamp To change the lamp used for illumination of your refrigerator, please call your Authorized Service. The lamp(s) used in this appliance is not suitable for household room illumination. The intended purpose of this lamp is to assist the user to place foodstuffs in the refrigerator/freezer in a safe and comfortable way. The lamps used in this appliance have to withstand extreme physical conditions such as temperatures below -20 C. Cleaning and care Interior and Exterior Surfaces Attention Always unplug the power cable or switch off the circuit breaker before cleaning. Cleaning of the accessories Door shelves: Remove all food from the door shelves. Lift the cover of the shelf upwards and pull it off sideward. Remove the bottom of the door shelf by pushing it upwards. Collecting container (Pan): Make sure that the pan at the back of the appliance is always clean. Gently release the snap of the pan from the compressor by pushing it using a tool (like screwdriver), so that the pan can be removed. Lift the pan, clean it and wipe it dry. Re-assemble in reverse order. Crisper or Drawers: To clean a drawer, pull it out as far as possible, tilt it upwards and then pull it out completely (Fig. 7-8). Clean the exterior using lukewarm water and a mild detergent. Never use detergents, abrasive or acidic agents. Wipe the inside compartment dry. Be careful to prevent water from getting into contact with the electrical connections of the temperature control or the interior light. If the device is not going to be used for a long period of time, unplug the power cable and remove all food. Clean the appliance and keep the door open. To preserve the appearance of your appliance, you can polish the exterior and the door accessories with a silicone wax. Clean the condenser at the back of the appliance once a year using a brush or a vacuum cleaner. Dust build-up leads to increased energy consumption. Inspect the door gasket at regular intervals. Clean with water only, and wipe totally dry. 7
14 EN Practical tips and notes Cooling Clean fresh food and vegetables before storing in the crisper bin. Always pack or wrap food, or put it in a suitable container, before storing it in the appliance. Wrap food which is not suitable for storage at cold temperatures in polyethylene bags (pineapple, melons, cucumbers, tomatoes etc.). Food with strong odour or apt to acquire odour should be wrapped in airtight or smellproof packaging material. Keep fresh food separate from cooked food, to avoid bacteria contamination. Never keep fresh meat in the fridge for more than 2 or 3 days. Remove any left-over canned food from the can and store it in a suitable container. Refer to the shelf life indicated on the food packaging. Do not obstruct the air circulation inside the device by covering the shelves. Never keep any dangerous or poisonous substances inside your device. Always check food that has been stored for a long period of time for its suitability for consumption. Do not store fresh and cooked food together in the same container. Close the door immediately after opening, to avoid unnecessary energy consumption. Do not use hard or sharp objects to remove the ice build-up. Do not load hot food into your appliance. Freezing Instruction for use Always leave food to thaw in a container that allows the thawing water to run off. Do not exceed the maximum allowable freezing capacity when freezing fresh food (see the section "Freezing"). Do not give children ice-cream and water ices direct from the freezer. The low temperature may cause freeze burns on lips. Never re-freeze defrosted food; defrosted food must be consumed within 24 hours. Only food that has been cooked can be refrozen. Do not take out frozen food with wet hands. Store only fresh and impeccable food. Always use appropriate packaging material to avoid odour penetration or degradation of the food. Store commercially frozen food in accordance with the instructions given on the packaging. Freeze cooked food in small quantities. This ensures rapid freezing and maintains the quality of the food. Do not freeze liquid in tightly closed bottles or containers. The bottles/containers may burst at low temperatures. Carry pre-frozen food in suitable bags and place it in your freezer as soon as possible. Always defrost food in the fridge compartment. 8
15 EN Instruction for use Examples of Use White wine, beer and mineral water Bananas Fish or offal Cheese Melons Raw meat and poultry chill before use do not store in a fridge store in polyethylene bags only use airtight containers or polyethylene bags; for best results, take out from the fridge an hour before consumption. store only for a short period of time, use airtight packaging/wrapping do not store together with delicate food such as cooked food or milk Placing the food Freezer compartment shelves Egg holder Fridge compartment shelves Fridge compartment door shelves Crisper Fresh zone compartment Various frozen food such as meat, fish, ice cream, vegetables and etc. Egg Food in pans, covered plates and closed containers Small and packaged food or drinks (such as milk, fruit juice and beer) Vegetables and fruits Delicatessen products (cheese, butter, salami and etc.) Setting recomandation Freezer Compartment Fridge Compartment Explanations Adjustment Adjustment -18 or -20 C 4 C This is the normal recommended setting. -22 or -24 C 4 C These settings are recommended when the ambient temperature exceeds 30 C. Quick Freeze 4 C Use when you wish to freeze your food in a short time. Your refrigerator will return to its previous mode when the process is over. -18 C or colder 2 C If you think that your fridge compartment is not cold enough because of the hot conditions or frequent opening and closing of the door. -18 C or colder Quick Fridge You can use it when your fridge compartment is overloaded or if you wish to cool down your food rapidly. It is recommended that you activate quick fridge function 4-8 hours before placing the food. 9
16 EN Normal operating noises Various functional noises are completely normal due to the operation of the cooling system of your appliance; Gurgling, hissing, boiling or bubbling noises are caused by the refrigerant, circulating inside the cooling system. These noises can still be heard for a short period of time after the compressor shuts off. Sudden, sharp cracking or popping noises are caused by the expansion and contraction of the inside walls or some components inside the cabinets. Buzzing, whirring, pulsating or high-pitched humming noises are caused by the compressor. These noises are slightly louder at the start-up of the compressor and reduce when the appliance reaches the operating temperatures. Also to avoid disturbing vibrations and noises make sure that; Your refrigerator is standing level on all four feet. Your refrigerator is not in contact with the walls, surrounding objects or kitchen cabinets and furniture. Cans, bottles or dishes inside the refrigerator are not touching and rattling against each other. All shelves and bins are mounted correctly inside the refrigerator cabinets and doors. 10 Instruction for use Practical advice concerning the reduction of the electricity consumption 1. Make sure that the appliance is located in wellventilated areas, far from any source of heat (cooker, radiator etc.). At the same time, the location of the appliance must be done in such a way that it prevents it to be under the direct incidence of the sunbeams. 2. Make sure that the food purchased in refrigerated/frozen condition is placed into the appliance as soon as possible, especially during summertime. It is recommended to use thermal insulated bags to transport the food home. 3. We recommend the thawing of the packets taken out from the freezer compartment be done in the refrigerator compartment. For this purpose, the packet which is going to be thawed will be placed in a vessel so that the water resulting from the thawing does not leak in the refrigerator compartment. We recommend you to start the thawing at least 24 hours before the use of the frozen food. 4. We recommend reducing the number of door openings to the minimum. 5. Do not keep the door of the appliance open more than necessary and make sure that after each opening the door is well closed. When doors are open, warm air enters the fridge/freezer cabinets and the appliance consumes more energy to cool down the foodstuffs.thus please do not open doors frequently in order to save energy and to keep foods at ideal storage temperature. 6. Maximum frozen food storage volume is achieved without using the middle and upper drawer provided in the freezer compartment. Energy consumption of your appliance is declared while the freezer compartment is fully loaded without using the middle and upper drawer. 7. Do not block the freezer fan grill by placing foods in front.there must always be left minimum 3 cm open distance in front of the freezer fan grill to allow necessary air flow to freeze the compartment efficiently. 8. If you do not plan to store foodstuff in freshfood compartment, please activate Eco Fuzzy function for energy saving. Freezer compartment keeps frezing normalıy. 9. Activate Energy Saving Function. When energy Saving Function is active, all icons on the display will turn off except energy saving icon. All icons will be lightened, if freshfood door is opened or display is touched. 10. Recommended temperature settings are +4 C and -20 C for freshfood and freezer compartments respectively.
17 EN What, if The appliance will not work, even though it is switched on. Check if the power cable is properly connected! Check if the mains supply is in order, or if a circuit breaker has been tripped! Check the temperature control for correct setting! 2- There is a power failure. Keep the doors of your device closed. Frozen food will not be affected if the power failure lasts less than the Conservation Time From Failure (hours) declaration mentioned in the Technical Features leaflet. If the power failure lasts longer, check the food and consume it immediately. You can also cook the defrosted food and then re-freeze it. 3- The interior light does not work. Please call your Authorized Service. 4- There is high temperature alarm If the actual temperature of the freezer compartment is warm then the alarm icon on the display (Fig. 2/18) lights on. The alarm icon lights off when the actual temperature of the freezer compartment cools down. The high temperature alarm may rise up due following situations. a) Warm food storage b) Warm air in the freezer compartment c) Freezer door is left open for a long time If the high temperature alarm remains on for more than 24 hours then contact with the customer service. The high temperature alarm is not active in 24 hours after plugging the appliance into the electricity. Instruction for use 5- There is error messages and alarm Incase any failure condition due wiring connection of the appliance occurs, and then the alarm icon on the display (Fig. 2/18) starts blinking together with the relevant error message. Incase some certain characters (E0, E3,..etc.) appear on the display then contact with the customer service. The alarm icon lights off just after the removal of the failure. 6- There is actual fridge temperature failure The appliance performs cooling considering the fridge set temperature. The actual fridge temperature shown on the display will reach the adjusted fridge set temperature, when the packages are cold enough. There may be some oscillations on the actual fridge temperature shown on the display due; a) The fridge door is Opened / Closed frequently b) Loading warm packages inside the fridge. c) Leaving the fridge door open for a long period of time 7- There is actual freezer temperature failure The appliance performs cooling considering the freezer set temperature. The actual freezer temperature shown on the display will reach the adjusted freezer set temperature, when the packages are cold enough. There may be some oscillations on the actual freezer temperature shown on the display due; a) The freezer door is Opened / Closed frequently b) Loading warm packages inside the freezer c) Leaving the freezer door open for a long period of time 11
18 EN 8- Other possible malfunctions Not every malfunction is a case for our customer service. Very often, you can easily resolve the problem without requesting service. Before requesting service, please check if the malfunction has been caused by an operating error. If this is the case, and a service has been requested, a service charge will be levied even if the device is still under guarantee. If the problem persists please contact your dealer or customer service. Please have the type and serial number of your device when calling. The rating label is located inside. Door Open Alarm There is a built in buzzer in the appliance that will inform customer if the fridge door is left open for a minute. This alarm is a periodic alarm and it reminds the customer that the fridge door is left open. There is no buzzer alarm related to freezer door. In order to stop the door open alarm, it is enough to press any button on the display or close the door. Thus the alarm will stop till next time. Reversing the doors Instruction for use The door of your refrigerator is designed to operate towards both sides at your convenience. If you want the door to open towards the other side, please call the nearest authorized maintenance service for assistance. The symbol on the product or on packaging indicates that this product may not be treated as household waste. Instead it shall be handed over to the applicable collection point for the recycling of electrical and electronic equipment. By ensuring this product is disposed of correctly, you will help prevent potential negative consequences for the environment and human health, which could otherwise be caused by inappropriate waste handling of this product. For more detailed information about recycling of this product, please contact your local city office, your household waste disposal service or the shop where you purchased the product. This appliance is not intended for use by person with reduced physical, sensory or mental capabilities or lack of experience and knowledge unless they have been given supervision or instruction concerning use of the appliance by a person responsible for their safety. Children should be supervised to ensure that they do not play with the appliance. 12
19 DA Brugsvejledning Tillykke med dit valg af produkt, der uden tvivl vil give dig mange års god funktion. Sikkerheden først! Læs venligst brugsanvisningen grundigt. Den indeholder vigtige informationer om anvendelsen af dit apparat. Hvis instruktionerne ikke overholdes, kan du miste retten til gratis service i garantiperioden. Gem venligst denne vejledning på et sikkert sted og overdrag den til senere brugere, hvis den kan bruges. Tilslut ikke dit apparat til stikkontakten før al emballage og alle transportsikringer er fjernet. Lad det stå oprejst i mindst 4 timer, før det sættes til for at lade systemet sætte sig, hvis det har været transporteret vandret. Dette køle-/fryseskab skal kun bruges efter hensigten, dvs. opbevaring og nedfrysning af spiselige fødevarer. Vi anbefaler ikke brug at dette køle-/fryseskab i et uopvarmet, koldt rum, f.eks. garage, vinterhave, anneks, skur, udendørs osv., se Placering Ved levering skal du ved kontrol sikre dig, at produktet ikke er ødelagt, og at alle dele og tilbehør er i aperfekt stand. Lad ikke et ødelagt køle-/fryseskab køre; check i tvivlstilfælde hos leverandøren. Lad ikke børn lege med apparatet. Stå eller sid ikke på apparat eller udtræksdelene og lad heller ikke børn stå eller sidde på apparatet eller udtræksdelene. Hæng ikke på køleskabets låge. Dit apparat indeholder ingen fluoriderede kølemidler (CFC/HFC), men indeholder det kølende isobutan (R600a), en naturlig gas, der er yderst forenelig med miljøet. (R600a) er letantændelig. Du skal derfor sikre dig, at det kølende kredsløb ikke er beskadiget enten under transport eller under drift. I tilfælde af beskadigelse; Undgå åben ild, gnister og brandfarlige stoffer. Udluft øjeblikkeligt rummet, hvor køle-/fryseskabet er placeret. Hvis udsprøjtende kølemidler kommer i kontakt med dine øjne, kan det forårsage øjenskader. Arealet i det rum, hvor apparatet er installeret, skal ikke være mindre en 10 m 3. Bortskaf ikke apparatet ved at brænde det. Dit apparat indeholder CFC-fri stoffer i isoleringen, som er brandbare. Kontakt venligst de lokale myndigheder i dit område for information om bortskaffelsesmetoder og anlæg til rådighed. Advarsel - Hold ventilationsåbninger i apparatets hylster eller i indbygningskonstruktionen fri for blokering. Advarsel- Der må ikke anvendes mekaniske genstande eller andre midler, ud over de af producenten anbefalede, til at fremskynde afrimningsprocessen. Advarsel - Undgå at beskadige kølekredsløbet. Advarsel - Anvend ikke elektriske apparater inde i apparatets opbevaringsrum, med mindre der er tale om en type, som er anbefalet af producenten. Undgå berøring af den metalliske kondensator trådføring på bagsiden af køle-/fryseskabet, da der er risiko for skade. I tilfælde af en mulig funktionsfejl skal apparatet først afbrydes fra strømforsyningen. Inden apparatet rengøres, skal stikket altid trækkes ud af strømforsyningen, eller sikringen afbrydes. Træk ikke i ledningen træk i hanstikket. Reparationer på det elektriske udstyr må kun udføres af kvalificerede eksperter. Hvis strømstikket er beskadiget, skal det udskifte af leverandøren, dennes serviceagent eller lignende kvalificeret personer for at undgå fare. 13
20 DA Transportinstruktioner Apparatet bør kun transporteres opretstående. Før udførelsen af arbejdstesten i forretningen skal apparatets emballage være intakt. Efter at have været transporteret liggende må udstyret først tages i funktion efter igen at have været lodretstående i 4 timer. Apparatet skal beskyttes mod regn, fugt og andre atmosfæriske påvirkninger. Producenten påtager sig intet ansvar, hvis sikkerhedsinstruktionerne er tilsidesat. Bortskaffelse Gør øjeblikkeligt apparatet ubrugeligt. Træk stikket ud af kontakten og afbryd netkablet. Fjern eller ødelæg snap- eller smæklåse, inden apparatet bortskaffes. På den måde forhindrer du børn i at låse sig selv inde og derved bringe deres liv i fare. Opsætning af apparatet Dit apparat skal ikke køre i et rum, hvor temperaturen sandsynligvis falder til under 10 C om natten og/eller især om vinteren. Apparatet fungerer måske ikke ved lavere temperaturer, hvilket kan resultere i en reduktion i fødevarernes holdbarhed. Klimaklassificeringen for dit apparat er opgivet i brochuren for Tekniske Egenskaber og skrevet på typeskiltet inde i apparat. Det angiver de egnede rumtemperaturer som forklaret nedenfor. Klimaklasse Rumtemperaturer SN o C til 32 o C N o C til 32 o C ST o C til 38 o C T o C til 43 o C SN-ST o C til 38 o C SN-T o C til 43 o C Placering Placer kun apparat, som vist på tegningen, i tørre rum med luftventilation. Undgå direkte sollys eller direkte varmekilder som f.eks. en ovn eller radiator. Hvis dette ikke kan undgås, bør følgende mindsteafstande overholdes: Elektriske ovne: 3,00 cm Radiator: 3,00 cm Afkølingsudstyr: 2.50 cm Sørg for tilstrækkelig luftcirkulation til dit apparat. Kontrollér at der er tilstrækkelig plads omkring apparatet til at sikre fri luftcirkulation (Fig. 3). Monter de to vægafstandsstykker, der er leveret med apparatet, drejet en kvart omgang, på kondensatoren bag på apparatet (Fig. 4). Apparatet skal placeres på en jævn overflade. De to forreste fødder kan justeres efter ønske (Fig. 5). For at sikre at dit apparat står lodret, kan du justere de to forreste fødder ved at dreje dem med eller mod uret, indtil produktet har fast kontakt med gulvet. Korrekt justering af fødder forhindrer overdreven vibration og støj. Elektriske forbindelser Brugsvejledning Advarsel Dette apparat skal jordforbindes. Kontrollér om strømtypen og spændingen i dit område svarer til den, der er angivet på mærkepladen inde i apparatet. Apparatets elektriske sikkerhed kan kun sikres, hvis jordingsanlægget i huset er installeret i overensstemmelse med regulativerne. Ved placering af apparatet må ledningen ikke komme i klemme under det, da den så vil blive beskadiget. Sørg for at stikket forbliver let tilgængeligt. Undlad at bruge en multiadapterskinne eller et mellemkabel. 14
21 DA Brugsvejledning Lær dit apparat at kende Advarsel Informationen nedenfor om tilbehør er blot givet som reference. Tilbehøret nedenfor er måske ikke nøjagtigt det samme som tilbehøret til dit apparat. Fig Betjeningspanel 2. Indvendigt lys 3. Ventilator til fersk kød 4. Vinhylde 5. Justerbare kabinethylder 6. Friskzone rum 7. Låg til grøntsagsskuffe 8. Salatboks 9. Isbakkehylde & isbakke 10. Rum til hurtigfrys 11. Rum til at opbevare frossen mad 12. Justerbare forreste fødder 13. Rum til mejerivarer 14. Æggebakke 15. Hylde til dåser 16. Hylde til flasker 17. Fryser blæser Blæsernes formål er at lade luften cirkulere i rummet. Indstilling af driftstemperaturen Temperaturen i fryseren kan justeres på det elektroniske display (Fig. 2) Betjeningspanel Kontrolfunktioner Ved betragtning af fig. 2 er følgende funktioner implementeret på apparatet. 1.Indicator for frysertemperatur 2.Funktion for temperaturjustering i fryserum 3.Hurtig-frys funktion 4.Indikator for hurtig-frys 5.Indikator for temperatur i køleskab 6.Funktion for temperaturjustering i køleskabet 7. Hurtig-køl funktion 8. Indikator for hurtig-køl 9. Øko-Fuzzy (speciel økonomisk anvendelse) funktion 10. Indikator for Øko-Fuzzy (speciel økonomisk anvendelse) 11. Feriefunktion 12. Indikator for feriefunktion 13. Energieffektiv funktion 14. Indikator for energieffektiv 15. Tastelås funktion 16. Indikator for tastelås 17. Indikator for Økonomisk anvendelse 18. Advarselsindikator for høj temperatur/fejl Inden igangsætning Inden du begynder at bruge dit apparat, bør følgende punkter kontrolleres igen af sikkerhedsmæssige årsager. Står apparatet ordentligt på gulvet? Er der plads nok til god luftcirkulation? Er apparatet rent indvendigt? (Se også afsnittet Rengøring og pleje ) Tilslut nu apparatet til strømforsyningen. Kompressoren er tændt; det indvendige lys tænder, når lågen åbnes. Undlad at sætte madvarer i køleskabet, før temperaturen har nået det ønskede niveau. 15
22 DA Brugsvejledning Beskrivelse af kontrolfunktionerne 1. Indicator for frysertemperatur Indikerer for frysertemperatur. 2.Funktion for temperaturjustering i fryserum Denne funktion gør det muligt for dig at indstille fryserrummets temperatur. Tryk på denne knap for at indstille fryserrummets temperatur til hhv. -18, -20, -22 og -24 grader. 3.Hurtig-frys funktion Indikatoren for hurtig-frys lyser, når hurtig-frys funktionen er aktiveret. For at annullere denne funktion skal du trykke på hurtig-frys knappen igen. Hurtig-frys indikatoren vil gå ud og gå tilbage til de normale indstillinger. Hvis du ikke annullerer den, vil hurtig-frys annullere sig selv efter 12 timer, eller når fryseren når den ønskede temperatur. Hvis du vil fryse en større mængde ferskvarer, skal du trykke på hurtig-frys knappen, før du lægger maden i fryseren. Hvis du trykker på Hurtigfrysknappen gentagne gange med korte intervaller, vil den elektroniske kredsløbsbeskyttelse blive aktiveret, og kompressoren vil ikke starte op med det samme. Denne funktion gemmes ikke efter strømsvigt. 4.Indikator for hurtig-frys Symbolet blinker på en animeret måde, når hurtig-frys funktionen er aktiv. 5.Indikator for temperatur i køleskab Indikerer temperaturindstillingen for køleskabet. 6.Funktion for temperaturjustering i køleskabet Denne funktion gør det muligt for dig at indstille køleskabets temperatur. Tryk på denne knap for at indstille køleskabets temperatur til hhv. 8, 6, 4 og 2 grader. 7. Hurtig-køl funktion Når du trykker på hurtig-køl knappen, vil kølerummets temperatur blive koldere end de indstillede værdier. Denne funktion bruges til fødevarer, der kræver hurtig nedkøling. Hvis du vil køle store mængder fersk mad, anbefales det at aktivere denne funktion, inden maden sættes i køleskabet. Indikatoren for hurtig-køl lyser, når hurtig-køl funktionen er aktiveret. For at annullere denne funktion skal du trykke på hurtig-køl knappen igen. Hurtigkøl indikatoren vil gå ud og gå tilbage til de normale indstillinger. Hvis du ikke annullerer den, vil hurtig-køl funktionen annullere sig selv efter 2 timer, eller når køleskabet når den ønskede temperatur. Denne funktion gemmes ikke efter strømsvigt. 8. Indikator for hurtig-køl Symbolet blinker på en animeret måde, når hurtig-køl funktionen er aktiv. 9. Øko-Fuzzy (speciel økonomisk anvendelse) funktion Når du trykker på Øko-Fuzzy knappen, bliver Øko-Fuzzy funktionen aktiveret og indikatoren for Øko-Fuzzy vil lyse. Køleskabet vil begynde at køre mest økonomisk mindst 6 timer senere, og indikatoren for økonomisk anvendelse vil tænde, når funktionen er aktiv. Tryk på Øko-Fuzzy knappen igen for at deaktivere Øko-Fuzzy funktionen. 10. Indikator for Øko-Fuzzy (speciel økonomisk anvendelse) Dette symbol lyser op, når Øko-Fuzzy funktionen er aktiv. 11. Feriefunktion Tryk og hold Øko-Fuzzy knappen i 3 sekunder for at aktivere feriefunktionen. Indikatoren for ferie vil lyse. Afkølingen af køleskabet stopper, og temperaturen i køleskabsrummet fastholdes ved 15 grader for at forhindre dårlig lugt. Når funktionen er aktiveret, vil indikatoren for temperatur i køleskabet ikke vise temperaturen. Tryk og hold Øko-Fuzzy knappen i 3 sekunder for at deaktivere feriefunktionen. 16
SAFETY PRECAUTIONS SPECIFICATIONS
 SAFETY PRECAUTIONS Read the instructions carefully before use and save them for future reference. Before you connect the appliance: Ensure that the voltage rating on the type plate corresponds to your
SAFETY PRECAUTIONS SPECIFICATIONS
 SAFETY PRECAUTIONS Read the instructions carefully before use and save them for future reference. Before you connect the appliance: Ensure that the voltage rating on the type plate corresponds to your
Boiler with heatpump / Värmepumpsberedare
 Boiler with heatpump / Värmepumpsberedare QUICK START GUIDE / SNABBSTART GUIDE More information and instruction videos on our homepage www.indol.se Mer information och instruktionsvideos på vår hemsida
SAFETY PRECAUTIONS SPECIFICATIONS
 SAFETY PRECAUTIONS Read the instructions carefully before use and save them for future reference. Before you connect the appliance: Ensure that the voltage rating on the type plate corresponds to your
INSTALLATION INSTRUCTIONS
 INSTALLATION - REEIVER INSTALLATION INSTRUTIONS RT0 RF WIRELESS ROOM THERMOSTAT AND REEIVER MOUNTING OF WALL MOUTING PLATE - Unscrew the screws under the - Pack contains... Installation - Receiver... Mounting
ARC 32. Tvättställsblandare/Basin Mixer. inr.se
 ARC 32 Tvättställsblandare/Basin Mixer inr.se SE Användning och skötsel Manualen är en del av produkten. Bevara den under hela produktens livscykel. Vi rekommenderar er att noggrant läsa igenom manualen
Support Manual HoistLocatel Electronic Locks
 Support Manual HoistLocatel Electronic Locks 1. S70, Create a Terminating Card for Cards Terminating Card 2. Select the card you want to block, look among Card No. Then click on the single arrow pointing
Windlass Control Panel v1.0.1
 SIDE-POWER Windlass Systems 86-08950 Windlass Control Panel v1.0.1 EN Installation manual Behåll denna manual ombord! S Installations manual SLEIPNER AB Kilegatan 1 452 33 Strömstad Sverige Tel: +46 525
IMPORTANT! RETAIN FOR FUTURE REFERENCE PLEASE READ CAREFULLY VIKTIGT! BEHÅLL FÖR FRAMTIDA REFERENS LÄS IGENOM INSTRUKTIONSMANUALEN
 Heart & Stripes Junior Bed Instructions Manual Instruktions Manual IMPORTANT! RETAIN FOR FUTURE REFERENCE PLEASE READ CAREFULLY VIKTIGT! BEHÅLL FÖR FRAMTIDA REFERENS LÄS IGENOM INSTRUKTIONSMANUALEN Thank
IMPORTANT! RETAIN FOR FUTURE REFERENCE PLEASE READ CAREFULLY VIKTIGT! BEHÅLL FÖR FRAMTIDA REFERENSLÄS IGENOM INSTRUKTIONSMANUALEN NOGGRANT
 13060 Basic Cot One Instruction Manual Instruktion Manual IMPORTANT! RETAIN FOR FUTURE REFERENCE PLEASE READ CAREFULLY VIKTIGT! BEHÅLL FÖR FRAMTIDA REFERENSLÄS IGENOM INSTRUKTIONSMANUALEN NOGGRANT Thank
Instruction Manual. Svenska, English. Power Bank. Model: PRBN
 Instruction Manual Svenska, English Power Bank Model: PRBN Innehåll / Content Innehåll Säkerhetsföreskrifter... 4 Delar... 5 Specifikationer... 6 Miljö / Lag och säkerhet / Förbehåll... 7 Content Safety
Installation Instructions
 Installation Instructions (Cat. No. 1794-IE8 Series B) This module mounts on a 1794 terminal base unit. 1. Rotate keyswitch (1) on terminal base unit (2) clockwise to position 3 as required for this type
manual Facial spa Art nr: 48682 Rubicson 2016-06-08
 manual Facial spa Art nr: 8682 EN NO SV 2016-06-08 Rubicson ENGLISH Overview Use Fill the container ENGLISH 1. Make sure that the power cord is not connected to a wall socket. 1 2 2. Remove the funnel
Spotlight Set Spotlightset / Spotlightsett
 Manual / Bruksanvisning / Bruksanvisning Spotlight Set Spotlightset / Spotlightsett ENG SE NO Item. No/Art. nr./art. nr. 995-9 ENG Thank you for choosing to purchase a product from Rusta! Read through
LBI 3000 HCA LBI 3001 LBI 3002F
 LBI 3000 HCA LBI 3001 LBI 3002F en-index 1-9 Safety first.../1 Transport instructions.../2 Disposal.../2 Device Setup.../2 Get to know your device.../3 Prior to startup.../4 Setting the operating temperature.../4
SAFETY PRECAUTIONS SPECIFICATIONS
 SAFETY PRECAUTIONS Read the instructions carefully before use and save them for future reference. Before you connect the appliance: Ensure that the voltage rating on the type plate corresponds to your
LINC 23. Tvättställsblandare/Basin Mixer. inr.se 130226A
 LINC 23 Tvättställsblandare/Basin Mixer 130226A inr.se S Användande och skötsel Manualen är en del av produkten. Bevara den under hela produktens livscykel. Vi rekommenderar att noggrant läsa igenom manualen
LINC MODELL 13. INR SVERIGE AB Kosterögatan 15 SE-211 24 Malmö 13 EN 1428:2005+A1:2008
 LINC MODELL 13 151005 Produkten är anpassad till branschregler Säker Vatteninstallation. INR garanterar produktens funktion om branschreglerna och monteringsanvisningen följs. INR SVERIGE AB Kosterögatan
Bruksanvisning Badrumsvåg Modell: PG220
 Bruksanvisning Badrumsvåg Modell: PG220 INNAN DU ANVÄNDER VÅGEN 1. Ta bort allt emballage. 2. Öppna batterifacket och lägg i 1 st CR2032-batteri i batterifacket. Stäng batterifacket. 3. Ställ vågen på
BBT057/ BBC057 BBCD057/ BBT057-NL HOLDEN COLORADO 9/2016+ HOLDEN TRAILBLAZER WD & 4WD Models
 INSTALLATION GUIDE BBT057/ BBC057 BBCD057/ BBT057-NL HOLDEN COLORADO 9/2016+ HOLDEN TRAILBLAZER 2017+ 2WD & 4WD Models Ironman 4x4 BBT/ BBC/ BBCD/BBT057-NL Bull Bars fit to a Holden Colorado 9/2016+ It
PRESS FÄLLKONSTRUKTION FOLDING INSTRUCTIONS
 PRESS FÄLLKONSTRUKTION FOLDING INSTRUCTIONS Vänd bordet upp och ner eller ställ det på långsidan. Tryck ner vid PRESS och fäll benen samtidigt. OBS! INGA STORA KRAFTER KRÄVS!! Om benen sitter i spänn tryck
Christmas tree lighting Julgransbelysning / Juletrebelysning
 Manual / Bruksanvisning / Bruksanvisning Christmas tree lighting Julgransbelysning / Juletrebelysning ENG SE NO Item. No 772701090101 ENG Thank you for choosing to purchase a product from Rusta! Read through
VASSVIK FIXED STAND SE / ENG
 VASSVIK FIXED STAND SE / ENG SE VIKTIGT Läs noga igenom instruktionerna före användning och spar dessa för framtida bruk. VARNING: Barnets huvud bör inte ligga lägre än barnets kropp. Lägg inte till ytterligare
Plain A262. För T16 (T5) lysrör. Innehåll. Monteringsanvisning. A. Instruktion för rampmontering
 lysrör. Innehåll. Monteringsanvisning. A. Instruktion för rampmontering") Plain A262 För T16 (T5) lysrör Innehåll Ramparmatur: ändmodul En stängd gavel/ en öppen gavel Plint i båda ändarna Överkopplingssladd 1 rampgavel 1 lysrörsbytare Ramparmatur: mellanmodul Plint i en ände
Plain A262 För T16 (T5) lysrör Innehåll Ramparmatur: ändmodul En stängd gavel/ en öppen gavel Plint i båda ändarna Överkopplingssladd 1 rampgavel 1 lysrörsbytare Ramparmatur: mellanmodul Plint i en ände
Monteringsanvisning / Installation instruction Felsökningsschema Styxx Troubleshooting Styxx STEG 1
 Mora Armatur Box 480 SE-792 27 MORA SWEDEN www.moraarmatur.com Monteringsanvisning / Installation instruction Troubleshooting Styxx Rev. 001-14.11. MA nr 1005138 STEG 1 Kontrollera så att medföljande tillhörande
Dokumentnamn Order and safety regulations for Hässleholms Kretsloppscenter. Godkänd/ansvarig Gunilla Holmberg. Kretsloppscenter
 1(5) The speed through the entire area is 30 km/h, unless otherwise indicated. Beware of crossing vehicles! Traffic signs, guardrails and exclusions shall be observed and followed. Smoking is prohibited
 BÄNKVÅG / BENCH SCALE Modell : SW-III / Model : SW-III ANVÄNDARMANUAL / USER MANUAL SW-III WWW.LIDEN-WEIGHING.SE 2014-03-26 OBS! Under vågen sitter en justerbar skruv (se bild). Standardinställning är
81152 TRANSFER CASE SHIFT HANDLE
 Installation Instructions for TRANSFER CASE SHIFT HANDLE for 2007 2018 JEEP JK WRANGLER 1 2 3 ITEM NO. PART NO. DESCRIPTION QTY. 1 4101359 SHIFT KNOB, JEEP WRANGLER JK, MOLDED 1 2 1794720 JAM NUT, 3/8
Your No. 1 Workout. MANUAL pro
 Your No. 1 Workout MANUAL pro Innehåll/Contents Svenska Viktigt om säkerhet Specifikationer & delar Rekommenderade övningar 3 5 6-7 2 English Safety instructions Specifications & parts Recommended exercises
 BÄNKVÅG / BENCH SCALE ANVÄNDARMANUAL / USER MANUAL SW-III www.liden-weighing.com Svenska OBS! Under vågen sitter en justerbar skruv (se bild). Standardinställning är den för vägning. Om ni vill rengöra
BEAM. Product Manual Produktmanual
 BEAM Product Manual Produktmanual BEAM Technical Specifications Tekniska Specifikationer Description Product number Mode Voltage Current Vehicle interface Cable length Encapsulation Operating temperature
SkillGuide. Bruksanvisning. Svenska
 SkillGuide Bruksanvisning Svenska SkillGuide SkillGuide är en apparat utformad för att ge summativ återkoppling i realtid om hjärt- och lungräddning. www.laerdal.com Medföljande delar SkillGuide och bruksanvisning.
MCP-16RC, Air Purification
 Kompakt patronfilter med tryckstötsrensning. MCP-16RC Air Purification Tower är ett kompakt patronfilter för decentraliserad luftrening inomhus, där luft återåtervinning är möjlig. Den kompakta filterenheten
BOW. Art.nr
 190412 BOW Art.nr 80000637-80000642 SE INNEHÅLL Komponenter 3 Produktfakta 3 Montering 4 Kontakt 8 EN CONTENTS Components 3 Product facts 3 Installation 4 Contact 8 KOMPONENTER COMPONENTS x 3 x 3 PRODUKTFAKTA
INKOPPLINGSANVISNING ELTRYCKSLÅS WIRING DIAGRAM SOLENOID LOCK
 INKOPPLINGSANVISNING ELTRYCKSLÅS WIRING DIAGRAM SOLENOID LOCK SE EN S. 2-4 P. 5-7 SL 510/511 SL 520/521 SL 530-50/531-50 2013 11 07 SE TEKNISK SPECIFIKATION Driftspänning. Ström. Reed relä. Drifttemperatur.
PRESS FÄLLKONSTRUKTION FOLDING INSTRUCTIONS
 PRESS FÄLLKONSTRUKTION FOLDING INSTRUCTIONS Vänd bordet upp och ner eller ställ det på långsidan. Tryck ner vid PRESS och fäll benen samtidigt. Om benen sitter i spänn tryck benen mot kortsidan före de
Remote control Fjärrströmbrytare / Fjernstrømbryter
 Manual / Bruksanvisning / Bruksanvisning Remote control Fjärrströmbrytare / Fjernstrømbryter ENG SE NO Item. No. 9220-1070 ENG Thank you for choosing to purchase a product from Rusta! Read through the
Bathtub Filler CN EN. TBP02201 Type / TBP02202 Type. Installation Manual. Continued on the back cover
 03N74E Installation Manual 207.8 Bathtub Filler TBP0220 Type / TBP02202 Type For best results, install the product correctly according to the instructions in this Installation Manual. After installation,
Consumer attitudes regarding durability and labelling
 Consumer attitudes regarding durability and labelling 27 april 2017 Gardemoen Louise Ungerth Konsumentföreningen Stockholm/ The Stockholm Consumer Cooperative Society louise.u@konsumentforeningenstockholm.se
Accepterad monteringsanvisning 2016:1. Metris (RSK: ) Metris S (RSK: ) Metris (RSK: )
 Metris S (RSK: ) Metris (RSK: )") EN Table of contents 1 Instructions for use / assembly instructions 2 Assembly 4-5 Adjustment 6 Operation 7 Dimensions 8-9 Flow diagram 8-9 Spare parts 10-12 Cleaning 13 Test certificate 14 Contact information
EN Table of contents 1 Instructions for use / assembly instructions 2 Assembly 4-5 Adjustment 6 Operation 7 Dimensions 8-9 Flow diagram 8-9 Spare parts 10-12 Cleaning 13 Test certificate 14 Contact information
 Bänkvåg LCW-6S Manual/Förenklat handhavande User Manual LCW-6S www.liden-weighing.se Knappfunktioner: ON/OFF Sätter på och stänger av vågen. UNIT Skiftar vägningsenhet ZERO/TARE Nollställer vågen Tarerar
Workplan Food. Spring term 2016 Year 7. Name:
 Workplan Food Spring term 2016 Year 7 Name: During the time we work with this workplan you will also be getting some tests in English. You cannot practice for these tests. Compulsory o Read My Canadian
Joki Joki Air. JCD70-xx JAD90-xx. lasiesta.com. Manual. Betriebsanleitung. Manuel. Manual. Manuale. Gebruiksaanwijzing.
 lasiesta.com LA SIESTA GmbH Im Wiesenweg 4 55270 Jugenheim Germany Tel: +49 6130 9119-19 LA SIESTA Inc. 7355 S.W. 87 th Ave., Ste. 100 Miami, FL 33173 USA Tel: +1 786 401-1138 EN DE FR ES IT NL DA SV FI
INNEHÅLL / CONTENT. Svenska Säkerhetsföreskrifter...4-5 Användning...6-7 Elschema... 8 Specifikationer... 9 Information...10
 party cooler INNEHÅLL / CONTENT Svenska Säkerhetsföreskrifter...4-5 Användning...6-7 Elschema... 8 Specifikationer... 9 Information...10 English Safety Precautions...12-13 Operation...14-15 Electrical
Nathi Skötbord Changing unit Table à langer murale Wickeltisch Verschoontafel Puslebord Cambiador de pared Přebalovací pult Fasciatoio
 Nathi Skötbord Changing unit Table à langer murale Wickeltisch Verschoontafel Puslebord Cambiador de pared Přebalovací pult Fasciatoio Пеленальный стол Tested and approved according to SS-EN 12221:2008+A1_2013
Accepterad monteringsanvisning 2016:1
 EN Table of contents 1 Instructions for use / assembly instructions 2 Assembly 4-6 Adjustment 7 Dimensions 8 Flow diagram 9 Test certificate 9 Operation 10 Spare parts 11 Cleaning 12 Contact information
Accepterad monteringsanvisning 2016:1. Talis S (RSK: ) Talis S (RSK: ) 1 (12)
 Talis S (RSK: ) 1 (12)") EN Table of contents 1 Instructions for use / assembly instructions 2 Assembly 4-5 Adjustment 6 Dimensions 7 Flow diagram 7 Operation 8 Spare parts 9 Cleaning 10 Test certificate 11 Contact information
EN Table of contents 1 Instructions for use / assembly instructions 2 Assembly 4-5 Adjustment 6 Dimensions 7 Flow diagram 7 Operation 8 Spare parts 9 Cleaning 10 Test certificate 11 Contact information
Om oss DET PERFEKTA KOMPLEMENTET THE PERFECT COMPLETION 04 EN BINZ ÄR PRECIS SÅ BRA SOM DU FÖRVÄNTAR DIG A BINZ IS JUST AS GOOD AS YOU THINK 05
 Om oss Vi på Binz är glada att du är intresserad av vårt support-system för begravningsbilar. Sedan mer än 75 år tillverkar vi specialfordon i Lorch för de flesta olika användningsändamål, och detta enligt
Accepterad monteringsanvisning 2016:1. Focus (RSK: ) 1 (12)
 1 (12)") EN Table of contents 1 Instructions for use / assembly instructions 2 Assembly 4 Adjustment 5 Dimensions 6 Flow diagram 6 Operation 7 Spare parts 8 Cleaning 9 Test certificate 10 Contact information 12
EN Table of contents 1 Instructions for use / assembly instructions 2 Assembly 4 Adjustment 5 Dimensions 6 Flow diagram 6 Operation 7 Spare parts 8 Cleaning 9 Test certificate 10 Contact information 12
BBT042/ BBC042/ BBCD042 NISSAN NAVARA D40 V STX & PATHFINDER R WD & 4WD Models
 INSTALLATION GUIDE BBT042/ BBC042/ BBCD042 NISSAN NAVARA D40 V6 2010+ STX & PATHFINDER R51 2010+ 2WD & 4WD Models Ironman 4x4 BBT/ BBC/ BBCD042 Bull Bars fit to a Nissan Navara D40 STX & Pathfinder R51.
Accepterad monteringsanvisning 2016:1. Ecos M CoolStart (RSK: ) Ecos L CoolStart (RSK: ) 1 (12)
 Ecos L CoolStart (RSK: ) 1 (12)") EN Table of contents 1 Instructions for use / assembly instructions 2 Assembly 4-5 Adjustment 6 Dimensions 7 Flow diagram 7 Operation 8 Spare parts 9 Cleaning 10 Test certificate 11 Contact information
EN Table of contents 1 Instructions for use / assembly instructions 2 Assembly 4-5 Adjustment 6 Dimensions 7 Flow diagram 7 Operation 8 Spare parts 9 Cleaning 10 Test certificate 11 Contact information
Accepterad monteringsanvisning 2016:1. Talis S (RSK: ) Talis S 100 CoolStart (RSK: )
 Talis S 100 CoolStart (RSK: )") EN Table of contents 1 Instructions for use / assembly instructions 2 Assembly 4-5 Adjustment 6 Dimensions 7 Flow diagram 7 Operation 8 Spare parts 9 Cleaning 10 Test certificate 11 Contact information
EN Table of contents 1 Instructions for use / assembly instructions 2 Assembly 4-5 Adjustment 6 Dimensions 7 Flow diagram 7 Operation 8 Spare parts 9 Cleaning 10 Test certificate 11 Contact information
FORTA M315. Installation. 218 mm.
 1 Installation 2 1 2 1 218 mm. 1 2 4 5 6 7 8 9 2 G, G0= Max 100 m 1.5 mm² (AWG 15) X1, MX, Y, VH, VC = Max 200 m 0.5 mm² (AWG 20) Y X1 MX VH VC G1 G0 G 0 V 24 V~ IN 0-10 0-5, 2-6 60 s OP O 1 2 4 5 6 7
Arctic. Design by Rolf Fransson
 Arctic Design by Rolf Fransson 2 Endless possibilities of combinations. Oändliga kombinationsmöjligheter. 3 4 5 If you are looking for a range of storage furniture which limits of combination is set by
SOLAR LIGHT SOLUTION. Giving you the advantages of sunshine. Ningbo Green Light Energy Technology Co., Ltd.
 2017 SOLAR LIGHT SOLUTION Address:No.5,XingYeMiddleRoad,NingboFreeTradeZone,China Tel:+86-574-86812925 Fax:+86-574-86812905 Giving you the advantages of sunshine SalesServiceE-mail:sales@glenergy.cn Tech.ServiceE-mail:service@glenergy.cn
Flexit ART.NR MONTERINGSVEILEDNING NTC-føler. MONTERINGANVISNING NTC-givare. INSTALLATION INSTRUCTIONS NTC sensor
 116498-03 2018-07 Flexit ART.NR. 116496 MONTERINGSVEILEDNING NTC-føler MONTERINGANVISNING NTC-givare INSTALLATION INSTRUCTIONS NTC sensor ! Alle elektriske tilkoblinger må utføres av fagperson.! Alla elektriska
IRAB Mottagare sida 2-5 Tele Radio AB Mottagare sida 6
 IRAB Mottagare sida -5 Tele Radio AB Mottagare sida 6 Installation of receiver type smd 700 4 RELAY FUNCTIONS / -4 VAC/DC PCB TYPE NO: LWEG 4L Rev: 95-09 Installation: Install the receivers in a protected
Tänder din grill på sextio sekunder. Lights your grill in sixty seconds.
 LOOFTLIGHTER Tänder din grill på sextio sekunder. Lights your grill in sixty seconds. Hur den fungerar Med Looftlighter behöver du aldrig mer använda tändvätska för att tända din grill. Istället används
Viktig information för transmittrar med option /A1 Gold-Plated Diaphragm
 Viktig information för transmittrar med option /A1 Gold-Plated Diaphragm Guldplätering kan aldrig helt stoppa genomträngningen av vätgas, men den får processen att gå långsammare. En tjock guldplätering
Shower cabins / Steam cabins
 Installation manual for Shower cabins / Steam cabins Arrow Skandinavien AB Tel: +46 (0)31 330 00 10 www.arrowshower.com Models: 6030 6130 2 3 (SE) Lås upp brunnen. (UK) Unlock. 4 (SE) På karets undersida,
www.pianoflygelservice.com
 PRESENTERAR KLIMATANLÄGGNING FÖR PIANON OCH FLYGLAR. Varför blir ett piano eller en flygel ostämd? Det kan vara många orsaker, t.ex. hårdhänt bruk, flyttning av instrument, stora skillnader i luftfuktighet
(SV) Installationsmanual för duschkabiner och ångbastukabiner (EN) Installation manual for shower cabins and steam cabins
 Installationsmanual för duschkabiner och ångbastukabiner (EN) Installation manual for shower cabins and steam cabins") Arrow Skandinavien AB Tel: +46 (0)31 330 00 10 www.arrowshower.com (SV) Installationsmanual för duschkabiner och ångbastukabiner (EN) Installation manual for shower cabins and steam cabins 6004 6005 6006
Arrow Skandinavien AB Tel: +46 (0)31 330 00 10 www.arrowshower.com (SV) Installationsmanual för duschkabiner och ångbastukabiner (EN) Installation manual for shower cabins and steam cabins 6004 6005 6006
Instruktioner. Säkerhetsföreskrifter. Förklaringar av symboler
 Instruktioner Modell: 570070 Säkerhetsföreskrifter Varning! Titta inte för länge på utrustningens upplysta LED-lampor. Ljuset från LEDlamporna kan orsaka skador eller irritation i ögonen. Titta inte direkt
Beijer Electronics AB 2000, MA00336A, 2000-12
 Demonstration driver English Svenska Beijer Electronics AB 2000, MA00336A, 2000-12 Beijer Electronics AB reserves the right to change information in this manual without prior notice. All examples in this
Preschool Kindergarten
 Preschool Kindergarten Objectives CCSS Reading: Foundational Skills RF.K.1.D: Recognize and name all upper- and lowercase letters of the alphabet. RF.K.3.A: Demonstrate basic knowledge of one-toone letter-sound
SE ELMÄTARE Bruksanvisning i original Viktigt! Läs bruksanvisningen noggrant innan användning! Spara den för framtida behov.
 006252 SE ELMÄTARE Bruksanvisning i original Viktigt! Läs bruksanvisningen noggrant innan användning! Spara den för framtida behov. NO STRØMMÅLER Bruksanvisning (Oversettelse av original bruksanvisning)
Montageanvisning Airway system 1000/1500 Assembly instruction Airway system 1000/1500
 S.Det är lämpligt att denna information överlämnas till användaren av anläggningen. GB. It is appropriate that this information is passed on to the user of the installation. D. Diese informationen sind
Monteringsanvisning Nödutrymningsbeslag ASSA 179E
 Monteringsanvisning Nödutrymningsbeslag ASSA 179E Denna monteringsanvisning avser nödutrymningsbeslag ASSA 179E med artikelnummer 364371 i kombination med låshus Abloy EL580 med artikelnummer EL580100011.
Svenska()(Bruksanvisning(för(handdukstork()(1400(x(250(mm(
(Bruksanvisning(för(handdukstork()(1400(x(250(mm(") 1 Svenska()(Bruksanvisning(för(handdukstork()(1400(x(250(mm( Läsnogaigenombruksanvisningeninnanproduktenanvänds 6Kontrolleraattduharalladelarenligtpacklistannedan.Kontaktadinåterförsäljareomnågondelär
1 Svenska()(Bruksanvisning(för(handdukstork()(1400(x(250(mm( Läsnogaigenombruksanvisningeninnanproduktenanvänds 6Kontrolleraattduharalladelarenligtpacklistannedan.Kontaktadinåterförsäljareomnågondelär
USER MANUAL. Svenska, English. Molly I.0 KITCHEN SCALE
 USER MANUAL Svenska, English Molly I.0 KITCHEN SCALE Svenska Säkerhetsföreskrifter...4 Användning...5 Underhåll...6 Specifikationer...6 Övrig information...7 English Safety precautions...8 Operation...9
Bruksanvisning Directions for use
 Bruksanvisning Directions for use KOMBIDON OUTSIDE WALL HOOD SVENSK/ENGLISH VERSION SVENSKA Denna montageanvisning omfattar produkten KOMBIDON. BESKRIVNING/ ANVÄNDNING Kombidon från AB C.A. Östberg är
Decoration Light Dekorationsbelysning/Dekorasjonsbelysning
 Manual / Bruksanvisning / Bruksanvisning Decoration Light Dekorationsbelysning/Dekorasjonsbelysning STJÄRNA ENG SE NO Item. No 772601780101 ENG Thank you for choosing to purchase a product from Rusta!
LÄNKHJUL S3. Monteringsanvisning för: Länkhjul S3
 MONTERINGSANVISNING LÄNKHJUL S3 Art.no. 8822117 Rev.2018-01 Link to english Monteringsanvisning för: Länkhjul S3 art.nr. 2002010 Länkhjul S3 90 mm art.nr. 2002020 Länkhjul S3 120 mm art.nr. 2002030 Länkhjul
Schenker Privpak AB Telefon VAT Nr. SE Schenker ABs ansvarsbestämmelser, identiska med Box 905 Faxnr Säte: Borås
 Schenker Privpak AB Interface documentation for web service packageservices.asmx 2012-09-01 Version: 1.0.0 Doc. no.: I04304b Sida 2 av 7 Revision history Datum Version Sign. Kommentar 2012-09-01 1.0.0
Accepterad monteringsanvisning 2016:1. Focus (RSK: ) Focus 100 CoolStart (RSK: ) (RSK: )
 Focus 100 CoolStart (RSK: ) (RSK: )") EN Table of contents 1 Instructions for use / assembly instructions 2 Assembly 4-5 Adjustment 6 Dimensions 7 Flow diagram 7 Operation 8 Spare parts 9-10 Cleaning 11 Test certificate 12 Contact information
EN Table of contents 1 Instructions for use / assembly instructions 2 Assembly 4-5 Adjustment 6 Dimensions 7 Flow diagram 7 Operation 8 Spare parts 9-10 Cleaning 11 Test certificate 12 Contact information
 INSTALLATION INSTRUCTIONS Accessory S P/N 08E12-SZT-100 Application CR-Z Publications No. Issue Date SEP PARTS LIST Left illuminated door sill trim Right illuminated door sill trim Illumination harness
(SV) Installationsmanual för duschkabiner och ångbastukabiner (EN) Installation manual for shower cabins and steam cabins
 Installationsmanual för duschkabiner och ångbastukabiner (EN) Installation manual for shower cabins and steam cabins") Arrow Skandinavien AB Tel: +46 (0)31 330 00 10 www.arrowshower.com (SV) Installationsmanual för duschkabiner och ångbastukabiner (EN) Installation manual for shower cabins and steam cabins 6030 6130 Ver:
Arrow Skandinavien AB Tel: +46 (0)31 330 00 10 www.arrowshower.com (SV) Installationsmanual för duschkabiner och ångbastukabiner (EN) Installation manual for shower cabins and steam cabins 6030 6130 Ver:
CompactAIR Center Ventilation - Filtrering - Uppvärmning CompactAIR Center Ventilation - Filtration - Heating
 CompactAIR / CompactAIR CompactAIR Center Ventilation - Filtrering - Uppvärmning CompactAIR Center Ventilation - Filtration - Heating Typenschlüssel / Type Code Beteckning / Type code Compact AIR / CompactAIR
Popcorn maker Popcorn maker / Popcorn maker
 Manual/Bruksanvisning/Bruksanvisning Popcorn maker Popcorn maker / Popcorn maker ENG SE NO Item. No 900101210101 ENG Thank you for choosing to purchase a product from Rusta! Read through the entire manual
1.1. INSTALLERA EN APPARAT... 68 1.2. INSTALLERA TVÅ APPARATER... 68
 INNEHÅLLSFÖRTECKNING Kapitel 1: INSTALLATION...68 1.1. INSTALLERA EN APPARAT... 68 1.2. INSTALLERA TVÅ APPARATER... 68 Kapitel 2: FUNKTIONER...69 2.1. 6th SENSE / GREEN INTELLIGENCE... 69 2.2. DÖRRLARM...
Quick Start Guide. To switch the TV on. cable to connect the two units together. To select the TV broadcasts. To HDMI connection on.
 Quick Start Guide 1 Insert the batteries into the remote control Lift the cover on the back of the remote upward gently. Install two AAA batteries. Make sure to match the + and - ends of the batteries
Schenker Privpak AB Telefon 033-178300 VAT Nr. SE556124398001 Schenker ABs ansvarsbestämmelser, identiska med Box 905 Faxnr 033-257475 Säte: Borås
 Schenker Privpak AB Interface documentation for web service packageservices.asmx 2010-10-21 Version: 1.2.2 Doc. no.: I04304 Sida 2 av 14 Revision history Datum Version Sign. Kommentar 2010-02-18 1.0.0
INSTALLATION. (SE) Duschkabin och ångbastu (UK) Shower cabins and steam cabins. Model
 Duschkabin och ångbastu (UK) Shower cabins and steam cabins. Model") 1 INSTALLATION (SE) Duschkabin och ångbastu (UK) Shower cabins and steam cabins Model 6004 6005 6006 6007 6015 6016 6025 6026 6030 6036 6106 6116 6126 6130 Arrow Skandinavien AB www.arrowshower.com Tel.
1 INSTALLATION (SE) Duschkabin och ångbastu (UK) Shower cabins and steam cabins Model 6004 6005 6006 6007 6015 6016 6025 6026 6030 6036 6106 6116 6126 6130 Arrow Skandinavien AB www.arrowshower.com Tel.
Här kan du sova. Sleep here with a good conscience
 Här kan du sova med rent samvete Sleep here with a good conscience MÅNGA FRÅGAR SIG hur man kan göra en miljöinsats. Det är egentligen väldigt enkelt. Du som har checkat in på det här hotellet har gjort
manual Powerbank 3X Solar Item: Linocell
 manual Powerbank 3X Solar Item: 96907 EN NO SV Linocell ENGLISH Overview 1. Solar panel 2. USB port 1 (1 A) 3. Power switch 4. LED indicators 5. USB port 2 (2.1 A) 6. Flashlight 7. Micro USB port Charge
S 2 Förvaras oåtkomligt för barn Keep out of the reach of children. S 3 Förvaras svalt Keep in a cool place
 Utdrag ur och översättning av Kemikalieinspektionens föreskrifter (KIFS 2005:7) om klassificering och märkning av kemiska produkter. Förteckningen finns även i Klassificeringslistan (KIFS 2005:5). Excerpt
VARIOBARRIER S/M MIMSAFE BY CHOICE
 VAROBARRR S/M MMSA BY CHOC K L A B D M C H A B C D 522 K 524 Right leg Right leg 514L 514R 510L 510R L 526L M 526R S508 S509 521 6X 521 + H 527 529 528 8X/1 18X 8X/1 M-460641AL M-SM6X14A M-460641B M-M37202_2014
säkerhetsutrustning / SAFETY EQUIPMENT
 säkerhetsutrustning / SAFETY EQUIPMENT Hastighetsvakt / Speed monitor Kellves hastighetsvakter används för att stoppa bandtransportören när dess hastighet sjunker under beräknade minimihastigheten. Kellve
Isolda Purchase - EDI
 Isolda Purchase - EDI Document v 1.0 1 Table of Contents Table of Contents... 2 1 Introduction... 3 1.1 What is EDI?... 4 1.2 Sending and receiving documents... 4 1.3 File format... 4 1.3.1 XML (language
Accepterad monteringsanvisning 2016:1. Talis E ( ) ( ) Talis E 110 CoolStart ( )
 ( ) Talis E 110 CoolStart ( )") EN Table of contents 1 Instructions for use / assembly instructions 2 Assembly 4-6 Test certificate 6 Adjustment 7 Dimensions 8 Flow diagram 8 Operation 9 Spare parts 10-11 Cleaning 12 Contact information
EN Table of contents 1 Instructions for use / assembly instructions 2 Assembly 4-6 Test certificate 6 Adjustment 7 Dimensions 8 Flow diagram 8 Operation 9 Spare parts 10-11 Cleaning 12 Contact information
Användarhandbok. MHL to HDMI Adapter IM750
 Användarhandbok MHL to HDMI Adapter IM750 Innehåll Inledning...3 MHL to HDMI Adapter-översikt...3 Komma igång...4 Smart Connect...4 Uppgradera Smart Connect...4 Använda MHL to HDMI Adapter...5 Ansluta
Monteringsanvisning Podie T 4100 K
 Monteringsanvisning Podie T 4100 K Monteringsanvisning Förbered fundamentet 1. Montera ställfötterna. Montera tvättmaskin SV 1. Fäst gaffelbeslagen i bakkant med brickor och skruv. OBS! Placera beslagen
DAMPER EQAZ-12, EQAZ-13, STAZ-30, STBZ-30
 DAMPER EQAZ-12, EQAZ-13, STAZ-30, INSTALLATION INSTRUCTION EQAZ-12 DAMPER, DAMPER ACTUATOR AND EQAZ-13LEVER ACTUATOR DAMPER ACTUATION The damper can be actuated by means of the, damper actuator (accessory)
Active Speaker System X-Line 50 AW
 Active Speaker System X-Line 50 AW Important Safety Information: Read all documentation before operating your equipment. Retain all documentation for future reference. Save the carton and packing material
Problem som kan uppkomma vid registrering av ansökan
 Problem som kan uppkomma vid registrering av ansökan Om du har problem med din ansökan och inte kommer vidare kan det bero på det som anges nedan - kolla gärna igenom detta i första hand. Problem vid registrering
TEXTURED EASY LOCK BLOCK INSTALLATION GUIDE. australianpaving.com.au
 TEXTURED EASY LOCK BLOCK INSTALLATION GUIDE 1800 191 131 australianpaving.com.au TEXTURED EASY LOCK BLOCK The Textured Easy Lock Block retaining wall system is the premium retaining wall product for near
Vanliga frågor om Duocom (för installatör eller reparatör) GB Frequently asked questions about Duocom (for installer or repairman)
 GB Frequently asked questions about Duocom (for installer or repairman)") Manual SE Vanliga frågor om Duocom (för installatör eller reparatör) GB Frequently asked questions about Duocom (for installer or repairman) 1 SE VANLIGA FRÅGOR OM DUCOM... 3 1.1 Det hörs inget ljud i
Manual SE Vanliga frågor om Duocom (för installatör eller reparatör) GB Frequently asked questions about Duocom (for installer or repairman) 1 SE VANLIGA FRÅGOR OM DUCOM... 3 1.1 Det hörs inget ljud i
Anvisning för Guide for
 Anvisning för Guide for PRISMA SENSOR 1 96243235zPC Montering i tak/installation in the ceiling Byte av kupa/change of diffuser 2 Installation Installation från gavel / Installation from the end Installationskabel
Industri-Vågar WEIGHING TENSIOMETER MODEL WT12 SERVICE ELLER KALIBRERING RING
 Industri-Vågar WEIGHING TENSIOMETER MODEL WT12 SERVICE ELLER KALIBRERING RING 040-984200 The WF12 can be rigged in any position to satisfy any loading condition: suspended weights, inserted in tensioned
Här kan du checka in. Check in here with a good conscience
 Här kan du checka in med rent samvete Check in here with a good conscience MÅNGA FRÅGAR SIG hur man kan göra en miljöinsats. Det är egentligen väldigt enkelt. Du som har checkat in på det här hotellet