IH SE... 6 GB... 8 DE... 20
|
|
|
- Vilhelm Ivarsson
- för 9 år sedan
- Visningar:
Transkript
1 SE... 6 GB... 8 DE... 20
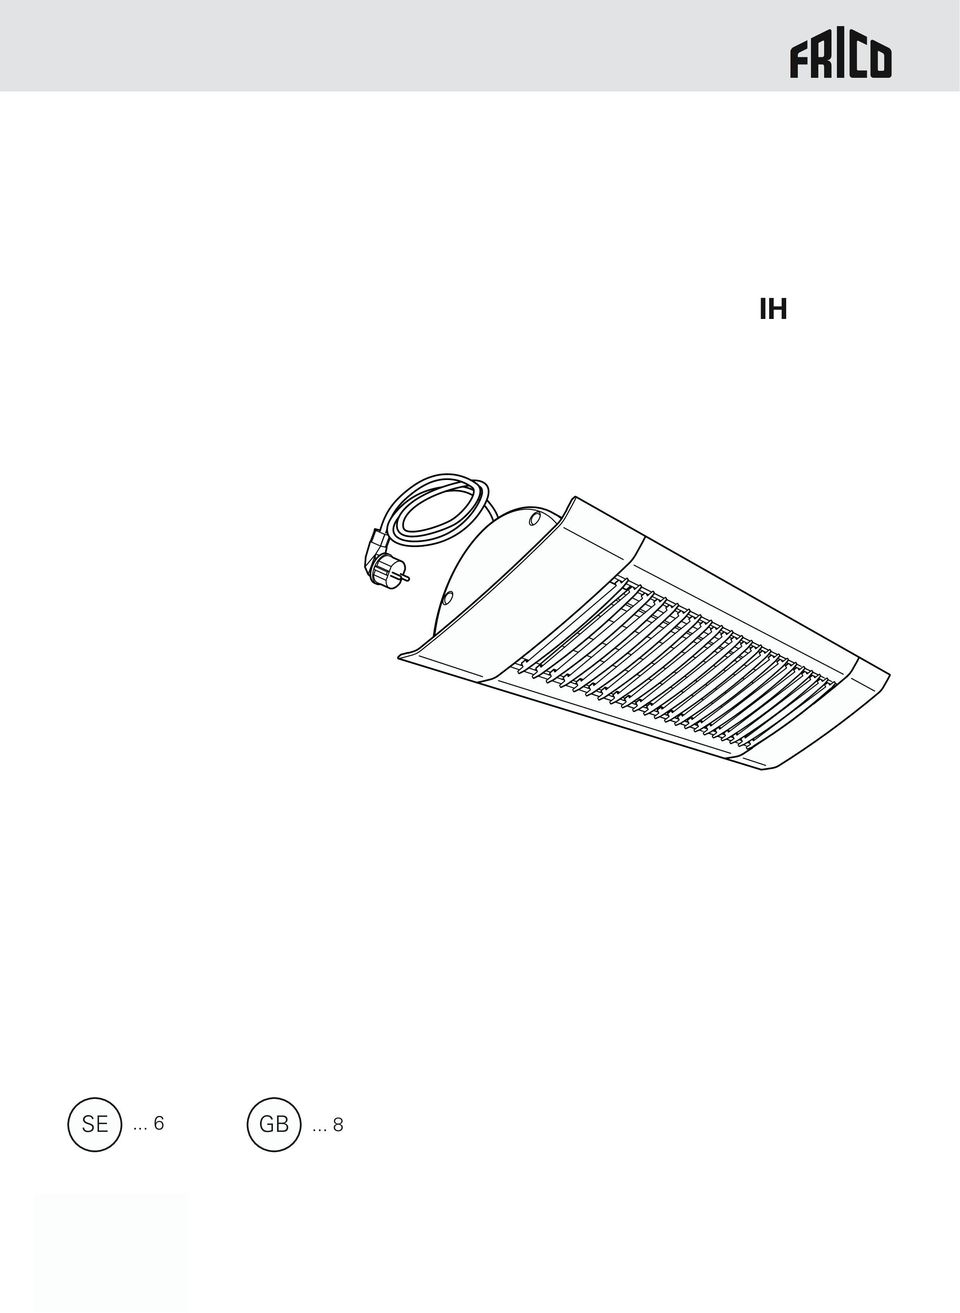
2 Positioning A B C Fig. 1: The heaters should heat from at least two directions for even heating Type [mm] A 200 B 1000 C 1800 Fig. 2: Minimum mounting distance 46,5 ø8 17,5 25, Fig. 3: Bracket measurements 2
![for even heating Type [mm] A 200 B 1000 C 1800 Fig.](/docs-images/48/5410814/images/page_2.jpg "2: Minimum mounting distance 46,5 ø8 17,5 25,5 35 24 60")
3 160 0,9 m Fig. 4 Replacing the halogen lamp Fig. 5 3

4 Wiring diagrams Timer control CBT LN Max load 3500W 230V~ L N L N L N Timer control with contactor CBT LN V~ 400V3~ L N L1 L2 L3 N L N L N L N 4

5 Technical specifications Infrared heater W with wide heat distribution, installation height m 3 Type E-nr (SE) EL-nr (NO) Heat output (1) [W] Voltage (2) Amperage (3) Max. filament temperature (4) [ C] [V] [A] [kg] W V~ 4, ,9 W V~ 6, ,9 Technical specifications Infrared heater F with directed heat distribution, installation height m 3 Type E-nr (SE) EL-nr (NO) Heat output (1) [W] Voltage (2) Amperage (3) Max. filament temperature (4) [ C] [V] [A] [kg] F V~ 4, ,9 F V~ 6, ,9 *) without brackets Protection class : (IPX4), splash-proof design. CE compliant. Weight (5) Weight (5) (1) SE: GB: NO: FR: RU: DE: PL: FI: ES: Effekt Output Effekt Puissance Выходная мощность Abgabe Moc Teho Potencia (4) SE: GB: NO: FR: RU: DE: PL: FI: ES: Maximal yttemperatur Max. surface temperature Maksimal overflatetemp. Température de surface Max. темпер. греющ. поверх. Max. Oberflächentemperatur Max. temperatura powierzchni grzewczej Maks. pintalämpötila Máxima temperatura de superficie (2) SE: GB: NO: FR: RU: DE: PL: FI: ES: Spänning Voltage Spenning Tension Напряжение Spannung Napięcie Jännite Tensión (5) SE: GB: NO: FR: RU: DE: PL: FI: ES: Vikt Weight Vekt Poids Вес Gewicht Waga Paino Peso (3) SE: GB: NO: FR: RU: DE: PL: FI: ES: Ström Amperage Strøm Intensité Сила тока Strom Natężenie prądu Virranvoimakkuus Intensidad 5
![heat distribution, installation height 2.3 3.5 m 3 Type E-nr (SE) EL-nr (NO) Heat output (1) [W] Voltage (2) Amperage (3) Max.](/docs-images/48/5410814/images/page_5.jpg "filament temperature (4) [ C] [V] [A] [kg] F10 85 701 21 54 325 84 1000 230V~ 4,3 2200 1,9 F15 85 701 22 54 325 85 1500 230V~ 6,5 2200 1,9 *) without brackets Protection class : (IPX4), splash-proof")
6 SE Montage- och bruksanvisning Allmänna anvisningar Läs noga igenom denna bruksanvisning före installation och användning. Spara manualen för framtida bruk. Produkten får endast användas till det som framgår av denna montage- och bruksanvisning. Garantin gäller endast om anvisningen har följts och produkten använts såsom är beskrivet. Användningsområde Halogeninfra är det perfekta valet för utsatta utomhusmiljöer där designen är viktig som t.ex. altaner, uteserveringar etc. kan också användas som punktuppvärmning i stora lokaler såsom kyrkor, industrier och lager. finns i två olika utföranden. W ger en behaglig värme i vistelsezonen från nära håll och med en bred värmespridning. F har en mer fokuserad värmespridning och är avsedd att installeras på högre höjd. Kapslingsklass: IPX4. Placering Värmarna ska placeras så de innesluter det område som önskas uppvärmt, se fig. 3. Normal monteringshöjd är 2 3 meter över marken/golvet. En tumregel för halogeninfror är att W/m² höjer den upplevda temperaturen med cirka 10 C. Effektbehovet kan minskas om området som ska värmas upp är skyddat. Om området bara har tak, bör minst 800 W/m² installeras, medan 600 W/m² räcker om området har tre väggar. För slutna utrymmen måste effektbehovet beräknas. En person upplever bäst komfort om värmestrålningen kommer från minst två håll. För W som ger en bred värmespridning är rekommenderad installationshöjd 1,8 2,5 m och för F som ger en fokuserad värmespridning är rekommenderad installationshöjd 2,3 3,5 m. Montering monteras fast på vägg med konsolen. Värmaren kan även monteras på t.ex. ett parasoll eller en stolpe, för detta används en lämplig U-bult (ingår inte) ihop med den medlevererade konsolen. Även andra alternativ är möjliga, t ex. pendla från tak. Värmaren ska monteras horisontellt, för att lampan ska vara i horisontellt läge. Värmaren kan riktas rakt ut från väggen eller vinklas upp till 45. För minimimått, se fig Fäst konsolen på väggen, se fig. 2. Observera att väggkonsolen inte får monteras enbart med skruvarna i nyckelhålen. 2. Ta loss skruvarna som sitter på apparatens fäste vid leverans. 3. Haka fast fästet i konsolen. 4. Lås fast i önskat läge med skruvarna. Observera att apparaten inte får placeras direkt under fast vägguttag. Elinstallation är försedd med en 0,9 meter lång sladd med stickpropp för anslutning till jordat uttag. Anslutningskabeln får inte ligga mot apparaten eftersom ytan är varm eller träffas av värmestrålningen. Om kabeln ska bytas kontakta en fackman, observera att på grund av höga temperaturer i värmaren krävs att kabeln som används är av typ H05 SS-F 3G1 mm² eller motsvarande. En halogenlampa har en hög startström och därför bör vägguttaget skyddas av en trög säkring. Vid osäkerhet kontakta en behörig elinstallatör. 6

7 SE Byte av halogenlampa Värmelampan i är av högsta kvalitet och om den inte utsätts för mekanisk påfrestning i form av vibrationer och stötar kommer den att hålla länge. Livslängden är beroende på omgivningstemperaturen och hur värmaren är monterad. När värmaren installeras fritt och utomhus blir temperaturen låg och livslängden på lampan kan förväntas bli upp till 3000 timmar. Lampan skall bytas av en installatör eller annan kompetent personal. - Bryt strömmen. - Vänta tills apparaten kallnat. 1. Ta bort locken i båda gavlarna (fyra skruvar). 2. Drag ut gallret åt ena sidan. 3. Ta bort båda reflektorgavlarna (två skruvar). 4. Lossa anslutningarna i plintarna. 5. Drag ut lampan ur lamphållarna. - Kontrollera att ersättningslampan har rätt effekt och spänning. - Montera den nya lampan. Observera att lampan inte får vidröras med fingrarna, använd handskar eller liknande. - Skyddsslangen ska sättas tillbaka runt kablarna, så att inte kablarna skadas när gallret monteras. - Sätt ihop apparaten igen. Säkerhet Apparaten har vid drift heta ytor! Apparaten får ej övertäckas helt eller delvis med brandfarligt material, då överhettning av apparaten kan medföra brandfara! Denna produkt är inte avsedd att användas av barn eller personer med nedsatt fysisk eller mental förmåga eller brist på erfarenhet och kunskap, om inte anvisningar angående produktens användning har getts av person med ansvar för deras säkerhet eller att denna person övervakar handhavandet. Barn skall hållas under uppsikt så att de inte kan leka med produkten. Värmaren är försedd med skyddsgaller för att hindra beröring eller att större föremål når den varma lampan. Apparaten får inte användas utan detta skyddsgaller. Se till så att brännbart material inte finns samlat på och nära värmaren Det fria avståndet till brännbart material i strålriktningen måste vara minst 1 meter. Se fig. 5. Skötsel Vid all service, reparation och underhåll ska strömförsörjningen till apparaten vara frånkopplad. Apparaten har inga rörliga delar så kravet på underhåll är litet, men den måste hållas ren från damm och smuts. Om reflektorn inte är ren kommer värmestrålningen från apparaten att minska och apparaten blir varmare. Större nedsmutsning kan också orsaka överhettning. Reflektorns yta är ömtålig och måste därför rengöras med försiktighet. Om reflektorn blir nedsmutsad ska den rengöras eller bytas ut av en fackman. 7
. 2. Drag ut gallret åt ena sidan. 3. Ta bort båda reflektorgavlarna (två skruvar). 4.")
8 GB Assembly and operating instructions General Instructions Read these instructions carefully before installation and use. Keep this manual for future reference. The product may only be used as set out in the assembly and operating instructions. The guarantee is only valid if the product is used in the manner intended and in accordance with the instructions. Application Infrared halogen is the perfect choice for exposed outdoor environments where design is important, for example, balconies, pavement cafés, etc. can also be used as local heating in large premises such as churches, industries and warehouses. is available in two different designs. W gives a comfortable heat in the occupied zone from close range and also wider heat distribution. F has more direct heat distribution and is designed to be installed higher up. Infrared halogen is energy efficient, as it is only used when there is a heating requirement. Protection class: IPX4 Positioning The heaters must be placed so that they enclose the area to be heated, see fig. 3. The normal assembly height is 2 3 metres above the ground/floor. A rule of thumb for infrared halogen is that W/m² increases the experienced temperature by about 10 C. The output demand can be reduced if the area to be heated is protected. If the area only has a roof, at least 800 W/m² should be installed. 600 W/m² is sufficient if the area has three walls. For enclosed areas, the output demand must be calculated. Optimum comfort is achieved if the heat is distributed from at least two directions. We recommend an installation height of m for W which has wide heat distribution and an installation height of m for F which gives a focused heat distribution. Mounting is mounted on the wall using the bracket. The heater can also be mounted on e.g. a parasol or a post, a suitable U-bolt (not included) is used for this together with the supplied console. Other alternatives are possible, e.g. suspended from the ceiling. The heater must be mounted in a horizontal position in order to keep the lamp horizontal. The heater can be directed straight out from the wall or angled up to 45. For minimum measurements, see fig Secure the bracket on the wall, see fig. 2. Note that the wall bracket must not only be fitted with the screws in the keyhole slots. 2. Remove the screws fixed to the unit's attachment on delivery. 3. Hook the attachment on the bracket. 4. Lock in position with the screws. Note that the unit must not be placed directly under the permanent wall socket. Electrical installation is equipped with a 0.9 metre cord with plug for connection to an earthed outlet socket. The connection cord must not rest against the unit as the surface becomes hot or can be hit by thermal radiation. Contact an electrician if the cord needs to be changed. Note that due to the high temperatures in the heater, a cord of the type H05 SS-F 3G1 mmor the like should be used. As the halogen lamp has a high starting current the wall socket should be fuse protected by a slow burn fuse. In the event of uncertainty contact an electrician. 8

9 GB Replacing the halogen lamp The heat lamp in is of the highest quality and unless it is subjected to mechanical strains in the form of vibrations and impact it will last for a long time. The service life is dependent on the ambient temperature and how the heater is installed. When the heater is installed freely and outdoors the temperature will be low and the life of the lamp can be expected to be in the region of 3000 hours. The lamp must be replaced by an installer or other skilled person. - Disconnect the power supply. - Wait until the unit is cold. 1. Remove the covers at both ends (four screws). 2. Pull the grille to one side. 3. Remove both reflector ends (two screws). 4. Loosen the connections on the terminal block. 5. Pull the lamp out of the lamp holders. - Check that the replacement lamp has the correct output and voltage. - Fit the new lamp. Note do not touch the lamp with your fingers, wear gloves or the like. - The protective tube must be refitted to the cables, so that the cables are not damaged when the grille is fitted. - Reassemble the unit again. See fig. 5. Safety During operation the surfaces of the unit are hot! The unit must not be fully or partially covered with inflammable materials, as overheating can result in a fire risk! This product is not designed to be used by children or persons with reduced physical or mental ability or a lack of experience and knowledge, unless instruction regarding the product's use has been given by a person with responsibility for their safety or that this person supervises operation. Children must be kept under supervision to ensure they do not play with the product. The heater is equipped with a protective grille to prevent contact or to prevent large objects from touching the hot lamp. The unit must not be used without this protective grille. Ensure that there are no inflammable materials gathered on or close to the heater. The free space to the inflammable material in the direction of radiation must be at least 1 meter. Maintenance The power supply to the unit must be disconnected during all service, repair and maintenance work. The unit has no moving parts so the maintenance requirement is small, but it must be kept clean and free from dust and dirt. If the reflector is not clean the thermal radiation from the unit will decrease and the heater will become hotter. A large amount of dirt can cause overheating. The surface of the reflector is sensitive and must be cleaned with care. If the reflector is dirty it must be cleaned or replaced by a specialist. 9
. 2.")
10

11

12 Main office Frico AB Tel: Box 102 Fax: SE Partille Sweden United Kingdom Frico Limited Tel: +44 (0) Cheston Road Fax: +44 (0) B7 5EJ UK-Birmingham United Kingdom Norway Frico AS Tel: P.B 6756 Etterstad Fax: NO-0609 Oslo Norway France Frico SAS Tel: avenue Carnot Fax: Neuville sur Saône info@frico.fr France Spain Frico repr. office in Spain Tel: C/Montecarlo Nº 14 Fax: P.I. Uranga ES Fuenlabrada mailbox@frico.com.es Spain Netherlands Frico BV Tel: Wethouder van Nunenst. 12d Fax: TK Helmond info@fricobv.nl Netherlands For latest updated information, see: Russia Frico repr. office in Russia Tel: Lavrov per RU Moscow Fax: Russia frico@trankm.ru China Frico repr. office in China Tel: Rm 702, Mod. Comm. Build. Fax: , New Jin qiao Rd frico@sohu.com Shanghai P.R. China Austria Frico GmbH Tel: Kolpingstraße Wien office@altexa-frico.at Austria Switzerland Gutekunst AG Baselstrasse 22 CH-4144 Arlesheim Switzerland Tel: (nat) Fax: (nat) info@gutekunst-ag.ch Art no: , HH/LP

IHC ... 19 ...16 ... 22
 GB... 6 SE... 9 NO... 11 DE... 13 FR...16 ES... 19 RU... 22 Dimensions 160 0,9 m 77 147 500/676 169 46,5 ø8 17,5 25,5 35 24 60 115 Fig. 1: Wall bracket Positioning Fig. 2: The heaters should heat from
IH GB... 6 SE... 9 NO DE FR...16 ES RU... 22
 IH GB... 6 SE... 9 NO... 11 DE... 13 FR...16 ES... 19 RU... 22 IH Dimensions 160 0,9 m 77 147 500/676 169 46,5 ø8 17,5 25,5 35 24 60 115 Fig. 1: Wall bracket Positioning Fig. 2: The heaters should heat
Original instructions. Comfortinfra CIR11021C
 Original instructions Comfortinfra CIR11021C SE... 4 GB... 5 CIR11021C 1250 900 (recommended) 600 (min) 137 94 44 Type Output [W] CIR11021C 1000 1 2 CIR11021C 2 3 150 300 150 700 1800 4 3 SE CIR11021C
IR3000, IR4500, IR6000
 Original instructions SE... 8 GB... 9 O... 10 FR... 11 FI... 13 L... 14 DE... 16 PL... 18 RU... 19 IT... 21 Type [mm] [mm] IR3000 600 1125 IR4500 900 1500 IR6000 1200 1875 Minimum distance [mm] Ceiling
Original instructions. Infrared heater IRCF
 Original instructions Infrared heater SE...7 NO...9 GB...11 DE...13 FR...15 Fig. 1 Fig. 2 2 Fig. 3 3 Technical specifications Infrared heater 3 Type Heat output (1) [W] Voltage (2) Amperage (3) Dimensions
Infrared heater ELIR
 SE... 4 GB... 6 FR... 8 RU... 11 Infrared heater ELIR Minimum mounting distance Минимальные расстояния при установке ELIR 600 600 1800 400 1000 600 Mounting Установка NB! The lamp must be horizontal at
CAT kw
 AT 3 kw SE... 4 GB... 6 NO... 8 FR... 10 DE... 12 FI... 14 NL... 16 RU... 18 AT A min 300 mm B 10 A [mm] B [mm] [mm] 3 355 255 276 5 355 255 276 9 405 315 335 min 300 mm min 1,8 m Minimum distance in a
IR3000, IR4500, IR6000
 Original instructions IR3000, IR4500, IR6000 SE... 8 GB... 9 O... 11 FR... 13 FI... 15 L... 17 DE... 19 PL... 21 RU... 22 IT... 24 IR3000, IR4500, IR6000 Type IR3000 600 1125 IR4500 900 1500 IR6000 1200
Infrared heater ELIR
 SE... 4 G... 6 FR... 8 RU... 10 Infrared heater ELIR Minimum mounting distance Минимальные расстояния при установке ELIR Mounting Установка Fig. 1: Wall mounting Рис1 Настенное крепление N! The lamp must
Original instructions. Comfortinfra CIR DE NL FI RU... 20
 Original instructions Comfortinfra CIR SE... 6 O... 8 GB... 10 FR... 12 DE... 14 FI... 16 L... 18 RU... 20 CIR A B 137 94 44 Type Power [W] 230V~ 400V2~ A [mm] B* 1 [mm] B (min) [mm] CIR105 500 CIR10521-710
Kamrör / Ribbed pipe radiator
 Kamrör / Ribbed pipe radiator SE... 4 GB... 4 RU... 5 Kamrörsradiator / Ribbed pipe radiator Mått / Dimensions/Основные размеры A min 300 180 125 min 50 125 B 185 min 200 Typ/Type/Модель A [mm] B [mm]
Original instructions. Thermoplus
 Original instructions SE... 6 GB... 8 NO... 10 FR... 12 DE... 14 FI... 16 IT... 18 NL... 20 RU... 22 EC ECV Type A B EC450 1076 600 EC600 1505 900 EC750 1810 1200 EC900 2140 1800 Type A B ECV300 870 400
Infrared heater ELIR
 SE... 4 GB... 6 FR... 8 RU... 11 Infrared heater ELIR Minimum mounting distance Минимальные расстояния при установке ELIR 600 600 1800 400 1000 600 Mounting Установка NB! The lamp must be horizontal at
Tiger 20-30kW
 Tiger 20-0kW SE... 4 GB... 5 NO... 6 FR... 7 RU... 8 DE... 9 FI... 10 NL... 11 Tiger 20-0kW B A C A B C [mm] [mm] [mm] P20, P0, P05 60 590 600 Fig. 1 / Abb. 1 / Kuva 1 /Afb. 1 Tiger 20 kw P20 20V~ /400V~
Original instructions Elztrip EZ W
 Original instructions Elztrip 00 600-1500 W SE... 7 GB... 9 NO... 11 FR... 13 RU... 15 DE... 17 PL... 19 FI... 21 MÅTT Elztrip EZ 100 L [mm] A [mm] 06 1000 744 11 1500 1244 15 2000 1744 1 2 EZMVK 00 2
Original instructions. Thermocassette HP
 Original instructions Thermocassette HP SE... 6 GB... 8 NO... 10 FR... 12 DE... 14 FI... 16 RU... 18 Thermocassette HP HP3N HP6N 1,8 1,8 Minimum mounting distance [mm] A 80 B 50 C 500 D 1800 Flammable
Carboninfra IHC För mjuk och effektiv värme
 3 1150 1750 W Elvärme 2 modeller Carboninfra IHC För mjuk och effektiv värme Användningsområden Carboninfra IHC ger en mjuk och direkt värme som tillsammans med det behagliga skenet passar väl i miljöer
Elektra C ... 15 ... 9 GB... 11 NO... 13 ... 23 ... 17 ... 25 ... 29 ... 27
 SE... 9 GB... 11 NO... 13 FR... 15 RU... 17 DE... 19 PL... 21 FI... 23 NL... 25 ES... 27 IT... 29 ELC331 ELC623, ELC633, ELC923, ELC933, ELC1533 min 300 mm 9 16 300/240 445/336 445 375 300 340 375 430
Original instructions Elztrip EZ W
 Original instructions Elztrip 00 600-1500 W SE... 7 GB... 9 NO... 11 FR... 13 RU... 15 DE... 17 PL... 19 FI... 21 MÅTT Elztrip 00 L A 06N 870 655 11N 1470 1252 15N 1950 1731 1 2 EZMVK 00 2 Elztrip 00 3
Halogeninfra IH. För designade och utsatta utomhusmiljöer
 För designade och utsatta utomhusmiljöer Användningsområden Halogeninfra IH är kraftfull med en hög glödtrådstemperatur på 2200 C och är det perfekta valet för utsatta utomhusmiljöer där designen är viktig.
Spotlight Set Spotlightset / Spotlightsett
 Manual / Bruksanvisning / Bruksanvisning Spotlight Set Spotlightset / Spotlightsett ENG SE NO Item. No/Art. nr./art. nr. 995-9 ENG Thank you for choosing to purchase a product from Rusta! Read through
Original instructions. Thermoplus
 Original instructions Thermoplus SE... 5 GB... 7 NO... 9 FR... 11 DE... 13 FI... 15 IT... 17 NL... 19 RU... 21 Thermoplus Mounting on the wall Mounting on the ceiling Ceiling fixture Min. distance Ceiling
säkerhetsutrustning / SAFETY EQUIPMENT
 säkerhetsutrustning / SAFETY EQUIPMENT Hastighetsvakt / Speed monitor Kellves hastighetsvakter används för att stoppa bandtransportören när dess hastighet sjunker under beräknade minimihastigheten. Kellve
Infrared heater IRC15
 SE... 3 GB... 5 Infrared heater IRC15 IRC15 Minimum montageavstånd/mounting distance Min. 200 mm Min. 320 mm Min. 320 mm Rek. höjd/height 2.10-2.70 m Fig. 1 Väggmontage/Wall mounting Fig. 2: Beslag för
Comfortinfra CIR W. Comfortinfra CIR. För diskret design och funktion
 För diskret design och funktion Användningsområden CIR ger behaglig värme året runt på skyddade terrasser, balkonger och uteserveringar. CIR kan också användas för punktuppvärmning i verkstäder och lager.
Plain A262. För T16 (T5) lysrör. Innehåll. Monteringsanvisning. A. Instruktion för rampmontering
 lysrör. Innehåll. Monteringsanvisning. A. Instruktion för rampmontering") Plain A262 För T16 (T5) lysrör Innehåll Ramparmatur: ändmodul En stängd gavel/ en öppen gavel Plint i båda ändarna Överkopplingssladd 1 rampgavel 1 lysrörsbytare Ramparmatur: mellanmodul Plint i en ände
Plain A262 För T16 (T5) lysrör Innehåll Ramparmatur: ändmodul En stängd gavel/ en öppen gavel Plint i båda ändarna Överkopplingssladd 1 rampgavel 1 lysrörsbytare Ramparmatur: mellanmodul Plint i en ände
SAFETY PRECAUTIONS SPECIFICATIONS
 SAFETY PRECAUTIONS Read the instructions carefully before use and save them for future reference. Before you connect the appliance: Ensure that the voltage rating on the type plate corresponds to your
Nathi Skötbord Changing unit Table à langer murale Wickeltisch Verschoontafel Puslebord Cambiador de pared Přebalovací pult Fasciatoio
 Nathi Skötbord Changing unit Table à langer murale Wickeltisch Verschoontafel Puslebord Cambiador de pared Přebalovací pult Fasciatoio Пеленальный стол Tested and approved according to SS-EN 12221:2008+A1_2013
Carboninfra IHC. Carboninfra IHC. För mjuk och effektiv värme
 Carboninfra IHC För mjuk och effektiv värme Användningsområden Carboninfra IHC ger en mjuk och direkt värme som tillsammans med det behagliga skenet passar väl i miljöer där designen är viktig såväl inomhus
Original instructions. ADA Cool RU
 Original instructions SE... 4 GB... 6 NO... 8 FR... 10 RU... 12 DE... 14 PL... 16 FI... 18 ES... 20 NL... 22 1 58 L L2 218 251 231 110 26 117 2 L [mm] L2 [mm] ADAC090 900 747 ADAC120 1200 1047 3 4 30 2
ARC 32. Tvättställsblandare/Basin Mixer. inr.se
 ARC 32 Tvättställsblandare/Basin Mixer inr.se SE Användning och skötsel Manualen är en del av produkten. Bevara den under hela produktens livscykel. Vi rekommenderar er att noggrant läsa igenom manualen
SAFETY PRECAUTIONS SPECIFICATIONS
 SAFETY PRECAUTIONS Read the instructions carefully before use and save them for future reference. Before you connect the appliance: Ensure that the voltage rating on the type plate corresponds to your
Thermozone ADA Cool ... 6 ... 4 RU... 12
 SE... 4 GB... 6 NO... 8 FR... 10 RU... 12 DE... 14 PL... 16 FI... 18 ES... 20 NL... 22 1 D H L L H D ADAC090 900 235 215 mm ADAC120 1200 235 215 mm 2 E G A B A B E G ADAC090 95 747 216 110 mm ADAC120 95
IMPORTANT! RETAIN FOR FUTURE REFERENCE PLEASE READ CAREFULLY VIKTIGT! BEHÅLL FÖR FRAMTIDA REFERENS LÄS IGENOM INSTRUKTIONSMANUALEN
 Heart & Stripes Junior Bed Instructions Manual Instruktions Manual IMPORTANT! RETAIN FOR FUTURE REFERENCE PLEASE READ CAREFULLY VIKTIGT! BEHÅLL FÖR FRAMTIDA REFERENS LÄS IGENOM INSTRUKTIONSMANUALEN Thank
Elektra V GB... 8 NO
 SE... 6 GB... 8 NO... 10 FR... 12 RU... 14 DE... 16 PL... 18 FI... 20 ELV3333, ELV3344, ELV5333, ELV6344 375 300 340 min 300 mm c-c 277 24 9 16 min 300 mm min 500 mm Fig. 1 10 419 415 375 333 9 28 Fig.
Uteserveringar. luftridåer värmestrålare värmefläktar konvektorer. Skapa komfort och förläng sommaren. Uteserveringar
 Skapa komfort och förläng sommaren Uteserveringar Skapa komfort och förläng sommaren Uteserveringar luftridåer värmestrålare värmefläktar konvektorer Värmestrålning så fungerar det Fricos värmestrålare
Windlass Control Panel v1.0.1
 SIDE-POWER Windlass Systems 86-08950 Windlass Control Panel v1.0.1 EN Installation manual Behåll denna manual ombord! S Installations manual SLEIPNER AB Kilegatan 1 452 33 Strömstad Sverige Tel: +46 525
Halogeninfra ELIR. Halogeninfra ELIR. För utomhusmiljöer där stor flexibilitet önskas
 Halogeninfra ELIR För utomhusmiljöer där stor flexibilitet önskas 3 1 modell 1200 W Elvärme Användningsområden ELIR:s intensiva värmeavgivning gör den lämplig för alla utomhusmiljöer och för tuff industrimiljö.
BOW. Art.nr
 190412 BOW Art.nr 80000637-80000642 SE INNEHÅLL Komponenter 3 Produktfakta 3 Montering 4 Kontakt 8 EN CONTENTS Components 3 Product facts 3 Installation 4 Contact 8 KOMPONENTER COMPONENTS x 3 x 3 PRODUKTFAKTA
Kamrör / Ribbed pipe radiator
 Kamrör / Ribbed pipe radiator SE... 4 GB... 4 RU... 5 FR... 5 DE... 6 Kamrörsradiator / Ribbed pipe radiator Mått / Dimensions / Основные размеры / Dimensions / Abmessungen 125 A B A [mm] B [mm] 125-12B
VASSVIK FIXED STAND SE / ENG
 VASSVIK FIXED STAND SE / ENG SE VIKTIGT Läs noga igenom instruktionerna före användning och spar dessa för framtida bruk. VARNING: Barnets huvud bör inte ligga lägre än barnets kropp. Lägg inte till ytterligare
Comfort Panel SZR.... xx... 13
 SE... xx NO... xx SE... 11 GB... 13 1. 3/4" male threaded connections (included, not mounted) 2. Steel radiant panel 3. Suspension 4. Insulation 30 mm (included, not mounted) 5. Insulation holding strip
Installation Instructions
 Installation Instructions (Cat. No. 1794-IE8 Series B) This module mounts on a 1794 terminal base unit. 1. Rotate keyswitch (1) on terminal base unit (2) clockwise to position 3 as required for this type
Infrasmart IHS20W/B/S24
 Infrasmart IHS20W/B/S24 GB... 3 SE... 9 NO... 11 DE... 13 FR...16 ES... 19 FI... 22 NL... 22 DK... 22 2 Infrasmart IHS20W/B/S24 Infrasmart IHS20W/B/S24 SE MONTAGE- OCH BRUKSANVISNING Bäste kund! Vi ber
INSTALLATION INSTRUCTIONS
 INSTALLATION - REEIVER INSTALLATION INSTRUTIONS RT0 RF WIRELESS ROOM THERMOSTAT AND REEIVER MOUNTING OF WALL MOUTING PLATE - Unscrew the screws under the - Pack contains... Installation - Receiver... Mounting
KRT19, KRTV19, KRT1900
 SE... FR... 7 DK... NO... 4 DE... 8 IT... FI... 5 NL... 9 ES... GB... 6 RU... 0 PT... 4 Instruction sheet PS970 SHT067N600(00) KRT900, KRT90, KRTV9 Specification Description Spezifikation Specificatie
Accepterad monteringsanvisning 2016:1. Metris (RSK: ) Metris S (RSK: ) Metris (RSK: )
 Metris S (RSK: ) Metris (RSK: )") EN Table of contents 1 Instructions for use / assembly instructions 2 Assembly 4-5 Adjustment 6 Operation 7 Dimensions 8-9 Flow diagram 8-9 Spare parts 10-12 Cleaning 13 Test certificate 14 Contact information
EN Table of contents 1 Instructions for use / assembly instructions 2 Assembly 4-5 Adjustment 6 Operation 7 Dimensions 8-9 Flow diagram 8-9 Spare parts 10-12 Cleaning 13 Test certificate 14 Contact information
BBT057/ BBC057 BBCD057/ BBT057-NL HOLDEN COLORADO 9/2016+ HOLDEN TRAILBLAZER WD & 4WD Models
 INSTALLATION GUIDE BBT057/ BBC057 BBCD057/ BBT057-NL HOLDEN COLORADO 9/2016+ HOLDEN TRAILBLAZER 2017+ 2WD & 4WD Models Ironman 4x4 BBT/ BBC/ BBCD/BBT057-NL Bull Bars fit to a Holden Colorado 9/2016+ It
Ringmaster RM3 - RM 5 RM3 RM 4 RM 5
 RM3 - RM 5 Ringmaster We offer ball pickers in 5 different sizes with a picking width of up to 6 m. RM3 - RM5 has a self-supporting chassis so that the collected balls do not place a load on the picking
SAFETY PRECAUTIONS SPECIFICATIONS
 SAFETY PRECAUTIONS Read the instructions carefully before use and save them for future reference. Before you connect the appliance: Ensure that the voltage rating on the type plate corresponds to your
AirCare - Bakteriekontroll i offentliga utrymmen
 AirCare - Bakteriekontroll Ohygiensk toalett ger negativa kunder Bakterier finns överallt i vår omgivning och i våra kroppar. I skolor och på andra platser där det finns mycket människor trivs de extra
A TASTE OF THE FUTURE
 A TASTE OF THE FUTURE Servicemanual SE Rostfri Värmehäll för glaskanna COFFEE QUEEN V2 S SE/GB Din återförsäljare / Your retail dealer GB Stainless Warmer for glasspot Rev. 071017 1. Innehåll / Table of
VARIOBARRIER S/M MIMSAFE BY CHOICE
 VAROBARRR S/M MMSA BY CHOC K L A B D M C H A B C D 522 K 524 Right leg Right leg 514L 514R 510L 510R L 526L M 526R S508 S509 521 6X 521 + H 527 529 528 8X/1 18X 8X/1 M-460641AL M-SM6X14A M-460641B M-M37202_2014
IMPORTANT! RETAIN FOR FUTURE REFERENCE PLEASE READ CAREFULLY VIKTIGT! BEHÅLL FÖR FRAMTIDA REFERENSLÄS IGENOM INSTRUKTIONSMANUALEN NOGGRANT
 13060 Basic Cot One Instruction Manual Instruktion Manual IMPORTANT! RETAIN FOR FUTURE REFERENCE PLEASE READ CAREFULLY VIKTIGT! BEHÅLL FÖR FRAMTIDA REFERENSLÄS IGENOM INSTRUKTIONSMANUALEN NOGGRANT Thank
Thermozone AR 200 E ... 12 ... 8 ... 13
 Thermozone AR 200 E SE... 8 GB... 12 GB... xx FR... 12 RU... 13 DE... xx PL... xx DE... 14 FI... 15 PL... 16 Dimensions and connections 1000 940 AR220 2042 2 Mounting and installation Fig. 1: The mounting
Your No. 1 Workout. MANUAL pro
 Your No. 1 Workout MANUAL pro Innehåll/Contents Svenska Viktigt om säkerhet Specifikationer & delar Rekommenderade övningar 3 5 6-7 2 English Safety instructions Specifications & parts Recommended exercises
Ersättning styrkort GOLD, stl 1-3, Version 1-3/ Replacement control circuit board GOLD, sizes 1-3, Version 1-3
 SPGO0867.0900 Ersättning styrkort GOLD, stl -, Version -/ Replacement control circuit board GOLD, sizes -, Version -. Allmänt När styrkortet byts ut försvinner alla injusterade värden som tex temperaturreglering,
P650 - Takscreen. Installationsguide EN
 P650 - Takscreen Installationsguide 1309-150507EN V650-Tallinn Installation manual Montera främre linhjul 12 13 Placera linan över linhjulet och skruva tillbaka täcklocket på linhjulhuset (7). Öppna linhjulshuset
Dokumentnamn Order and safety regulations for Hässleholms Kretsloppscenter. Godkänd/ansvarig Gunilla Holmberg. Kretsloppscenter
 1(5) The speed through the entire area is 30 km/h, unless otherwise indicated. Beware of crossing vehicles! Traffic signs, guardrails and exclusions shall be observed and followed. Smoking is prohibited
Joki Joki Air. JCD70-xx JAD90-xx. lasiesta.com. Manual. Betriebsanleitung. Manuel. Manual. Manuale. Gebruiksaanwijzing.
 lasiesta.com LA SIESTA GmbH Im Wiesenweg 4 55270 Jugenheim Germany Tel: +49 6130 9119-19 LA SIESTA Inc. 7355 S.W. 87 th Ave., Ste. 100 Miami, FL 33173 USA Tel: +1 786 401-1138 EN DE FR ES IT NL DA SV FI
Original instructions. Panther 6-15 kw
 Original instructions 6-15 kw SE... 8 GB... 10 NL... 12 IT... 14 ES... 16 FI... 18 DE... 20 FR... 22 NO... 24 RU... 26 PL... 28 6/15 Fig 1. Bracket 100 ø7 520 90 ø6,5 ø14 450 510 Fig 2. Ceiling Wall 30
Accepterad monteringsanvisning 2016:1. Focus (RSK: ) 1 (12)
 1 (12)") EN Table of contents 1 Instructions for use / assembly instructions 2 Assembly 4 Adjustment 5 Dimensions 6 Flow diagram 6 Operation 7 Spare parts 8 Cleaning 9 Test certificate 10 Contact information 12
EN Table of contents 1 Instructions for use / assembly instructions 2 Assembly 4 Adjustment 5 Dimensions 6 Flow diagram 6 Operation 7 Spare parts 8 Cleaning 9 Test certificate 10 Contact information 12
Anvisning för Guide for
 Anvisning för Guide for PRISMA SENSOR 1 96243235zPC Montering i tak/installation in the ceiling Byte av kupa/change of diffuser 2 Installation Installation från gavel / Installation from the end Installationskabel
Monteringsanvisning Nödutrymningsbeslag ASSA 179E
 Monteringsanvisning Nödutrymningsbeslag ASSA 179E Denna monteringsanvisning avser nödutrymningsbeslag ASSA 179E med artikelnummer 364371 i kombination med låshus Abloy EL580 med artikelnummer EL580100011.
PRESS FÄLLKONSTRUKTION FOLDING INSTRUCTIONS
 PRESS FÄLLKONSTRUKTION FOLDING INSTRUCTIONS Vänd bordet upp och ner eller ställ det på långsidan. Tryck ner vid PRESS och fäll benen samtidigt. OBS! INGA STORA KRAFTER KRÄVS!! Om benen sitter i spänn tryck
Information technology Open Document Format for Office Applications (OpenDocument) v1.0 (ISO/IEC 26300:2006, IDT) SWEDISH STANDARDS INSTITUTE
 v1.0 (ISO/IEC 26300:2006, IDT) SWEDISH STANDARDS INSTITUTE") SVENSK STANDARD SS-ISO/IEC 26300:2008 Fastställd/Approved: 2008-06-17 Publicerad/Published: 2008-08-04 Utgåva/Edition: 1 Språk/Language: engelska/english ICS: 35.240.30 Information technology Open Document
SVENSK STANDARD SS-ISO/IEC 26300:2008 Fastställd/Approved: 2008-06-17 Publicerad/Published: 2008-08-04 Utgåva/Edition: 1 Språk/Language: engelska/english ICS: 35.240.30 Information technology Open Document
PRESS FÄLLKONSTRUKTION FOLDING INSTRUCTIONS
 PRESS FÄLLKONSTRUKTION FOLDING INSTRUCTIONS Vänd bordet upp och ner eller ställ det på långsidan. Tryck ner vid PRESS och fäll benen samtidigt. Om benen sitter i spänn tryck benen mot kortsidan före de
Boiler with heatpump / Värmepumpsberedare
 Boiler with heatpump / Värmepumpsberedare QUICK START GUIDE / SNABBSTART GUIDE More information and instruction videos on our homepage www.indol.se Mer information och instruktionsvideos på vår hemsida
Fig. 2: Inkoppling av lindningarna / Winding wiring diagram
 Inkopplingsanvisning / Installation notes Fabrikat Stögra 2-fas stegmotor SM 56 2-phase steppingmotor SM 56 Fig. 1: SM 56..L.. Stegmotor med enkelledare Stepping motor with leads Fig. 2: Inkoppling av
Industriinfra IR För stora lokaler med hög takhöjd
 3 3000 6000 W Elvärme 3 modeller Industriinfra För stora lokaler med hög takhöjd Användningsområden är lämplig för totaluppvärmning eller tillskottsvärme i stora lokaler med hög takhöjd. Den kan också
Comfortinfra CIR För diskret design och funktion
 500-2000 W Elvärme 12 13 modeller Comfortinfra CIR För diskret design och funktion Användningsområden CIR ger behaglig värme året runt på skyddade terrasser, balkonger och uteserveringar. CIR kan också
LINC MODELL 13. INR SVERIGE AB Kosterögatan 15 SE-211 24 Malmö 13 EN 1428:2005+A1:2008
 LINC MODELL 13 151005 Produkten är anpassad till branschregler Säker Vatteninstallation. INR garanterar produktens funktion om branschreglerna och monteringsanvisningen följs. INR SVERIGE AB Kosterögatan
Users manual Bruksanvisning Gebrauchanweisung Guide d instructions
 Multi-pressure bucket pump Bärbar fettpump hochdruck abschmierpumpe distributeur manuel de graisse Users manual Bruksanvisning Gebrauchanweisung Guide d instructions 11018-1 - 815850 R02/03 IMPORTANT:
Montageanvisning Airway system 1000/1500 Assembly instruction Airway system 1000/1500
 S.Det är lämpligt att denna information överlämnas till användaren av anläggningen. GB. It is appropriate that this information is passed on to the user of the installation. D. Diese informationen sind
Active Speaker System X-Line 50 AW
 Active Speaker System X-Line 50 AW Important Safety Information: Read all documentation before operating your equipment. Retain all documentation for future reference. Save the carton and packing material
Instruction Manual. Svenska, English. Power Bank. Model: PRBN
 Instruction Manual Svenska, English Power Bank Model: PRBN Innehåll / Content Innehåll Säkerhetsföreskrifter... 4 Delar... 5 Specifikationer... 6 Miljö / Lag och säkerhet / Förbehåll... 7 Content Safety
SUZUKI GRAND VITARA 3P CITY 2011»
 00-2082 120 SUZUKI GRAND VITARA 3P CITY 2011» 661-0830 rev. 2014-04-04 DC Congratulations on purchasing an ATS towbar Alexo Towbars Sweden offer quality towbars produced as a result of direct market research.
00-1595. Fiat 500 2007» Fiat Panda / 4x4 2003» Fiat Panda 4x4 Climbing / 4x4 Cross 20033» 619-0300
 00-1595 120 Fiat 500 2007» Fiat Panda / 4x4 2003» Fiat Panda 4x4 Climbing / 4x4 Cross 20033» 619-0300 rev. 2014-04-04 DC Congratulations on purchasing an ATS towbar Alexo Towbars Sweden offer quality towbars
GOLD SD 14-40. Med styrenhet/with control unit. Fläkt/ Fan. Utan filter/ Without filter. Fläkt/Fan. Fläkt/ Fan. Med filter/ With filter.
 GOLD SD 4-40 Med styrenhet/with control unit Skiss visar styrenhet för aggregat med inspektionssida vänster, styrenhet för aggregat med inspektionssida höger ser något annorlunda ut, men principen är lika./
Thermozone RD E SE... 5 GB... 8
 SE... 5 GB... 8 Thermozone RD E RD E Air inlet Min. 80 mmmin. 80 mm Dimensions visible mounting (VM) Top view From the top (standard) From the front Fig: Minimum distance Concealed mounting L R Side view
LÄNKHJUL S3. Monteringsanvisning för: Länkhjul S3
 MONTERINGSANVISNING LÄNKHJUL S3 Art.no. 8822117 Rev.2018-01 Link to english Monteringsanvisning för: Länkhjul S3 art.nr. 2002010 Länkhjul S3 90 mm art.nr. 2002020 Länkhjul S3 120 mm art.nr. 2002030 Länkhjul
Accepterad monteringsanvisning 2016:1. Talis S (RSK: ) Talis S 100 CoolStart (RSK: )
 Talis S 100 CoolStart (RSK: )") EN Table of contents 1 Instructions for use / assembly instructions 2 Assembly 4-5 Adjustment 6 Dimensions 7 Flow diagram 7 Operation 8 Spare parts 9 Cleaning 10 Test certificate 11 Contact information
EN Table of contents 1 Instructions for use / assembly instructions 2 Assembly 4-5 Adjustment 6 Dimensions 7 Flow diagram 7 Operation 8 Spare parts 9 Cleaning 10 Test certificate 11 Contact information
INKOPPLINGSANVISNING ELTRYCKSLÅS WIRING DIAGRAM SOLENOID LOCK
 INKOPPLINGSANVISNING ELTRYCKSLÅS WIRING DIAGRAM SOLENOID LOCK SE EN S. 2-4 P. 5-7 SL 510/511 SL 520/521 SL 530-50/531-50 2013 11 07 SE TEKNISK SPECIFIKATION Driftspänning. Ström. Reed relä. Drifttemperatur.
GOLD SD 80-2. Med styrenhet/with control unit. Fläkt 1A/B/ Fan 1A/B. Fläkt 2A/B/ Fan 2A/B. Fläkt/ Fan. Utan filter/ Without filter
 SE/G.ELS80E.3095 GOL S 80- Med styrenhet/with control unit Skiss visar styrenhet för vänster, styrenhet för höger ser något annorlunda ut, men principen är lika./ The sketch shows control unit for HU with
SAFETY PRECAUTIONS SPECIFICATIONS
 SAFETY PRECAUTIONS Read the instructions carefully before use and save them for future reference. Before you connect the appliance: Ensure that the voltage rating on the type plate corresponds to your
Bruksanvisning Konvektorelement 99106
 Bruksanvisning Konvektorelement 99106 Endast för isolerade utrymmen eller tillfälliganvändning 1 Läs denna bruksanvisning noga innan användning Spara den för framtida användning. Viktigt! Vissa delar av
SOLAR LIGHT SOLUTION. Giving you the advantages of sunshine. Ningbo Green Light Energy Technology Co., Ltd.
 2017 SOLAR LIGHT SOLUTION Address:No.5,XingYeMiddleRoad,NingboFreeTradeZone,China Tel:+86-574-86812925 Fax:+86-574-86812905 Giving you the advantages of sunshine SalesServiceE-mail:sales@glenergy.cn Tech.ServiceE-mail:service@glenergy.cn
SkillGuide. Bruksanvisning. Svenska
 SkillGuide Bruksanvisning Svenska SkillGuide SkillGuide är en apparat utformad för att ge summativ återkoppling i realtid om hjärt- och lungräddning. www.laerdal.com Medföljande delar SkillGuide och bruksanvisning.
CTC VT 80. Installations- och skötselanvisning/ Installation- and Maintenance Manual. Providing sustainable energy solutions worldwide
 162 201 89-2 2019-04-03 Providing sustainable energy solutions worldwide Installations- och skötselanvisning/ Installation- and Maintenance Manual CTC VT 80 Svenska Installations- och skötselanvisning
SNÄCKVÄXLAR WORM GEARBOXES
 SNÄCKVÄXLAR WORM GEARBOXES BSV Excellence in Electric Drives and Power Generation SNÄCKVÄXLAR MED TILLBEHÖR / WORM GEARBOXES WITH OPTIONS Hålaxel Utgående axel / Output shaft Momentstag Utgående Fläns
Monteringsanvisning Installation instructions
 Monteringsanvisning Installation instructions TAKGENOMFÖRING med överbeslag TGÖ/THÖ och underbeslag TGU ROOF CURB with mounting plate TGÖ/THÖ and bottom fixing plate TGU Denna bruksanvisning omfattar följande
Accepterad monteringsanvisning 2016:1
 EN Table of contents 1 Instructions for use / assembly instructions 2 Assembly 4-6 Adjustment 7 Dimensions 8 Flow diagram 9 Test certificate 9 Operation 10 Spare parts 11 Cleaning 12 Contact information
Accepterad monteringsanvisning 2016:1. Talis S (RSK: ) Talis S (RSK: ) 1 (12)
 Talis S (RSK: ) 1 (12)") EN Table of contents 1 Instructions for use / assembly instructions 2 Assembly 4-5 Adjustment 6 Dimensions 7 Flow diagram 7 Operation 8 Spare parts 9 Cleaning 10 Test certificate 11 Contact information
EN Table of contents 1 Instructions for use / assembly instructions 2 Assembly 4-5 Adjustment 6 Dimensions 7 Flow diagram 7 Operation 8 Spare parts 9 Cleaning 10 Test certificate 11 Contact information
GOLD SD 50-80. Fläkt 2/ Fan 2. Fläkt 1/ Fan 1. Fläkt/ Fan. Utan filter/ Without filter. Fläkt 1/ Fan 1. Fläkt 2/ Fan 2. Med filter/ With filter Filter
 SE/G.ELSD5080.0803 GOLD SD 50-80 Med styrenhet/with control unit Skiss visar styrenhet för aggregat med inspektionssida vänster, styrenhet för aggregat med inspektionssida höger ser något annorlunda ut,
Accepterad monteringsanvisning 2016:1. Ecos M CoolStart (RSK: ) Ecos L CoolStart (RSK: ) 1 (12)
 Ecos L CoolStart (RSK: ) 1 (12)") EN Table of contents 1 Instructions for use / assembly instructions 2 Assembly 4-5 Adjustment 6 Dimensions 7 Flow diagram 7 Operation 8 Spare parts 9 Cleaning 10 Test certificate 11 Contact information
EN Table of contents 1 Instructions for use / assembly instructions 2 Assembly 4-5 Adjustment 6 Dimensions 7 Flow diagram 7 Operation 8 Spare parts 9 Cleaning 10 Test certificate 11 Contact information
Technical description with installation and maintenance instructions
 www.euronom.se Technical description with installation and maintenance instructions VPS 300 / 500 BXU 0710-102 EXOTANK VPS 300/500 BXU Technical description Installation and maintenance instructions Installation...2
Vanliga frågor om Duocom (för installatör eller reparatör) GB Frequently asked questions about Duocom (for installer or repairman)
 GB Frequently asked questions about Duocom (for installer or repairman)") Manual SE Vanliga frågor om Duocom (för installatör eller reparatör) GB Frequently asked questions about Duocom (for installer or repairman) 1 SE VANLIGA FRÅGOR OM DUCOM... 3 1.1 Det hörs inget ljud i
Manual SE Vanliga frågor om Duocom (för installatör eller reparatör) GB Frequently asked questions about Duocom (for installer or repairman) 1 SE VANLIGA FRÅGOR OM DUCOM... 3 1.1 Det hörs inget ljud i
Fläktradiator PFW Fan convector PFW Vifteradiator PFW Convecteur dynamique PFW
 Fläktradiator PFW Fan convector PFW Vifteradiator PFW Convecteur dynamique PFW Ventilatorkonvektor PFW Konwektory wentylatorowe PFW Puhallinlämmitin PFW SE...4 GB...6 RU...8 PFW 515 / 975 20 Inlet DN15,outside
Thermozone SF WL SE... 10 GB... 13
 SE... 10 GB... 13 Thermozone SF WL 281 H 50 245 560 560 100 210 2 Connections 178 40 40 56 42 Ø 50 mm Electrical connections Water connections Minimum mounting distance min 120 Mounting 1 30 233 29 153
CompactAIR Center Ventilation - Filtrering - Uppvärmning CompactAIR Center Ventilation - Filtration - Heating
 CompactAIR / CompactAIR CompactAIR Center Ventilation - Filtrering - Uppvärmning CompactAIR Center Ventilation - Filtration - Heating Typenschlüssel / Type Code Beteckning / Type code Compact AIR / CompactAIR