USER INSTRUCTIONS. Smart-Splitter A Smart-Line Product
|
|
|
- Christer Åberg
- för 8 år sedan
- Visningar:
Transkript


1 USER INSTRUCTIONS BRUKSANVISNING I ORIGINAL. USER INSTRUCTIONS IN ORIGINAL FORMAT. ARTIKELNR. / ARTICLE NO: Smart-Splitter A Smart-Line Product Patented
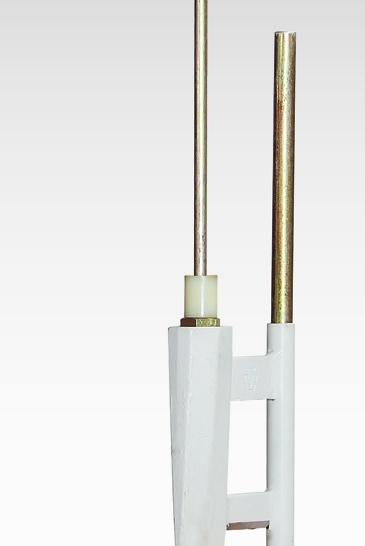
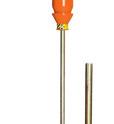
2 1 2 Greppyta Grip area
3 SMART-SPLITTER, KOMPONENTER 1 Stoppmutter 2 Vikt 3 Plastbussning 4 Yxmutter 5 Handtag 6 Yxa 7 Späntkniv 8 Guidebricka, stål 9 Guidebricka, gummi 10 Löpstång 11 Guidestång SMART-SPLITTER COMPONENTS 1 Stop nut 2 Hammer 3 Plastic bushing 4 Axe nut 5 Handle 6 Axe 7 Splinter knife 8 Guide washer, steel 9 Guide washer, rubber 10 Hammer guide rod 11 Axe guide rod 3
4 VARNINGSFÖRESKRIFTER Risk för skär- och klämskada. Använd skyddshandskar vid montering och användning av Smart-Splitter. Smart-Splitter har två vassa eggar, en under yxan och en under späntkniven. Använd endast yxans anvisade hantag (se fig. på sida 2) för att lyfta yxan. Håll aldrig i veden när vikten lyfts ifrån yxan. Vikten ska alltid lyftas med båda händerna. Håll händerna endast innanför de svarvade anvisningarna på vikten. Håll ihop fingrarna. (Se fig. på sida 2 för anvisad tillåten greppyta på vikten.) Släpp alltid vikten minst 20 cm ovanför yxan. Användaren måste ha fyllt 16 år och läst och förstått bruksanvisningen. Se till att inga obehöriga kan använda klyven. Lyft av yxdelen från guidstången när du lämnar Smart-Splitter utan uppsikt. Max tillåten vedlängd 55 cm. Rekommenderad vedlängd 40 cm. Smart-Splitter ska stå på plant och stadigt underlag. Guidestången ska sitta fast eller sitta trögt i sitt hål. Om huggkubben ska flyttas måste yxdelen först avlägsnas ifrån guidestången. Lyftanvisning, yxdel: Använd skyddshandskar. Fatta guidestången med ena handen och yxdelens handtag med andra handen. Vänd ut yxans egg ifrån kroppen. Risk för splitter. Använd skyddsglasögon. Risk för exponering av högt ljud. Använd hörselskydd. 4
5 SAFETY INSTRUCTIONS Risk of cut and crush injuries. Use protective gloves when assembling and using the Smart- Splitter. The Smart-Splitter has two sharp edges, one on the lower part of the axe and one on the splinter knife. Only use the axe handle (see illustration on p.2) to lift the axe. Never hold the log when the hammer is lifted from the axe. You should always lift the hammer with both hands. Keep your hands within the machined markings on the hammer. Keep your fingers togehter. (See illustration on p.2 for allowed grip area on the hammer.) Always let go of the hammer when it is at least 20 cm above the axe. Persons using the Smart-Splitter must be over 16 years old and must have read and understood the user instructions. Ensure that no unauthorized person uses the Smart-Splitter. Lift off the axe from the guide rod when leaving the Smart-Splitter unattended. Max. allowed wood length is 55 cm. Recommended wood length is 40 cm. The Smart-Splitter should stand on a plane and stable surface. The axe guide rod should fit firmly or tightly in its hole. If the chopping block has to be moved, the axe must first be removed from the guide rod. Lifting instructions, axe: Use protective gloves. Hold the axe guide rod with one hand, and the axe handle with your other hand. Turn the axe edge away from you. Risk of splinters springing off. Use safety goggles. Risk of exposure to loud noise. Use ear protection. 5
6 6
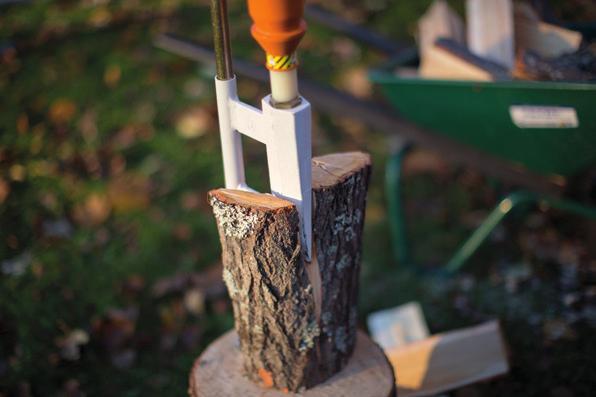
7 MONTERING Använd en huggkubbe som är 35 cm hög och minst 35 cm i diameter. 1. Borra ett hål i huggkubben, diameter 20 mm, med den medföljande borren. Hålet ska vara 8 cm in från huggkubbens kant och 12 cm djupt. 2. Se till att yxmuttern, plastbussningen och vikten är påträdd på löpstången enligt fig. till vänster, och att stoppmuttrarna är korrekt monterade i löpstångens ändar. 3. Skruva in yxmuttern i yxan. Dra åt hårt. 4. För ned guidestången i det borrade hålet i huggkubben och trä på guidebrickorna enl fig. till vänster. TIPS: Kila fast guidestången i hålet så att den sitter fast. 5. Håll i löpstången och handtaget på yxdelen och trä på yxdelen på guidestången. ASSEMBLY Use a chopping block that is 35 cm in height and at least 35 cm in diameter. 1. In the chopping block, drill a hole with a diameter of 20 mm, using the supplied drill bit. The hole should be placed 8 cm in from the edge of the chopping block and be 12 cm deep. 2. Make sure that the axe nut, the plastic bushing and the hammer are fitted on the hammer guide rod according to the illustration to the left, and that the stop nut and axe nut are correctly fitted at the ends of the axe guide rod. 3. Screw the axe nut into the threaded hole in the axe. Tighten it firmly. 4. Fit the axe guide rod in the drilled hole in the chopping block and thread the guide washers onto the rod according to the illustration to the left. TIP: Wedge the axe guide rod in the hole to secure it. 5. Hold the axe guide rod and the handle of the axe and slip the axe onto the rod. 7
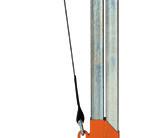
8 ANVÄNDNING AV SMART-SPLITTER Läs varningsföreskrifterna och använd föreskriven skyddsutrustning. VEDKLYVNING* 1. Lyft yxan i handtaget och placera ved under yxans egg. 2. Fatta vikten. Händerna ska hållas på anvisat område på viktens tjockaste del (se fig. på sida 2). 3. Lyft vikten och kasta ned den. Släpp vikten i god tid innan den träffar yxan. Vid behov upprepas detta tills yxan gått igenom veden. SPÄNTA STICKOR 1. Placera veden under späntkniven. 2. Lyft vikten med båda händerna och släpp vikten mot yxan. LÖSGÖRING AV YXAN Om yxan stannar i veden utan att veden klyvs kan yxan fastna. 1. Fatta vikten med båda händerna. 2. Slå vikten uppåt mot löpstångens stoppmuttrar tills yxan lossnar. TIPS: Om du inte når upp, kan yxan med veden vridas 180 grader så att veden faller ned från huggkubben. Då sänks även guidstången (Se fig. nedan). VIKTIGT: Plastbussningen är en förslitningsdetalj som måste bytas ut efter en tids användning. Använd aldrig Smart-Splitter utan plastbussning då det leder till högt ljud och att yxan skadas. *Se fig. på sida 10. 8
. 3. Lift the hammer and throw it down.")

9 USING THE SMART-SPLITTER Read the safety instructions and use required protective equipment. WOOD SPLITTING* 1. Lift the axe by its handle and place the log under the edge of the axe. 2. Take hold of the hammer. Keep both your hands within the grip area on the thickest part of the hammer (see illustration on p.2). 3. Lift the hammer and throw it down. Let the hammer go in good time before it hits the axe. If necessary, you repeat step 3 until the axe has split the log. SPLITTING SPLINTERS 1. Place the piece of wood under the splinter knife. 2. Lift the hammer with both hands and throw the hammer down towards the axe. 1. Take hold of the hammer with both hands. 2. With both hands, strike the hammer against the stop nut on the guide rod until the axe come loose. TIP: If you cannot reach all the way up, turn the axe and the log 180 degrees to make the log fall down from the chopping block. This way, the hammer guide rod will be lowered too (see illustration below). IMPORTANT: The plastic bushing is a wear part that has to be replaced after a period of use. Never use the Smart-Splitter without a plastic bushing, since this will result in high noise and damage the axe. DISLODGING THE AXE If the axe stops in the log without splitting it, it can get stuck in the log. *See illustration on p.10. 9
10 10
11 Tekniska data: Smart-Splitter Patenterad Tredjepartscertifierad av TÜV Total längd: 140 cm Total vikt: 9,5 kg Max. tillåten vedlängd: 55 cm Max. tillåten veddiameter: 50 cm Medföljande borr: 20 mm Technical data: Smart-Splitter Patented Third-party certified by TÜV Total length: 140 cm Total weight: 9.5 kg Max. allowed length of the log: 55 cm Max. allowed log diameter: 50 cm Supplied drill bit: 20 mm 11


12 Smart-Line Smart-Pusher Smart-Holder Smart-Splitter Smart-Turner Smart-Sappie Smart-TimberJig LOGOSOL Fiskaregatan 2, S Härnösand, SWEDEN Phone Fax
LÄNKHJUL S3. Monteringsanvisning för: Länkhjul S3
 MONTERINGSANVISNING LÄNKHJUL S3 Art.no. 8822117 Rev.2018-01 Link to english Monteringsanvisning för: Länkhjul S3 art.nr. 2002010 Länkhjul S3 90 mm art.nr. 2002020 Länkhjul S3 120 mm art.nr. 2002030 Länkhjul
ASSEMBLY INSTRUCTIONS SCALE - SYSTEM
 ASSEMBLY INSTRUCTIONS 60 mm 00 mm 600 mm 000 mm R50 mm ALL COMPONENTS Metal profile 60 mm (start and end of system) Metal profile connection Wire Felt square Metal profile 00 mm Metal profile connection
ASSEMBLY INSTRUCTIONS SCALE SQUARE - STANDARD
 ASSEMBLY INSTRUCTIONS ALL COMPONENTS Metal profile 0 mm Gripper Ceiling attachments Screws for ceiling attachements (not included) Wires Metal profile 60 mm Metal profile 00 mm Felt - Full Felt - Half
PRESS FÄLLKONSTRUKTION FOLDING INSTRUCTIONS
 PRESS FÄLLKONSTRUKTION FOLDING INSTRUCTIONS Vänd bordet upp och ner eller ställ det på långsidan. Tryck ner vid PRESS och fäll benen samtidigt. OBS! INGA STORA KRAFTER KRÄVS!! Om benen sitter i spänn tryck
ASSEMBLY INSTRUCTIONS SCALE CIRCLE - STANDARD
 ASSEMBLY INSTRUCTIONS ALL COMPONENTS Metal profile 0 mm Gripper Ceiling attachments Screws for ceiling attachements (not included) Wires Metal profile 60 mm Metal profile 00 mm Felt - Full Felt - Half
ASSEMBLY INSTRUCTIONS
 ASSEMBLY INSTRUCTIONS Unite XL2 EXTEND COMPONENTS End tabletop 190/260 cm Middle tabletop 140/210 cm 1 Assemble all the legs, start by putting a foot into an inner leg. Slide the outer leg over the inner
Installation Instruction Monteringsinstruktion JK400
 Installation Instruction Monteringsinstruktion JK400 Tools: 2pcs of spanner 13 and 17mm or 2pcs of adjustable spanner, cross slotted screwdriver PZ 2 Warning: Plates can be sharp in the edges and corners,
Contents / Innehållsförteckning
 Contents / Innehållsförteckning Copyright This manual is the copyright of CI no 55650-4137. No part of this manual may be revised, copied or transmitted in any way without written permission from CI no
PRESS FÄLLKONSTRUKTION FOLDING INSTRUCTIONS
 PRESS FÄLLKONSTRUKTION FOLDING INSTRUCTIONS Vänd bordet upp och ner eller ställ det på långsidan. Tryck ner vid PRESS och fäll benen samtidigt. Om benen sitter i spänn tryck benen mot kortsidan före de
LINC MODELL 13. INR SVERIGE AB Kosterögatan 15 SE-211 24 Malmö 13 EN 1428:2005+A1:2008
 LINC MODELL 13 151005 Produkten är anpassad till branschregler Säker Vatteninstallation. INR garanterar produktens funktion om branschreglerna och monteringsanvisningen följs. INR SVERIGE AB Kosterögatan
00-1595. Fiat 500 2007» Fiat Panda / 4x4 2003» Fiat Panda 4x4 Climbing / 4x4 Cross 20033» 619-0300
 00-1595 120 Fiat 500 2007» Fiat Panda / 4x4 2003» Fiat Panda 4x4 Climbing / 4x4 Cross 20033» 619-0300 rev. 2014-04-04 DC Congratulations on purchasing an ATS towbar Alexo Towbars Sweden offer quality towbars
BATH MIXER 160 LINC 21. incl. HAND SHOWER. inr.se
 LINC 21 BATH MIXER 150 BATH MIXER 160 incl. HAND SHOWER 110309 inr.se Innan montering Vi förordar en sakkunnig VVS-installatör vid installation och service. Ledningarna ska renspolas innan installation.
Droppställning / IV stand
 MONTERINGSANVISNING / ASSEMBLY INSTRUCTIONS Droppställning / IV stand Fellow Classic Art. nr. / Art. no: 08814 1 SVENSKA Produktbeskrivning Droppställningen består av följande delar: - Klamma, 3 st - Bottenstöd
Monteringsanvisning Podie T 4100 K
 Monteringsanvisning Podie T 4100 K Monteringsanvisning Förbered fundamentet 1. Montera ställfötterna. Montera tvättmaskin SV 1. Fäst gaffelbeslagen i bakkant med brickor och skruv. OBS! Placera beslagen
Z-LYFTEN PRODUKTION AB MONTERINGSANVISNING INSTALLATION INSTRUCTIONS
 Z-LYFTEN PRODUKTION AB 55523 MONTERINGSANVISNING INSTALLATION INSTRUCTIONS Monteringssats/ Mounting kit 53650 Renault Master, Opel Movano, Nissan Interstar 2007-12-21 Försäljning/Sales/Verkauf Mossvägen
81152 TRANSFER CASE SHIFT HANDLE
 Installation Instructions for TRANSFER CASE SHIFT HANDLE for 2007 2018 JEEP JK WRANGLER 1 2 3 ITEM NO. PART NO. DESCRIPTION QTY. 1 4101359 SHIFT KNOB, JEEP WRANGLER JK, MOLDED 1 2 1794720 JAM NUT, 3/8
Assembly instruction Kit 200
 MA9602 2012-11-19 1/2 S.Det är lämpligt att denna information Montageanvisning Kit 200 Assembly instruction Kit 200 Observera: För att IP44 ska packning och bricka användas vid installation enligt bild
Suzuki SX4 2006» Fiat Sedici 2006»
 Suzuki SX4 006» Fiat Sedici 006» Nº Revisión Fecha Aprobación Nº 005 3-05-017 SUZUKI SX4 006 FIAT SEDICI 006 CLASS A50-X APPROVAL NUMBER CLASS 00-6 TYPE SUZ01 9,9 TYPE 50 SUZ013-S kn kg 9,9 D 00-7 TYPE
USER MANUAL. Manuell framdrift/ Manual Feed Unit LOGOSOL M8
 UR MANUAL BRUKSANVISNING I ORIGINAL. TRANSLATION OF ORIGINAL UR MANUAL. ARTIKELNR./ARTICLE NO: 0458-395-2740 Manuell framdrift/ Manual Feed Unit LOGOSOL M8 : Läs igenom monteringsinstruktionen noggrant.
Nathi Skötbord Changing unit Table à langer murale Wickeltisch Verschoontafel Puslebord Cambiador de pared Přebalovací pult Fasciatoio
 Nathi Skötbord Changing unit Table à langer murale Wickeltisch Verschoontafel Puslebord Cambiador de pared Přebalovací pult Fasciatoio Пеленальный стол Tested and approved according to SS-EN 12221:2008+A1_2013
Installation. Twice Nisch. Twice Corner SVENSKA ENGLISH
 Installation Arrow Skandinavien AB Tel: +46 (0)31 330 00 10 www.arrowshower.com Twice Corner Twice Nisch SVENSKA (SV) Installationsanvisning för Arrow duschvägg. Vi förbättrar ständigt våra installationsanvisningar.
CANALKLER 250S. Gänga i tum Thread in inch
 Skruvkoppling/Reusable coupling CANALKLER kopplingar används under högt tryck. Använd endast kopplingar som rekommenderas av Trelleborg och följ monteringsanvisningarna noggrant. Kontrollera så att slangen
BBT057/ BBC057 BBCD057/ BBT057-NL HOLDEN COLORADO 9/2016+ HOLDEN TRAILBLAZER WD & 4WD Models
 INSTALLATION GUIDE BBT057/ BBC057 BBCD057/ BBT057-NL HOLDEN COLORADO 9/2016+ HOLDEN TRAILBLAZER 2017+ 2WD & 4WD Models Ironman 4x4 BBT/ BBC/ BBCD/BBT057-NL Bull Bars fit to a Holden Colorado 9/2016+ It
Your No. 1 Workout. MANUAL pro
 Your No. 1 Workout MANUAL pro Innehåll/Contents Svenska Viktigt om säkerhet Specifikationer & delar Rekommenderade övningar 3 5 6-7 2 English Safety instructions Specifications & parts Recommended exercises
P650 - Takscreen. Installationsguide EN
 P650 - Takscreen Installationsguide 1309-150507EN V650-Tallinn Installation manual Montera främre linhjul 12 13 Placera linan över linhjulet och skruva tillbaka täcklocket på linhjulhuset (7). Öppna linhjulshuset
 BÄNKVÅG / BENCH SCALE Modell : SW-III / Model : SW-III ANVÄNDARMANUAL / USER MANUAL SW-III WWW.LIDEN-WEIGHING.SE 2014-03-26 OBS! Under vågen sitter en justerbar skruv (se bild). Standardinställning är
IMPORTANT! RETAIN FOR FUTURE REFERENCE PLEASE READ CAREFULLY VIKTIGT! BEHÅLL FÖR FRAMTIDA REFERENS LÄS IGENOM INSTRUKTIONSMANUALEN
 Heart & Stripes Junior Bed Instructions Manual Instruktions Manual IMPORTANT! RETAIN FOR FUTURE REFERENCE PLEASE READ CAREFULLY VIKTIGT! BEHÅLL FÖR FRAMTIDA REFERENS LÄS IGENOM INSTRUKTIONSMANUALEN Thank
VASSVIK FIXED STAND SE / ENG
 VASSVIK FIXED STAND SE / ENG SE VIKTIGT Läs noga igenom instruktionerna före användning och spar dessa för framtida bruk. VARNING: Barnets huvud bör inte ligga lägre än barnets kropp. Lägg inte till ytterligare
SUZUKI GRAND VITARA 3P CITY 2011»
 00-2082 120 SUZUKI GRAND VITARA 3P CITY 2011» 661-0830 rev. 2014-04-04 DC Congratulations on purchasing an ATS towbar Alexo Towbars Sweden offer quality towbars produced as a result of direct market research.
Monteringsanvisning Nödutrymningsbeslag ASSA 179E
 Monteringsanvisning Nödutrymningsbeslag ASSA 179E Denna monteringsanvisning avser nödutrymningsbeslag ASSA 179E med artikelnummer 364371 i kombination med låshus Abloy EL580 med artikelnummer EL580100011.
Montageanvisning Airway system 1000/1500 Assembly instruction Airway system 1000/1500
 S.Det är lämpligt att denna information överlämnas till användaren av anläggningen. GB. It is appropriate that this information is passed on to the user of the installation. D. Diese informationen sind
 BÄNKVÅG / BENCH SCALE ANVÄNDARMANUAL / USER MANUAL SW-III www.liden-weighing.com Svenska OBS! Under vågen sitter en justerbar skruv (se bild). Standardinställning är den för vägning. Om ni vill rengöra
Monteringsanvisning benfundament TM 8055, TM 8060, T 8118 K. Art nr ,
 Monteringsanvisning benfundament TM 8055, TM 8060, T 8118 K Art nr 102056, 102057 Monteringsanvisning Förbered fundamentet 1. Montera ställfötterna. Montera tvättmaskin SV 1. Fäst gaffelbeslagen i bakkant
Montageanvisning Airway system 1000/1500 Assembly instruction Airway system 1000/1500
 S.Det är lämpligt att denna information överlämnas till användaren av anläggningen. GB. It is appropriate that this information is passed on to the user of the installation. D. Diese informationen sind
LINC Modell 17 130624A
 LINC Modell 17 130624A Denna produkt är anpassad till Branschregler Säker Vatteninstallation. INR garanterar produktens funktion om branschregler och monteringsanvisning följs. INR SVERIGE AB Kosterögatan
BBT042/ BBC042/ BBCD042 NISSAN NAVARA D40 V STX & PATHFINDER R WD & 4WD Models
 INSTALLATION GUIDE BBT042/ BBC042/ BBCD042 NISSAN NAVARA D40 V6 2010+ STX & PATHFINDER R51 2010+ 2WD & 4WD Models Ironman 4x4 BBT/ BBC/ BBCD042 Bull Bars fit to a Nissan Navara D40 STX & Pathfinder R51.
säkerhetsutrustning / SAFETY EQUIPMENT
 säkerhetsutrustning / SAFETY EQUIPMENT Hastighetsvakt / Speed monitor Kellves hastighetsvakter används för att stoppa bandtransportören när dess hastighet sjunker under beräknade minimihastigheten. Kellve
10. Slangkopplingar clip / Hose fittings clip
 Köldmdieslang/ Refrigerant hose Øi Øy H 190 7,9 mm(5/16 ) 15,2 6 191,2 mm(13/32 ) 17,8 8 264 12,5 mm (1/2 ) 19,9 192 15,6 mm(5/8 ) 24,1 12 187 Tång burgaclip/ 188 Slangklippare / Hose cutter 206 208 2
Plain A262. För T16 (T5) lysrör. Innehåll. Monteringsanvisning. A. Instruktion för rampmontering
 lysrör. Innehåll. Monteringsanvisning. A. Instruktion för rampmontering") Plain A262 För T16 (T5) lysrör Innehåll Ramparmatur: ändmodul En stängd gavel/ en öppen gavel Plint i båda ändarna Överkopplingssladd 1 rampgavel 1 lysrörsbytare Ramparmatur: mellanmodul Plint i en ände
Plain A262 För T16 (T5) lysrör Innehåll Ramparmatur: ändmodul En stängd gavel/ en öppen gavel Plint i båda ändarna Överkopplingssladd 1 rampgavel 1 lysrörsbytare Ramparmatur: mellanmodul Plint i en ände
Monteringsanvisning benfundament TM 9060, TM 9070, T 9153 E/K/VP. Art nr , ,
 Monteringsanvisning benfundament TM 9060, TM 9070, T 9153 E/K/VP Art nr 102058, 102059, 102030 Monteringsanvisning SV Förbered fundamentet 1. Montera ställfötterna. 4. Fundamentet skall alltid tippsäkras.
VASSVIK ROCKING STAND
 VASSVIK ROCKING STAND SE / ENG SE VIKTIGT Läs noga igenom instruktionerna före användning och spar dessa för framtida bruk. VARNING: Barnets huvud bör inte ligga lägre än barnets kropp. Lägg inte till
Glass fence Glasräcke / Glassrekkverk
 Manual/Bruksanvisning/Bruksanvisning Glass fence Glasräcke / Glassrekkverk ENG SE NO Item. No 6210 1155 0101 59 0101 ENG Thank you for choosing to purchase a product from Rusta! Read through the entire
Dokumentnamn Order and safety regulations for Hässleholms Kretsloppscenter. Godkänd/ansvarig Gunilla Holmberg. Kretsloppscenter
 1(5) The speed through the entire area is 30 km/h, unless otherwise indicated. Beware of crossing vehicles! Traffic signs, guardrails and exclusions shall be observed and followed. Smoking is prohibited
Rev No. Magnetic gripper 3
 Magnetic gripper 1 Magnetic gripper 2 Magnetic gripper 3 Magnetic gripper 4 Pneumatic switchable permanent magnet. A customized gripper designed to handle large objects in/out of press break/laser cutting
Installation Instructions
 Installation Instructions (Cat. No. 1794-IE8 Series B) This module mounts on a 1794 terminal base unit. 1. Rotate keyswitch (1) on terminal base unit (2) clockwise to position 3 as required for this type
Windlass Control Panel v1.0.1
 SIDE-POWER Windlass Systems 86-08950 Windlass Control Panel v1.0.1 EN Installation manual Behåll denna manual ombord! S Installations manual SLEIPNER AB Kilegatan 1 452 33 Strömstad Sverige Tel: +46 525
Accepterad monteringsanvisning 2016:1. Metris (RSK: ) Metris S (RSK: ) Metris (RSK: )
 Metris S (RSK: ) Metris (RSK: )") EN Table of contents 1 Instructions for use / assembly instructions 2 Assembly 4-5 Adjustment 6 Operation 7 Dimensions 8-9 Flow diagram 8-9 Spare parts 10-12 Cleaning 13 Test certificate 14 Contact information
EN Table of contents 1 Instructions for use / assembly instructions 2 Assembly 4-5 Adjustment 6 Operation 7 Dimensions 8-9 Flow diagram 8-9 Spare parts 10-12 Cleaning 13 Test certificate 14 Contact information
Alfa Romeo » x
 00-0517 90 Alfa Romeo 156 1997»2005 601-050x rev. 2014-04-07 DC Congratulations on purchasing an ATS towbar Alexo Towbars Sweden offer quality towbars produced as a result of direct market research. Every
Z-LYFTEN PRODUKTION AB MONTERINGSANVISNING INSTALLATION INSTRUCTION
 Z-LYFTEN PRODUKTION AB MONTERINGSANVISNING INSTALLATION INSTRUCTION 55798 Monteringssats/Mounting kit VW T5 56908 & 53742 2009-06-25 Försäljning/Sales/Verkauf Mossvägen 8, 641 49 KATRINEHOLM,SWEDEN Telephone:
Boiler with heatpump / Värmepumpsberedare
 Boiler with heatpump / Värmepumpsberedare QUICK START GUIDE / SNABBSTART GUIDE More information and instruction videos on our homepage www.indol.se Mer information och instruktionsvideos på vår hemsida
GB ASSEMBLY INSTRUCTION MANUAL SE MONTERINGSANVISNING SLAM 30 HOOP ART. NO
 www.stigagames.com GB ASSEMBLY INSTRUCTION MANUAL SE MONTERINGSANVISNING SLAM 30 HOOP ART. NO. 61-4803-30 GB ENGLISH OWNER S MANUAL 1. Read this manual carefully before starting assembly. Read each step
GB ASSEMBLY INSTRUCTION MANUAL SE MONTERINGSANVISNING RIM 45 CM ART. NO
 www.stigagames.com GB ASSEMBLY INSTRUCTION MANUAL SE MONTERINGSANVISNING RIM 45 CM ART. NO. 61-4800-45 GB ENGLISH OWNER S MANUAL 1. Read this manual carefully before starting assembly. Read each step completely
VARIOBARRIER S/M MIMSAFE BY CHOICE
 VAROBARRR S/M MMSA BY CHOC K L A B D M C H A B C D 522 K 524 Right leg Right leg 514L 514R 510L 510R L 526L M 526R S508 S509 521 6X 521 + H 527 529 528 8X/1 18X 8X/1 M-460641AL M-SM6X14A M-460641B M-M37202_2014
In Bloom CAL # 8, sista varv och ihopsättning / last rows and assemble
 In Bloom CAL # 8, sista varv och ihopsättning / last rows and assemble I del 9 använder du virknål 3.0 mm. Efter varje varvsnummer står numret (1-7) för den färg du skall använda för det varvet, se färg/garn-tabell.
Diskant Yta eller Vikelfäste montering Mount
 Installation och Bruksanvisning Inledning Välj fästpunkterna för dina dome TW250 Silk diskanter. Kom ihåg att för bästa prestanda bör diskanterna monteras så nära mitten av bas som möjligt, med fri, direkt
SAFETY PRECAUTIONS SPECIFICATIONS
 SAFETY PRECAUTIONS Read the instructions carefully before use and save them for future reference. Before you connect the appliance: Ensure that the voltage rating on the type plate corresponds to your
Congratulations on purchasing an ATS towbar. Gratulationer till er nyinköpta ATS dragkrok
 00-95 65 668-04x rev. 204-04-04 DC Congratulations on purchasing an ATS towbar Alexo Towbars Sweden offer quality towbars produced as a result of direct market research. Every towbar is sold with a unique
Par m 328 feet. Lång höger sväng. Korgen står placerad i en skogsglänta OB-linje på vänster sida.
 1 100 m 328 feet Lång höger sväng. Korgen står placerad i en skogsglänta -linje på vänster sida. Long right turn. Basket are placed in a forrest glade. -line on the left side. Snälla, skräpa ej ner vår
Accepterad monteringsanvisning 2016:1. Focus (RSK: ) 1 (12)
 1 (12)") EN Table of contents 1 Instructions for use / assembly instructions 2 Assembly 4 Adjustment 5 Dimensions 6 Flow diagram 6 Operation 7 Spare parts 8 Cleaning 9 Test certificate 10 Contact information 12
EN Table of contents 1 Instructions for use / assembly instructions 2 Assembly 4 Adjustment 5 Dimensions 6 Flow diagram 6 Operation 7 Spare parts 8 Cleaning 9 Test certificate 10 Contact information 12
Z-LYFTEN PRODUKTION AB MONTERINGSANVISNING INSTALLATION INSTRUCTIONS
 Z-LYFTEN PRODUKTION AB 55982 MONTERINGSANVISNING INSTALLATION INSTRUCTIONS Monteringssats / Mounting kit 57336 & 57337 Fiat Ducato 2007- Peugeot Boxer 2007- Citroen Jumper 2007-2010-09-10 Försäljning/Sales/Verkauf
BBT034/ BBC034/ BBCD034 BBCD060/ BBT060-NL/ BB060-TL/ BB060-SL VOLKSWAGEN AMAROK
 INSTALLATION GUIDE BBT034/ BBC034/ BBCD034 BBCD060/ BBT060-NL/ BB060-TL/ BB060-SL VOLKSWAGEN AMAROK Ironman 4x4 BBT/ BBC/ BBCD034 BBCD060/ BBT060-NL/ BB060-TL/ BB060-SL Bull Bars fit to a Volkswagen Amarok.
LINC Modell A
 LINC Modell 13 130624A Denna produkt är anpassad till Branschregler Säker Vatteninstallation. INR garanterar produktens funktion om branschregler och monteringsanvisning följs. INR SVERIGE AB Kosterögatan
Installation manual for pool enclosure Installationsmanual för pooltak
 Installation manual for pool enclosure Installationsmanual för pooltak Assembling a module Ihopsättning av en modul Cut careful 3cm of the plastic protection folie from BOTH sides of the polycarbonate
Joki Joki Air. JCD70-xx JAD90-xx. lasiesta.com. Manual. Betriebsanleitung. Manuel. Manual. Manuale. Gebruiksaanwijzing.
 lasiesta.com LA SIESTA GmbH Im Wiesenweg 4 55270 Jugenheim Germany Tel: +49 6130 9119-19 LA SIESTA Inc. 7355 S.W. 87 th Ave., Ste. 100 Miami, FL 33173 USA Tel: +1 786 401-1138 EN DE FR ES IT NL DA SV FI
ARC 32. Tvättställsblandare/Basin Mixer. inr.se
 ARC 32 Tvättställsblandare/Basin Mixer inr.se SE Användning och skötsel Manualen är en del av produkten. Bevara den under hela produktens livscykel. Vi rekommenderar er att noggrant läsa igenom manualen
Z-LYFTEN PRODUKTION AB MONTERINGSANVISNING INSTALLATION INSTRUCTIONS
 Z-LYFTEN PRODUKTION AB 55430 MONTERINGSANVISNING INSTALLATION INSTRUTIONS Monteringssats / Mounting kit 53926 MB Sprinter 300 series, VW rafter 35 Hjulbas / Wheel base = 4325mm (Enkel och dubbelhytt /
LX Desk Mount LCD Arm
 ASSEMBLY INSTRUCTIONS LX Desk Mount LCD Arm * Den vertikala hissens lägsta rörelseomfång minskas upp till 3 tum (76 mm) när armen justeras för att kunna stödja över 20 lbs (9 kg). 8.5 (216 mm) 5-25 lbs*
DAMPER EQAZ-12, EQAZ-13, STAZ-30, STBZ-30
 DAMPER EQAZ-12, EQAZ-13, STAZ-30, INSTALLATION INSTRUCTION EQAZ-12 DAMPER, DAMPER ACTUATOR AND EQAZ-13LEVER ACTUATOR DAMPER ACTUATION The damper can be actuated by means of the, damper actuator (accessory)
TYLÖ SAUNA EVOLVE CORNER TRADITION
 TYLÖ SAUNA EVOLVE CORNER TRADITION 1507 Art.nr 2900 4225 Väggsektion för aggregat Wall section for heater Moduł ścianki do montażu pieca do sauny Tips! Tip! Porada! Rumsemballage Använd som skydd på golvet
Accepterad monteringsanvisning 2016:1. Talis S (RSK: ) Talis S (RSK: ) 1 (12)
 Talis S (RSK: ) 1 (12)") EN Table of contents 1 Instructions for use / assembly instructions 2 Assembly 4-5 Adjustment 6 Dimensions 7 Flow diagram 7 Operation 8 Spare parts 9 Cleaning 10 Test certificate 11 Contact information
EN Table of contents 1 Instructions for use / assembly instructions 2 Assembly 4-5 Adjustment 6 Dimensions 7 Flow diagram 7 Operation 8 Spare parts 9 Cleaning 10 Test certificate 11 Contact information
Accepterad monteringsanvisning 2016:1
 EN Table of contents 1 Instructions for use / assembly instructions 2 Assembly 4-6 Adjustment 7 Dimensions 8 Flow diagram 9 Test certificate 9 Operation 10 Spare parts 11 Cleaning 12 Contact information
Accepterad monteringsanvisning 2016:1. Talis S (RSK: ) Talis S 100 CoolStart (RSK: )
 Talis S 100 CoolStart (RSK: )") EN Table of contents 1 Instructions for use / assembly instructions 2 Assembly 4-5 Adjustment 6 Dimensions 7 Flow diagram 7 Operation 8 Spare parts 9 Cleaning 10 Test certificate 11 Contact information
EN Table of contents 1 Instructions for use / assembly instructions 2 Assembly 4-5 Adjustment 6 Dimensions 7 Flow diagram 7 Operation 8 Spare parts 9 Cleaning 10 Test certificate 11 Contact information
MONTERINGSINSTRUKTION ASSEMBLY INSTRUCTION
 11/ 97 MONTERINGINTRUKTION AEMBLY INTRUCTION AGNPRIDARE / CHAFFPREADER Art. nr. 12313, 12314 CLAA LEXION 420-460 REKORDVERKEN weden AB Öttum E-535 92 KVÄNUM Tel. +46(0)511-37 01 00 Fax. +46(0)511-37 00
SAFETY PRECAUTIONS SPECIFICATIONS
 SAFETY PRECAUTIONS Read the instructions carefully before use and save them for future reference. Before you connect the appliance: Ensure that the voltage rating on the type plate corresponds to your
Christmas tree lighting Julgransbelysning / Juletrebelysning
 Manual / Bruksanvisning / Bruksanvisning Christmas tree lighting Julgransbelysning / Juletrebelysning ENG SE NO Item. No 772701090101 ENG Thank you for choosing to purchase a product from Rusta! Read through
A » VW
 00-0706 90 Audi A3 96-03 Skoda Octavia/oct kombi 97-04 Seat Leon 99-05 - Toledo 99-04 - Toledo 2012» VW Golf IV/Bora/New Beatle/Roomster 2006» Skoda Rapid 5p 2012» Skoda Spaceback 2013» 659-0700 rev. 2014-05-13
00-0718. Mitsubishi Montero io 10/1999» Pajero Pinin 3-5 platser 642-0200
 00-0718 120 Mitsubishi Montero io 10/1999» Pajero Pinin 3-5 platser 642-0200 rev. 2014-04-04 DC Congratulations on purchasing an ATS towbar Alexo Towbars Sweden offer quality towbars produced as a result
IMPORTANT! RETAIN FOR FUTURE REFERENCE PLEASE READ CAREFULLY VIKTIGT! BEHÅLL FÖR FRAMTIDA REFERENSLÄS IGENOM INSTRUKTIONSMANUALEN NOGGRANT
 13060 Basic Cot One Instruction Manual Instruktion Manual IMPORTANT! RETAIN FOR FUTURE REFERENCE PLEASE READ CAREFULLY VIKTIGT! BEHÅLL FÖR FRAMTIDA REFERENSLÄS IGENOM INSTRUKTIONSMANUALEN NOGGRANT Thank
 INSTALLATION INSTRUCTIONS Accessory S P/N 08E12-SZT-100 Application CR-Z Publications No. Issue Date SEP PARTS LIST Left illuminated door sill trim Right illuminated door sill trim Illumination harness
Accepterad monteringsanvisning 2016:1. Ecos M CoolStart (RSK: ) Ecos L CoolStart (RSK: ) 1 (12)
 Ecos L CoolStart (RSK: ) 1 (12)") EN Table of contents 1 Instructions for use / assembly instructions 2 Assembly 4-5 Adjustment 6 Dimensions 7 Flow diagram 7 Operation 8 Spare parts 9 Cleaning 10 Test certificate 11 Contact information
EN Table of contents 1 Instructions for use / assembly instructions 2 Assembly 4-5 Adjustment 6 Dimensions 7 Flow diagram 7 Operation 8 Spare parts 9 Cleaning 10 Test certificate 11 Contact information
Consumer attitudes regarding durability and labelling
 Consumer attitudes regarding durability and labelling 27 april 2017 Gardemoen Louise Ungerth Konsumentföreningen Stockholm/ The Stockholm Consumer Cooperative Society louise.u@konsumentforeningenstockholm.se
Installation Instructions
 Installation Instructions TrailVie w So ft To p For proper installation and best possible fit, please read all instructions BEFORE you begin. For technical assistance or to obtain missing parts, please
Enhandsbroms till Volaris S7, Volaris S7 SMART och Volaris S7 PATROL One-hand brake for Volaris S7, Volaris S7 Smart and Volaris S7 Patrol
 Enhandsbroms till Volaris S7, Volaris S7 SMART och Volaris S7 PATROL One-hand brake for Volaris S7, Volaris S7 Smart and Volaris S7 Patrol Monteringsinstruktion Assembly instructions Verktyg du behöver
Instruction Manual. Svenska, English. Power Bank. Model: PRBN
 Instruction Manual Svenska, English Power Bank Model: PRBN Innehåll / Content Innehåll Säkerhetsföreskrifter... 4 Delar... 5 Specifikationer... 6 Miljö / Lag och säkerhet / Förbehåll... 7 Content Safety
BOW. Art.nr
 190412 BOW Art.nr 80000637-80000642 SE INNEHÅLL Komponenter 3 Produktfakta 3 Montering 4 Kontakt 8 EN CONTENTS Components 3 Product facts 3 Installation 4 Contact 8 KOMPONENTER COMPONENTS x 3 x 3 PRODUKTFAKTA
Isolda Purchase - EDI
 Isolda Purchase - EDI Document v 1.0 1 Table of Contents Table of Contents... 2 1 Introduction... 3 1.1 What is EDI?... 4 1.2 Sending and receiving documents... 4 1.3 File format... 4 1.3.1 XML (language
Isabellakiss Ver
 Isabellakiss 2012 Ver 2012 2 1 Isabellakiss Mera KISS för Isabellan. Inget snickrande av lådan baki. En plastback med lock kläms mellan sidobrädorna som går ut i aktern. Bottenplywood går förbi sidobrädorna
In Bloom CAL # 5. Virka inte v för hårt / don t crochet r to tight. V 35 / r 35 (5) Upprepa v 18. [38 1-lm-bågar / sida och 2 lm / hörn]
![In Bloom CAL # 5. Virka inte v för hårt / don t crochet r to tight. V 35 / r 35 (5) Upprepa v 18. [38 1-lm-bågar / sida och 2 lm / hörn]](/thumbs/85/91841713.jpg "In Bloom CAL # 5. Virka inte v för hårt / don t crochet r to tight. V 35 / r 35 (5) Upprepa v 18. [38 1-lm-bågar / sida och 2 lm / hörn]") In Bloom CAL # 5 I del 5 använder du virknål 3.0 mm. Efter varje varvsnummer står numret (1-7) för den färg du skall använda för det varvet, se färg/garn-tabellen. Du kommer att repetera varv från del
In Bloom CAL # 5 I del 5 använder du virknål 3.0 mm. Efter varje varvsnummer står numret (1-7) för den färg du skall använda för det varvet, se färg/garn-tabellen. Du kommer att repetera varv från del
GB ASSEMBLY INSTRUCTION MANUAL SE MONTERINGSANVISNING PRECISION 44 ART. NO
 www.stigagames.com GB ASSEMBLY INSTRUCTION MANUAL SE MONTERINGSANVISNING PRECISION 44 ART. NO. 61-4824-44 GB ENGLISH OWNER S MANUAL 1. Read this manual carefully before starting assembly. Read each step
MONTERINGSINSTRUKTION ASSEMBLY INSTRUCTION
 FEB. 1997 MONTERINGINTRUKTION AEMBLY INTRUCTION AGNPRIDARE / CHAFFPREADER Art. nr. 12224, 12138 NEW HOLLAND TX62-68 REKORDVERKEN weden AB Öttum E-535 92 KVÄNUM Tel. +46(0)511-37 01 00 Fax. +46(0)511-37
Preschool Kindergarten
 Preschool Kindergarten Objectives CCSS Reading: Foundational Skills RF.K.1.D: Recognize and name all upper- and lowercase letters of the alphabet. RF.K.3.A: Demonstrate basic knowledge of one-toone letter-sound
Anvisning för Guide for
 Anvisning för Guide for PRISMA SENSOR 1 96243235zPC Montering i tak/installation in the ceiling Byte av kupa/change of diffuser 2 Installation Installation från gavel / Installation from the end Installationskabel
Ringmaster RM3 - RM 5 RM3 RM 4 RM 5
 RM3 - RM 5 Ringmaster We offer ball pickers in 5 different sizes with a picking width of up to 6 m. RM3 - RM5 has a self-supporting chassis so that the collected balls do not place a load on the picking
Users manual Bruksanvisning Gebrauchanweisung Guide d instructions
 Multi-pressure bucket pump Bärbar fettpump hochdruck abschmierpumpe distributeur manuel de graisse Users manual Bruksanvisning Gebrauchanweisung Guide d instructions 11018-1 - 815850 R02/03 IMPORTANT:
Module 6: Integrals and applications
 Department of Mathematics SF65 Calculus Year 5/6 Module 6: Integrals and applications Sections 6. and 6.5 and Chapter 7 in Calculus by Adams and Essex. Three lectures, two tutorials and one seminar. Important
Verktyg som behövs. LX HD Sit-Stand Desk Mount LCD Arm SVENSKA. 20" (508 mm) 14-30 lbs (6.35-13.61 kg)
 14-30 lbs (6.35-13.61 kg)") ASSEMBLY INSTRUCTIONS LX HD Sit-Stand Desk Mount LCD Arm 14-30 lbs (6.35-13.61 kg) Maximal skärmstorlek * = 46 * Begränsat till max 30 lbs (13,61 kg) 0.78"-2.56" (20-65mm) 0.78-2.25 (20-57mm) 0.5"-2.5"
ASSEMBLY INSTRUCTIONS LX HD Sit-Stand Desk Mount LCD Arm 14-30 lbs (6.35-13.61 kg) Maximal skärmstorlek * = 46 * Begränsat till max 30 lbs (13,61 kg) 0.78"-2.56" (20-65mm) 0.78-2.25 (20-57mm) 0.5"-2.5"
The Municipality of Ystad
 The Municipality of Ystad Coastal management in a local perspective TLC The Living Coast - Project seminar 26-28 nov Mona Ohlsson Project manager Climate and Environment The Municipality of Ystad Area:
Molift Raiser 75135G Etac Box 203, Anderstorp Sweden Tel Fax
 7G 8-0-07 SE SE EN EN Till och med serienummer 0900 Från serienummer 0900 Up to serial number 0900 From serial number 0900.... Etac Box 0, Anderstorp Sweden Tel + 7 8 7 00 Fax + 7 8 7 90 www.etac.com Svenska
»Bromma« Assembly instructions Monteringsanvisning GB SE. 1/10 Bromma
 »Bromma«GB S Assembly instructions Monteringsanvisning 07.08.2017 1/10 Bromma GB RCOMMNDATIONS BFOR ASSMBL o Always follow the manufacturers instructions. o Please check the contents listed in the assembly
DETALJMONTERINGSANVISNING ASSEMBLY INSTRUCTION, DETAILED VERSION GUNGSTÄLLNINGAR SWINGSETS
 DETALJMONTERINGSANVISNING ASSEMBLY INSTRUCTION, DETAILED VERSION GUNGSTÄLLNINGAR SWINGSETS Steg för steg, monteringsinstruktion: 1. Mät hela ytan och se till att aktuell produkts krav på säkerhetsyta efterlevs.