f C e h s q v p k READ CAREFULLY LEGGERE ATTENTAMENTE LIRE ATTENTIVEMENT SORGFÄLTIG LESEN LEER ATENTAMENTE EERST GOED DOORLEZEN LÄS NOGA
|
|
|
- Siv Fransson
- för 6 år sedan
- Visningar:
Transkript
1 Operator s Manual Manuale d istruzioni Manuel d instructions Bedienungsanleitung Manual de instrucciones Gebruikershandleiding Ägarhandbok Brugehåndbog Omistajankäsikirja Eierens Håndbok Manual de Instruções O HΓIEΣ XPHΣEΩΣ Használati útmutató READ CAREFULLY LEGGERE ATTENTAMENTE LIRE ATTENTIVEMENT SORGFÄLTIG LESEN LEER ATENTAMENTE EERST GOED DOORLEZEN LÄS NOGA LÆS OMHYGGELIGT LUE HUOLELLISESTI ig i f C e h s q v LES NØYE { LER ATENTAMENTE IABAΣTE ΠPOΣEKTIKA FIGYELEMMEL OLVASANDÓ p k
2 A. B.
3 C. D. Partner oil 50 : 1 McCulloch oil 40 : 1 2 T oil 25 : 1 2% 2,5% 4% 1 ltr. 20 cm 3 25 cm 3 40 cm
4 E. F. G.
5 H. I. L.
6 g Due to a constant product improvement programme, the factory reserves the right to modify technical details mentioned in this manual without prior notice. i La casa produttrice si riserva la possibilità di variare caratteristiche e dati del presente manuale in qualunque momento e senza preavviso. f La Maison se réserve la possibilité de changer des caractéristiques et des données de ce manuel à n importe quel moment et sans préavis. C Im Sinne des Fortschritts behält sich der Hersteller das Recht vor, technische Änderungen ohne vorherigen Hinweis durchzuführen. e La firma productora se reserva la posibilidad de cambiar las características y datos del presente manual en cualquier momento y sin previo aviso. h Door konstante produkt ontwikkeling behoud de fabrikant zich het recht voor om rechnische specificaties zoals vermeld in deze handleiding te veranderen zonder biervan vooraf bericht te geven. s Tilverkaren reserverar sig rätten att ändra fakta och uppgifter ur handboken utan förvarning. q Producenten forbeholder sig ret til ændringer, hvad angår karakteristika og data i nærværende instruktion, når som helst og uden varsel. v Jatkuvan tuotteen parannusohjelman tähden valmistaja pidättää oikeuden vaihtaa ilman ennakkovaroitusta tässä ohjekirjasessa mainittuja teknisiä yksityiskohtia. { Produsenten forbeholder seg all rett og mulighet til å forandre tekniske detaljer i denne manualen uten forhåndsvarsel. p A casa productora se reserva a possibilidade de variar características e dados do presente manual em qualquer momento e sen aviso prévio. k Λόγω προγράµµατος συνεχούς βελτίωσης προϊόντων, το εργοστάσιο επιφυλάσσεται του δικαιώµατος να τροποποιεί τις τεχνικές λεπτοµέρειες που αναφέρονται στο εγχειρίδιο αυτό χωρίς προηγούµενη ειδοποίηση. Folyamatos gyártmány felùjítási müsorunk következtében, a gyártó cég fenntartja a jogát ebben a Használati leirt müszaki adatok elözetes értesítés nélküli változtatására.
7 SPECIFICATIONS THIS PRODUCT MEETS THE SAFETY STANDARD REQUIREMENT OF THE EUROPEAN MACHINERY DIRECTIVE UK DISPLACEMENT (cm 3 ) BORE AND STROKE (mm)... 40x30 41x30 43x32 ENGINE OUTPUT (kw)... 1,5 1,75 2,4 ENGINE SPEED AT MAX POWER (min -1 ) MAXIMUM SPEED (min -1 ) MINIMUM SPEED (min -1 ) DRY WEIGHT (Kg) (NO BAR AND CHAIN) ,5 CHAIN PITCH (9,525-8,255 mm)... 3/8 3/ / CHAIN GAUGE (mm)... 1,3 1,3 1,3 BAR LENGTHS (cm)... 35/40/45 40/45 40/45 No. OF SPROCKET TEETH /7 6/7 OIL TANK CAPACITY (cm 3 ) FUEL TANK CAPACITY (cm 3 ) SOUND PRESSURE LEVEL (AT THE OPERATOR S EAR). LpAav (dba) (EN EN 608) GUARANTEED SOUND POWER LEVEL LwAav (dba) (ISO EN 608) MEASURED SOUND POWER LEVEL LwAav (dba) (ISO EN 608) VIBRATION LEVEL (ISO EN 608) (m/s 2 )... 7,5 8,7 6,9 DATI TECNICI QUESTO PRODOTTO È CONFORME ALLA DIRETTIVA EUROPEA SULLA SICUREZZA DELLE MACCHINE I CILINDRATA (cm 3 ) ALESAGGIO x CORSA (mm)... 40x30 41x30 43x32 POTENZA (kw)... 1,5 1,75 2,4 REGIME Dl MASSIMA POTENZA (min -1 ) REGIME MASSIMO (min -1 ) REGIME DI MINIMO (min -1 ) PESO A SECCO (Kg) (SENZA BARRA E CATENA) ,5 PASSO CATENA (9,525-8,255 mm)... 3/8 3/ / SPESSORE CATENA (mm)... 1,3 1,3 1,3 LUNGHEZZA BARRA (cm)... 35/40/45 40/45 40/45 No. DENTI DEL PIGNONE /7 6/7 CAPACITÀ SERBATOIO OLIO (cm 3 ) CAPACITÀ SERBATOIO MISCELA (cm 3 ) PRESSIONE SONORA ALL ORECCHIO DELL OPERATORE LpAav (dba) (EN EN 608) LIVELLO POTENZA SONORA GARANTITA LwAav (dba) (ISO EN 608) LIVELLO POTENZA SONORA MISURATA LwAav (dba) (ISO EN 608) VIBRAZIONI (ISO EN 608) (m/s 2 )... 7,5 8,7 6,9 CARACTÉRISTIQUES TECHNIQUES CE PRODUIT EST CONFORME À LA NORME EUROPÉENNE POUR LA SÉCURITÉ DES MACHINES F CYLINDRÉE (cm 3 ) ALÈSAGE / COURSE (mm)... 40x30 41x30 43x32 PUISSANCE MOTEUR (kw)... 1,5 1,75 2,4 REGIME MOTEUR PUISSANCE MAX (min -1 ) REGIME MAXIMUM (min -1 ) REGIME DE RALENTI (min -1 ) POIDS A VIDE (Kg) (SANS BARRE NI CHAÎNE) ,5 PAS DE LA CHAÎNE (9,525-8,255 mm)... 3/8 3/ / JAUGE (mm)... 1,3 1,3 1,3 LONGUEUR DE GUIDE (cm)... 35/40/45 40/45 40/45 NOMBRE DES DENTS DE PIGNONS /7 6/7 CAPACITÉ DU RÉSERVOIR HUILE (cm 3 ) CAPACITÉ DU RÉSERVOIR ESSENCE (cm 3 ) PRESSION SONORE À L OREILLE DE L OPERATEUR. LpAav (dba) (EN EN 608) NIVEAU DE PUISSANCE SONORE GARANTI LwAav (dba) (ISO EN 608) NIVEAU DE PUISSANCE SONORE MESURÉ LwAav (dba) (ISO EN 608) VIBRATIONS (ISO EN 608) (m/s 2 )... 7,5 8,7 6,9
8 SYMBOL MEANING Read operator s manual carefully Wear safety clothing: 1 Approved safety glasses or face shield 2 Approved safety helmet 3 Approved ear defender 4 Approved gloves 5 Approved safety footwear Do not smoke while refuelling or while operating the machine Warning - Caution Choke fully opened (hot start /run) Choke partially opened GENERAL DESCRIPTION 1 - BAR 2 - CHAIN 3 - FUEL TANK CAP 4 - OIL TANK CAP 5 - STOP SWITCH 6 - STARTER HOUSING 7 - STARTER HANDLE 8 - FRONT HANDLE 9 - AIR FILTER COVER 10 - CHOKE KNOB 11 - CARBURETOR ADJUSTMENT SCREWS 12 - SAFETY CHAIN BRAKE 13 - BAR RETAINING NUTS 14 - CHAIN CATCHER 15 - MUFFLER SHIELD 16 - REAR HANDLE 17 - THROTTLE TRIGGER LOCKOUT 18 - THROTTLE TRIGGER 19 - CHAIN BRAKE COVER 20 - CHAIN ADJUSTER SCREW / INTENZ 21 - SPIKE/SPACER 22 - THROTTLE ADVANCE 23 - DECOMPRESSION VALVE UK A Choke closed (cold start) Brake engaged / disengaged Beware of kickback Do not cut with the end on the bar, this may cause kickback Never use the machine with only one hand Always use the machine with both hands SAFETY PRECAUTIONS B 1 All operators should read this manual carefully before using this chainsaw; only use this machine for usage specifically mentioned in this manual. Wear suitable clothing. This should include snugly-fitting (safety) clothing, sturdy boots, heavy duty gloves, goggles or a face screen and ear plugs or ear mufflers. Wear a helmet if there is risk of falling objects or projections from trees. 2 Always hold the chainsaw firmly with both hands when the engine is running. Always maintain a firm foothold. Ensure you are able to stop the engine quickly if necessary.do not work up a tree unless you have received suitable training and have the appropriate equipment (belts, ropes, safety hooks etc.) for this type of work. We strongly recommend that all first-time chainsaw users obtain practical instruction on safe chainsaw usage before operating the chainsaw. Do not operate this machine when tired or under the influence of any substances, drugs or alcohol which can impair vision, dexterity or judgement. Prolonged use of chainsaws or other machines exposing the operator to vibration may produce Whitefinger s Disease (Raynaud s Phenomenon). This may reduce the hands ability to feel and regulate temperature and may 1
9 UK produce general numbness. Continual or regular users should therefore monitor closely the condition of their hands or fingers. If any of the symptoms appear, seek immediate medical advice. 3 Never carry the chainsaw with the engine running. Whenever carrying a chainsaw, even for short distances, the chain should be covered by the chain guard (scabbard) and the bar should point backwards. When transporting the chainsaw in a vehicle, secure the saw to prevent fuel spillage. 4 To avoid kick-back, do not attempt to cut with the nose of the bar. Ensure the engine is running at full throttle before commencing to cut. To avoid kick-back, do not let the nose of the bar come into contact with logs, branches, the ground or any other obstruction. Do not allow any part of the chain to come into contact with rock, nails or wire fence Ensure the chain is kept sharp and correctly tensioned. Keep the spike or the saw body against the wood when cutting. Use only genuine accessories and spare parts. We recommend you have your unit periodically checked and serviced by an authorised dealer. Do not use chainsaw above shoulder height. 5 Do not operate the chainsaw near a naked flame or spilled fuel. Only operate the chainsaw outside and in well ventilated areas. After re-fuelling, always wipe off any spilled fuel. Move the chainsaw away from the fuelling point before starting the engine. 6 Keep by-standers and animals out of the work area; at a minimum distance of 10 m or twice the timber length. If necessary, use warning signs to keep on-lookers at a distance. Carefully survey the working site to note any hazards, eg. roads, paths, electricity cables, dangerous trees etc. Do not use the chainsaw if the device for stopping the chain (safety chainbrake) does not work correctly. Never place hands on the chain whilst the engine is running. Ensure someone is within hearing distance in case of an accident. If this is not possible, it is recommended that users operating chainsaws in remote areas carry an adequate first-aid kit with them and ensure someone knows their location. Never leave the engine running while the tool is unattended. ONLY USE ORIGINAL SPARE PARTS AND ACCESSO- RIES. BAR AND CHAIN INSTALLATION - INTENZ Ensure engine is always switched off before fitting or adjusting chain. Wear a pair of protective gloves when fitting or adjusting chain. 1 Ensure chain brake lever is in disengaged position (A). Remove retaining nuts (B) and cover. 2 Turn the adjusting screw (D) counterclockwise taking it fully back. 3 Feed chain into bar groove ensuring correct direction of chain (P). C 4 Work the chain around sprocket and set the bar as illustrated, make the lower hole (F) coincide with the pin (G) of the adjusting screw. 5 Reposition side cover. Fit spike as illustrated. 6 Lock nuts (B) finger tight. Adjust chain tension pin by turning screw (D) so that when lifting the chain an entire drive link is just visible. The chain is correctly tensioned when there is no slack on the underside of the bar, and it runs freely in bar groove. Tighten the bar retaining nuts with the wrench, pushing bar tip upwards. INTENZ Turn the adjusting screw (I) counterclockwise taking it fully back. Feed chain into bar groove ensuring correct direction of chain (P). Lock nuts (B) finger tight. Adjust chain tension pin by turning screw (I) so that when lifting the chain an entire drive link is just visible. The chain is correctly tensioned when there is no slack on the underside of the bar, and it runs freely in bar groove. Tighten the bar retaining nuts with the wrench, pushing bar tip upwards. FUEL MIX D Use only fuel recommended by this manual. This product is fitted with a 2-stroke engine and therefore requires a 2-stroke petrol and oil mix. Use leaded (4 Star) or unleaded petrol with a minimum octane rating of 90. UNLEADED PETROL: if using unleaded petrol, you must use a totally synthetic 2-stroke engine oil or branded 2-stroke engine oil (see table). Only use oil from sealed containers. In order to obtain a good fuel mix, put the oil into the container before the petrol. IMPORTANT Always shake this fuel mix vigorously each time you use it. We recommend to carry out this operation each time you use the fuel. Fuel mix properties deteriorate with time, we therefore recommend that you only make the quantity of fuel mix you will need for each usage. Do not use fuel mix more than a week old as this could damage the engine. WARNING Do not smoke when re-fuelling. Always open the fuel cap slowly. Re-fuel in open spaces only, keeping away from naked flames or sparks. Always store fuel in an approved container. SAFE STORAGE OF FUEL Petrol is highly inflammable. Put out all cigarettes, pipes and cigars before working with petrol. Avoid spilling petrol. Store fuel in a cool, well ventilated place, in an approved container specifically designed for the purpose. 2
10 UK Never store engine with fuel in the tank in enclosed, poorly ventilated areas, where fuel fumes may reach an open flame, spark or pilot light such as in a furnace, water heater, clothes dryer etc. Petrol fumes can cause an explosion or a fire. Do not store large amounts of fuel. CHAIN LUBRICATION IMPORTANT The service life of the bar and chain depends on good lubrication. Always use chain lubricating oil of medium viscosity. We recommend special McCulloch chain lubricating oil. Never use waste oil for this purpose. This results in damage to the bar, the chain and the oil pump. Refill the chain oil tank each time the saw is refuelled. To prevent possible restarting problems avoid running the fuel tank dry. This also helps to extend engine life. NOTE: Saw chain stretches during use particularly when it is new, and it will occasionally be necessary to adjust and tighten it. A new chain will require adjustment after about 5 minutes of operation. The mechanical oil pump for chain lubrication can be adjusted. The feed rate of the chain oil pump can be adjusted by means of the regulating screw (A) (see details in the illustration). STARTING AND STOPPING IMPORTANT Never start or operate unless bar and chain are properly installed. Before starting always move the saw away from the fuelling area and place it on a firm, flat surface, the guide bar to the front. STARTING A COLD ENGINE 1 Check that the chain brake is in the disengaged position moving the lever (L) towards the front handle. Move the stop switch upwards. 2 Slide the choke lever (A) to the CLOSED position (OUT). Push the decompression valve (D) down if your models is fitted with one. 3 Depress throttle trigger lock out (S). Depress throttle trigger (G) and then operate throttle advance (P) moving it backwards. 4 Hold the saw firmly as shown in illustration and pull the starter rope until the engine fires once. Beware of moving chain! 5 Move choke lever (A) to the OPEN position (IN). Push the decompression valve (D) down if your models is fitted with one. Pull the starter rope until the engine starts. Allow engine to warm up for ten seconds for better cutting performance. Squeeze the throttle trigger (G) to release the throttle advance. If engine fails to start, repeat these instructions. 6 The engine is stopped by depressing the STOP switch to STOP position. E After lengthy use of the chain at full speed,we recommend to run the engine for a few seconds at idle speed before stopping it. STARTING A WARM ENGINE Check that the ignition switch is not in the stop position and do not use the throttle lock. Hold the saw firmly, press valve (D) for decompression and pull the starter rope. STARTING A WARM ENGINE AFTER RE-FUELLING In the fuel tank as run completely dry, procede to start as with a cold engine. USAGE F IMPORTANT Before using a chain saw read the Operator s Manual and all safety precautions carefully. FELLING TREES Make sure that there are no bystanders or animals in the work area. Study the direction of the fall of the tree and then plan your exit path away from the planned direction of fall. Don t fell trees when there is a strong wind. 1 Clear the tree base of interfering limbs and brush. Clean the work area from stones or other objects which could damage the chain. If the tree has large protruding roots, remove them before felling (see illustrations). 2 A) Cut a felling notch (A) of 45 on the side you want the tree to fall to a depth of about one third of the trunk diameter (d). Then make a felling cut (B) about 5 cm higher than the felling notch on the opposite side of the tree. Make sure that the felling cut does not go right through the trunk. A hinge (C) must always be left to provide control over the direction of the fall. B) Use wedges to control the moment and direction of the fall. 3 When the tree starts to fall, walk away along your preplanned escape path. CUTTING FALLEN TRUNKS 4 A) Limbing thick branches. For limbing and bucking leave the lower limbs to support the log off the ground. B) Supported at one end only. Begin with a bottom cut made by the upper side of the bar (A); the depth of the cut should be about one third of the log diameter. Finnish with a top cut (B) meeting the first one. With this technique splitting, cracking can be avoided C) Supported at both ends. Begin with a top cut about one third of the log diameter. Then finish with a bottom cut (B) meeting the first one. this technique avoids the risk of pinching the bar in the log. D) If the log is supported along its whole length it may be cut normally from above. Take care not to touch the ground with the chain. When working on a slope always stand on the uphill. When cutting prepared timber, use clamps or chocks to secure work. Use extreme caution when cutting small size brush and saplings which may catch the chain and pull you off balance. 3
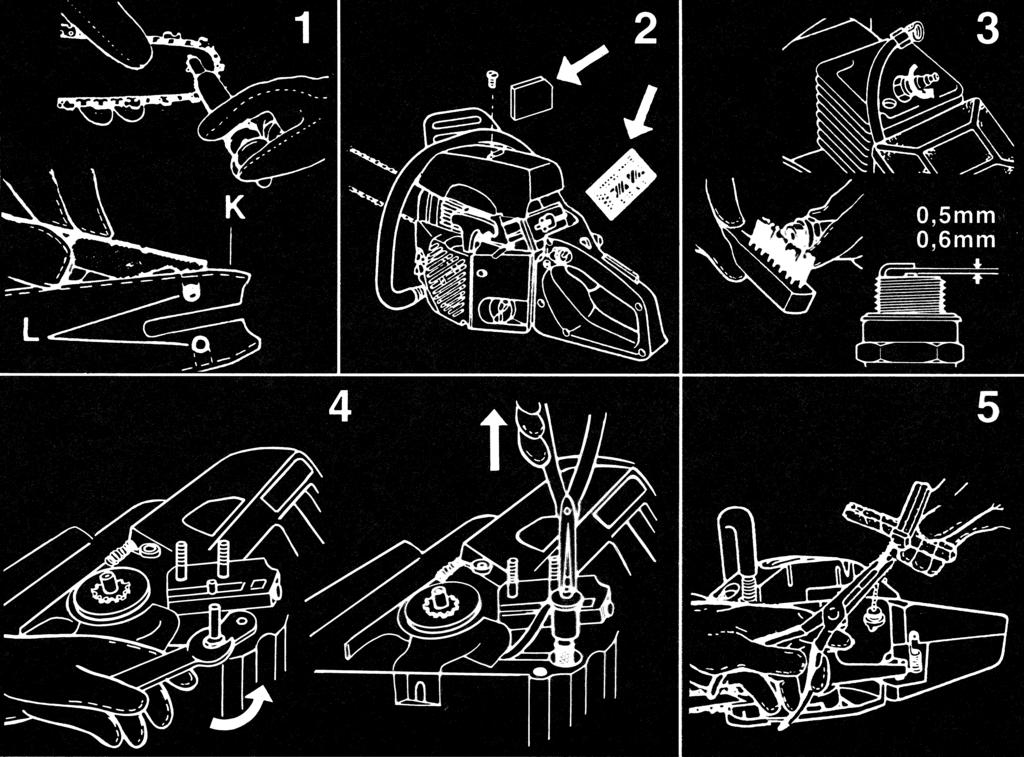
11 UK CARBURETTOR ADJUSTMENT We suggest carburetor adjustments are made by an authorized servicing dealer. The carburetor has three adjustment screws: L: The needle screw L governs the fuel flow at low speed and also the acceleration from low to full speed. To set screw L: close screw L turning it clockwise without forcing. Then open screw 1 full turn (counterclockwise). If acceleration is not smooth, open another 1/8 turn to increase fuel flow. H: The needle screw H governs fuel flow at high speed (throttle valve fully open). To set hi speed screw H: close screw H turning it clockwise without forcing. Then open screw 1 full turn (counterclockwise). If the engine speed is too high, open the screw about 1/8 turn (counterclockwise). Optimal adjustment is found between 1 and 1 1/4 turns. I: The I (IDLE) screw controls the throttle opening to govern idle speed (2800 min -1 ) adjust as necessary. CAUTION: increased idle speed may cause chain movement. The carburetor is adjusted for normal operation during production. When considerable changes of altitude require a supplementary adjustment, contact an authorised service station which offers the latest in tools, parts and technical assistance. ROUTINE MAINTENANCE Ensure engine is always switched off before any kind of maintenance operation. CHAIN: Check tension regularly. A new chain will require more frequent adjustment. Loosen retention nuts. Tighten chain (see assembly instructions). Tighten retention nuts and adjust. 1 BAR Clean the bar groove (K) and check the lubrication holes (L) in the bar to ensure that they are not clogged. Grease sprocket periodically. Rotate sprocket and repeat. Rotate bar periodically to maximise bar life. 2 AIR FILTER A dust clogged air filter may cause carburetor problems. This may prevent the engine from reaching its maximum r.p.m. and cause high fuel consumption. Remove cover. Wash filter in petrol (do not use fuel which is mixed with oil). The filter can also be cleaned with compressed air. Replace filter if damaged or if it does not seal tightly in the air box. 3 SPARK PLUG Remove and clean the spark plug every 30 hours. Check the electrode gap (0,5/0,6 mm inches). Replace spark plug about every 100 working hours or whenever it is extremely encrusted. G H Heavily encrusted electrodes can result from an incorrect carburetor setting or from wrong fuel mixture (too much oil in the fuel mix) or a poor quality of oil in the fuel mix. Check and correct. 4 OIL FILTER The oil filter is on the end of the oil suction hose inside the oil tank. To clean and replace the filter pull it out through the oil tank filter opening. Use a piece of bent wire or long forceps. To remove deposits from the oil tank half-fill it with kerosene or petrol and shake thoroughly. Drain off and fill the tank with fresh saw chain oil. Never use waste oil. 5 FUEL FILTER To change fuel filter remove the tank cap and pull out the filter with a piece of bent wire or long forceps. Replace the filter as shown in the illustration and reposition it. It is recommended to replace the fuel filter at least once a year. CHAIN BRAKE WARNING: Contact your service dealer if anything appears wrong with your chain brake. Do not disassemble or manipulate the mechanism of the chain brake. Clean the brake mechanism periodically (without disassembling it) and control the wear of the band visually. PERIODICALLY: It is important to clean the saw thoroughly particularly around cylinder fins to avoid overheating of the engine. LONG STORAGE: Empty fuel and run engine until dry. SAFETY CHAIN BRAKE Your chain saw is fitted with a safety chainbrake designed to stop the chain in milliseconds in case of kickback. Always hold the saw firmly in both hands. The chain brake does not provide a total protection if the machine is used without taking the necessary precautions and maintenances. The chain brake is intended to engage automatically in case of kickback. The chain brake can also be engaged manually by pushing the chain brake lever forwards.the manual use of the chain brake is recommended only at idle. Always test the chain brake before using your saw. Do this by engaging the brake at idle (see below). Always release the brake before starting. Kickback may occur if the end of the bar (see illustrated angle) touches any solid object. Never attempt to start a cut with the end of the bar. Kickback is a violent upward and rearward movement of the bar and may cause you to lose control of the machine. Therefore you should avoid starting a cut with this part of the bar. Always keep a firm grip on the saw with both hands because, in case of kickback, it is the contact of the left hand with the brake lever which will help to engage the brake. CHAIN BRAKE TESTING: 1 The chain brake (A) is disengaged when brake lever is pulled back and locked(chain can move). I 4
12 UK 2 The chain brake (A) is engaged when brake lever is in the position (chain cannot rotate).the chain brake should snap into both positions.if strong resistance is felt or lever does not move into either position, DO NOT USE YOUR SAW. Take it immediately to an authorized servicing dealer. 3 CHAIN CATCHER This unit is fitted with a chain catcher below the drive spocket. This is intended to stop the rearward movement of the chain in case of breakage or if it should come out of the bar. It should never be removed. CHAIN SHARPENING L 1 Chain cutter teeth can be sharpened with a round file, as follows: CHAIN FILE MP 370 GLX 5/32 PM 320 GX 3/16 The exact chain type is marked on the bottom half of the drive link which runs inside the bar groove. Filing can be made easier by also using a file holder. The chain can remain fitted on the bar during sharpening. Before commencing, the chain should be tensioned correctly and the chain brake should be activated to prevent the chain from moving. 2 To obtain a correct sharpening the file must be carefully held to maintain 3 basic angles: A Top angle B External, side angle C Internal, side angle 60 File in one direction only, from the inside of the cutter tooth towards the outside. Do not allow the file to touch the chain as you bring it back to re-position it. Each cutter tooth should be filed with the same number of strokes. 3 The file should be held horizontally to the cutter tooth being sharpened. 4 Best results to obtain a precise sideways angle can be obtained by holding the file so that it rises 0,5 mm above the top face of the cutter tooth. 5 DEPTH GAUGE Correct depth gauge height is vital to ensure maximum chain life and cutting efficiency. The height of the depth gauge should be lowered as the cutter tooth is filed back; this height should be checked every 4 or 5 sharpenings. The best way to do this is to use a flat file and a depth gauge tool. The correct setting is 0.65 mm below the top edge of the cutter tooth. The cutter tooth depth gauge should then be rounded (D). FAULT FINDING TABLE Check STOP switch is in the position I. Engine will not start Engine runs badly The chainsaw runs Engine runs badly or but does not cut well looses power when cutting Control fuel level min. 25% tank capacity. Check air filter is clean. Remove spark plug, dry it, clean it and adjust it, and replace it, if necessary. Control and adjust the carburetor screws if necessary. Change fuel filter. Contact your dealer. Carefully follow the chain assembly instructions. Check chain is sharp. Otherwise, contact your dealer. Engine still gives trouble: contact your dealer. 5
13 A EC Declaration of conformity In accordance with the EC Machine Directive (98/37/CEE), 93/68/EEC (CE Marking Directive) & 89/336/EEC (Directive on electromagnetic compatibility) Directive 2000/14/CEE (Annex V). The undersigned, Fausto Parazzini, authorised by E.O.P.I., declares that the petrol-driven chainsaw: MS38E, MS40E, MS46E serial number as above, with chain bar of cutting length 35/40/45 cm, manufactured by E.O.P.I., Via Como 72, Valmadrera (LC), Italia, conform to the machine that was the object of the EC type testing in accordance with Annex VI of the Machine Directive. The EC type examination was conducted by Marchio di Qualità (IMQ), Via Quintiliano 43, Milano (Italia), EC type examination certificate no. IMQ AQ 024DM, IMQ AQ 025DM, IMQ AQ 026DM. This type testing established that the machine conforms to the essential health and safety requirements of the EC Machinery Directive. C EU-Erklärung der Übereinstimmung Gemaß der Maschinendirektive der 98/37/CEE (Maschinen-richtlinie), 93/68/CEE (CE Kennzeichnungsrichtlinie) & 89/336/CEE (EMV Richtlinie) entsprechen, Richtlinie 2000/14/CEE (Anhang V). Der Unterzeichnete Fausto Parazzini, bevollmächtigt durch E.O.P.I., erklärt daß die Kettensägen mit Benzinmotor: MS38E, MS40E, MS46E Seriennummer wie oben angegeben, Kettenstange mit Schneidlänge von 35/40/45 cm, hergestellt durch E.O.P.I., Via Como 72, Valmadrera (LC), Italia, der Maschine entsprechen, die Gegenstand der EG-Typenprüfung gemäß Anhang VI der Maschinendirektive war. Die EG-Typenkontrolle wurde durchgeführt von Marchio di Qualità (IMQ), Via Quintiliano 43, Milano (Italia), Bescheinigung der EG-Typenkontrolle Nr. IMQ AQ 024DM, IMQ AQ 025DM, IMQ AQ 026DM. Diese Typenprüfung hat ergeben, daß die Maschine den grundlegenden Gesundheits - und Sicherheitsbestimmungen der EG-Maschinendirektive entspricht. E Declaracion de cumplimiento de la directriz de la UE En cumplimiento con la Directiva sobre Maquinaria de la UE (98/37/CEE), 93/68/CEE (Directiva sobre Marcas de la CE) & 89/336/CEE (Directiva sobre Compatibilidad Electro Magnética ) Directiva 2000/14/CEE (Anexo V) El abajo firmante Fausto Parazzini, autorizado por E.O.P.I., declara que las motosierras de gasolina: MS38E, MS40E, MS46E con número de serie indicado anteriormente con barra portacadena de longitud de corte de 35/40/45 cm, fabricadas por E.O.P.I., Via Como 72, Valmadrera (LC), Italia, cumplen con las especificaciones de la máquina objeto de la prueba de la UE conforme al Anexo VI de la Directiva sobre Maquinaria. La prueba realizada por la UE se llevó a cabo en Marchio di Qualità (IMQ), Via Quintiliano 43, Milano (Italia), certificado de tipo de prueba de la UE No. IMQ AQ 024DM, IMQ AQ 025DM, IMQ AQ 026DM. Esta clase de prueba establece que la máquina cumple con las normativas imprescindibles sobre sanidad y seguridad de la Directriz de la UE sobre Maquinaria. B Déclaration de conformité Européenne En accord avec la directive européenne (98/37/CEE), 93/68/CEE (Directive Marquage CE) & 89/336/CEE (Directive EMC) Directive 2000/14/CEE (Annexe V). Le soussigné Fausto Parazzini, dûment mandaté par E.O.P.I., déclare que, les tronçonneuses thermiques: MS38E, MS40E, MS46E dont le numéro de série est cité ci-dessus équipées d un guide chaîne de 35/40/45 cm de longueur, fabriquées par E.O.P.I., Via Como 72, Valmadrera (LC), Italia, sont identiques à la machine soumise aux tests européens en accord avec l annexe VI de la directive ci-dessus. Les tests ont été effectués par Marchio di Qualità (IMQ), Via Quintiliano 43, Milano (Italia), certificat de tests européens numéro IMQ AQ 024DM, IMQ AQ 025DM, IMQ AQ 026DM. Ces tests ont établi que la machìne est conforme aux recommandations d hygiène et de sécurité de la directive européenne ci-dessus. G Declaração de conformidade da CE De acordo com a Directive de Máquinas (98/37/CEE), 93/68/CEE (Directiva de Marcação CE) e 89/336/CEE (Directiva de Compatibilidade Electromagnética) Directiva 2000/14/CEE (Apêndice V) O abaixo assinado Fausto Parazzini, autorizado por E.O.P.I., declara que: as serras mecänícas a gasolina: MS38E, MS40E, MS46E com número de série acima indicado com uma barra de corrente com o comprimento de corte de 35/40/45 cm, fabricada por E.O.P.I., Via Como 72, Valmadrera (LC), Italia, estäo em conformidade com a máquina que foi submetida ao ensaio tipo da CE de acordo com o Anexo VI da Directiva de Máquinas. A inspecção tipo da CE foi efectuada por Marchio di Qualità (IMQ), Via Quintiliano 43, Milano (Italia), No. de certificado de inspecção tipo da CE no. IMQ AQ 024DM, IMQ AQ 025DM, IMQ AQ 026DM. Este ensaio tipo constata que a máquina esta em conformidade com os requisitos mínimos de Saude e Segurança de Directiva de Máquinas da CE. D Dichiarazione di conformità CE In accordo con la Direttiva Macchine CE (98/37/CEE), 93/68/CEE (Direttiva Marcatura CEE) & 89/336/CEE (Direttiva Compatibilità Elettromagnetica) Direttiva 2000/14/CEE (Allegato V). Il sottoscritto Fausto Parazzini, autorizzato dalla E.O.P.I., dichiara che la sega a catena portatile da legno modello: MS38E, MS40E, MS46E numero di serie come sopra riportato, con barra guida catena con lunghezza di taglio da 35/40/45 cm, costruita da E.O.P.I., Via Como 72, Valmadrera (LC), Italia, è conforme al modello di macchina che è stato sottoposto all esame per la certificazione CE in accordo con l allegato VI della Direttiva Macchine. L esame per la certificazione CE è stato condotto dall Istituto del Marchio di Qualità (IMQ), Via Quintiliano 43, Milano (Italia), autorizzato dalla Repubblica Italiana con Decreto Ministeriale del 23/12/1993. Attestato di certificazione CE no. IMQ AQ 024DM, IMQ AQ 025DM, IMQ AQ 026DM. Questo esame ha stabilito che la macchina è conforme ai requisiti essenziali di salute e di sicurezza della Direttiva Macchine CE. / EU julistus vastaavuudesta Yhteneväinen EU n koneista annetun määräyksen (98/37/CEE), 93/68/CEE (CE mærkningsdirektiv) & 89/336/CEE (EMC-direktiv) Direktiivi 2000/14/CEE (Liite V). Allerkirjoittanut Fausto Parazzini, E.O.P.I., in valtuuttama, vakuuttaa että bensiinimoottorisahat: MS38E, MS40E, MS46E yllä merkityllä sarjanumerolla, 35/40/45 cm:n ketjulevyllä, E.O.P.I., Via Como 72, Valmadrera (LC), Italia, valmistama, mukautuu koneeseen, joka oli EY tyyppitestin objekti koneohjeellisen Annex VI mukainen. EY tyypitarkastus oli Marchio di Qualità (IMQ), Via Quintiliano 43, Milano (Italia), johtama, EY tyyppitarkastustodistus no. IMQ AQ 024DM, IMQ AQ 025DM, IMQ AQ 026DM. Tämä tyyppitesti vahvisti, että kone mukautuu EY koneohjeellisen välttämättömiin terveys-ja turvallisuusmääräyksììn.
14 ; EU Konformitetsdirektiv I følge EU Maskindirektiv (98/37/CEE), 93/68/CEE (CE-merkingsdirektiv) & 89/336/CEE (Direktiv om elektromagnetisk kompatibilitet) Direktiv 2000/14/CEE (Annex V). Undertegnede Fausto Parazzini, autorisert av E.O.P.I., erklærer at bensindrevne kjedesager: MS38E, MS40E, MS46E med serienummer som vist oventor, med et kjedesverd med skjærelengde 35/40/45 cm, produsert av E.O.P.I., Via Como 72, Valmadrera (LC), Italia, er i samsvar med den maskinen som var gjenstand for EU typeprøvning i følge Vedlegg VI til Maskindirektivet.EU typeundersøkelsen ble utført av Marchio di Qualità (IMQ), Via Quintiliano 43, Milano (Italia), EU Typeundersøkelsessertifikat nr. IMQ AQ 024DM, IMQ AQ 025DM, IMQ AQ 026DM. Denne typeprøvningen fastslo at maskinen tilfredstiller de nødvendige helse- og sikkerhetskravene i EU Maskindirektiv. L Intyg angående överenstämmelse med EG I enlighet med EGs Maskindirektiv (98/37/CEE), 93/68/CEE (CE märkningsdirektiv) & 89/336/CEE (Elektromagnetisk kompatibilitet) Direktiv 2000/14/CEE (Annex V). Undertecknad Fausto Parazzini, auktoriserad av E.O.P.I., intygar att bensindrivna kedjesågar: MS38E, MS40E, MS46E med 35/40/45 cm långt svärd, vars serienummer visas ovan, tillverkade av E.O.P.I., Via Como 72, Valmadrera (LC), Italia, överenstämmer med den maskin som var föremål för EG-provning i enlighet med Annex VI av Maskindirektivet. EG-provet utfördes av Marchio di Qualità (IMQ), Via Quintiliano 43, Milano (Italia), EG-provets certifikatsnummer IMQ AQ 024DM, IMQ AQ 025DM, IMQ AQ 026DM. Denna provningsmetod fastställer att maskìnen överenstämmer med de väsentliga hälso- och säkerhetsföreskrifterna i EGs Maskindirektiv. : EF Konformitetserklæring I overensstemmelse med EF Maskindirektivet (98/37/CEE), 93/68/CEE (CE mærkningsdirektiv) & 89/336/CEE (EMC-direktiv) Direktiv 2000/14/CEE (Annex V). Undertegnede Fausto Parazzini, bemyndiget af E.O.P.I., erklærer at benzindrevne kædesave: MS38E, MS40E, MS46E serienummer som angivet ovenor, med 35/40/45 cm lang kædestang, fremstillet af E.O.P.I., Via Como 72, Valmadrera (LC), Italia, er i overensstemmelse med den maskine, som var genstand for EF-typeafprøvning ifølge Tillæg VI af Maskindirektivet. EF-typeundersøgelsen blev gennemført af Marchio di Qualità (IMQ), Via Quintiliano 43, Milano (Italia), EF-typeundersøgelsescertifikatnummer IMQ AQ 024DM, IMQ AQ 025DM, IMQ AQ 026DM. Denne typeafprøvning fastslog, at maskinen er i overensstemmelse med de grundlæggende krav af sikkerhed og sundhed ifølge EF Maskindirektivet. F EC Verklaring van Overeenstemming In overeenstemming met de EC Machine Richtlijn (98/37/CEE), 93/68/CEE (EG Markering Richtlijn) & 89/336/CEE (Richtlijn aangaande elektromagnetische compatibiliteit) Richtlijn 2000/14/CEE (Annex V). Ondergetekende Fausto Parazzini, gemachtigd door E.O.P.I., verklaart dat de benzine aangedreven kettingzaag: MS38E, MS40E, MS46E met bovenstaand serienummer met zwaard lengte van 35/40/45 cm, geproduceerd door E.O.P.I., Via Como 72, Valmadrera (LC), Italia, overeenstemt met de machine die gebruikt is voor het EC type onderzoek volgens de Annex VI van de Machine Richtlijn. Het EC type onderzoek is uitgevoerd door Marchio di Qualità (IMQ), Via Quintiliano 43, Milano (Italia), EC type onderzoek certificaat nr. IMQ AQ 024DM, IMQ AQ 025DM, IMQ AQ 026DM. It typeonderzoek toont aan dat de machine overeenstemt met de fundamentele eisen van veiligheid en gezondheid volgens de Machine ήλωση Συµµορφωσης της EK Σύµφωνα µε την περί Mηχανών Eντολή της EK (98/37/CEE), 93/68/CEE (η περί του Σήµατος CE Eντολή) & 89/336/CEE (η περί Hλεκτροµαγνητικης Συµβατότητας Eντολή) Kαvοvιδµός 2000/14/CEE (V) O υποφαινοµενος Fausto Parazzini, µε εξουσιοδοτηση της E.O.P.I., δηλωνω ότι: τα βενζινοκίνητα αλυσοπρίονα: MS38E, MS40E, MS46E µε αλνσιδωτη λαµα µηκονς κοπης 35/40/45 εκ., κατασκευασθεντα απo την E.O.P.I., Via Como 72, Valmadrera (LC), Italia, ανταποκρίνονται προς τη µηχανή που υπηρξε αντικειµενο εξετασης τυπου της EK συµφωνα µε το Παραρτηµα VI της περι Mηχανων Eντολης. H εξεταση τυπου της EK εγινε απο Marchio di Qualità (IMQ), Via Quintiliano 43, Milano (Italia), (διευθυνση), εγγεγραµµενο πρακτορείο του Γαλλικου ικαιου (Πιστοποιητικο εξετασης τυπου υπ αρ IMQ AQ 024DM, IMQ AQ 025DM, IMQ AQ 026DM. Mε την εξεταση τυπου διαπιστώθηκε οτι η µηχανη συµµορφωνεται προς τις στοιχειωδεις απαιτήσεις υγειας και ασφάλειας της περί Mηχανων Eντολης της EK. EC Megegyezési nyilatkozat Az EC Gépek direktiva (98/37/CEE), 93/68/CEE & 89/336/CEE szerint Direktíva 2000/14/CEE (Melléklet V) Az alulírott, Fausto Parazzini, a E.CO.P.I. feljogosításával, kijelentem hogy a benzinmotoros láncfűrész: MS38E, MS40E, MS46E gyártási sorszám a fentiek szerint, egy 35/40/45 cm vágó hosszal rendelkező vezetőlappal, gyártott a E.O.P.I. Via Como 72, Valmadrera (LC), Olaszország által, megegyezik avval a géppel amelyik tárgya volt az EC típusvizsgálatnak a Gépek direktiva VI Mellékletének megfelelően. Az EC típusvizsgálat vezetve volt a Marchio di Qualita (IMQ)-nál, Via Quintiliano 43, Milano, Olaszország, EC típusvizsgálat bizonyítvány szám IMQ AQ 024DM, IMQ AQ 025DM, IMQ AQ 026DM. Ez a típusvizsgálat megállapította azt, hogy a gép megfelel az EC Gép Direktiva alapvető egészségi és biztonsági követelményeinek. Fausto Parazzini (Amministratore Delegato), E.O.P.I., Valmadrera Valmadera (Lecco), Via Como 72, Italia. P/N (01.02)
81152 TRANSFER CASE SHIFT HANDLE
 Installation Instructions for TRANSFER CASE SHIFT HANDLE for 2007 2018 JEEP JK WRANGLER 1 2 3 ITEM NO. PART NO. DESCRIPTION QTY. 1 4101359 SHIFT KNOB, JEEP WRANGLER JK, MOLDED 1 2 1794720 JAM NUT, 3/8
Din manual PARTNER P 461 II P.U.O. http://sv.yourpdfguides.com/dref/937662
 Du kan läsa rekommendationerna i instruktionsboken, den tekniska specifikationen eller installationsanvisningarna för PARTNER P 461 II P.U.O.. Du hittar svar på alla dina frågor i PARTNER P 461 II P.U.O.
HMANTIKE HPOºOPIE È ÛÙÂ ÙÔ appleúèv applefi ÙË Ú ÛË Î È Ê Ï ÍÙÂ ÙÔ ÁÈ v ÙÔ Û Ì Ô ÏÂ ÂÛÙÂ ÛÙÔ Ì ÏÏÔv
 GR HMANTIKE HPOºOPIE È ÛÙÂ ÙÔ appleúèv applefi ÙË Ú ÛË Î È Ê Ï ÍÙÂ ÙÔ ÁÈ v ÙÔ Û Ì Ô ÏÂ ÂÛÙÂ ÛÙÔ Ì ÏÏÔv A. B. C. D. Partner oil 50 : 1 McCulloch oil 40 : 1 2 T oil 25 : 1 2% 2,5% 4% 1 ltr. 20 cm 3 25 cm
Installation Instructions
 Installation Instructions (Cat. No. 1794-IE8 Series B) This module mounts on a 1794 terminal base unit. 1. Rotate keyswitch (1) on terminal base unit (2) clockwise to position 3 as required for this type
IMPORTANT! RETAIN FOR FUTURE REFERENCE PLEASE READ CAREFULLY VIKTIGT! BEHÅLL FÖR FRAMTIDA REFERENS LÄS IGENOM INSTRUKTIONSMANUALEN
 Heart & Stripes Junior Bed Instructions Manual Instruktions Manual IMPORTANT! RETAIN FOR FUTURE REFERENCE PLEASE READ CAREFULLY VIKTIGT! BEHÅLL FÖR FRAMTIDA REFERENS LÄS IGENOM INSTRUKTIONSMANUALEN Thank
IMPORTANT! RETAIN FOR FUTURE REFERENCE PLEASE READ CAREFULLY VIKTIGT! BEHÅLL FÖR FRAMTIDA REFERENSLÄS IGENOM INSTRUKTIONSMANUALEN NOGGRANT
 13060 Basic Cot One Instruction Manual Instruktion Manual IMPORTANT! RETAIN FOR FUTURE REFERENCE PLEASE READ CAREFULLY VIKTIGT! BEHÅLL FÖR FRAMTIDA REFERENSLÄS IGENOM INSTRUKTIONSMANUALEN NOGGRANT Thank
Windlass Control Panel v1.0.1
 SIDE-POWER Windlass Systems 86-08950 Windlass Control Panel v1.0.1 EN Installation manual Behåll denna manual ombord! S Installations manual SLEIPNER AB Kilegatan 1 452 33 Strömstad Sverige Tel: +46 525
BBT057/ BBC057 BBCD057/ BBT057-NL HOLDEN COLORADO 9/2016+ HOLDEN TRAILBLAZER WD & 4WD Models
 INSTALLATION GUIDE BBT057/ BBC057 BBCD057/ BBT057-NL HOLDEN COLORADO 9/2016+ HOLDEN TRAILBLAZER 2017+ 2WD & 4WD Models Ironman 4x4 BBT/ BBC/ BBCD/BBT057-NL Bull Bars fit to a Holden Colorado 9/2016+ It
ARC 32. Tvättställsblandare/Basin Mixer. inr.se
 ARC 32 Tvättställsblandare/Basin Mixer inr.se SE Användning och skötsel Manualen är en del av produkten. Bevara den under hela produktens livscykel. Vi rekommenderar er att noggrant läsa igenom manualen
 INSTALLATION INSTRUCTIONS Accessory S P/N 08E12-SZT-100 Application CR-Z Publications No. Issue Date SEP PARTS LIST Left illuminated door sill trim Right illuminated door sill trim Illumination harness
Joki Joki Air. JCD70-xx JAD90-xx. lasiesta.com. Manual. Betriebsanleitung. Manuel. Manual. Manuale. Gebruiksaanwijzing.
 lasiesta.com LA SIESTA GmbH Im Wiesenweg 4 55270 Jugenheim Germany Tel: +49 6130 9119-19 LA SIESTA Inc. 7355 S.W. 87 th Ave., Ste. 100 Miami, FL 33173 USA Tel: +1 786 401-1138 EN DE FR ES IT NL DA SV FI
Nathi Skötbord Changing unit Table à langer murale Wickeltisch Verschoontafel Puslebord Cambiador de pared Přebalovací pult Fasciatoio
 Nathi Skötbord Changing unit Table à langer murale Wickeltisch Verschoontafel Puslebord Cambiador de pared Přebalovací pult Fasciatoio Пеленальный стол Tested and approved according to SS-EN 12221:2008+A1_2013
Dokumentnamn Order and safety regulations for Hässleholms Kretsloppscenter. Godkänd/ansvarig Gunilla Holmberg. Kretsloppscenter
 1(5) The speed through the entire area is 30 km/h, unless otherwise indicated. Beware of crossing vehicles! Traffic signs, guardrails and exclusions shall be observed and followed. Smoking is prohibited
Din manual PARTNER P 610 DECO P.U.O.
 Du kan läsa rekommendationerna i instruktionsboken, den tekniska specifikationen eller installationsanvisningarna för PARTNER P 610 DECO P.U.O.. Du hittar svar på alla dina frågor i PARTNER P 610 DECO
Support Manual HoistLocatel Electronic Locks
 Support Manual HoistLocatel Electronic Locks 1. S70, Create a Terminating Card for Cards Terminating Card 2. Select the card you want to block, look among Card No. Then click on the single arrow pointing
5 6 7 A. min 4mm (0,16 ) C B. 2 English Rev
 C B. 2 English Rev") GB Operator s manual 6-26 SE Bruksanvisning 27-47 DK Brugsanvisning 48-69 FI Käyttöohje 70-91 NO Bruksanvisning 92-112 FR Manuel d utilisation 113-135 NL Gebruiksaanwijzing 136-158 IT Istruzioni per l
GB Operator s manual 6-26 SE Bruksanvisning 27-47 DK Brugsanvisning 48-69 FI Käyttöohje 70-91 NO Bruksanvisning 92-112 FR Manuel d utilisation 113-135 NL Gebruiksaanwijzing 136-158 IT Istruzioni per l
CS 35 CS 35S EE LV LT SK HR BA RS SI CZ BG GB SE DK FI NO FR NL IT DE ES PT HU PL RU
 GB SE DK FI NO FR NL IT DE ES PT HU PL RU Operator s manual 6-27 Bruksanvisning 28-49 Brugsanvisning 50-71 Käyttöohje 72-94 Bruksanvisning 95-116 Manuel d utilisation 117-140 Gebruiksaanwijzing 141--164
235e, 236e 240e, 240e TrioBrake
 EN Operator's Manual, 6-23 ES Manual de instrucciones, 24-43 SE Bruksanvisning, 44-61 FI Käyttöohje, 62-79 DK Brugsanvisning, 80-97 NO Bruksanvisning, 98-115 IT Istruzioni per l uso, 116-135 PT Instruções
Users manual Bruksanvisning Gebrauchanweisung Guide d instructions
 Multi-pressure bucket pump Bärbar fettpump hochdruck abschmierpumpe distributeur manuel de graisse Users manual Bruksanvisning Gebrauchanweisung Guide d instructions 11018-1 - 815850 R02/03 IMPORTANT:
LINC MODELL 13. INR SVERIGE AB Kosterögatan 15 SE-211 24 Malmö 13 EN 1428:2005+A1:2008
 LINC MODELL 13 151005 Produkten är anpassad till branschregler Säker Vatteninstallation. INR garanterar produktens funktion om branschreglerna och monteringsanvisningen följs. INR SVERIGE AB Kosterögatan
USER INSTRUCTIONS. Smart-Splitter A Smart-Line Product
 USER INSTRUCTIONS BRUKSANVISNING I ORIGINAL. USER INSTRUCTIONS IN ORIGINAL FORMAT. ARTIKELNR. / ARTICLE NO: 0458-395-2800 Smart-Splitter A Smart-Line Product Patented 1 2 Greppyta Grip area 10 3 4 5 6
Instruction Manual. Svenska, English. Power Bank. Model: PRBN
 Instruction Manual Svenska, English Power Bank Model: PRBN Innehåll / Content Innehåll Säkerhetsföreskrifter... 4 Delar... 5 Specifikationer... 6 Miljö / Lag och säkerhet / Förbehåll... 7 Content Safety
säkerhetsutrustning / SAFETY EQUIPMENT
 säkerhetsutrustning / SAFETY EQUIPMENT Hastighetsvakt / Speed monitor Kellves hastighetsvakter används för att stoppa bandtransportören när dess hastighet sjunker under beräknade minimihastigheten. Kellve
VARIOBARRIER S/M MIMSAFE BY CHOICE
 VAROBARRR S/M MMSA BY CHOC K L A B D M C H A B C D 522 K 524 Right leg Right leg 514L 514R 510L 510R L 526L M 526R S508 S509 521 6X 521 + H 527 529 528 8X/1 18X 8X/1 M-460641AL M-SM6X14A M-460641B M-M37202_2014
INSTALLATION INSTRUCTIONS
 INSTALLATION - REEIVER INSTALLATION INSTRUTIONS RT0 RF WIRELESS ROOM THERMOSTAT AND REEIVER MOUNTING OF WALL MOUTING PLATE - Unscrew the screws under the - Pack contains... Installation - Receiver... Mounting
SAFETY PRECAUTIONS SPECIFICATIONS
 SAFETY PRECAUTIONS Read the instructions carefully before use and save them for future reference. Before you connect the appliance: Ensure that the voltage rating on the type plate corresponds to your
Accepterad monteringsanvisning 2016:1. Metris (RSK: ) Metris S (RSK: ) Metris (RSK: )
 Metris S (RSK: ) Metris (RSK: )") EN Table of contents 1 Instructions for use / assembly instructions 2 Assembly 4-5 Adjustment 6 Operation 7 Dimensions 8-9 Flow diagram 8-9 Spare parts 10-12 Cleaning 13 Test certificate 14 Contact information
EN Table of contents 1 Instructions for use / assembly instructions 2 Assembly 4-5 Adjustment 6 Operation 7 Dimensions 8-9 Flow diagram 8-9 Spare parts 10-12 Cleaning 13 Test certificate 14 Contact information
VASSVIK FIXED STAND SE / ENG
 VASSVIK FIXED STAND SE / ENG SE VIKTIGT Läs noga igenom instruktionerna före användning och spar dessa för framtida bruk. VARNING: Barnets huvud bör inte ligga lägre än barnets kropp. Lägg inte till ytterligare
SCdefault. 9-5 Installation instructions
 SCdefault 9-5 Installation instructions SITdefault Tuning Kit MONTERINGSANVISNING INSTALLATION INSTRUCTIONS MONTAGEANLEITUNG INSTRUCTIONS DE MONTAGE Accessories Part No. Group Date Instruction Part No.
Boiler with heatpump / Värmepumpsberedare
 Boiler with heatpump / Värmepumpsberedare QUICK START GUIDE / SNABBSTART GUIDE More information and instruction videos on our homepage www.indol.se Mer information och instruktionsvideos på vår hemsida
Your No. 1 Workout. MANUAL pro
 Your No. 1 Workout MANUAL pro Innehåll/Contents Svenska Viktigt om säkerhet Specifikationer & delar Rekommenderade övningar 3 5 6-7 2 English Safety instructions Specifications & parts Recommended exercises
BBT042/ BBC042/ BBCD042 NISSAN NAVARA D40 V STX & PATHFINDER R WD & 4WD Models
 INSTALLATION GUIDE BBT042/ BBC042/ BBCD042 NISSAN NAVARA D40 V6 2010+ STX & PATHFINDER R51 2010+ 2WD & 4WD Models Ironman 4x4 BBT/ BBC/ BBCD042 Bull Bars fit to a Nissan Navara D40 STX & Pathfinder R51.
Accepterad monteringsanvisning 2016:1
 EN Table of contents 1 Instructions for use / assembly instructions 2 Assembly 4-6 Adjustment 7 Dimensions 8 Flow diagram 9 Test certificate 9 Operation 10 Spare parts 11 Cleaning 12 Contact information
Diskant Yta eller Vikelfäste montering Mount
 Installation och Bruksanvisning Inledning Välj fästpunkterna för dina dome TW250 Silk diskanter. Kom ihåg att för bästa prestanda bör diskanterna monteras så nära mitten av bas som möjligt, med fri, direkt
ASSEMBLY INSTRUCTIONS SCALE SQUARE - STANDARD
 ASSEMBLY INSTRUCTIONS ALL COMPONENTS Metal profile 0 mm Gripper Ceiling attachments Screws for ceiling attachements (not included) Wires Metal profile 60 mm Metal profile 00 mm Felt - Full Felt - Half
Accepterad monteringsanvisning 2016:1. Talis S (RSK: ) Talis S (RSK: ) 1 (12)
 Talis S (RSK: ) 1 (12)") EN Table of contents 1 Instructions for use / assembly instructions 2 Assembly 4-5 Adjustment 6 Dimensions 7 Flow diagram 7 Operation 8 Spare parts 9 Cleaning 10 Test certificate 11 Contact information
EN Table of contents 1 Instructions for use / assembly instructions 2 Assembly 4-5 Adjustment 6 Dimensions 7 Flow diagram 7 Operation 8 Spare parts 9 Cleaning 10 Test certificate 11 Contact information
Accepterad monteringsanvisning 2016:1. Talis S (RSK: ) Talis S 100 CoolStart (RSK: )
 Talis S 100 CoolStart (RSK: )") EN Table of contents 1 Instructions for use / assembly instructions 2 Assembly 4-5 Adjustment 6 Dimensions 7 Flow diagram 7 Operation 8 Spare parts 9 Cleaning 10 Test certificate 11 Contact information
EN Table of contents 1 Instructions for use / assembly instructions 2 Assembly 4-5 Adjustment 6 Dimensions 7 Flow diagram 7 Operation 8 Spare parts 9 Cleaning 10 Test certificate 11 Contact information
BBT014/ BBC014/ BBCD014 PJ & PK FORD RANGER WD & 4WD Models
 INSTALLATION GUIDE BBT014/ BBC014/ BBCD014 PJ & PK FORD RANGER 2007+ 2WD & 4WD Models Ironman 4x4 BBT/ BBC/ BBCD014 Bull Bars fit to a Ford Ranger. It will take about 3 hours to install. NOTE: This product
Bathtub Filler CN EN. TBP02201 Type / TBP02202 Type. Installation Manual. Continued on the back cover
 03N74E Installation Manual 207.8 Bathtub Filler TBP0220 Type / TBP02202 Type For best results, install the product correctly according to the instructions in this Installation Manual. After installation,
SAFETY PRECAUTIONS SPECIFICATIONS
 SAFETY PRECAUTIONS Read the instructions carefully before use and save them for future reference. Before you connect the appliance: Ensure that the voltage rating on the type plate corresponds to your
INKOPPLINGSANVISNING ELTRYCKSLÅS WIRING DIAGRAM SOLENOID LOCK
 INKOPPLINGSANVISNING ELTRYCKSLÅS WIRING DIAGRAM SOLENOID LOCK SE EN S. 2-4 P. 5-7 SL 510/511 SL 520/521 SL 530-50/531-50 2013 11 07 SE TEKNISK SPECIFIKATION Driftspänning. Ström. Reed relä. Drifttemperatur.
SAFETY PRECAUTIONS SPECIFICATIONS
 SAFETY PRECAUTIONS Read the instructions carefully before use and save them for future reference. Before you connect the appliance: Ensure that the voltage rating on the type plate corresponds to your
Rev No. Magnetic gripper 3
 Magnetic gripper 1 Magnetic gripper 2 Magnetic gripper 3 Magnetic gripper 4 Pneumatic switchable permanent magnet. A customized gripper designed to handle large objects in/out of press break/laser cutting
Accepterad monteringsanvisning 2016:1. Focus (RSK: ) 1 (12)
 1 (12)") EN Table of contents 1 Instructions for use / assembly instructions 2 Assembly 4 Adjustment 5 Dimensions 6 Flow diagram 6 Operation 7 Spare parts 8 Cleaning 9 Test certificate 10 Contact information 12
EN Table of contents 1 Instructions for use / assembly instructions 2 Assembly 4 Adjustment 5 Dimensions 6 Flow diagram 6 Operation 7 Spare parts 8 Cleaning 9 Test certificate 10 Contact information 12
Mac 540E / California / Promac 40 II - 40 cc Mac 545E / Promac 46 II
 Operator s Manual Manuale d istruzioni Manuel d instructions Bedienungsanleitung Manual de instrucciones Gebruikershandleiding Ägarhandbok Brugehåndbog Omistajankäsikirja Eierens Håndbok Manual de Instruções
Accepterad monteringsanvisning 2016:1. Ecos M CoolStart (RSK: ) Ecos L CoolStart (RSK: ) 1 (12)
 Ecos L CoolStart (RSK: ) 1 (12)") EN Table of contents 1 Instructions for use / assembly instructions 2 Assembly 4-5 Adjustment 6 Dimensions 7 Flow diagram 7 Operation 8 Spare parts 9 Cleaning 10 Test certificate 11 Contact information
EN Table of contents 1 Instructions for use / assembly instructions 2 Assembly 4-5 Adjustment 6 Dimensions 7 Flow diagram 7 Operation 8 Spare parts 9 Cleaning 10 Test certificate 11 Contact information
LX Desk Mount LCD Arm
 ASSEMBLY INSTRUCTIONS LX Desk Mount LCD Arm * Den vertikala hissens lägsta rörelseomfång minskas upp till 3 tum (76 mm) när armen justeras för att kunna stödja över 20 lbs (9 kg). 8.5 (216 mm) 5-25 lbs*
manual Facial spa Art nr: 48682 Rubicson 2016-06-08
 manual Facial spa Art nr: 8682 EN NO SV 2016-06-08 Rubicson ENGLISH Overview Use Fill the container ENGLISH 1. Make sure that the power cord is not connected to a wall socket. 1 2 2. Remove the funnel
FD50H SLIDING DOOR SYSTEM Installation Manual
 FD50H SLIDING DOOR SYSTEM Installation Manual Thank you for selecting our product. Before starting installation, please read this manual thoroughly to ensure correct installation. Please keep this manual
Installation. Twice Nisch. Twice Corner SVENSKA ENGLISH
 Installation Arrow Skandinavien AB Tel: +46 (0)31 330 00 10 www.arrowshower.com Twice Corner Twice Nisch SVENSKA (SV) Installationsanvisning för Arrow duschvägg. Vi förbättrar ständigt våra installationsanvisningar.
LÄNKHJUL S3. Monteringsanvisning för: Länkhjul S3
 MONTERINGSANVISNING LÄNKHJUL S3 Art.no. 8822117 Rev.2018-01 Link to english Monteringsanvisning för: Länkhjul S3 art.nr. 2002010 Länkhjul S3 90 mm art.nr. 2002020 Länkhjul S3 120 mm art.nr. 2002030 Länkhjul
ASSEMBLY INSTRUCTIONS SCALE - SYSTEM
 ASSEMBLY INSTRUCTIONS 60 mm 00 mm 600 mm 000 mm R50 mm ALL COMPONENTS Metal profile 60 mm (start and end of system) Metal profile connection Wire Felt square Metal profile 00 mm Metal profile connection
Verktyg som behövs. LX HD Sit-Stand Desk Mount LCD Arm SVENSKA. 20" (508 mm) 14-30 lbs (6.35-13.61 kg)
 14-30 lbs (6.35-13.61 kg)") ASSEMBLY INSTRUCTIONS LX HD Sit-Stand Desk Mount LCD Arm 14-30 lbs (6.35-13.61 kg) Maximal skärmstorlek * = 46 * Begränsat till max 30 lbs (13,61 kg) 0.78"-2.56" (20-65mm) 0.78-2.25 (20-57mm) 0.5"-2.5"
ASSEMBLY INSTRUCTIONS LX HD Sit-Stand Desk Mount LCD Arm 14-30 lbs (6.35-13.61 kg) Maximal skärmstorlek * = 46 * Begränsat till max 30 lbs (13,61 kg) 0.78"-2.56" (20-65mm) 0.78-2.25 (20-57mm) 0.5"-2.5"
LINC 23. Tvättställsblandare/Basin Mixer. inr.se 130226A
 LINC 23 Tvättställsblandare/Basin Mixer 130226A inr.se S Användande och skötsel Manualen är en del av produkten. Bevara den under hela produktens livscykel. Vi rekommenderar att noggrant läsa igenom manualen
PRESS FÄLLKONSTRUKTION FOLDING INSTRUCTIONS
 PRESS FÄLLKONSTRUKTION FOLDING INSTRUCTIONS Vänd bordet upp och ner eller ställ det på långsidan. Tryck ner vid PRESS och fäll benen samtidigt. OBS! INGA STORA KRAFTER KRÄVS!! Om benen sitter i spänn tryck
BBT034/ BBC034/ BBCD034 BBCD060/ BBT060-NL/ BB060-TL/ BB060-SL VOLKSWAGEN AMAROK
 INSTALLATION GUIDE BBT034/ BBC034/ BBCD034 BBCD060/ BBT060-NL/ BB060-TL/ BB060-SL VOLKSWAGEN AMAROK Ironman 4x4 BBT/ BBC/ BBCD034 BBCD060/ BBT060-NL/ BB060-TL/ BB060-SL Bull Bars fit to a Volkswagen Amarok.
Contents / Innehållsförteckning
 Contents / Innehållsförteckning Copyright This manual is the copyright of CI no 55650-4137. No part of this manual may be revised, copied or transmitted in any way without written permission from CI no
SAFETY PRECAUTIONS SPECIFICATIONS
 SAFETY PRECAUTIONS Read the instructions carefully before use and save them for future reference. Before you connect the appliance: Ensure that the voltage rating on the type plate corresponds to your
Accepterad monteringsanvisning 2016:1. Focus (RSK: ) Focus 100 CoolStart (RSK: ) (RSK: )
 Focus 100 CoolStart (RSK: ) (RSK: )") EN Table of contents 1 Instructions for use / assembly instructions 2 Assembly 4-5 Adjustment 6 Dimensions 7 Flow diagram 7 Operation 8 Spare parts 9-10 Cleaning 11 Test certificate 12 Contact information
EN Table of contents 1 Instructions for use / assembly instructions 2 Assembly 4-5 Adjustment 6 Dimensions 7 Flow diagram 7 Operation 8 Spare parts 9-10 Cleaning 11 Test certificate 12 Contact information
ASSEMBLY INSTRUCTIONS SCALE CIRCLE - STANDARD
 ASSEMBLY INSTRUCTIONS ALL COMPONENTS Metal profile 0 mm Gripper Ceiling attachments Screws for ceiling attachements (not included) Wires Metal profile 60 mm Metal profile 00 mm Felt - Full Felt - Half
 BÄNKVÅG / BENCH SCALE Modell : SW-III / Model : SW-III ANVÄNDARMANUAL / USER MANUAL SW-III WWW.LIDEN-WEIGHING.SE 2014-03-26 OBS! Under vågen sitter en justerbar skruv (se bild). Standardinställning är
PRESS FÄLLKONSTRUKTION FOLDING INSTRUCTIONS
 PRESS FÄLLKONSTRUKTION FOLDING INSTRUCTIONS Vänd bordet upp och ner eller ställ det på långsidan. Tryck ner vid PRESS och fäll benen samtidigt. Om benen sitter i spänn tryck benen mot kortsidan före de
FD30EX SLIDING DOOR SYSTEM Installation Manual
 FD30EX SLIDING DOOR SYSTEM Installation Manual Thank you for selecting our product. Before starting installation, please read this manual thoroughly to ensure correct installation. Please keep this manual
Monteringsanvisning Nödutrymningsbeslag ASSA 179E
 Monteringsanvisning Nödutrymningsbeslag ASSA 179E Denna monteringsanvisning avser nödutrymningsbeslag ASSA 179E med artikelnummer 364371 i kombination med låshus Abloy EL580 med artikelnummer EL580100011.
Monteringsanvisning Podie T 4100 K
 Monteringsanvisning Podie T 4100 K Monteringsanvisning Förbered fundamentet 1. Montera ställfötterna. Montera tvättmaskin SV 1. Fäst gaffelbeslagen i bakkant med brickor och skruv. OBS! Placera beslagen
MCP-16RC, Air Purification
 Kompakt patronfilter med tryckstötsrensning. MCP-16RC Air Purification Tower är ett kompakt patronfilter för decentraliserad luftrening inomhus, där luft återåtervinning är möjlig. Den kompakta filterenheten
 BÄNKVÅG / BENCH SCALE ANVÄNDARMANUAL / USER MANUAL SW-III www.liden-weighing.com Svenska OBS! Under vågen sitter en justerbar skruv (se bild). Standardinställning är den för vägning. Om ni vill rengöra
ES5500 PORTABLE GENERATOR
 ES5500 PORTABLE GENERATOR 05 Industrial Park Road Van Buren, AR 7956 www.lifanpowerusa.com (866) 47-7464 6/73F- 5/73F- 3 0/8F- 4 7/73F- 5 7500/68F- 6 0-7 30/8F- 8 63/73F- 9 6/73F- 0 6/8F- GB/T677- GB/T345.-
Accepterad monteringsanvisning 2016:1. Talis E ( ) ( ) Talis E 110 CoolStart ( )
 ( ) Talis E 110 CoolStart ( )") EN Table of contents 1 Instructions for use / assembly instructions 2 Assembly 4-6 Test certificate 6 Adjustment 7 Dimensions 8 Flow diagram 8 Operation 9 Spare parts 10-11 Cleaning 12 Contact information
EN Table of contents 1 Instructions for use / assembly instructions 2 Assembly 4-6 Test certificate 6 Adjustment 7 Dimensions 8 Flow diagram 8 Operation 9 Spare parts 10-11 Cleaning 12 Contact information
GGP ENGINE SM70 Model Year 2010/2011
 GGP ENGINE Model Year 2010/2011 Use GLOBAL GARDEN PRODUCT Genuine Spare Parts specified in the parts list for repair and/or replacement. The contents described in the parts list may change due to improvement.
Droppställning / IV stand
 MONTERINGSANVISNING / ASSEMBLY INSTRUCTIONS Droppställning / IV stand Fellow Classic Art. nr. / Art. no: 08814 1 SVENSKA Produktbeskrivning Droppställningen består av följande delar: - Klamma, 3 st - Bottenstöd
Anvisning för Guide for
 Anvisning för Guide for PRISMA SENSOR 1 96243235zPC Montering i tak/installation in the ceiling Byte av kupa/change of diffuser 2 Installation Installation från gavel / Installation from the end Installationskabel
Adding active and blended learning to an introductory mechanics course
 Adding active and blended learning to an introductory mechanics course Ulf Gran Chalmers, Physics Background Mechanics 1 for Engineering Physics and Engineering Mathematics (SP2/3, 7.5 hp) 200+ students
BRIC MODELL A
 BRIC MODELL 3 150123A 2,5 & 4mm 1 2a 3 4 x 2 x 2 5a 2b 6 5b 5c 5d 5e x 1 x 1 x 1 x 1 1 x 1 x 1 x 4 x 1 x 3 x 4 ~20mm Alternativ placering av mittenstöd. Alternative placement of centre support 75-95mm
Beijer Electronics AB 2000, MA00336A, 2000-12
 Demonstration driver English Svenska Beijer Electronics AB 2000, MA00336A, 2000-12 Beijer Electronics AB reserves the right to change information in this manual without prior notice. All examples in this
00-1595. Fiat 500 2007» Fiat Panda / 4x4 2003» Fiat Panda 4x4 Climbing / 4x4 Cross 20033» 619-0300
 00-1595 120 Fiat 500 2007» Fiat Panda / 4x4 2003» Fiat Panda 4x4 Climbing / 4x4 Cross 20033» 619-0300 rev. 2014-04-04 DC Congratulations on purchasing an ATS towbar Alexo Towbars Sweden offer quality towbars
Bruksanvisning Directions for use
 Bruksanvisning Directions for use KOMBIDON OUTSIDE WALL HOOD SVENSK/ENGLISH VERSION SVENSKA Denna montageanvisning omfattar produkten KOMBIDON. BESKRIVNING/ ANVÄNDNING Kombidon från AB C.A. Östberg är
VASSVIK ROCKING STAND
 VASSVIK ROCKING STAND SE / ENG SE VIKTIGT Läs noga igenom instruktionerna före användning och spar dessa för framtida bruk. VARNING: Barnets huvud bör inte ligga lägre än barnets kropp. Lägg inte till
BBT034/ BBC034/ BBCD034 VOLKSWAGEN AMAROK. Ironman 4x4 BBT/ BBC/ BBCD034 Bull Bars fit to a Volkswagen Amarok. It will take about 3 hours to install.
 INSTALLATION GUIDE BBT034/ BBC034/ BBCD034 VOLKSWAGEN AMAROK Ironman 4x4 BBT/ BBC/ BBCD034 Bull Bars fit to a Volkswagen Amarok. It will take about 3 hours to install. IMPORTANT - If your vehicle has front
Plain A262. För T16 (T5) lysrör. Innehåll. Monteringsanvisning. A. Instruktion för rampmontering
 lysrör. Innehåll. Monteringsanvisning. A. Instruktion för rampmontering") Plain A262 För T16 (T5) lysrör Innehåll Ramparmatur: ändmodul En stängd gavel/ en öppen gavel Plint i båda ändarna Överkopplingssladd 1 rampgavel 1 lysrörsbytare Ramparmatur: mellanmodul Plint i en ände
Plain A262 För T16 (T5) lysrör Innehåll Ramparmatur: ändmodul En stängd gavel/ en öppen gavel Plint i båda ändarna Överkopplingssladd 1 rampgavel 1 lysrörsbytare Ramparmatur: mellanmodul Plint i en ände
DORINOXPLUS
 DORINOXPLUS 2 3 4 5 6 7 8 9 10 11 12 13 14 15 16 17 18 19 20 21 22 F PRODUITS: E PRODUCTOS: GB PRODUCTS: D PRODUKTE: I PRODOTTI: P PRODUTOS: NL PRODUKTEN: S PRODUKTER: N PRODUKTER: DK PRODUKTER: SF TUOTTEET:
INDUKTIV SLINGDETEKTOR INDUCTIVE LOOP DETECTOR
 INDUKTIV SLINGDETEKTOR INDUCTIVE LOOP DETECTOR Slingdetektorn används som ett alternativ till mekaniska gränslägen, momentbrytare eller annat gränsläge i gödselrännor. Detektorn är kopplad till en trådslinga
BEAM. Product Manual Produktmanual
 BEAM Product Manual Produktmanual BEAM Technical Specifications Tekniska Specifikationer Description Product number Mode Voltage Current Vehicle interface Cable length Encapsulation Operating temperature
Montageanvisning Airway system 1000/1500 Assembly instruction Airway system 1000/1500
 S.Det är lämpligt att denna information överlämnas till användaren av anläggningen. GB. It is appropriate that this information is passed on to the user of the installation. D. Diese informationen sind
SVENSK STANDARD SS-ISO :2010/Amd 1:2010
 SVENSK STANDARD SS-ISO 14839-1:2010/Amd 1:2010 Fastställd/Approved: 2010-11-08 Publicerad/Published: 2010-11-30 Utgåva/Edition: 1 Språk/Language: engelska/english ICS: 01.040.17; 17.160 Vibration och stöt
Ringmaster RM3 - RM 5 RM3 RM 4 RM 5
 RM3 - RM 5 Ringmaster We offer ball pickers in 5 different sizes with a picking width of up to 6 m. RM3 - RM5 has a self-supporting chassis so that the collected balls do not place a load on the picking
Molift Raiser 75135G Etac Box 203, Anderstorp Sweden Tel Fax
 7G 8-0-07 SE SE EN EN Till och med serienummer 0900 Från serienummer 0900 Up to serial number 0900 From serial number 0900.... Etac Box 0, Anderstorp Sweden Tel + 7 8 7 00 Fax + 7 8 7 90 www.etac.com Svenska
S 2 Förvaras oåtkomligt för barn Keep out of the reach of children. S 3 Förvaras svalt Keep in a cool place
 Utdrag ur och översättning av Kemikalieinspektionens föreskrifter (KIFS 2005:7) om klassificering och märkning av kemiska produkter. Förteckningen finns även i Klassificeringslistan (KIFS 2005:5). Excerpt
Digital Personvåg MANUAL H
 Digital Personvåg MANUAL H151-00-1 www. Specifikationer Kapacitet & Noggrannhet Strömförsörjning Arbetsmiljö 250kg / 0.1kg Adapter 120VAC-9VDC-50Hz / 230VAC 9VDC 50Hz Arbetstemperatur: 10 C to 35 C Förvaring,
Isolda Purchase - EDI
 Isolda Purchase - EDI Document v 1.0 1 Table of Contents Table of Contents... 2 1 Introduction... 3 1.1 What is EDI?... 4 1.2 Sending and receiving documents... 4 1.3 File format... 4 1.3.1 XML (language
Christmas tree lighting Julgransbelysning / Juletrebelysning
 Manual / Bruksanvisning / Bruksanvisning Christmas tree lighting Julgransbelysning / Juletrebelysning ENG SE NO Item. No 772701090101 ENG Thank you for choosing to purchase a product from Rusta! Read through
IronMax V Electric Airless Sprayer
 Parts IronMax V Electric Airless Sprayer 332254A EN For professional use only. Not approved for use in European explosive atmosphere locations. Model 278667 3300 psi (22.7 MPa, 227 bar) Maximum Working
MONTERINGSINSTRUKTION ASSEMBLY INSTRUCTION
 11/ 97 MONTERINGINTRUKTION AEMBLY INTRUCTION AGNPRIDARE / CHAFFPREADER Art. nr. 12313, 12314 CLAA LEXION 420-460 REKORDVERKEN weden AB Öttum E-535 92 KVÄNUM Tel. +46(0)511-37 01 00 Fax. +46(0)511-37 00
1850 x mm Clip Lock, Raised Shower Tray Kit
 Installation Instructions 850 x 30 40mm Clip Lock, Raised Shower Tray Kit Parts Supplied Description Qty Shower Tray Shower Tray Extension Shower Tray Base Parts Required (Fitting Kit) Materials Required
DAMPER EQAZ-12, EQAZ-13, STAZ-30, STBZ-30
 DAMPER EQAZ-12, EQAZ-13, STAZ-30, INSTALLATION INSTRUCTION EQAZ-12 DAMPER, DAMPER ACTUATOR AND EQAZ-13LEVER ACTUATOR DAMPER ACTUATION The damper can be actuated by means of the, damper actuator (accessory)
Preschool Kindergarten
 Preschool Kindergarten Objectives CCSS Reading: Foundational Skills RF.K.1.D: Recognize and name all upper- and lowercase letters of the alphabet. RF.K.3.A: Demonstrate basic knowledge of one-toone letter-sound
Reservdelskatalog Parts Catalogue COMBI 40 AE /S15 - Season 2017
 2306/S1 - Season 201 Use GLOBAL GARDEN PRODUCT Genuine Spare Parts specified in the parts list for repair and/or replacement. The contents described in the parts list may change due to improvement. The
Reservdelskatalog Parts Catalogue SM 50 - LC154FS /0 - Season 2016
 118551355/0 - Season 2016 Use GLOBAL GARDEN PRODUCT Genuine Spare Parts specified in the parts list for repair and/or replacement. The contents described in the parts list may change due to improvement.
Viktig information för transmittrar med option /A1 Gold-Plated Diaphragm
 Viktig information för transmittrar med option /A1 Gold-Plated Diaphragm Guldplätering kan aldrig helt stoppa genomträngningen av vätgas, men den får processen att gå långsammare. En tjock guldplätering
TEXTURED EASY LOCK BLOCK INSTALLATION GUIDE. australianpaving.com.au
 TEXTURED EASY LOCK BLOCK INSTALLATION GUIDE 1800 191 131 australianpaving.com.au TEXTURED EASY LOCK BLOCK The Textured Easy Lock Block retaining wall system is the premium retaining wall product for near