When using the sewing machine, basic safety precautions should always be followed, including the following: Read all instruction before using.
|
|
|
- Stig Sundberg
- för 9 år sedan
- Visningar:
Transkript
1 ? ZAN2250

2

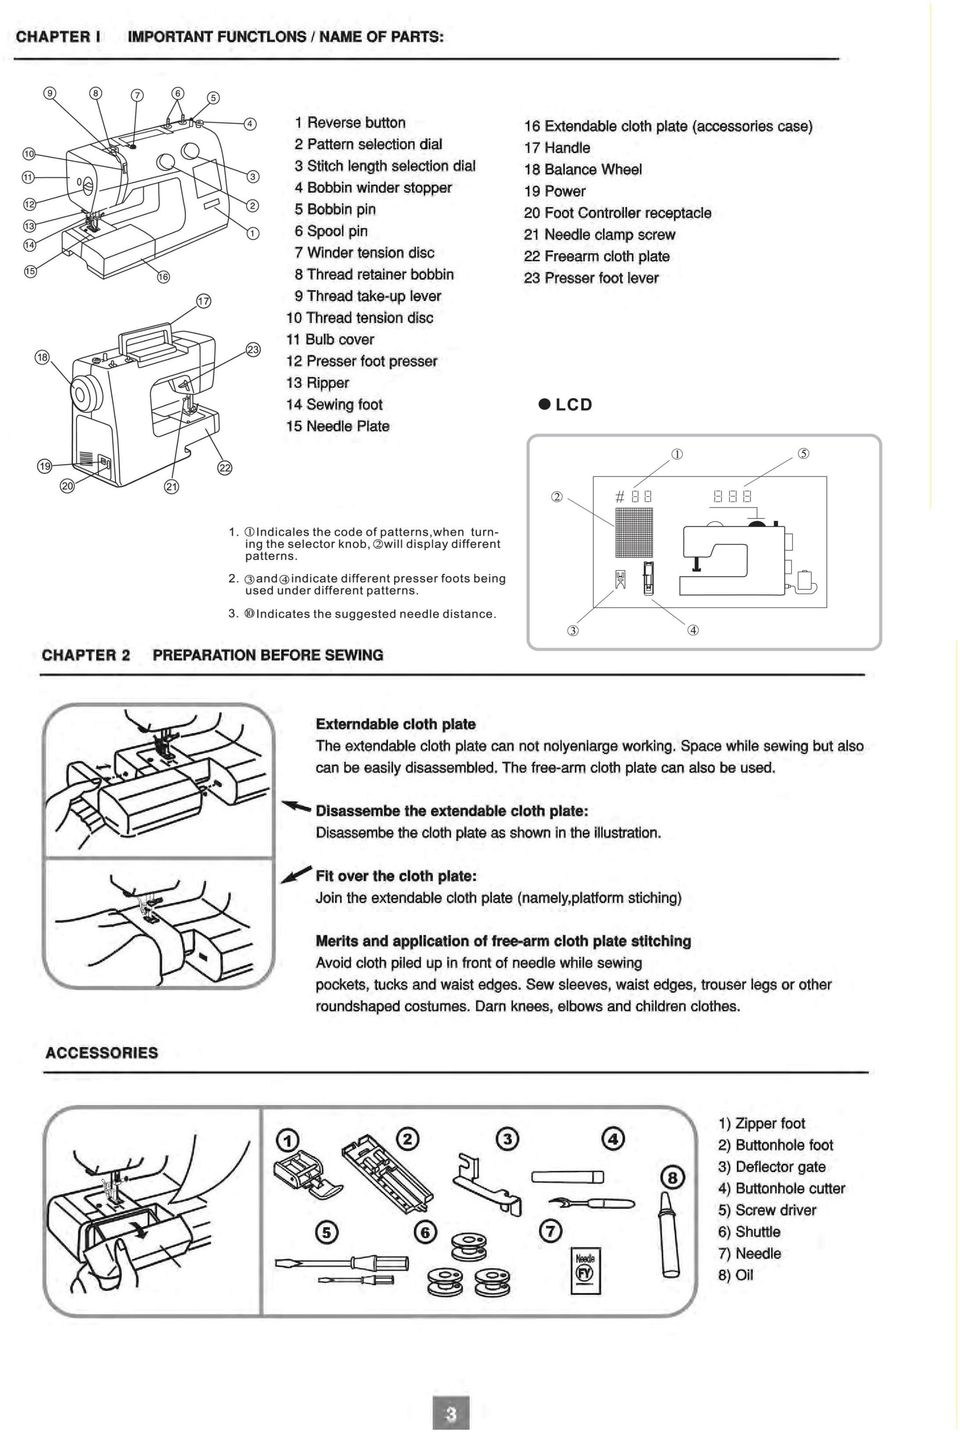
3 Anl.790.GB/SE/DK/FI/CZ/HU :32 Uhr Seite 3 GB IMPORTANT SAFETY INSTRUCTIONS When using the sewing machine, basic safety precautions should always be followed, including the following: Read all instruction before using. DANGER - To reduce the risk of electric shock: The sewing machine should never be left unattended when plugged in. Always unplug this sewing machine from the electrical outlet immediately after using and before cleaning. Always unplug before changing the light bulb. Replace bulb with same type rated 15 watts. WARNING - To reduce the risk of burns, fire, electric shock, or injury to persons: Do not allow this machine to be used as a toy. Close attention is necessary when the sewing machine is used by or near children. Use this sewing machine only for its intended use as described in this manual. Use only aceessories recommended by the manufacturer as contained in this manual. Never operate this sewing machine if it has a damaged cord or plug, if it is not working properly, if it has been dropped or damaged, or dropped into water, Return the sewing machine to the nearest authorized dealer or service center for examination, repair, electrical or mechanical adjustment. Never operate the sewing machine with any of the air openings blocked. Keep the ventilation openings of the sewing machine and foot controller free from the accumulation of lint, dust and loose cloth. Never drop or insert any object into any openings. Do not use this machine outdoors. Do not operate this machine where areosol (spray) products are being usecl or where oxygen is being administered. To disconnect, turn the main switch to the symbol" O " position which represents off, then remove plug from outlet. Do not unplug by pulling on the cord. To unplug, grasp the plug and pull, not the cord. Keep fingers away from all moving parts. Special care is requirecl around the sewing machine needle. Always use the proper needle plate. The wrong plate can cause the needle to break. Do not use a bent needle. Do not pull or push the fabric while stitching. It may deflect the needle causing it to break. Cut off the power position when making and adjustments in the needle area. such as threading the needle, changing the needle, threading the bobbin, or changing the presser foot. Always unplug the sewing machine from the electrical outlet when removing covers, lubricating, or when making any other user service adjustments mentioned in this instruction manual. SAVE THESE INSTRUCTIONS This sewing machine is intended for household use. 1

4 Anl.790.GB/SE/DK/FI/CZ/HU :32 Uhr Seite 4 CONTENTS A Brief Introduction Chapter I Imporatant Functions Name of parts: Chapter II Preparation before sewing Extendable 3 Accessory 3 Power supply 4 Foot controller 4 Sewinglamp 4 Remove and attach presser foot 4 Change the needle 5 Thread and needle chart 5 How to use spool holder 5 Remove and attach the bobbin case 6 Wind the bobbin 6 Attach bobbin into bobbin case 6 Machine threading 7 Draw up lower threading 7 Tension at adjustment of upper thread 7 Pattern selection dial 8 Select double action stitch 8 Stitch length selection dial 8 Stitch width selection dial 8 Reverse sewing button 8 Lower feed dog 8 Presser foot pressure selection dia 9 Chapter III Start sewing Straight sewing 9 Change sewing direction 9 Use leg wire on the needle plate 10 Right-angle drive 10 Zigzag sewing 10 Chapter IV Join fabric Zigzag over-lock 10 Triple zigzag stitching 11 Triple stretch straight stitching 11 Button sewing 11 Make a buttonhole 12 Buttonhole with decorative stitching 12 Zipper insertion 13 Blind hem 13 Chapter V Decorative stitching Shell stitchin 13 Double Action stitching 14 Reticulate stitching 14 Box-shaped elastic stitching 14 Pad stitching 15 Edge joining 15 Chapter VI Maintainance of machine Remove the shuttle and its accessories 15 Clean feed dog 16 Oil the machine 16 Obstacle avoidance 17 2

5 !!!!! &"!!!!! '"! '"!
6 Anl.790.GB/SE/DK/FI/CZ/HU :32 Uhr Seite 6 POWER SUPPLY It is to be determined that the voltage and frequency indicated on the machine should be identical to the supply prior to connected to the power. 1.Connect machine plug (5) to, machine interface (4) 2.Connect attaching plug (1) to recacle(3). 3.Switch on sewing lamp with switch button (2). (1) Attachplug (2) Switchbutton (3) Receptacle (4) Machine interface (5) Machine plug (6) Foot controller Foot controller Foot controller may change speed of sewing. The tighter the switch is pressed, the faster stitching goes. SEWING LAMP Sewing lamp Sewing lamp hulb stands at the back of top cover.take the top cover when changing the bulb (front screw).! Note Switch off the power before replacing a bulb. Take out a bulb: Hold it and screw off to the left. Fit over a bulb: Hold it and screw on to the right. REMOTE AND ATTACH PRESSER FOOT Removing: Turn forward the balance wheel while raising the needle to the highest position. Leveling up the presser foot. Hold back the lever on the foot bearer while releasing the presser foot. Installing: Fit over the presser foot so that its plate dowel is just opposite to the groove. Lower the presser foot lever and its presser foot will be fixed to the place. 4
 Attachplug (2) Switchbutton (3) Receptacle (4) Machine interface (5) Machine plug (6) Foot controller Foot controller Foot controller may change speed of sewing.")
7 Anl.790.GB/SE/DK/FI/CZ/HU :32 Uhr Seite 7 CHANGING THE NEEDLE Turn forward the balance wheel while raising the needle to the high level and lower the presser foot. Loosen the needle clamp bolt by turning it anti-clockwise.remove the used needle and insert the new one with its flat side facing the back. While inserting the needle, the needle should be pressed as firmly as possible up into the needle clamp, which should he tightened with a screwdriver. Note! Regular checking should be done to ensure that the needle is never twisted or blunt. Knitting materıals, lıne silk or silk fabrıcs may frequently encounter knots and skipping stitches, which are often caused by the damaged needles. THEAD AND NEEDLE CHART Needle size Material Cotton thread Specification Silk thread Specification Nr. 60 (#7) Fine silk Nr. 70 (#10) Crepe Nr. 80 (#12) Poplin Pure Silk lOO Nr. 80-9O (#12-14) Woolen, cloth Cotton Nr (#14-16) Wool Nr t#14-18) Jeans Materials Elastic stitching Nr. 70 (#10) Knitting Materials HOW TO USE SPOOL HOLDER Spool holder is used lo hold spools.pulling up the spool holder when sewing. Prees the spoolholder down, when the machine is packed Pressdown the machine when it is packed. (1) upper tread (2) hole (fig.1) Instruction: (fig.2) (fig.1) + (fig.2) In case that the thread in use is easily tangled with spool holder or knotted, you can pull the thread through the hole as shown in the illustration. While keeping the hole facing the spool. 5

8 Anl.790.GB/SE/DK/FI/CZ/HU :32 Uhr Seite 8 REMOVE AND LOAD THE BOBBIN CASE Live the Cover (1) Cover Turn forward the balance wheel to raise the needle. Hold on to the bobbin exit and pull out the bobbin case. (3) Bobbin case handle (2) Bobbin exit Press the bobbin case handle to the innermost to ensure joining when loading it into the bobbin case. (3) Bobbin case handle WINDING (1) Pull out the balance wheel to the right so as to break contact with machine (2) Draw thread from the spool through the bobbin winder tension disc. (3) Pull thread through the hole in the bobbin and insert the bobbin into the bobbin shaft. (4) Turn the bobbin to the right. (5) Hold the end of the thread and keep stepping down the foot controller. Stop the after several turns.cut the excess thread close to the bobbin. (6) Stop down again the foot controller. Wind thread until the bobbin is full and stop the machine. Push the shaft to the left and cut the thread. (7) Push the balance wheel to the left to close contact (to the original position). Instruction: The bobbin shaft is to be pushed to the left when the winding finished. PUT THREAD INTO O THE BOBBIN CASE (3) Spulenkapselfinger Load bobbin in bobbin case. Make sure that the thread is pulled out in the direction indicated by the arrowhead (clockwise). (2) Pull thread into the slit of bobbin case. (3) And then, pull thread through bobbin tension regulator spring to the outlet hole. Instruction: pull thread out about 10 cm. 6
 Pull thread through the hole in the bobbin and insert the bobbin into the bobbin shaft. (4) Turn the bobbin to the right. (5) Hold the end of the thread and keep stepping down the foot controller.")
9 Anl.790.GB/SE/DK/FI/CZ/HU :33 Uhr Seite 9 MACHINE THREADING Turning forward the balance wheel and move thread take-up lever to the highest positon. Raise presser foot and insert the spool into spoolholder (as shown in the illustration). Draw thread from the back side of the spool. (1) Lead the thread through the pretension. (2) Hold the thread and pull it into the thread tension disc and then past the thread plate. (3) Pull up the thread tightly and let it through the slit of thread take-up lever from the right side. (4) Then pull down thread and let it through the thread hook. (5) Pull down thread and let it go through the catch the thread hook. (6) Pull thread through needle hole from the front to the back. Instruction: Cut the thread with sharp scissors so as to make easy threading.ln. DRAW W UP LOWER THREAD (1) Lift presser foot and hold the upper thread lightly with your left hand. (2) Keep turning forward the balance wheel until thread take-up Iever is at its highest position.pull the upper thread so as to pull up the lower thread. (3) Leave about 5 cm of both threads and pull them under the presser foot then toward the back of the presser foot. Leave 10 cm of both threads. TENSION ADJUSTMENT OF UPPER THREAD While doing straight stitching, both upper and lower threads must be knotted between the two layers of garment. Adjust selection dial of thread tension disc within the window. (1) Regulated indicator (2) The smaller the tension of upper thread is bigger, turn up the ındıcator. (3) The tension of upper thread ıs smaller, turn down the indicator. The tension of upper thread in case of zigzag stitching. In order to achieve good effect of zigzagging, the tension of upper thread should be less than that of straight stitching. The upper thread should be visible from the reverse. 7
 Then pull down thread and let it through the thread hook. (5) Pull down thread and let it go through the catch the thread hook. (6) Pull thread through needle hole from the front to the back.")
10 Anl.790.GB/SE/DK/FI/CZ/HU :33 Uhr Seite 10 PATTERN SELECTION DIAL Needle is pulled out from fabric and the desired size of stitching should he selected on the selection dial. Select Double Action stitching As for stitching Double Action stitching, its length should be adjusted into (1)-(8). Wıth the following adjustment, the length of stitchcould be selected as you like. " + " refers to thick stitch in Iength. " - " refers to sparse stitch in length. Instruction: Width of stitch changes between selection dial 2 and 3 should be different. SELECTION DIAL FOR LENGTH OF STITCH -Turn the selection dial with help adjust stitch to its ideal length. - The bigger the number is,the longer the stitch is. is the correct range of adjustment for making buton holes -Range from 0.5 to 4 could be used for zigzag stitching -The correct elastic stitch value should be (1)-(10). How to make the elastic stitch better? In case the elastic stitch turns out to be unsatisfactory, you may turn the selection dial to - " and in this way, stitches would be thicker while turning to +" they would be more sparse. Instruction: while turning the selection dial. The needle should be stopped at a rather high position above fabric. REVERSE BUTTON If the reverse button is always pressed down, the machine will do reverse stitching all the time. Lower feed dog 1. Open the cover (1) Cover 2. Lower the feed dog by pulling down the shaft and moving it towards the direction inclicated by the arrow head as shown in the illustration. (2) Lower teeth lever 3. Raise the feed dog by pulling down the lower teeth lever and moving it towards the direction indicated and reach "A" by the arrowhead as shown in the illustration. Instruction: for ordinary sewing, all the feed dog shall be raised. 8

11 Anl.790.GB/SE/DK/FI/CZ/HU :33 Uhr Seite 11 FOOT PRESSURE SELECTION DIAL For ordinary sewing, selection dial is present at " 3 ". And its pressure drops to " 2 " when sewing appliques, mesh fabrics and embroidery. As for chiffon, lace, yarn and other miscellaneous fine materials, you may put the dial to " 3 ". Cotton flannel and braided stretch textile should be adjusted to " 1 ". (1) Regulatory value indication CHAPTER III START SEWING Straight stitching (1) Pattern selection dial: 1 or 2 (2) stitch length: (3) presser foot for needlework: zigzag (4) pressure of thread tension disc: 2-6 Raise presser foot and put cloth beside leg wire of needle plate.turn forward the balance wheel and lower the needle down into the fabric. Lower presser foot and make sure that thread is placed backward. Step down fool controller. Fabric will go along leg wire and is carned forward automatically by feed dog. In order to make end of thread firm, please press the reverse stitch buton and do several reverse stitches. Raise presser foot extract fabric and pull the thread backward. Clip both threads with a cutter. Leave certain length of thread for future use. CHANGE SEWING DIRECTION Stop the machine, and turn the balance wheel to bring the needle down into the fabric. Raise the presser foot. Turn the fabric to change direction as desired. Lower the presser foot to resume sewing. 9
 Regulatory value indication CHAPTER III START SEWING Straight stitching (1) Pattern selection dial: 1 or 2 (2) stitch length: 1.")
12 Anl.790.GB/SE/DK/FI/CZ/HU :33 Uhr Seite 12 THE STRIPS OF LEG WIRE ON THE NEEDLE PLATE The Strips of leg wire on the needle plate is of great help to maintaining width between the needle and the thread. Instruction: these data conforrn to the distance between strips of leg wire and the needle. (1) Strips of leg wire (2) Comer (3) Needle plate (4) Hole of needle plate (5) The width of sewing to the center of needle Figure on the needle plate /8 4/8 5/8 6/8 Spacing in cm RIGHT-ANGLE STITCH While doing right stitches, a space of 1.6 cm should bekept apart from the edge of fabric When the edge of fabric is aligned with the corner. stop the machine and turn (forward) the balance wheel to lower the needle. Raise the presser foot, turn the fabric around the needle to change direction until its edge is aligned with the strip of leg wire of 1.6 cm. Lower the presser foot and sew in the new direction. (2) Thread from the corner ZIGZAG STITCHING (1) pattern selection dial:3), 3-5 (2) stitch length: 1-4 (3) presser foot: zigzag (4) thread tension disc: 2-6 Simple zigzag stitches are often used for hemming. Making button holes and elastic bends. CHAPTER IV CLOTHES STITCHING Zigzag over-lock (1) pattern selection dial:3, 3-8 (2) stitch length: M1-2 (3) presser foot: zigzag (4) thread tension disc:4-6 The stitch is used for making over-lock so that thread at the edge of cloth shall not fall apart. 10
 Strips of leg wire (2) Comer (3) Needle plate (4) Hole of needle plate (5) The width of sewing to the center of needle Figure on the needle plate 10 15 20 3/8 4/8 5/8 6/8 Spacing in cm 1.0 1.5 2.0 1.0 1.3 1.")
13 Anl.790.GB/SE/DK/FI/CZ/HU :33 Uhr Seite 13 TRIPLE ZIGZAG (1) pattern selection dial:3, 3-8 ( (2) stitch length: M 1-2 (3) presser foot: zigzag (4) thread tension disc:4-6 The stitch is used for synthetic materials and other materials that get folds easily. It also suits over-lock so as to avoid threads falling apart. It is fit for sewing elastic bends and darning. A strip of hemming-stitch with 1.5 cm is to be left. Cut off the strip of hemming-stitching after sewing. TRIPLE STRETCH STRAIGHT STRITCHING (1) pattern selection dial: 1 or 2 (2) stitch length: (1)-(8) (3) presser foot: zigzag (4) thread tension disc: 4-6 Two stitches forward and then one stitch backward will make the stitching firm. Prior to stitching garment pıeces, make a sample by using pins. Such stitches are most suitable for sewing crotches. BUTTON SEWING (1) Stitch selection dial: 3); 3-5 (aslong as fit for button sewing) (2) Stitch length: could be adjusted to any figure (3) Stitch wide: making presser foot for button sewing (4) Presser foot: button sewing (5) Tread tension disk presser: 1-3 (6) Tape the button over the marked position (See page 11) Align both holes of the button with groove slots while placing the left button hole directly under the needle point. Low presser foot -Turn pattern selection dial -turn the stitch width just up to the top of right button hole. Make 5 stitches approximately and raise the needle. To get a thicker button handle, cut the thread wıth 20 cm left. Bring the upper thread down through the button hole and wind it around the button handle for several turns. Draw the thread to the back and make a knot. Instruction: raise the teed dog again after sewing buttons. 11

14 Anl.790.GB/SE/DK/FI/CZ/HU :33 Uhr Seite 14 BUTTONHOLES (1) satural pattern selection dial: see the drawing 1 (2) stitch length: (0,5-1) (3) presser foot: making buttonholes (4) thread tension disc tension: 3-5 Stitch width is to be chosen arbitranly with in between 0 and 1 range according to variation of stitch length. (1) For thicker stitching, adjust selection dial to "O". Satin stitches suit lightweight material. (2) For thicker stitching, adjust selection dial to "1. Loose stitches suit heavyweıght material. Instructron: Make trial stıtchıng on some small cloth so as to find out the optimum effect. (1) Make the marks of buttonhole carefully on the material. (2) Pull forward slide (A),keep the mark (C)on it in conformity to the initial mark (B),The mark on the presser foot should be aligned with that of the material Lower the presser foot. Instruction: marks on the slide should be carved in cm. (3) Adjust stitch selection dial to. Keep stitching forward until come to the marks in front of the buttons and then stop sewing with needle pausing at top left. (4) Adjust stitch selection dial to Make 4-6 stitches before stopping sewing with needle pausing at top right. (5) Adjust stitch selection dial to Keep stitching backward until come to the marks at the back of buitons and then stop sewing with needle pausing at top right. (6) Adjust stitch selection dial to Make 4-6 stitches before stopping sewing with needle pausing at top left. (7) After sewing: buttonholes, take out fabrics. Insert a pin at the back hole of buttonhole so that the end of thread of buttonhole will not be cut off mis takely. Cut out the buttonhole carefully with a buttonhole cutter. BUTTONHOLES WITH DECORATIVE STITCHING (1) pattern selection dial:bh (2) stitch length: IIIIIIIIII (0,5-1) (3) presser foot: making buttonholes (4) thread tension disc tension: Raise the foot plate of buttonholes sewing hang the laid in threads on the cam at the back of presser foot, (1) Positioning cam 2. Draw forward the end of additional thread under the presser foot and place it under the center of presser foot. 3. Hold tightly the additional thread and hook the fork in front of the presscr foot. 4. Bring the neddle into the fabrics before starting sewing and lower the presser foot. 5. Slowly step down foot controller buttonholes, with each face of buttonholes encasing the laid-in threads 6.Take out fabrics and clip sewing thread. 7. Pull the laid-in threads from left side and hold it tightly. 8.The end of thread should be wound to darning needle. Draw the thread to the back and clip. Instruction: while cutting out buttonholes, pay attention to the instruction on Page
 For thicker stitching, adjust selection dial to \"1. Loose stitches suit heavyweıght material.")
15 Anl.790.GB/SE/DK/FI/CZ/HU :33 Uhr Seite 15 ZIPPER SEWING (1) pattern selection dial: 1 (2) stitch length: 1,5-4 (3) presser foot: zipper (4) thread tension disc pressure: 4-6 Stick a zipper or needle it to the fabrics and place it under foot plate. Draw the thread to be back and lower the presser foot. Sew on the left sıde of the zıpper by guıdıng the zipper teeth as close as possible to the needle drop. Fabrics and zipper should be stitched tightly at the same time Pivot fabric to the opposite side and the way to stitch the other side of zipper should be identical to that of the left side. BLIND HEMMING (1) Pattern selection dial: 5-6 (2) stitch length: 1-3 (3) presser foot: zigzag plus guiding plate (4) thread tension disc pressure: Folding method for fabrics (1) Back side of fabrics (2) cm 2. Lower presser foot, release the screw of the fixed presser foot and push forward the guiding plate between the screw and foot plate groove. Fix the screw and make sure that the stopper of guilding plate should be installed in the middle of foot plate. 3. raisc the presser foot, place fabrics under the foot while keeping tucks facing the stopper of the guiding plate. Lower the presser foot and stitch slowly in order to command a better control.the needle on the left zlgzag should be brought just into tucks. Pay attention to the tucks, which are to be placed at the side of stopper of guiding plate while sewing. 4. When rıght upper layer of cloth ıs ıroned upward, its stitches are hardly to be perceived. CHAPTER V DECORATIVE STITCHING Shell stitching (1) pattern selection dial: 9 (2) stitch length: 2 (3) presser foot: zigzag (4) thread tension disc pressure: 6-8 Folded cloth lace should be placed beside the presser foot and needle on the right of the cloth so as to work out shell stitching. 13

16 Anl.790.GB/SE/DK/FI/CZ/HU :33 Uhr Seite 16 DOUBLE ACTION STITCHING (1) pattern selection dial: (1-10) (2) stitch length: (1)-(10) (3) presser foot: zigzag (4) thread tension disc pressure: 2-6 With following adjustment, the stitch length could be selected as you like. Adjustment to " + " reters to thick stitch in length. Adjustment to " - " refers to sparse stitch in length. RETICULATE TE STITCHING (1) pattern selection dial: 6 (2) stitch length: 1-10 (3) presser foot: zigzag (4) thread tension disc pressure: 4-6 Straight stitch the tucked side with spacing of 1 cm. Select "4 for its stitch length. Knot the thread on one side.tighten lower thread and make tucks with even spaces. Fıx the thread on the other side. Make a reticulate and decoratıve stitching along the middle of tucks. Then, extract the tuck stitches. Instruction: Decrease upper thread tension will make tuck decoration easy. BOX SHAPED ELASTIC STITCHING (1) pattern selection dial: 8 (2) stitch length: 1 (3) presser foot: zigzag (4) thread tension disc pressure: 4-6 The stitches are most suitable to sewing the elastic cords over 3 mm of children's sleeves. Tighten the elastic cord after sewing. Such stitches are aiso good to sewing heavyweight Fold the two seamless fabrics and stitch them together. 14
 pattern selection dial: 6 (2) stitch length: 1-10 (3) presser foot: zigzag (4) thread tension disc pressure: 4-6 Straight stitch the tucked side with spacing of 1 cm.")
17 Anl.790.GB/SE/DK/FI/CZ/HU :33 Uhr Seite 17 PAD STITCHING (1) pattern selection dial: 3 (2) stitch length: 0,5-1 (3) presser foot: zigzag (4) thread tension disc pressure: 1-4 (5) presser foot presser: 2 Adhere tightly the decorative parts to the fabrics or iron it with solvable non-woven textiles. Stitch around the decorative parts and make sure that suture beyond the decorative parts should disappear. Insert the needle into the cloth when encountering corner. Raise the presser foot and pivot the cloth to the left or right. Instruction: After sewing, adjust the selecıion dial EDGE JOINT (1) pattern selection dial: 10 (2) stitch length: 1-10 (3) presser foot: zigzag (4) thread tension disc pressure: 4-6 Fold in both sides with 1.5 cm each and iron it. The folded sides should be fixed to non-woven textiles with spacing of 0.3 cm. Slowly stitch and make sure that each stitch should reach the folding edges. CHAPTER VI MAINTAINANCE AINANCE OF MACHINE Remove the pendular shuttle and its assemblies Instruction: switch off lamp or pull plug out.take out the pendular shuttle: Raise needle to its highest position and lift shuttle Gover. Remove the bobbin case from the machine, Uncover shuttle lever and draw out the shuffle retaining ring. Instruction: clean the feed dog with a brush and soft and dry rag (1) Bobbin case (2) Shuttle lever (3) Shuttle retaining ring (4) Pendular shuttle (5) Shuttle carrıer Installation of the pendular shuttle: hold shuttle center pin and fit carefully black into the shuttle carrier. Refit shuttle retaining ring and make sure that the following Center pin is fixed in the Slot of the shuttle canier. Lock retaining ring by turning levers back into position. Refit bobbin case with bobbin (6) Center pin (7) Slot 15

18 Anl.790.GB/SE/DK/FI/CZ/HU :33 Uhr Seite 18 CLEANING THE FEED DOG Switch off lamp and pull plug out before cleaning the feed dog. Remove the needle and presser foot. Remove the screw on the left hand side of the needle plate with the screwdriver. Remove the needle plate. Clean the feed dog teeth with a brush and refit the needle plate. Fit the presser foot and it is ready for sewing Instruction: to obtain first rate effect of needlework. Frequent cleaning is required for frequent use. ÖLEN DER MASCHINE OIL THE WORKS Instruction: Apply only one or two drops of machine oil, or cloth will be stained. If the machine should not run well after being out of use for a long period, apply a few drops of oil before running it and the result will be the same as the well thumbed condition OILING THE BACK OF TOPT Remove the cover, screw and top cover Oiling the parts as shown in the illustration. (1) Cover (2) Screw (3) Top cover OIL THE PENDULAR SHUTTLE Oiling is required for the positions marked in the illustration (4) Cover 16

19 Anl.790.GB/SE/DK/FI/CZ/HU :33 Uhr Seite 19 Obstacle avoidance Malfunction Cause Explanation 1.Upper thread is not correctly installed. See Page 7 Upper thread breaks 2.Upper thread tension is too tight. See Page 7 3.Needle is bent or dull. See Page 5 4.Needle is misplaced. See Page 5 5.Fabrics are not pulled backward after sewing. See Page 9 6.Thread is either too thick or too thin. See Page 5 1.Lower thread is not threaded properly in See Page 6 the shuttle hook. Clean the bobbin Lower thread breaks 2.There is fine hair inside hook. case 3.Bobbin is damaged. Replace bobbin 1.Needle is not correctly installed. See Page 5 2.Needle is bent or dull. Needlebreaks 3.Needle clamp screw goes loose. See Page 5 4.Upper thread tension is to tight. See Page 7 5.Fabrics are not pulled backward after sewing. See Page 9 6.Needle is too thin to the cloth to be stitched.. See Page 5 7.Pattern selection dial is not turned See Page 8 properly. 1.Needle is incorrectly installed. See Page 5 2.Needle is bent or dull. Skipping stitch 3.Neither needle nor thread is fit for sewing. See Page 5 4.Upper threading is not correct. See Page 7 17

20 Anl.790.GB/SE/DK/FI/CZ/HU :33 Uhr Seite 20 Malfunction Cause Explanation 1. Upper thread tension is too tight. See Page 7 2.Threading is not correct See Page 7 Fabric puckers 3.Needle is too thick for the fabric See Page 5 4.Stitches are too big to the cloth to be sewn. See Page 8 Non-woven lining under the cloth is required for very thin cloth to be stitched. 1.Upper thread pressure it too weak. See Page 7 Loop in seam. 2.The combination of needle size / thread See Page 5 size / fabric is incorrect, either too thick or too thin. Fabric does not 1.Feed dog is stained by fine hair. See Page 16 feed propertly 2.Feed dog is not hoisted. See Page 8 3.Stitching is too small. See Page 8 1.Main power switch is turned off. See Page 16 Machine does not work 2.thread in the hook is tangled See Page 6 3.Clutch release switch ıs set at bobbin mark. See Page 16 Machine is noisy 1.thread in the hook is tangled. See Page 16 and works slowly. 2.feed dog is stained by fine hair. See Page 16 Insufficient oiling. 18

21 Anl.790.GB/SE/DK/FI/CZ/HU :33 Uhr Seite 21 SE Viktig säkerhetsinformation När symaskinen används skall grundläggande säkerhetsföreskrifter alltid följas, inklusive följande: Läs igenom alla instruktioner innan symaskinen används. FARA För att minska risken för en elektrisk stöt: Symaskinen skall aldrig lämnas obevakad när den är ansluten till vägguttaget. Drag alltid ur symaskinens el-sladd ur vägguttaget efter att den har använts och innan den rengörs. Drag alltid ur el-sladden innan den elektriska lampan byts ut. Byt lampan mot en av samma modell och styrka, 15 watt. VARNING För att minska risken för brännskador, eldsvåda, elektrisk stöt på människor: Tillåt inte att maskinen används som leksak. Stor uppmärksamhet är viktig när symaskinen används av eller i närheten av barn. Använd den här symaskinen till vad den är avsedd för enligt denna handbok. Använd endast tillbehör som är rekommenderade av tillverkaren i denna handbok. Använd inte symaskinen om dess el-sladd eller kontakten är skadad, om den inte fungerar korrekt, om den tappats eller skadats eller tappats i vatten. Returnera symaskinen till när maste auktoriserade återförsäljare eller servicecenter för genomgång, reparation, elektriska eller mekaniska justeringar. Använd aldrig symaskinen när något av luftintagen är tilltäppta. Håll symaskinens luftintag och fotpedal rena från tygrester, damm och lösa tygstycken. Tappa aldrig eller för in någonting i någon öppning. Använd inte symaskinen utomhus. Använd inte symaskinen där areosol-podukter (spray) används eller där syrgas tillförs. För att stänga av, ställ huvudströmbrytaren på symbolen " O " vilket innebär av, drag sedan ur stickproppen. Drag inte i el-sladden. Fatta tag i kontakten och drag, inte i sladden. Håll fingrarna borta från rörliga delar. Speciell försiktighet krävs i området omkring symaskinsnålen. Använd alltid lämplig nålplatta. Felaktig platta kan orsaka att nålen går av. Använd inte en böjd nål. Drag inte i eller skjut på tyget under sömnaden. Detta kan rubba nålen så att den går av. Stäng av strömmen när något utförs i nålens område som t.ex. trädning av nålen, byta nål, träda undertråd eller byta pressarfot. Drag alltid ur symaskinens el-sladd ur vägguttaget när höljet tas bort, vid smörjning eller när andra servicejusteringar utförs som beskrivs i denna handbok. SPARA DESSA INSTRUKTIONER Denna symaskin är avsedd för hemmabruk. 1
22 Anl.790.GB/SE/DK/FI/CZ/HU :33 Uhr Seite 22 INNEHÅLL En kort introduktion Kapitel l Viktiga funktioner Delarnas namn Kapitel ll Förberedelser innan sömnaden påbörjas Justerbart sybord 3 Tillbehör 3 Strömförsörjning 4 Fotpedal 4 Sylampa 4 Ta bort och montera pressarfot 4 Byta nål 5 Tråd och nåltabell 5 Hur trådrullehållaren används 5 Ta bort och montera spolkapseln 6 Spolning 6 Montera spolen i spolkapseln 6 Träda maskinen 7 Dra upp undertråden 7 Stygnvalsknappen 7 Välj elastisk söm 8 Stygnlängdsvalknappen 8 Stygnbreddsvalknappen 8 Knapp för backmatning 8 Sänka matartänderna 8 Val av pressarfottrycket 9 Kapitel lll Starta sömnad Raksöm 9 Ändra sömnadsriktning 9 Använda markeringarna på stygnplåten 10 Sy i rät vinkel 10 Sicksacksöm 10 Kapitel lv Att sy i tyg Sicksack-kastsöm 10 Trestegssicksacksöm 11 Trestegs raksöm 11 Sy i knappar 11 Göra knapphål 12 Knapphål med dekorationsstygn 12 Sy i blixtlås 13 Blindstygn 13 Kapitel V Dekorationssömnad Bågstygn 13 Elastiskt söm 14 Gallersöm 14 Elastiskt tvåstygnssöm 14 Applikationssöm 15 Sy ihop kant mot kant 15 Kapitel Vl Ta bort skytteln och dess delar 15 Rengöra matartänderna 16 Smörja maskinen 16 Avhjälpa fel 17 2
23 !! 1. (1) Visar sömvalskoden, när väljarratten vrids kommer (2) visa olika sömmar. 2. (2) och (3) visar vilka olika pressarfötter som används vid olika sömmar. 3. (10) visar det föreslagna nålavståndet.!! &"!!! '"!
24 Anl.790.GB/SE/DK/FI/CZ/HU :33 Uhr Seite 24 STRÖMFÖRSÖRJNING Det skall kontrolleras att spänningen och frekvensen som finns angiven på maskinen överenstämmer med den i vägguttaget innan maskinen ansluts till nätet. 1. Anslut maskinkontakten (5) till maskinens uttag (4) 2. Anslut stickkontakten (1) till vägguttaget (3) 3. Slå på symaskinslampan med strömbrytaren (2). (1) Stickkontakt (2) Strömbrytare (3) Vägguttag (4) Maskinens elanslut ningsuttag (5) Maskinkontakten (6) Fotpedal Fotpedal Fotpedalen ändrar sömnadshastigheten. Ju hårdare pedalen trycks ned ju snabbare går sömmandet. SYMASKINSLAMPA Symaskinslampa Symaskinslampan sitter på baksidan av det övre höljet. Tag bort det övre höljet när lampan skall bytas (skruvar på framsidan). OBSERVERA! Stäng av strömmen innan lampan byts ut. Att ta ut lampan: Fatta tag om lampan och skruva ur den åt vänster. Att sätta i en lampa: Fatta tag om lampan och skruva i den åt höger. TA A BORT T OCH MONTERA PRESSARFOT Ta bort: Vrid balanshjulet så att nålen hamnar i sitt högsta läge. Lyft upp pressarfoten. Håll emot hävarmen på pressarfotshållaren medan pressarfoten avlägsnas. Montera: Rikta in pressarfoten så att dess balk befinner sig mitt emot pressarfotshållaren. Sänk pressarfotsstången så att pressarfoten fixeras på plats. 4
25 Anl.790.GB/SE/DK/FI/CZ/HU :33 Uhr Seite 25 BYTA A NÅL Vrid balanshjulet framåt så att nålen hamnar i sitt högsta läge och sänk ner pressarfoten. Lossa nålklämmans skruv genom att vrida den moturs. Tag bort den använda nålen och för in en ny med dess platta sida vänd bakåt. När nålen sätts in skall den pressa upp så tätt som möjligt i nålklämman som sedan skall dras åt med en skruvmejsel. OBSERVERA! Regelbundna kontroller skall göras att nålen är rak och vass. Trikåmaterial, konstsiden eller sidentyg kan då och då orsaka knutar och felstygn vilket ofta beror på skadade nålar. TRÅD OCH NÅLTABELL Nålnummer Material Bomullstråd Silkestråd». 60 (Ë.7) Finmaskigt siden ». 70 (Ë.10) Kräpp». 80 (Ë.12) Poplin, Natursiden lOO». 80-9O (Ë.12-14) ull, filt Bomul » (Ë.14-16) UlL » (Ë.14-18) Jeansmaterial Elastisk söm Jerseymaterial ».70 (Ë.10) HUR TRÅDRULLEHÅLLAREN ANVÄNDS Trådrullehållaren används för att hålla trådrullarna. Drag upp trådrullehållaren när symaskinen skall användas. Tryck ner trådrullehållaren när maskinen packas ihop (1) övertråds (2) -hål (fig.1) Anvisning: (fig.2) Om den tråd som används lätt trasslar sig i trådrullehållaren eller knyter sig kan du dra tråden genom hålet så som det visas på bilden. Hålet skall vara vänt mot trådrullen. (fig.1) + (fig.2) 5
26 Anl.790.GB/SE/DK/FI/CZ/HU :33 Uhr Seite 26 TA A BORT T OCH MONTERA SPOLKAPSELN Öppna luckan (1) Lucka Vrid balanshjulet framåt så att nålen hamnar i sitt högsta läge. Fatta tag i spolkapseln och drag ut den. (2) Spolkapselklaffen Tryck in spolkapseln så långt det går för att vara säker på att den fäster när den laddas i skytteln. (3) Spolkapselfingret SPOLNING 1) Drag ut balanshjulet till höger för att frikoppla maskinen. (2) Drag tråden från trådrullen genom spolspännarbrickorna. (3) För in tråden genom hålet i spolen och sätt den på spolapparatens tapp. (4) Vrid spolen åt höger (5) Håll änden på tråden och tryck försiktigt ner fotpedalen. Stanna efter några varv. Klipp av den lösa trådänden intill spolen. (6) Tryck på fotpedalen igen. Spola tråd tills spolen är full och stanna därefter maskinen. Tryck spolen till vänster och klipp av tråden. (7) Tryck balanshjulet åt vänster för att koppla in maskinen igen (i det ursprungliga läget). Anvisning: Tryck spolstiftet måste tryckas åt vänster när spolningen är avslutad. TRÄDA SPOLKAPSELN (3) Spulenkapselfinger 1) Sätt in spolen i spolkapseln. Se till att tråden dras ut i den riktning som visas med pilen (medurs). (2) Drag in tråden i skåran på spolkapseln. (3) Drag sedan tråden genom spännfjäderspringan till utgångshålet. Anvisning: drag ut tråden ca 10 cm. 6
27 Anl.790.GB/SE/DK/FI/CZ/HU :33 Uhr Seite 27 TRÄDA MASKINEN Vrid balanshjulet framåt så att trådupptagaren hamnar i sitt högsta läge. Lyft pressarfoten och sätt på trådrullen på hållaren ( enligt bilden). Drag tråden från baksidan på trådrullen. (1) För tråden genom trådspännaren med båda händerna. (2) Håll tråden och drag in den mellan trådspänningsbrickorna och sedan förbi i trådplattan. (3) Drag upp tråden sträckt och för den genom uttaget på trådtilldragaren från höger sida. (4) Drag sedan ner tråden och för den genom trådkroken. (5) Drag ner tråden och för den genom nästa trådfångarkrok. (6) För tråden genom nålsögat framifrån och bakåt. Anvisning: Klipp av tråden med en vass sax för att göra trädningen lättare. DRA UPP UNDERTRÅDEN 1) Lyft upp pressarfoten och håll övertråden löst i din vänsterhand. (2) Vrid balanshjulet framåt tills att trådupptagaren hamnar i sitt högsta läge. Drag i övertråden så att den drar upp undertråden. (3) Lämna ca 5 cm av de båda trådarna kvar och drag dem under pressarfoten mot dess baksida. Lämna 5 cm kvar av båda trådarna. SPÄNNINGSJUSTERING AV ÖVERTRÅDEN Vid raksöm måste både över- och undertråd knytas mella de två lagren av tyg. Justera den inställda trådspänningbrickorna i fönstret. (1) Nytt inställningsvärde (2) Ju lägre inställningstalet är ju mindre spänd är övertråden. (3) Ju högre inställningstalet är ju mera spänd är övertråden. Övertrådens spänning vid sicksack-söm. För att uppnå en bra sicksack-söm skall övertrådens spänning vara mindre än vid raksöm. Övertråden skall vara synlig på baksidan. 7
28 Anl.790.GB/SE/DK/FI/CZ/HU :33 Uhr Seite 28 STYGNVALSKNAPPEN Nålen dras upp från tyget och önskad storlek på stygnen väljs med knappen. Elastiskt söm Vid sömnad med elastiska stygn skall deras längd ställas in på mellan (1)-(8). Med följande justeringar kan stygnens längd väljas som man önskar. " - " gäller täta stygn. " + " gäller glesa stygn. Anvisning: Bredden på stygnförändringen mellan 2 och 3 skall vara olika. STYGNLÄNGDSKNAPP -Vrid stygnlängdsknappen för att ställa in den ideala stygnlängden. - Ju högre siffra ju längre stygn. Inställningen är lämplig när man gör knapphål. - Mellan 0,5 till 4 kan användas för sicksack-söm. - Det rätta värdet för elastisk söm är (1)-(10). Hur man får den elastiska sömmen bättre? Om den elastiska sömmen inte blir bra kan du ställa knappen på -" så blir stygnen tätare medan +" gör dem glesare. Anvisning: när man vrider på stygnlängdsvalknappen skall nålen stannas i ett ganska högt läge över tyget. BACKMATNINGSKNAPPEN Om backmatningsknappen alltid är netryckt kommer maskinen att sy baklänges hela tiden. Sänka matartänderna 1. Öppna luckan (1) Lucka 2. Sänk matartänderna genom att föra ner handtaget och föra det enligt vad pilhuvudet på bilden visar. (2) Handtag för sänkning av matartänderna. 3. Höj upp matartänderna genom att föra ner handtaget och för det enligt vad pilhuvudet på bilden visar indikerat med "A". Anvisning: vid vanlig sömnad skall alla matartänderna vara uppe. 8
29 Anl.790.GB/SE/DK/FI/CZ/HU :34 Uhr Seite 29 KNAPP FÖR PRESSARFOTSTRYCKET Vid vanlig sömnad skall knappen vara inställd på "3". Trycket skall minskas till "2" när man syr applikationer, nättyg och gör broderier. För chiffong, spetsar, garn och andra fina material kan man ställa in knappen på "3". För bomullsflanell och stretchtyger skall knappen justeras till "1". (1) Inställbara värden KAPITEL III BÖRJA SY (1) Stygnvalsknappen: 1 eller 2. (2) stygnslängd: 1,5-4 (3) pressarfot för syarbete: sicksack 4 Trådspänningsbrickor: 2-6 Lyft pressarfoten och sätt tyget bredvid markeringen i stygnplåten. Vrid balanshjulet framåt så att nålen förs ner i tyget. Sänk pressarfoten och se till att tråden är dragen bakåt. Tryck ner fotpedalen. Tyget rör sig längs med markeringen i stygnplåten och mats fram automatiskt av matartänderna. För att fästa tråden ordentligt tryck på backmatningsknappen och gör flera bakåtgående stygn. Lyft pressarfoten och drag tråden bakåt. Klipp av båda trådarna. Lämna en viss längd tråd kvar för framtida bruk ÄNDRA SÖMNADSRIKTNING Stanna maskinen och vrid balanshjulet så att nålen förs ner i tyget. Lyft upp pressarfoten. Vrid tyget för att byta riktning efter önskemål. Sänk pressarfoten för att fortsätta sömnaden. 9
30 Anl.790.GB/SE/DK/FI/CZ/HU :34 Uhr Seite 30 MARKERINGARNA PÅ STYGNPLÅTEN Markeringarna på stygnplåten är till stor hjälp för att behålla bredden mellan nålen och tråden. Anvisning: denna information bekräftar avståndet från markeringen och nålen. 1) Avståndsmarkering (2) Hörnmarkering (3) Stygnplåt (4) Stygnplåtens hål (5) Avståndet från kanten till nålens centrum. Siffror på stygnplåten /8 4/8 5/8 6/8 Avstånd i cm SY I RÄT VINKEL Vid raksöm skall ett avstånd på 1,6 cm från tygets kant hållas. När tygets kant ligger i hörnmarkeringen. Stranna maskinen och vrid balanshjulet framåt så att nålen sänks i tyget. Lyft pressarfoten, vrid tyget runt nålen för att ändra riktningen tills tygets kant ligger längs markeringslinjen för 1,6 cm. Sänk pressarfoten och sy i den nya riktningen. (2) Hörnlinjer SICKSACK-SÖM (1) knapp för val av stygnmönster: 3, 3-5 (2) stygnlängd: 1-4 (3) pressarfot: sicksack (4) trådspänningsbrickor: 2-6 Vanliga sicksack-stygn används ofta vid fållning. Vid knapphålssömnad och för krokiga elastiska sömmar. KAPITEL LV SÖMNAD I TYG SICKSACK-KASTSÖM (1) knapp för val av stygnmönster: 3, 3-8 (2) stygnlängd: M1-2 (3) pressarfot: sicksack (4) trådspänningsbrickor: 4-6 Stygnet används till kastning så att tygkanten inte repar upp sig. 10
31 Anl.790.GB/SE/DK/FI/CZ/HU :34 Uhr Seite 31 TRESTEGS-SICKSACK (1) knapp för val av stygnmönster: (2) stygnlängd: M 1-2 (3) pressarfot: sicksack (4) trådspänningsbrickor: 4-6 Denna typ av stygn används i syntetmaterial och andra material som lätt rynkar sig. Det passar också till kastning för att undvika att tyget repar upp sig. Det passar för att använda till krokiga sömmar och vid stoppning. Lämna en 1,5 cm bred sömsmån. Klipp bort sömsmånen när sömmen är färdig. TRESTEGS RAKSÖM (1) Stygnvalsknappen: 1 eller 2. (2) stygnlängd: (1)-(8) (3) pressarfot: sicksack (4) trådspänningsbrickor: 4-6 Två stygn framåt och ett bakåt gör sömmen hållbar. Innan tygstyckena sys ihop nåla dem med knappnålar. Dessa styng är lämpligast att använda för kilar. SY I KNAPPAR AR (1) Stygnvalsknappen: 3, 3-5 (så till vida att det passar för knappsömnad) (2) Stygnlängd: kan justeras valfri siffra (3) Stygnbredd: välj den stygnbredd som lämpar sig för knappen (4) Pressarfot: knappsömnad (5) Trådspänningsbrickor: 1-3 (6) Tejpa knappen över det markerade stället (se sidan 11) Passa in båda hålen på knappen med öppningen i pressarfoten genom att placera knappens vänstra hål under nålspetsen. Sänk ner pressarfoten: - Vrid på stygnvalsknappen - ställ in stygnbredden så att den bassar precis över det högra knapphålet. Sy 5 stygn ungefär och för upp nålen. För att få ett större avstånd mellan knappen och tyget, klipp av tråden med 20 cm kvar av den. För ner övertråden genom knapphålet och linda den runt knappens trådar flera varv. Dra tråden bakåt och gör en knut. Anvisning: för upp matartänderna igen efter avslutad knappsömnad. 11
32 Anl.790.GB/SE/DK/FI/CZ/HU :34 Uhr Seite 32 KNAPPHÅL (1) stygnvalsknappen: se figur 1 (2) stygnlängd: (0,5-1) (3) pressarfot: den som gör knapphål (4) trådspänningsbrickor: 3-5 Stygnbredden kan väljas godtyckligt mellan 0 till 1 beroende på variationer i stygnlängden. (1) För tätare stygn välj "0". Satin-stygn passar tunna material. (2) För mindre täta stygn välj "1". Glesare stygn passa tjocka materia. Anvisning: Gör ett prov av stygnen på en liten tyglapp så att bästa resultat uppnås. (1) Märk ut knapphålet mycket noga på materialet. (2) Drag fram släden (A), behåll markeringen(c) i överensstämmelse med den ursprungliga markeringen (B). Markeringen på pressarfoten skall passas in med markeringen på materialet. Sänk ner pressarfoten. Anvisning: markeringarna på släden är i cm. (3) Ställ in stygnväljarknappen på (fig.). Sy framåt tills du kommer till den övre markeringen på knapphålet och stanna sedan med nålen i sitt högsta läge till vänster. (4) Ställ in stygnväljarknappen på (fig.). Sy 4-6 stygn innan sömnaden avbryts och nålen vilar i sitt högsta läge till höger. (5) Ställ in stygnväljarknappen på (fig.). Sy bakåt till du kommer till markeringen nederst på knapphålet och avbryt sömnaden med nålen vilande i sitt högsta läge till höger. (6) Ställ in stygnväljarknappen på (fig.). Sy 4-6 stygn innan sömnaden avbryts och nålen vilar i sitt högsta läge till vänster. (7) Efter sömnaden av knapphål, tag ut tyget ur maskinen. Stick in en nål framför nedre tvärsömmen på knapphålet så knapphålets trådända inte klipps av utav misstag. Skär ut knapphålet försiktigt med knapphålskniven. KNAPPHÅL MED DEKORATIONSSTYGN 1) stygnvalsknappen: BH (2) stygnlängd: IIIIIIIIII (0,5-1) (3) pressarfot: den som gör knapphål (4) trådspänningsbrickor: Lyft upp fotplattan för knapphålsömnad häng inläggningstrådarna över metallarmen på pressarfotens baksida. (1 ) Metallarmens placering. 2. Drag de övriga trådändarna framåt under pressarfoten så att de ligger mitt under pressarfoten. 3. Håll de övriga trådarna sträckta och haka fast dem i gaffeln frampå pressarfoten. 4. För ner nålen i tyget innan sömnaden påbörjas och sänk ner pressarfoten. 5. Tryck långsamt ner fotpedalen och sy längs alla sidorna på knapphålet med de inlagda trådarna innesluts. 6.Tag ut tyget ur maskinen och klipp av sytråden. 7. Drag i de inlagda trådarna från vänster sida och håll dem sträckta. (8) Trådänden skall lindas runt en stoppnål. Dra tråden bakåt och klipp av den. Anvisning: se anvisningarna på sidan 12 när knapphål skall klippas upp. 12
33 Anl.790.GB/SE/DK/FI/CZ/HU :34 Uhr Seite 33 SY I BLIXTLÅS (1) stygnvalsknappen: 1 (2) stygnlängd: 1,5-4 (3) pressarfot: pressarfot för blixtlås (4) trådspänningsbrickor: 4-6 Lägg blixtlåset på eller nåla fast det på tyget och placera det under fotplattan. Dra tråden bakåt och sänk ner pressarfoten. Sy på vänstra sidan av blixtlåset genom att låta blixtlåsets tänder löpa så nära nålen som möjligt. Tyg och blixtlås skall sys samman tätt vrid på samma gång tyget till motsatt sida och sy på samma sätt även där. BLINDSTYGN (1) Stygnvalsknappen: 5-6 ; 7-8 (2) stygnlängd: 1-3 (3) pressarfot: sicksack plus styrplatta (4) trådspänningsbrickor: Vikning av tyget (1) Tygets baksida (2) 0,4-0,7cm 2. Sänk ner pressarfoten och lossa skruven på den fixerade pressarfoten och skjut styrplattan framåt tills skruven och fotplattan fäster i varandra. Fixera skruven och kontrollera att stoppet i styrplattan sitter i mitten av fotplattan. 3. Lyft upp pressarfoten och placera tyget under foten medan vecken är vända mot stopparen på styrplattan. Sänk pressarfoten och sy långsamt för att få en bättre kontroll. Nålen på vänster sicksack skall vara precis i kanten på vecken. Ha uppsikt över vecken som skall vara placerade vid sidan av stopparen på styrplattan under sömnaden. 4. När den högra övre sidan av tyget stryks uppåt går det knappt att upptäcka stygnen. KAPITEL LV DEKORATIONSSÖMNAD (1) stygnvalsknappen: 7-6 ; 9 (2) stygnlängd: 2 (3) pressarfot: sicksack (4) trådspänningsbrickor: 6-8 Vikta tygspetsar skall placeras bredvid pressarfoten till höger på tyget för snäcksöm. 13
34 Anl.790.GB/SE/DK/FI/CZ/HU :34 Uhr Seite 34 ELASTISKT SÖM (1) stygnvalsknappen: 1-8 (2) stygnlängd: 1-8 (3) pressarfot: sicksack (4) trådspänningsbrickor: 2-6 Med följande justeringar kan stygnens längd väljas som man önskar. Justering till " - " gäller täta stygn. Justering till " + " gäller glesa stygn. RYNKSÖM (1) stygnvalsknappen: 4 (2) stygnlängd: 1-8 (3) pressarfot: sicksack (4) trådspänningsbrickor: 4-6 Sy raksöm på den veckade sidan med 1 cm mellanrum. Välj "4" som stygnlängd. Knyt trådarna på ena sidan. Sträck undertråden och gör veck med jämna mellanrum.fäst trådarna på andra sidan. Gör rynkor och dekorationssömnad mellan vecken. Drag sedan bort rynkstygnen. Anvisning: Ökad sträckning av övertråden gör veckdekorationer enkla att göra. ELASTISKT TVÅSTYGNSSÖM (1) stygnvalsknappen: 8 ;10 (2) stygnlängd: 1 (3) pressarfot: sicksack (4) trådspänningsbrickor: 4-6 Denna söm är mest lämplig för att sy fast elastiska band på över 3 mm på ärmarna på barnkläder. Drag åt det elsatiska bandet efter att det sytts fast. Dessa sömmar är också lämpliga för tjocka tyger. Vik de sömlösa tygerna och sy ihop dem. 14
35 Anl.790.GB/SE/DK/FI/CZ/HU :34 Uhr Seite 35 APPLIKATIONSSÖM (1) stygnvalsknappen: 3); 5 (2) stygnlängd: 0,5-1 (3) pressarfot: sicksack (4) trådspänningsbrickor: 1-4 (5) pressarfotstryck: 2 Lägg dekorationsstyckena tätt mot tyget eller stryk på dem med häftande fliselin. Sy runt dekorationsstyckena och kontrollera att stygnen bakom applikationerna försvinner. För ner nålen i hörnet när du kommer till ett hörn. Lyft upp pressarfoten och flytta tyget till vänster eller höger. Anvisning: Justera stygnlängdsvalknappen när sömnaden avslutats. KANTSAMMANFOGNING (1) stygnvalsknappen: 10 (2) stygnlängd: 1-10 (3) pressarfot: sicksack (4) trådspänningsbrickor: 4-6 Vik in båda sidor 1,5 cm och stryk dem. De vikta kanterna skall fixeras med fliselin med ett mellanrum på 0,3 cm. Sy långsamt och kontrollera att stygnen når vikta kanterna. KAPITEL VL MASKINENS UNDERHÅLL Ta bort pendelskytteln och dess delar Anvisning: stäng av lampan och drag ur kontakten. Tag ut den pendlande skytteln: För upp nålen i sitt högsta läge och lyft på skyttelns lucka. Tag bort spolkapseln ur maskinen. Öppna skyttelstången och drag ut skyttelhållarringen. Anvisning: Rengör matartänderna med en borste och torr trasa. (1) Spolkapsel (2) Skyttelstång (3) Skyttelhållarring (4) Pendlande skyttel (5) Skyttelförare Montering av den pendlande skytteln: håll i skyttelns centrumpinne och passa försiktigt in den i skyttelföraren. Sätt tillbaka skyttelhållarringen och se till att den följande centrumpinnen fixeras i skåran på skyttelföraren. Lås hållarringen genom att föra stången tillbaka i sitt läge. Sätt tillbaka spolkapseln med spole (6) Centrumpinne (7) Skåra 15
36 Anl.790.GB/SE/DK/FI/CZ/HU :34 Uhr Seite 36 RENGÖRING AV MATAR ARTÄNDERNA Släck lampan och drag ur kontakten innan matartänderna rengörs.tag bort nål och pressarfot. Skruva bort skruven på den vänstra sidan av stygnplåten med skruvmejseln.tag bort stygnplåten. Rengör matartänderna med en borste och sätt tillbaka stygnplåten. Sätt tillbaka pressarfoten och maskinen är färdig för användning. Anvisning: för att få bästa möjliga sömnadsresultat. Regelbunden rengöring är nödvändigt för regelbundet bruk. SMÖRJA MASKINEN Anvisning: Använd endast en eller två droppar olja, annars kan tyget få fläckar. Om maskinen inte fungerar som den ska efter att den inte använts under en längre period, smörj den med några droppa olja och resultatet kommer att bli att den fungerar som tidigare. Smörja den bakre övre delen Tag bort luckan skruv och övre höljet. Smörj delarna enligt bilden. (1) Lucka (2) Skruv (3) Övre höljet Smörjning av den pendlande skytteln: Smörjning krävs på de ställen som är markerade på bilden. (4) Lucka 16
SAFETY PRECAUTIONS SPECIFICATIONS
 SAFETY PRECAUTIONS Read the instructions carefully before use and save them for future reference. Before you connect the appliance: Ensure that the voltage rating on the type plate corresponds to your
PRESS FÄLLKONSTRUKTION FOLDING INSTRUCTIONS
 PRESS FÄLLKONSTRUKTION FOLDING INSTRUCTIONS Vänd bordet upp och ner eller ställ det på långsidan. Tryck ner vid PRESS och fäll benen samtidigt. OBS! INGA STORA KRAFTER KRÄVS!! Om benen sitter i spänn tryck
SAFETY PRECAUTIONS SPECIFICATIONS
 SAFETY PRECAUTIONS Read the instructions carefully before use and save them for future reference. Before you connect the appliance: Ensure that the voltage rating on the type plate corresponds to your
PRESS FÄLLKONSTRUKTION FOLDING INSTRUCTIONS
 PRESS FÄLLKONSTRUKTION FOLDING INSTRUCTIONS Vänd bordet upp och ner eller ställ det på långsidan. Tryck ner vid PRESS och fäll benen samtidigt. Om benen sitter i spänn tryck benen mot kortsidan före de
ASSEMBLY INSTRUCTIONS SCALE - SYSTEM
 ASSEMBLY INSTRUCTIONS 60 mm 00 mm 600 mm 000 mm R50 mm ALL COMPONENTS Metal profile 60 mm (start and end of system) Metal profile connection Wire Felt square Metal profile 00 mm Metal profile connection
LÄNKHJUL S3. Monteringsanvisning för: Länkhjul S3
 MONTERINGSANVISNING LÄNKHJUL S3 Art.no. 8822117 Rev.2018-01 Link to english Monteringsanvisning för: Länkhjul S3 art.nr. 2002010 Länkhjul S3 90 mm art.nr. 2002020 Länkhjul S3 120 mm art.nr. 2002030 Länkhjul
VASSVIK FIXED STAND SE / ENG
 VASSVIK FIXED STAND SE / ENG SE VIKTIGT Läs noga igenom instruktionerna före användning och spar dessa för framtida bruk. VARNING: Barnets huvud bör inte ligga lägre än barnets kropp. Lägg inte till ytterligare
IMPORTANT! RETAIN FOR FUTURE REFERENCE PLEASE READ CAREFULLY VIKTIGT! BEHÅLL FÖR FRAMTIDA REFERENS LÄS IGENOM INSTRUKTIONSMANUALEN
 Heart & Stripes Junior Bed Instructions Manual Instruktions Manual IMPORTANT! RETAIN FOR FUTURE REFERENCE PLEASE READ CAREFULLY VIKTIGT! BEHÅLL FÖR FRAMTIDA REFERENS LÄS IGENOM INSTRUKTIONSMANUALEN Thank
ASSEMBLY INSTRUCTIONS SCALE SQUARE - STANDARD
 ASSEMBLY INSTRUCTIONS ALL COMPONENTS Metal profile 0 mm Gripper Ceiling attachments Screws for ceiling attachements (not included) Wires Metal profile 60 mm Metal profile 00 mm Felt - Full Felt - Half
SAFETY PRECAUTIONS SPECIFICATIONS
 SAFETY PRECAUTIONS Read the instructions carefully before use and save them for future reference. Before you connect the appliance: Ensure that the voltage rating on the type plate corresponds to your
VARIOBARRIER S/M MIMSAFE BY CHOICE
 VAROBARRR S/M MMSA BY CHOC K L A B D M C H A B C D 522 K 524 Right leg Right leg 514L 514R 510L 510R L 526L M 526R S508 S509 521 6X 521 + H 527 529 528 8X/1 18X 8X/1 M-460641AL M-SM6X14A M-460641B M-M37202_2014
In Bloom CAL # 8, sista varv och ihopsättning / last rows and assemble
 In Bloom CAL # 8, sista varv och ihopsättning / last rows and assemble I del 9 använder du virknål 3.0 mm. Efter varje varvsnummer står numret (1-7) för den färg du skall använda för det varvet, se färg/garn-tabell.
BBT057/ BBC057 BBCD057/ BBT057-NL HOLDEN COLORADO 9/2016+ HOLDEN TRAILBLAZER WD & 4WD Models
 INSTALLATION GUIDE BBT057/ BBC057 BBCD057/ BBT057-NL HOLDEN COLORADO 9/2016+ HOLDEN TRAILBLAZER 2017+ 2WD & 4WD Models Ironman 4x4 BBT/ BBC/ BBCD/BBT057-NL Bull Bars fit to a Holden Colorado 9/2016+ It
ASSEMBLY INSTRUCTIONS SCALE CIRCLE - STANDARD
 ASSEMBLY INSTRUCTIONS ALL COMPONENTS Metal profile 0 mm Gripper Ceiling attachments Screws for ceiling attachements (not included) Wires Metal profile 60 mm Metal profile 00 mm Felt - Full Felt - Half
Windlass Control Panel v1.0.1
 SIDE-POWER Windlass Systems 86-08950 Windlass Control Panel v1.0.1 EN Installation manual Behåll denna manual ombord! S Installations manual SLEIPNER AB Kilegatan 1 452 33 Strömstad Sverige Tel: +46 525
IMPORTANT! RETAIN FOR FUTURE REFERENCE PLEASE READ CAREFULLY VIKTIGT! BEHÅLL FÖR FRAMTIDA REFERENSLÄS IGENOM INSTRUKTIONSMANUALEN NOGGRANT
 13060 Basic Cot One Instruction Manual Instruktion Manual IMPORTANT! RETAIN FOR FUTURE REFERENCE PLEASE READ CAREFULLY VIKTIGT! BEHÅLL FÖR FRAMTIDA REFERENSLÄS IGENOM INSTRUKTIONSMANUALEN NOGGRANT Thank
Montageanvisning Airway system 1000/1500 Assembly instruction Airway system 1000/1500
 S.Det är lämpligt att denna information överlämnas till användaren av anläggningen. GB. It is appropriate that this information is passed on to the user of the installation. D. Diese informationen sind
81152 TRANSFER CASE SHIFT HANDLE
 Installation Instructions for TRANSFER CASE SHIFT HANDLE for 2007 2018 JEEP JK WRANGLER 1 2 3 ITEM NO. PART NO. DESCRIPTION QTY. 1 4101359 SHIFT KNOB, JEEP WRANGLER JK, MOLDED 1 2 1794720 JAM NUT, 3/8
ARC 32. Tvättställsblandare/Basin Mixer. inr.se
 ARC 32 Tvättställsblandare/Basin Mixer inr.se SE Användning och skötsel Manualen är en del av produkten. Bevara den under hela produktens livscykel. Vi rekommenderar er att noggrant läsa igenom manualen
ASSEMBLY INSTRUCTIONS
 ASSEMBLY INSTRUCTIONS Unite XL2 EXTEND COMPONENTS End tabletop 190/260 cm Middle tabletop 140/210 cm 1 Assemble all the legs, start by putting a foot into an inner leg. Slide the outer leg over the inner
Nathi Skötbord Changing unit Table à langer murale Wickeltisch Verschoontafel Puslebord Cambiador de pared Přebalovací pult Fasciatoio
 Nathi Skötbord Changing unit Table à langer murale Wickeltisch Verschoontafel Puslebord Cambiador de pared Přebalovací pult Fasciatoio Пеленальный стол Tested and approved according to SS-EN 12221:2008+A1_2013
INKOPPLINGSANVISNING ELTRYCKSLÅS WIRING DIAGRAM SOLENOID LOCK
 INKOPPLINGSANVISNING ELTRYCKSLÅS WIRING DIAGRAM SOLENOID LOCK SE EN S. 2-4 P. 5-7 SL 510/511 SL 520/521 SL 530-50/531-50 2013 11 07 SE TEKNISK SPECIFIKATION Driftspänning. Ström. Reed relä. Drifttemperatur.
Droppställning / IV stand
 MONTERINGSANVISNING / ASSEMBLY INSTRUCTIONS Droppställning / IV stand Fellow Classic Art. nr. / Art. no: 08814 1 SVENSKA Produktbeskrivning Droppställningen består av följande delar: - Klamma, 3 st - Bottenstöd
Support Manual HoistLocatel Electronic Locks
 Support Manual HoistLocatel Electronic Locks 1. S70, Create a Terminating Card for Cards Terminating Card 2. Select the card you want to block, look among Card No. Then click on the single arrow pointing
Monteringsanvisning Podie T 4100 K
 Monteringsanvisning Podie T 4100 K Monteringsanvisning Förbered fundamentet 1. Montera ställfötterna. Montera tvättmaskin SV 1. Fäst gaffelbeslagen i bakkant med brickor och skruv. OBS! Placera beslagen
BATH MIXER 160 LINC 21. incl. HAND SHOWER. inr.se
 LINC 21 BATH MIXER 150 BATH MIXER 160 incl. HAND SHOWER 110309 inr.se Innan montering Vi förordar en sakkunnig VVS-installatör vid installation och service. Ledningarna ska renspolas innan installation.
VASSVIK ROCKING STAND
 VASSVIK ROCKING STAND SE / ENG SE VIKTIGT Läs noga igenom instruktionerna före användning och spar dessa för framtida bruk. VARNING: Barnets huvud bör inte ligga lägre än barnets kropp. Lägg inte till
Monteringsanvisning Nödutrymningsbeslag ASSA 179E
 Monteringsanvisning Nödutrymningsbeslag ASSA 179E Denna monteringsanvisning avser nödutrymningsbeslag ASSA 179E med artikelnummer 364371 i kombination med låshus Abloy EL580 med artikelnummer EL580100011.
P650 - Takscreen. Installationsguide EN
 P650 - Takscreen Installationsguide 1309-150507EN V650-Tallinn Installation manual Montera främre linhjul 12 13 Placera linan över linhjulet och skruva tillbaka täcklocket på linhjulhuset (7). Öppna linhjulshuset
Beijer Electronics AB 2000, MA00336A, 2000-12
 Demonstration driver English Svenska Beijer Electronics AB 2000, MA00336A, 2000-12 Beijer Electronics AB reserves the right to change information in this manual without prior notice. All examples in this
Symaskin Multifunktionell HN 5069. Bruksanvisning
 Symaskin Multifunktionell HN 5069 Bruksanvisning Innan man börjar använda symaskinen ska säkerhetsanvisningarna följas och bruksanvisningen läsas igenom. Fara! 1. Om symaskinen är obevakad ska man stänga
Installation. Twice Nisch. Twice Corner SVENSKA ENGLISH
 Installation Arrow Skandinavien AB Tel: +46 (0)31 330 00 10 www.arrowshower.com Twice Corner Twice Nisch SVENSKA (SV) Installationsanvisning för Arrow duschvägg. Vi förbättrar ständigt våra installationsanvisningar.
SAFETY PRECAUTIONS SPECIFICATIONS
 SAFETY PRECAUTIONS Read the instructions carefully before use and save them for future reference. Before you connect the appliance: Ensure that the voltage rating on the type plate corresponds to your
BBT042/ BBC042/ BBCD042 NISSAN NAVARA D40 V STX & PATHFINDER R WD & 4WD Models
 INSTALLATION GUIDE BBT042/ BBC042/ BBCD042 NISSAN NAVARA D40 V6 2010+ STX & PATHFINDER R51 2010+ 2WD & 4WD Models Ironman 4x4 BBT/ BBC/ BBCD042 Bull Bars fit to a Nissan Navara D40 STX & Pathfinder R51.
Montageanvisning Airway system 1000/1500 Assembly instruction Airway system 1000/1500
 S.Det är lämpligt att denna information överlämnas till användaren av anläggningen. GB. It is appropriate that this information is passed on to the user of the installation. D. Diese informationen sind
Quick Start. English Svenska PRIMACY. Printing settings and winsign
 Quick Start English Svenska PRIMACY Printing settings and winsign 2016-05-26 Before Printing Quick Start Primacy Install the printer according to the supplier s instructions, please see the PRIMACY user
Instruction Manual. Svenska, English. Power Bank. Model: PRBN
 Instruction Manual Svenska, English Power Bank Model: PRBN Innehåll / Content Innehåll Säkerhetsföreskrifter... 4 Delar... 5 Specifikationer... 6 Miljö / Lag och säkerhet / Förbehåll... 7 Content Safety
FORTA M315. Installation. 218 mm.
 1 Installation 2 1 2 1 218 mm. 1 2 4 5 6 7 8 9 2 G, G0= Max 100 m 1.5 mm² (AWG 15) X1, MX, Y, VH, VC = Max 200 m 0.5 mm² (AWG 20) Y X1 MX VH VC G1 G0 G 0 V 24 V~ IN 0-10 0-5, 2-6 60 s OP O 1 2 4 5 6 7
Installation Instruction Monteringsinstruktion JK400
 Installation Instruction Monteringsinstruktion JK400 Tools: 2pcs of spanner 13 and 17mm or 2pcs of adjustable spanner, cross slotted screwdriver PZ 2 Warning: Plates can be sharp in the edges and corners,
Your No. 1 Workout. MANUAL pro
 Your No. 1 Workout MANUAL pro Innehåll/Contents Svenska Viktigt om säkerhet Specifikationer & delar Rekommenderade övningar 3 5 6-7 2 English Safety instructions Specifications & parts Recommended exercises
Plain A262. För T16 (T5) lysrör. Innehåll. Monteringsanvisning. A. Instruktion för rampmontering
 lysrör. Innehåll. Monteringsanvisning. A. Instruktion för rampmontering") Plain A262 För T16 (T5) lysrör Innehåll Ramparmatur: ändmodul En stängd gavel/ en öppen gavel Plint i båda ändarna Överkopplingssladd 1 rampgavel 1 lysrörsbytare Ramparmatur: mellanmodul Plint i en ände
Plain A262 För T16 (T5) lysrör Innehåll Ramparmatur: ändmodul En stängd gavel/ en öppen gavel Plint i båda ändarna Överkopplingssladd 1 rampgavel 1 lysrörsbytare Ramparmatur: mellanmodul Plint i en ände
 BÄNKVÅG / BENCH SCALE Modell : SW-III / Model : SW-III ANVÄNDARMANUAL / USER MANUAL SW-III WWW.LIDEN-WEIGHING.SE 2014-03-26 OBS! Under vågen sitter en justerbar skruv (se bild). Standardinställning är
Boiler with heatpump / Värmepumpsberedare
 Boiler with heatpump / Värmepumpsberedare QUICK START GUIDE / SNABBSTART GUIDE More information and instruction videos on our homepage www.indol.se Mer information och instruktionsvideos på vår hemsida
Installation Instructions
 Installation Instructions (Cat. No. 1794-IE8 Series B) This module mounts on a 1794 terminal base unit. 1. Rotate keyswitch (1) on terminal base unit (2) clockwise to position 3 as required for this type
Anvisning för Guide for
 Anvisning för Guide for PRISMA SENSOR 1 96243235zPC Montering i tak/installation in the ceiling Byte av kupa/change of diffuser 2 Installation Installation från gavel / Installation from the end Installationskabel
Diskant Yta eller Vikelfäste montering Mount
 Installation och Bruksanvisning Inledning Välj fästpunkterna för dina dome TW250 Silk diskanter. Kom ihåg att för bästa prestanda bör diskanterna monteras så nära mitten av bas som möjligt, med fri, direkt
 BÄNKVÅG / BENCH SCALE ANVÄNDARMANUAL / USER MANUAL SW-III www.liden-weighing.com Svenska OBS! Under vågen sitter en justerbar skruv (se bild). Standardinställning är den för vägning. Om ni vill rengöra
VAL AV RÄTT NÅL/TYG/TRÅD
 VAL AV RÄTT NÅL/TYG/TRÅD Schema för val av nål, tyg, tråd NÅLSTORLEK TYG TRÅD 9-11(65-75) 12(80) 14(90) 16(100) 18(110) Tunna tyger tunn bomull, voile, siden, muslin, interlocktrikå, bomullstrikå, trikå,
MCP-16RC, Air Purification
 Kompakt patronfilter med tryckstötsrensning. MCP-16RC Air Purification Tower är ett kompakt patronfilter för decentraliserad luftrening inomhus, där luft återåtervinning är möjlig. Den kompakta filterenheten
manual Facial spa Art nr: 48682 Rubicson 2016-06-08
 manual Facial spa Art nr: 8682 EN NO SV 2016-06-08 Rubicson ENGLISH Overview Use Fill the container ENGLISH 1. Make sure that the power cord is not connected to a wall socket. 1 2 2. Remove the funnel
BBT034/ BBC034/ BBCD034 BBCD060/ BBT060-NL/ BB060-TL/ BB060-SL VOLKSWAGEN AMAROK
 INSTALLATION GUIDE BBT034/ BBC034/ BBCD034 BBCD060/ BBT060-NL/ BB060-TL/ BB060-SL VOLKSWAGEN AMAROK Ironman 4x4 BBT/ BBC/ BBCD034 BBCD060/ BBT060-NL/ BB060-TL/ BB060-SL Bull Bars fit to a Volkswagen Amarok.
CANALKLER 250S. Gänga i tum Thread in inch
 Skruvkoppling/Reusable coupling CANALKLER kopplingar används under högt tryck. Använd endast kopplingar som rekommenderas av Trelleborg och följ monteringsanvisningarna noggrant. Kontrollera så att slangen
T y p o. Cuttlery holder with monogram. Finished size: appr 16"x4" (40x10cm)
") T y p o Cuttlery holder with monogram Finished size: appr 16"x4" (40x10cm) TYPO cuttlery holder Typo is stitched with half cross stitch over 1 thread on burlap/hessian. Please see separate tutorial for
T y p o Cuttlery holder with monogram Finished size: appr 16"x4" (40x10cm) TYPO cuttlery holder Typo is stitched with half cross stitch over 1 thread on burlap/hessian. Please see separate tutorial for
Monteringsanvisning benfundament TM 8055, TM 8060, T 8118 K. Art nr ,
 Monteringsanvisning benfundament TM 8055, TM 8060, T 8118 K Art nr 102056, 102057 Monteringsanvisning Förbered fundamentet 1. Montera ställfötterna. Montera tvättmaskin SV 1. Fäst gaffelbeslagen i bakkant
Active Speaker System X-Line 50 AW
 Active Speaker System X-Line 50 AW Important Safety Information: Read all documentation before operating your equipment. Retain all documentation for future reference. Save the carton and packing material
 INSTALLATION INSTRUCTIONS Accessory S P/N 08E12-SZT-100 Application CR-Z Publications No. Issue Date SEP PARTS LIST Left illuminated door sill trim Right illuminated door sill trim Illumination harness
Hose reel CRO Slangrulle CRO
 Hose reel CRO Slangrulle CRO 644210, 644220, 644240, 614205, 614215, 624215 624440, 624445, 624492, 624904, 624910, 624922, 624951, 624971 Manual Alentec & Orion AB, Box 108, 132 23 Saltsjö-Boo Telefon:
Molift Raiser 75135G Etac Box 203, Anderstorp Sweden Tel Fax
 7G 8-0-07 SE SE EN EN Till och med serienummer 0900 Från serienummer 0900 Up to serial number 0900 From serial number 0900.... Etac Box 0, Anderstorp Sweden Tel + 7 8 7 00 Fax + 7 8 7 90 www.etac.com Svenska
In Bloom CAL - Maskbeskrivningar / Stitch tutorials
 In Bloom CAL - Maskbeskrivningar / Stitch tutorials Maskor och förkortningar som används i detta mönster: Bmb - bakre maskbågen Fm - fastmaska Hst - halvstolpe Hö - hoppa över Lm - luftmaska Nä - nästa
säkerhetsutrustning / SAFETY EQUIPMENT
 säkerhetsutrustning / SAFETY EQUIPMENT Hastighetsvakt / Speed monitor Kellves hastighetsvakter används för att stoppa bandtransportören när dess hastighet sjunker under beräknade minimihastigheten. Kellve
BBT014/ BBC014/ BBCD014 PJ & PK FORD RANGER WD & 4WD Models
 INSTALLATION GUIDE BBT014/ BBC014/ BBCD014 PJ & PK FORD RANGER 2007+ 2WD & 4WD Models Ironman 4x4 BBT/ BBC/ BBCD014 Bull Bars fit to a Ford Ranger. It will take about 3 hours to install. NOTE: This product
Technique and expression 3: weave. 3.5 hp. Ladokcode: AX1 TE1 The exam is given to: Exchange Textile Design and Textile design 2.
 Technique and expression 3: weave 3.5 hp Ladokcode: AX1 TE1 The exam is given to: Exchange Textile Design and Textile design 2 ExamCode: February 15 th 9-13 Means of assistance: Calculator, colorpencils,
2.1 Installation of driver using Internet Installation of driver from disk... 3
 &RQWHQW,QQHKnOO 0DQXDOÃ(QJOLVKÃ'HPRGULYHU )RUHZRUG Ã,QWURGXFWLRQ Ã,QVWDOOÃDQGÃXSGDWHÃGULYHU 2.1 Installation of driver using Internet... 3 2.2 Installation of driver from disk... 3 Ã&RQQHFWLQJÃWKHÃWHUPLQDOÃWRÃWKHÃ3/&ÃV\VWHP
Installation manual for pool enclosure Installationsmanual för pooltak
 Installation manual for pool enclosure Installationsmanual för pooltak Assembling a module Ihopsättning av en modul Cut careful 3cm of the plastic protection folie from BOTH sides of the polycarbonate
LINC Modell 17 130624A
 LINC Modell 17 130624A Denna produkt är anpassad till Branschregler Säker Vatteninstallation. INR garanterar produktens funktion om branschregler och monteringsanvisning följs. INR SVERIGE AB Kosterögatan
LINC 23. Tvättställsblandare/Basin Mixer. inr.se 130226A
 LINC 23 Tvättställsblandare/Basin Mixer 130226A inr.se S Användande och skötsel Manualen är en del av produkten. Bevara den under hela produktens livscykel. Vi rekommenderar att noggrant läsa igenom manualen
MONTERINGSINSTRUKTION ASSEMBLY INSTRUCTION
 11/ 97 MONTERINGINTRUKTION AEMBLY INTRUCTION AGNPRIDARE / CHAFFPREADER Art. nr. 12313, 12314 CLAA LEXION 420-460 REKORDVERKEN weden AB Öttum E-535 92 KVÄNUM Tel. +46(0)511-37 01 00 Fax. +46(0)511-37 00
Users manual Bruksanvisning Gebrauchanweisung Guide d instructions
 Multi-pressure bucket pump Bärbar fettpump hochdruck abschmierpumpe distributeur manuel de graisse Users manual Bruksanvisning Gebrauchanweisung Guide d instructions 11018-1 - 815850 R02/03 IMPORTANT:
Monteringsanvisning benfundament TM 9060, TM 9070, T 9153 E/K/VP. Art nr , ,
 Monteringsanvisning benfundament TM 9060, TM 9070, T 9153 E/K/VP Art nr 102058, 102059, 102030 Monteringsanvisning SV Förbered fundamentet 1. Montera ställfötterna. 4. Fundamentet skall alltid tippsäkras.
 Bänkvåg LCW-6S Manual/Förenklat handhavande User Manual LCW-6S www.liden-weighing.se Knappfunktioner: ON/OFF Sätter på och stänger av vågen. UNIT Skiftar vägningsenhet ZERO/TARE Nollställer vågen Tarerar
Joki Joki Air. JCD70-xx JAD90-xx. lasiesta.com. Manual. Betriebsanleitung. Manuel. Manual. Manuale. Gebruiksaanwijzing.
 lasiesta.com LA SIESTA GmbH Im Wiesenweg 4 55270 Jugenheim Germany Tel: +49 6130 9119-19 LA SIESTA Inc. 7355 S.W. 87 th Ave., Ste. 100 Miami, FL 33173 USA Tel: +1 786 401-1138 EN DE FR ES IT NL DA SV FI
Får endast utföras av behörig personal. May only be carried out by authorized electrician
 Instruktion för DMIS Instruction for DMIS FLE400FC, FLE850MP, W3400H, W4400H/W4600H (-980/1287) W3850H/W31100H, W4850/W41100H (-1220/636) Clarus Control 471 1530-75 2016.05.04 Får endast utföras av behörig
Quick Start. English Svenska. Moca
 Quick Start English Svenska Moca 2015-08-20 Before Printing Install the printer according to the supplier s instructions, please see the Moca user guide (chapter 3-1) at the installation CD. Choose Moca
Par m 328 feet. Lång höger sväng. Korgen står placerad i en skogsglänta OB-linje på vänster sida.
 1 100 m 328 feet Lång höger sväng. Korgen står placerad i en skogsglänta -linje på vänster sida. Long right turn. Basket are placed in a forrest glade. -line on the left side. Snälla, skräpa ej ner vår
LINC MODELL 13. INR SVERIGE AB Kosterögatan 15 SE-211 24 Malmö 13 EN 1428:2005+A1:2008
 LINC MODELL 13 151005 Produkten är anpassad till branschregler Säker Vatteninstallation. INR garanterar produktens funktion om branschreglerna och monteringsanvisningen följs. INR SVERIGE AB Kosterögatan
SCdefault. 9-5 Installation instructions
 SCdefault 9-5 Installation instructions SITdefault Tuning Kit MONTERINGSANVISNING INSTALLATION INSTRUCTIONS MONTAGEANLEITUNG INSTRUCTIONS DE MONTAGE Accessories Part No. Group Date Instruction Part No.
Contents / Innehållsförteckning
 Contents / Innehållsförteckning Copyright This manual is the copyright of CI no 55650-4137. No part of this manual may be revised, copied or transmitted in any way without written permission from CI no
BBT034/ BBC034/ BBCD034 VOLKSWAGEN AMAROK. Ironman 4x4 BBT/ BBC/ BBCD034 Bull Bars fit to a Volkswagen Amarok. It will take about 3 hours to install.
 INSTALLATION GUIDE BBT034/ BBC034/ BBCD034 VOLKSWAGEN AMAROK Ironman 4x4 BBT/ BBC/ BBCD034 Bull Bars fit to a Volkswagen Amarok. It will take about 3 hours to install. IMPORTANT - If your vehicle has front
Bruksanvisning Directions for use
 Bruksanvisning Directions for use KOMBIDON OUTSIDE WALL HOOD SVENSK/ENGLISH VERSION SVENSKA Denna montageanvisning omfattar produkten KOMBIDON. BESKRIVNING/ ANVÄNDNING Kombidon från AB C.A. Östberg är
vario d7 column display owners manual integrated column display
 OCTANORM vario tm Product Line. OCTANORM vario tm -sortimentet. Folding display Vikdisplay Frame Portable Window & Table top Banner Counter display Ram- Portabel- Skyltfönster- Banderoll- Diskdisplay Nov.
INDUKTIV SLINGDETEKTOR INDUCTIVE LOOP DETECTOR
 INDUKTIV SLINGDETEKTOR INDUCTIVE LOOP DETECTOR Slingdetektorn används som ett alternativ till mekaniska gränslägen, momentbrytare eller annat gränsläge i gödselrännor. Detektorn är kopplad till en trådslinga
Hose reel ORB Slangrulle ORB
 Hose reel ORB Slangrulle ORB 24974, 24975, 24976 24977, 44452, 44453 24978, 24979 Manual Alentec & Orion AB, Box 108, 132 23 Saltsjö-Boo Telefon: +46 8 747 67 00 Fax: +46 8-715 20 74 e-mail: info@alentec.se
(SV) Installationsmanual för duschkabiner och ångbastukabiner (EN) Installation manual for shower cabins and steam cabins
 Installationsmanual för duschkabiner och ångbastukabiner (EN) Installation manual for shower cabins and steam cabins") Arrow Skandinavien AB Tel: +46 (0)31 330 00 10 www.arrowshower.com (SV) Installationsmanual för duschkabiner och ångbastukabiner (EN) Installation manual for shower cabins and steam cabins 6004 6005 6006
Arrow Skandinavien AB Tel: +46 (0)31 330 00 10 www.arrowshower.com (SV) Installationsmanual för duschkabiner och ångbastukabiner (EN) Installation manual for shower cabins and steam cabins 6004 6005 6006
IRAB Mottagare sida 2-5 Tele Radio AB Mottagare sida 6
 IRAB Mottagare sida -5 Tele Radio AB Mottagare sida 6 Installation of receiver type smd 700 4 RELAY FUNCTIONS / -4 VAC/DC PCB TYPE NO: LWEG 4L Rev: 95-09 Installation: Install the receivers in a protected
Suzuki SX4 2006» Fiat Sedici 2006»
 Suzuki SX4 006» Fiat Sedici 006» Nº Revisión Fecha Aprobación Nº 005 3-05-017 SUZUKI SX4 006 FIAT SEDICI 006 CLASS A50-X APPROVAL NUMBER CLASS 00-6 TYPE SUZ01 9,9 TYPE 50 SUZ013-S kn kg 9,9 D 00-7 TYPE
Worsted weight yarn. MC: Appr 65/80/100/130/160 meters CC1: Appr 30/35/40/50/60 meters CC2: Appr 30/35/40/50/60 meters
 Sprinkles is a quick and easy top down knit with a gorgeous tweed stitch body use soft cotton for a lighter top, or some fabulous wool for a warm vest. Sizes available: Nb-3m/6m/1y/2y/4y Sizes: Materials:
Reservdelskatalog Parts Catalogue COMBI 40 AE /S15 - Season 2017
 2306/S1 - Season 201 Use GLOBAL GARDEN PRODUCT Genuine Spare Parts specified in the parts list for repair and/or replacement. The contents described in the parts list may change due to improvement. The
INSTRUKTIONER FÖR ANVÄNDNING
 S4050 MANUAL INSTRUKTIONER FÖR ANVÄNDNING 1) Denna modell är avsedd för användning på gym. Den har ett fast svänghjul och bör endast användas under överinseende av professionell personal. 2) Installation
Make a speech. How to make the perfect speech. söndag 6 oktober 13
 Make a speech How to make the perfect speech FOPPA FOPPA Finding FOPPA Finding Organizing FOPPA Finding Organizing Phrasing FOPPA Finding Organizing Phrasing Preparing FOPPA Finding Organizing Phrasing
TEXTURED EASY LOCK BLOCK INSTALLATION GUIDE. australianpaving.com.au
 TEXTURED EASY LOCK BLOCK INSTALLATION GUIDE 1800 191 131 australianpaving.com.au TEXTURED EASY LOCK BLOCK The Textured Easy Lock Block retaining wall system is the premium retaining wall product for near
Z-LYFTEN PRODUKTION AB MONTERINGSANVISNING INSTALLATION INSTRUCTIONS
 Z-LYFTEN PRODUKTION AB 55523 MONTERINGSANVISNING INSTALLATION INSTRUCTIONS Monteringssats/ Mounting kit 53650 Renault Master, Opel Movano, Nissan Interstar 2007-12-21 Försäljning/Sales/Verkauf Mossvägen
2 VIKTIGA SÄKERHETSINSTRUKTIONER
 2 VIKTIGA SÄKERHETSINSTRUKTIONER Vid användning av en elektrisk apparat bör grundläggande säkerhetsåtgärder alltid följas. Läs hela instruktionsboken innan du använder symaskinen. FARA - För att minska
Preschool Kindergarten
 Preschool Kindergarten Objectives CCSS Reading: Foundational Skills RF.K.1.D: Recognize and name all upper- and lowercase letters of the alphabet. RF.K.3.A: Demonstrate basic knowledge of one-toone letter-sound
BRUKSANVISNING. Oscilla 910
 BRUKSANVISNING Oscilla 910 C A TEGNÉR AB BOX 20003 161 02 BROMMA TEL 08-564 822 00 FAX 08-564 822 09 INTERNET: www.categner.se E-MAIL: info@categner.se OSCILLA SM910 INNEHÅLL FRONTPANEL... 3 BAKPANEL...
$99_brotherE_cover Bruksanvisning Svenska XC7413-021 Printed in China
 Bruksanvisning VIKTIGA SÄKERHETSFÖRESKRIFTER När maskinen används ska grundläggande säkerhetsåtgärder alltid vidtas, inklusive följande: Läs alla instruktioner före användning. FARA - För att minska risken
Bathtub Filler CN EN. TBP02201 Type / TBP02202 Type. Installation Manual. Continued on the back cover
 03N74E Installation Manual 207.8 Bathtub Filler TBP0220 Type / TBP02202 Type For best results, install the product correctly according to the instructions in this Installation Manual. After installation,
SUZUKI GRAND VITARA 3P CITY 2011»
 00-2082 120 SUZUKI GRAND VITARA 3P CITY 2011» 661-0830 rev. 2014-04-04 DC Congratulations on purchasing an ATS towbar Alexo Towbars Sweden offer quality towbars produced as a result of direct market research.
Enhandsbroms till Volaris S7, Volaris S7 SMART och Volaris S7 PATROL One-hand brake for Volaris S7, Volaris S7 Smart and Volaris S7 Patrol
 Enhandsbroms till Volaris S7, Volaris S7 SMART och Volaris S7 PATROL One-hand brake for Volaris S7, Volaris S7 Smart and Volaris S7 Patrol Monteringsinstruktion Assembly instructions Verktyg du behöver
(SV) Installationsmanual för duschkabiner och ångbastukabiner (EN) Installation manual for shower cabins and steam cabins
 Installationsmanual för duschkabiner och ångbastukabiner (EN) Installation manual for shower cabins and steam cabins") Arrow Skandinavien AB Tel: +46 (0)31 330 00 10 www.arrowshower.com (SV) Installationsmanual för duschkabiner och ångbastukabiner (EN) Installation manual for shower cabins and steam cabins 6030 6130 Ver:
Arrow Skandinavien AB Tel: +46 (0)31 330 00 10 www.arrowshower.com (SV) Installationsmanual för duschkabiner och ångbastukabiner (EN) Installation manual for shower cabins and steam cabins 6030 6130 Ver:
00-1595. Fiat 500 2007» Fiat Panda / 4x4 2003» Fiat Panda 4x4 Climbing / 4x4 Cross 20033» 619-0300
 00-1595 120 Fiat 500 2007» Fiat Panda / 4x4 2003» Fiat Panda 4x4 Climbing / 4x4 Cross 20033» 619-0300 rev. 2014-04-04 DC Congratulations on purchasing an ATS towbar Alexo Towbars Sweden offer quality towbars