English Svenska Dansk Deutsch V 2.31
|
|
|
- Gösta Svensson
- för 7 år sedan
- Visningar:
Transkript
1
2
3 English... 2 Svenska Dansk Deutsch V 2.31

4 Content Introduction... 5 Intended use... 6 Supplied items... 7 Overview... 8 LED indicators... 9 Technical data Safety instructions Storage when not in use Copyright Prior to use First use English

5 Setting mode Repeater Mode WPS - The easiest type of configuration Manual configuration Client Mode WPS - The easiest type of configuration Manual configuration Access Point (AP) Mode (Router Mode) WPS - Connect to the AP (Router Mode) Manual connection to the AP Configuration menu of the wifi range extender Wizard Wireless status WiFi (Wireless) English - 3

6 Network Management Status Environmental and disposal information Conformity information Troubleshooting Warranty and servicing advice English

7 Introduction SilverCrest SWV 300 C1 Thank you for purchasing a SilverCrest product. The SilverCrest Wifi Range Extender SWV 300 C1, hereinafter referred to as wifi range extender, increases the range of an existing wireless network The built-in WPS function enables it to be easily connected to a secure wireless network. Read these operating instructions carefully before first using the device as they contain important information on installation, usage, storage and disposal of the wifi range extender. English - 5

8 Intended use This wifi range extender is an information technology device. It increases the range of an existing wireless network. The wifi range extender can also be used as an access point (AP), for example, to use a router without its own wireless network as a "wireless router". In addition, the wifi range extender can be connected as a client to end devices with a LAN interface (for example, computer, notebook or TV set), which do not have their own wireless network. It is only designed for private use and not for industrial or commercial purposes. Furthermore, the wifi range extender may not be used outdoors or in tropical climates. This device complies with all standards and directives specified in the Declaration of Conformity. In the event of any modification to the wifi range extender that was not approved by the manufacturer, compliance with these standards is no longer guaranteed. The manufacturer does not accept any liability for any resulting damage or faults in such cases. Please observe the regulations and laws in the country of use. 6 - English

9 Supplied items SilverCrest SWV 300 C1 Check the contents to ensure they are complete. You must notify our Customer Service immediately if parts are missing. A B C SilverCrest Wifi Range Extender SWV 300 C1 2 network cables These operating instructions (symbolic representation) A separate flyer relating to the "GNU General Public License" is enclosed with this wifi range extender. This flyer can also be downloaded at English - 7
 A separate flyer relating to the \"GNU General Public License\" is enclosed with this wifi range")
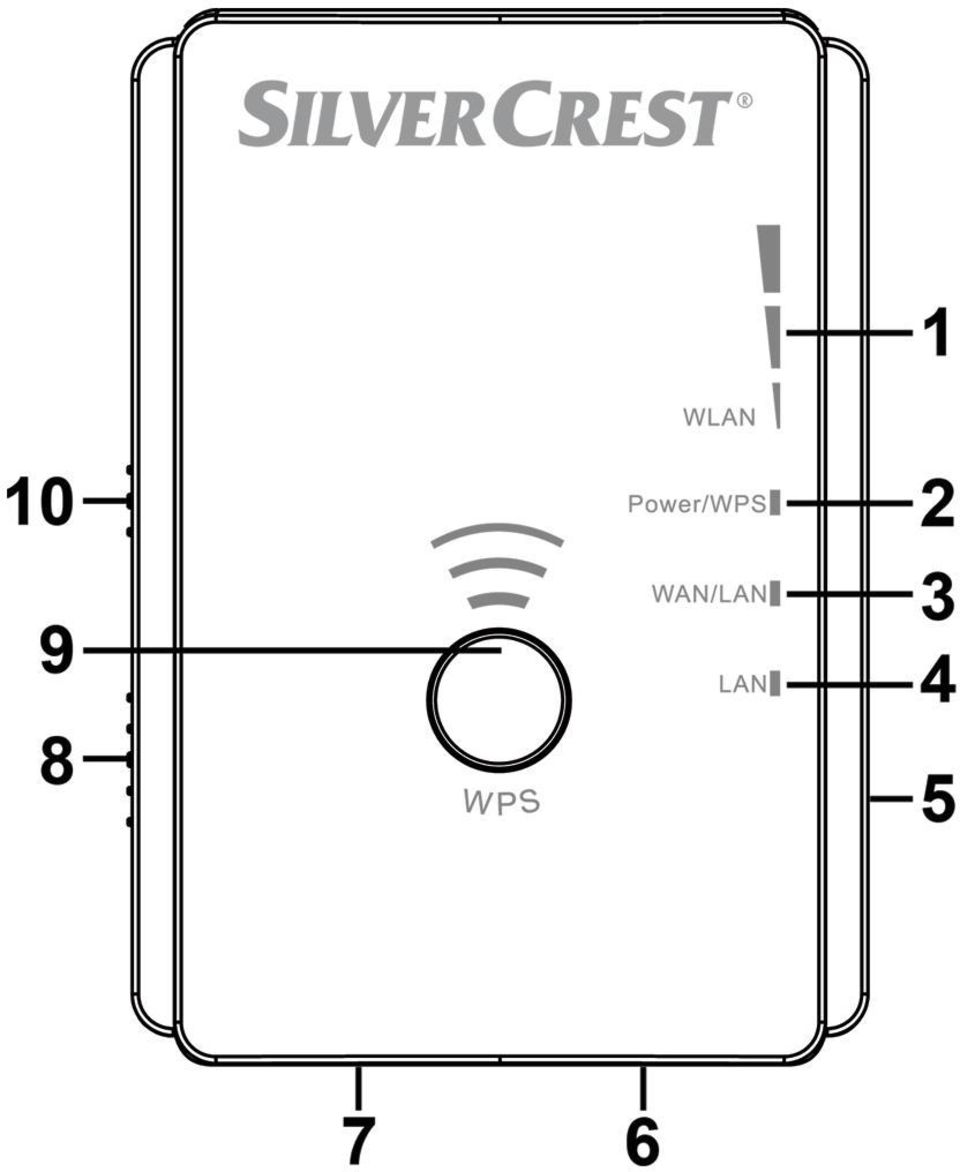
10 Overview These operating instructions have a fold-out cover. The wifi range extender is illustrated with numbers on the inside cover. The numbers indicate the following: 1 Field strength indicator 2 Power/WPS LED 3 WAN/LAN LED 4 LAN LED 5 Reset 6 WAN/LAN socket (network socket, RJ-45) 7 LAN socket (network socket, RJ-45) 8 Mode selector 9 WPS button 10 Main switch 8 - English
 7 LAN socket (network socket, RJ-45)")
11 LED indicators SilverCrest SWV 300 C1 LED Status Meaning Field strength indicator (1) lights up The more bars that light up, the better the reception (all bars light up in AP mode) flashes No reception Power/WPS (2) flashes WPS connection is being established or WPS signal of another device is expected lights up The wifi range extender is switched on off The wifi range extender is switched off WAN/LAN (3) lights up Connection is established off Connection is not established flashes Data is being transferred LAN (4) lights up Connection is established off Connection is not established flashes Data is being transferred English - 9
 lights up Connection is established off Connection is not established flashes Data is being transferred")
12 Technical data Input voltage V~, 50/60 Hz Power consumption max. 6 W WLAN standards b, g, n Frequency band 2.4GHz Data transfer rate up to 300Mbit/s Encryption WPA, WPA2, WEP (128/64) * Dimensions (W x H x D) approx. 54 x 76 x 81mm Weight approx. 88g Operating temperature, air humidity 5 to 35 C; max. 85% rel. humidity Storage temperature, air humidity -20 to 60 C; max. 90% rel. humidity * WEP (128/64) encryption only with b/g. The technical data and design may be changed without notification English
 encryption only with 802.11b/g.")
13 Safety instructions SilverCrest SWV 300 C1 Before using the device for the first time, please read the following instructions carefully even if you are familiar with using electronic devices. Store these operating instructions in a safe place for future reference. If you pass on the wifi range extender to someone else, be sure to always include these instructions as they are an integral part of the device. DANGER! This symbol in conjunction with the "danger" note indicates an imminent dangerous situation which, if not prevented, could result in serious injury or even death. WARNING! This symbol in conjunction with the "warning" note indicates important information for safe operation of the device and the safety of the user. This symbol indicates other important information on the topic. English - 11

14 Operating environment The wifi range extender is not designed for use in environments with a high temperature or humidity (e.g. bathrooms), and must be kept free from dust. Operating temperatures and operating air humidity: 5 C to 35 C, max. 85% rel. humidity. Please always maintain the wifi range extender at a minimum distance of 20 cm from the body to avoid exposure to radio radiation English DANGER! Ensure that no direct heat sources (e.g. heating) can affect the device no direct sunlight or bright artificial light reaches the device the device is not in the immediate vicinity of magnetic fields (e.g. speakers) no fire sources (e.g. burning candles) are placed on or near the device no foreign objects penetrate the device contact with sprayed and dripping water and corrosive liquids is avoided and the device is never operated near water; in particular it should never be immersed (do not place any objects filled with liquids, for example, vases or drinks, on or near the device)
 no fire sources (e.g. burning candles) are placed on or near the device no foreign objects penetrate the device contact with sprayed and dripping water and corrosive liquids is avoided")
15 the device is not subjected to any extreme temperature fluctuations as this could result in condensation and electrical short circuits. If the device was subjected to extreme temperature fluctuations, however, wait (approx. 2 hours) until the device has reached ambient temperature before use the device is never subjected to excessive shocks and vibrations the device is never touched with wet hands as there is a risk of an electric shock the housing openings, which ventilate the wifi range extender, are never covered or enclosed as there is a risk of fire If the aforementioned instructions are not adhered to, it poses a risk to your health or the device could be damaged. DANGER! Operational safety Only connect the wifi range extender to a freely accessible socket so that it can be quickly disconnected from the mains in the event of danger (smoke, fumes or smell of burning). The socket must always be easily accessible during operation also. The main switch (10) of this device does not fully disconnect the device from the mains. Even if the device is not being used, it consumes minimal power. Disconnect the wifi range extender from the mains if the device will not be used for a prolonged period (e.g. during holidays). This minimises the English - 13

16 risk of fire or smouldering, which always exists when an electrical device is connected to the mains power supply. To disconnect the wifi range extender completely from the power supply, you must remove its mains plug from the socket. Always disconnect the wifi range extender from the mains power supply before a storm or thunderstorm if there is the risk of lightning as the wifi range extender can be irreparably damaged by high voltage surges if lightning strikes. Never use any adapter plugs or extension cables which are damaged or which do not comply with valid safety standards. DANGER! Children and persons with disabilities Electrical devices do not belong in the hands of children. Persons with physical, mental or sensory disabilities should also only use electrical devices within the scope of their abilities. Never allow children or persons with disabilities to use electrical devices unsupervised, unless they have been instructed accordingly or are supervised by a person responsible for their safety. Children should always be 14 - English

17 supervised to ensure that they do not play with this device. Small parts can be fatal if swallowed. Always keep plastic packaging out of reach. DANGER! It poses a suffocation risk. DANGER! Radio interface Do not use the device on aircraft, in hospitals, operating rooms or in the vicinity of medical electronic systems. The transmitted radio waves can impair the functionality of sensitive devices. Keep the device at least 20 cm away from any pacemakers or implantable cardioverter defibrillators because the proper functioning of the pacemaker or implantable cardioverter defibrillator can be impaired by radio waves. The transmitted radio waves can cause interference in hearing aids. Do not place the device in the vicinity of flammable gases or in a potentially explosive environment (e.g. paint shop) when the radio components are switched on because the transmitted radio waves can cause an explosion or a fire. The range of the radio waves is dependent on conditions in the surrounding environment. In the event of data traffic via a wireless connection, it is also possible for unauthorised third parties to receive data. Targa GmbH is not responsible for radio or television interference caused by unauthorised changes to English - 15

18 this device. In addition, Targa assumes no responsibility for the replacement or exchange of connecting lines and devices not indicated by Targa GmbH. The user is solely responsible for the elimination of interference caused by such unauthorised changes and for the replacement or exchange of the devices. WARNING! Cables Always handle the cables by the plug and do not pull on the cables themselves. Never place furniture or other heavy objects on the cable and take care that the cable is not kinked, especially near the plug and connection sockets. Never make knots in any of the cables or tie them together with other cables. Ensure that all cables are placed so that no one can trip over them and they do not cause an obstruction English

19 WARNING! Maintenance / cleaning It is necessary to repair the device if it has been damaged in any way, for example, if the housing is damaged, if liquid or objects have penetrated the device or if the product has been exposed to rain or moisture. Repair work is also required if the device is not working properly or has been dropped. If smoke is produced, or there are any unusual sounds or smells, the device must be switched off immediately and its mains plug must be removed from the socket. In such cases, the device should not be used until it has been inspected by authorised service personnel. Only have the device repaired by qualified personnel. Never open the housing of the device. Only use a clean, dry cloth for cleaning and never use any corrosive liquids. Never try to open the housing of the device This would void your warranty. English - 17

20 Storage when not in use If the device will not be used for a long period of time, disconnect the wifi range extender from the mains power supply. Ensure that the storage temperature remains between -20 C and 60 C. The air humidity should not exceed 90% rel. humidity. Note: the temperature range and relative air humidity for storage and use are quite different; please see the information in the "Operating environment" section. Copyright All information contained in these instructions is subject to copyright and is provided for information purposes only. It is only permitted to copy or duplicate data and information with the express and written consent of the author. This also includes commercial use of the content and data. The text and illustrations are based on the state of the art at the time of printing English

21 Prior to use SilverCrest SWV 300 C1 Take the wifi range extender and the accessories out of the packaging and remove all packaging material completely. Check the wifi range extender for signs of damage. If it is damaged, the wifi range extender must not be used. The wifi range extender increases the range of your wireless network. The wifi range extender supports the following three modes: Repeater The range of your wireless network (WLAN) is extended. Thus wireless devices, which are outside the range of your wireless network, can be connected to the network via the wifi range extender. Client You can connect an end device with a LAN interface (for example, computer, notebook or TV set), which has no own wireless network, to the wifi range extender via the LAN cable (network cable). The wifi range extender can now connect your end device wirelessly to an existing wireless router. As we cannot guarantee compatibility with all devices, please read the operating instructions for your device. English - 19
22 Access Point (AP) This mode can be used, for example, to provide a router without its own wireless network as a "wireless router". The router must be connected to the wifi range extender via the LAN cable (network cable, see "Supplied items"). WARNING! Only use the network cable supplied with the device. First use Setting mode Select the desired mode using the mode selector (8). To do so, move the mode selector (8) to the desired position (Access Point, Repeater or Client) English
23 Repeater Mode SilverCrest SWV 300 C1 Repeater Mode is used to extend the range of your wireless network. Wireless devices which are outside the range of your wireless network can be connected to the network via the wifi range extender. Range without wifi range extender Range with wifi range extender The mode selector (8) must be set to the "Repeater" position for Repeater Mode. The wifi range extender should be placed near (approx. 2-3 metres) the wireless router the first time it is used. English - 21
24 Insert the wifi range extender into a socket that is always easily accessible. Then switch on the wifi range extender by turning the main switch (10) to the "ON" position. The wifi range extender requires a certain amount of time (boot time) after it is switched on before it is ready to use. After switching the device on, wait for approximately 30 seconds before using the wifi range extender. There are two different ways to configure the wifi range extender. If your wireless router supports WPS, you can use this simple function to easily set up the wifi range extender. If you would like to use a wireless router without WPS, you must connect the wifi range extender via a network cable or wireless network to your computer and configure it English
25 WPS - The easiest type of configuration SilverCrest SWV 300 C1 This is the easiest way to configure the wifi range extender. First, check whether your wireless router supports WPS. For further details, please read the operating instructions for your wireless router. 1. Press the WPS button (9) on the wifi range extender for at least 6 seconds. The Power/WPS LED (2) now flashes for approx. 2 minutes. 2. Within these 2 minutes, please press the connection button (WPS) on your wireless router. For further details, please read the operating instructions for your wireless router. English - 23
26 (Symbolic representation, connection button (WPS) can be differently arranged and referred to depending on the router model.) The wifi range extender then automatically connects to your wireless router and applies all of the settings. Once the connection has been successfully established, the field strength indicator (1) displays the signal strength. The wifi range extender can then be used. The wifi range extender can be accessed via the SSID (wireless name) and the network key of your wireless router. You can then use the wifi range extender where the wireless signal is to be extended. The optimal location for the wifi range extender is exactly in the middle between your wireless router and the wireless devices which are to be connected to the network using the wifi range extender. Test other locations if the wifi range extender does not work there. Insert the wifi range extender only into a socket that is easily accessible English
27 It is possible to configure multiple wifi range extenders. These should be configured one after the other. If your wireless router does not support WPS or the connection fails for some other reason, you must manually configure the wifi range extender. Manual configuration There are two different ways to configure the wifi range extender. If you are not using the network default settings on your computer and have manually set an IP address, you must restore the network settings to Automatically obtain an IP address. For further details, please read the operating instructions for your computer. 1. You can then configure the wifi range extender via the network cable. If you want to configure the wifi range extender via the network cable, you must connect the wifi range extender to your computer. Use the network cable included with the device for this purpose. Insert one end of the network cable into the WAN/LAN socket (6) or the LAN socket (7) of the wifi range extender and the other end into the LAN socket of your computer. English - 25
28 2. Alternatively, you can perform the configuration via a wireless network. To do so, start the search for available wireless networks on your computer. The network SWV 300 C1 is displayed in the list of available wireless networks. Select the network SWV 300 C1 and click on the Connect button to connect wirelessly to the wifi range extender. After having pressed the Connect button, you may have to click the option Connect without configuring the network. Open the Internet browser on your computer. Enter in the address line of the Internet browser and confirm the entry with the Enter button. The login window of the wifi range extender opens. Select the desired language and enter admin as the user name and password. Then click on the Submit button. The configuration menu of the wifi range extender will then open. Perform the configuration using the wizard. To do so, click on the Repeater button in the Wizard field English
29 From the list, select a wireless network whose range you want to extend by choosing the corresponding network in the "Select" field. English - 27
30 After having selected a wireless network, you can then specify any SSID for the wifi range extender for Wireless SSID. Enter the network key of your wireless router for Security key. Set the check mark for Unmask to display the registered security key. After completing the entry, click on the Apply button English
31 This will reboot the wifi range extender. Wait approximately 30 seconds before making any further entries. After the reboot has been completed, the wifi range extender is accessible under the specified SSID and the network key of your wireless router. If you would like to return to the configuration menu, you can click on WIFI Repeater in the title bar or enter repeater.setup in the address line of the Internet browser. Note that a connection must be English - 29
32 established with the wifi range extender for this purpose. To do so, connect the wifi range extender if necessary to your computer via a network cable. Once the connection has been successfully established, the field strength indicator (1) displays the signal strength. The wifi range extender can then be used. The wifi range extender can now be accessed via the previously specified SSID (wireless name) and the network key of your wireless router. You can then use the wifi range extender where the wireless signal is to be extended. The optimal location for the wifi range extender is exactly in the middle between your wireless router and the wireless devices which are to be connected to the network using the wifi range extender. Test other locations if the wifi range extender does not work there. Insert the wifi range extender only into a socket that is easily accessible. If you would like to open the configuration menu, you must ensure that there is a valid connection to the wifi range extender. To do so, connect the wifi range extender if necessary to your computer via a network cable English
33 Client Mode SilverCrest SWV 300 C1 Client Mode enables end devices with a LAN interface (for example, computer, notebook or TV set), which have no own wireless network, to connect wirelessly to an existing wireless router. Example of use: The mode selector (8) must be set to the "Client" position for Client Mode. The wifi range extender should be placed near (approx. 2-3 metres) the wireless router the first time it is used. English - 31
34 Insert the wifi range extender into a socket that is always easily accessible. Then switch on the wifi range extender by turning the main switch (10) to the "ON" position. The wifi range extender requires a certain amount of time (boot time) after it is switched on before it is ready to use. After switching the device on, wait for approximately 30 seconds before using the wifi range extender. There are two different ways to configure the wifi range extender. If your wireless router supports WPS, you can use this simple function to easily set up the wifi range extender. If you would like to use a wireless router without WPS, you must connect the wifi range extender to your computer via a network cable and configure it English
35 WPS - The easiest type of configuration SilverCrest SWV 300 C1 This is the easiest way to configure the wifi range extender. First, check whether your wireless router supports WPS. For further details, please read the operating instructions for your wireless router. 1. Press the WPS button (9) on the wifi range extender for at least 6 seconds. The Power/WPS LED (2) now flashes for approx. 2 minutes. 2. Within these 2 minutes, please press the connection button (WPS) on your wireless router. For further details, please read the operating instructions for your wireless router. English - 33
36 (Symbolic representation, connection button (WPS) can be differently arranged and referred to depending on the router model.) The wifi range extender then automatically connects to your wireless router and applies all of the settings. Once the connection has been successfully established, the field strength indicator (1) displays the signal strength. You can then use the wifi range extender where your end device is to be connected wirelessly with your router. Connect the wifi range extender to your end device. Use the network cable included with the device for this purpose. Insert one end of the network cable into the WAN/LAN socket (6) or the LAN socket (7) of the wifi range extender and the other end into the LAN socket of your end device. Insert the wifi range extender only into a socket that is easily accessible. If your wireless router does not support WPS or the connection fails for some other reason, you must manually configure the wifi range extender English
37 Manual configuration SilverCrest SWV 300 C1 If you are not using the network default settings on your computer and have manually set an IP address, you must restore the network settings to Automatically obtain an IP address. For further details, please read the operating instructions for your computer. You then have to configure the wifi range extender via the network cable. To do so, you have to connect the wifi range extender to your computer. Use the network cable included with the device. Insert one end of the network cable into the WAN/LAN socket (6) or the LAN socket (7) of the wifi range extender and the other end into the LAN socket of your computer. Open the Internet browser on your computer. Enter in the address line of the Internet browser and confirm the entry with the Enter button. The login window of the wifi range extender opens. Select the desired language and enter admin as the user name and password. Then click on the Submit button. The configuration menu of the wifi range extender will then open. English - 35
38 Perform the configuration using the wizard. To do so, click on the Client button in the Wizard field English
39 From the list, select a wireless network with which you want to connect the wifi range extender by choosing the corresponding network in the "Select" field. English - 37
40 After having selected a wireless network, you must then specify the network key of your wireless router for Security key. Set the check mark for Unmask to display the registered security key. After completing the entry, click on the Apply button English
41 This will reboot the wifi range extender. Wait approximately 30 seconds before making any further entries. After the reboot has been completed, you can connect the wifi range extender to your end device (for example, computer, notebook or TV set) via the network cable. Use the network cable included with the device for this purpose. Insert one end of the network cable into the WAN/LAN socket (6) or the LAN socket (7) of the wifi range extender and the other end into the LAN socket of your end device. Insert the wifi range extender only into a socket that is easily accessible. English - 39
42 Access Point (AP) Mode (Router Mode) Use the AP Mode to obtain a "wireless access point". The wireless end devices will connect to the wifi range extender in this mode. You can also use this mode, for example, to make a formerly non-wirelessenabled router wireless-enabled. Example of use: The mode selector (8) must be set to the "Access Point" position for AP Mode English
43 Insert the wifi range extender into a socket that is always easily accessible. SilverCrest SWV 300 C1 Then switch on the wifi range extender by turning the main switch (10) to the "ON" position. The wifi range extender requires a certain amount of time (boot time) after it is switched on before it is ready to use. After switching the device on, wait for approximately 30 seconds before using the wifi range extender. English - 41
44 There are two different ways to configure the wifi range extender. If you are not using the network default settings on your computer and have manually set an IP address, you must restore the network settings to Automatically obtain an IP address. For further details, please read the operating instructions for your computer. 1. You can then configure the wifi range extender via the network cable. If you want to configure the wifi range extender via the network cable, you must connect the wifi range extender to your computer. Use the network cable included with the device for this purpose. Insert one end of the network cable into the WAN/LAN socket (6) or the LAN socket (7) of the wifi range extender and the other end into the LAN socket of your computer. 2. Alternatively, you can perform the configuration via a wireless network. To do so, start the search for available wireless networks on your computer. The network SWV 300 C1 is displayed in the list of available wireless networks. Select the network SWV 300 C1 and click on the Connect button to connect wirelessly to the wifi range extender. After having pressed the Connect button, you may have to click the option Connect without configuring the network. Open the Internet browser on your computer. Enter in the address line of the Internet browser and confirm the entry with the Enter button English
45 The login window of the wifi range extender opens. Select the desired language and enter admin as the user name and password. Then click on the Submit button. The configuration menu of the wifi range extender will then open. Perform the configuration using the wizard. To do so, click on the AP button in the Wizard field to configure the wifi range extender as an access point. To configure the wifi range extender as a router, click on the Router button. In this mode, for example, you can use a DSL modem as a wireless router if it is connected to the wifi range extender. As a result, your end devices can connect wirelessly to the wifi range extender and use the Internet connection via your DSL modem and Internet service provider. English - 43
46 If you have selected Router Mode, you then have to select the type of Internet access. The following options can be selected: Internet service providers offer a fixed IP address the IP address must be fixed with this option. Contact your Internet service provider for the IP address. Automatically obtain an IP address the IP address is assigned automatically by the Internet service provider with this option. No further entries are required here. ADSL dial-up you must specify the user name and password for your Internet service provider with this option. Contact your Internet service provider for the user name and password English
47 Enter any SSID for the wifi range extender for SSID. With Channel, you can set a channel number or use the Auto option to enable the automatic assignment of a channel number. Select an encryption for Security type to protect your network against unauthorised access. You can also set up the network as unsecured by selecting the Disable option. However, we would recommend that you set up an encryption. English - 45
48 After having selected an encryption, you must then specify a network key for Security key. Set the check mark for Unmask to display the registered security key. Take particular note of the network key or keep it in a safe place. After completing the entry, click on the Apply button English
49 This will reboot the wifi range extender. Wait approximately 30 seconds before making any further entries. After the reboot has been completed, the wifi range extender is accessible under the specified SSID and the network key. English - 47
50 WPS - Connect to the AP (Router Mode) This is the easiest way to establish a connection to the AP. First, check whether your end device supports WPS. For further details, please read the operating instructions for your end device. 1. Press the WPS button (9) on the wifi range extender for at least 3 seconds. The Power/WPS LED (2) now flashes for approx. 2 minutes. 2. Within these 2 minutes, please press the connection button (WPS) on your end device. For further details, please read the operating instructions for your end device English
51 Your end device then automatically connects to your wifi range extender (AP) and applies all of the settings. You can then access the wifi range extender (AP) wirelessly. If your end device does not support WPS, you can also manually establish the connection to the wifi range extender (AP). Manual connection to the AP For a manual connection to the wifi range extender (AP), you must find available wireless networks on your end device. The wifi range extender (AP) is displayed under the specified SSID (wireless name) in the list of available wireless networks. Then select the corresponding SSID (wireless name) to connect your end device wirelessly with the wifi range extender (AP). Then enter the network key you assigned. For further details, please read the operating instructions for your end device. English - 49
52 Configuration menu of the wifi range extender You can open the configuration menu of the wifi range extender on your computer with an Internet browser. In this configuration menu, you can make advanced settings of the wifi range extender, display information or install a new firmware version. There are two different ways to configure the wifi range extender. If you are not using the network default settings on your computer and have manually set an IP address, you must restore the network settings to Automatically obtain an IP address. For further details, please read the operating instructions for your computer. 1. You can then configure the wifi range extender via the network cable. If you want to configure the wifi range extender via the network cable, you must connect the wifi range extender to your computer. Use the network cable included with the device for this purpose. Insert one end of the network cable into the WAN/LAN socket (6) or the LAN socket (7) of the wifi range extender and the other end into the LAN socket of your computer. 2. Alternatively, you can perform the configuration via a wireless network. To do so, start the search for available wireless networks on your computer. The network SWV 300 C1 is displayed in the list of available wireless networks. Select the network SWV 300 C1 and click on the Connect 50 - English
53 button to connect wirelessly to the wifi range extender. After having pressed the Connect button, you may have to click the option Connect without configuring the network. If you use the wifi range extender in Client Mode (mode selector is at "Client"), the configuration is possible only via the network cable. After you have established the connection as previously described, open the Internet browser on your computer. Enter in the address line of the Internet browser and confirm the entry with the Enter button. The login window of the wifi range extender opens. Select the desired language and enter admin as the user name and password. Then click on the Submit button. English - 51
54 The configuration menu of the wifi range extender will then open. You can close the configuration menu by clicking on the Log off button on the top right of the display. The configuration menu is divided into the following headings: 52 - English
55 Wizard SilverCrest SWV 300 C1 This Wizard enables the easy configuration of your wifi range extender. The currently set mode (Repeater, Client or AP) is displayed here. To start the Wizard, click on the Repeater, Client, AP or Router button. Follow the on-screen instructions of the Wizard. Wireless status Information about the wireless network of the wifi range extender is displayed here. Note that, depending on the selected mode (Repeater, Client or AP) of the wifi range extender, it is possible that not all options are displayed. Mode The operating mode that is currently set for the wifi range extender is displayed here. Status The current status of the wifi range extender is displayed here. SSID The SSID of the wifi range extender is displayed here. English - 53
56 Connected to This displays the wireless device which is connected to the wifi range extender. Channel The channel which is used by the wifi range extender is displayed here. Security This displays the encryption which is used by the wifi range extender. Clients This displays the number of clients (end devices) with which the wifi range extender is connected English
57 WiFi (Wireless) SilverCrest SWV 300 C1 You can make additional settings for the wireless network here. To do so, click on the icon or directly on the desired option. Basic Settings Wireless Enable You can enable or disable the wireless network here. To do so, click on the Enabled/Disable button. The wireless network is enabled if the Enabled/Disable button is green. The wireless network is disabled if the Disabled/Enable button is grey. Please note that wireless access to the wifi range English - 55
58 extender is no longer possible if it is disabled. Connect the wifi range extender via a network cable to your computer in order to regain access to the wifi range extender. SSID You can adjust the SSID (wireless name) of the wifi range extender here. The SSID of the router is specified here in Repeater Mode. Channel Set a channel number or choose the Auto option to enable the automatic assignment of a channel number. Security type Set an encryption for the network here. Click on the Apply button to confirm changed settings. This will reboot the wifi range extender. Wait approximately 30 seconds before making any further entries. We recommend that you use WPA/WPA2 PSK encryption because it provides maximum security. If your wireless devices do not support WPA/WPA2 PSK encryption, you have to use other encryption English
59 Advanced Settings SilverCrest SWV 300 C1 English - 57
60 This option should only be used by experienced users. Network settings can be made here. As the settings have to be customised to your network, they will not be discussed further here. You can obtain more information via our service hotline (see page 78). Click on the Apply button to confirm changed settings. WPS WPS Enable WPS is enabled in the original condition of the device. You can enable or disable WPS here. Click on the Enabled/Disable button to disable WPS. WPS is enabled if the Enabled/Disable button is green. WPS is disabled if the Disabled/Enable button is grey. Click on the Disabled/Enable button to enable WPS. Please note that when WPS is disabled, there can be no connection to the wireless device via WPS. The WPS button (9) on the wifi range extender does not work also English
61 PIN SilverCrest SWV 300 C1 The WPS PIN of the wifi range extender is displayed here. You can use this WPS PIN to connect the wifi range extender to your wireless router. To do so, your wireless router must support the WPS PIN method. Enter the WPS PIN on your wireless router. For further details, please read the operating instructions for your wireless router. The wifi range extender then automatically connects to your wireless router and applies all of the settings. Once the connection has been successfully established, the field strength indicator (1) lights up. The wifi range extender can then be used. Start PBC / Stop PBC Here, you can connect the wifi range extender to a WPS-enabled end device. Click on the Start PBC button to start WPS. The Power/WPS LED (2) of the wifi range extender now flashes for approximately 2 minutes. Within these 2 minutes, please press the connection button (WPS) on your end device. For further details, please read the operating instructions for your end device. The wifi range extender then automatically connects to your end device. Once the connection has been successfully established, the field strength indicator (1) lights up. The wifi range extender can then be used. You can stop WPS by clicking on the Stop PBC button. Status The current WPS status of the wifi range extender is displayed here. The following indicators are possible: Idle The WPS scan was not started yet, Started The WPS scan was started, Connecting The WPS connection is established, Successfully The WPS connection has been English - 59
62 successfully established, Failed The WPS connection failed, Overlap Several devices try to establish a WPS connection at the same time and Timeout! The WPS connection could not be established due to the timeout English
63 Schedule SilverCrest SWV 300 C1 The Schedule option is available only in AP and Repeater Mode. English - 61
64 Here, you can set a timer for the wireless network to switch it on and off automatically. To do so, click on the Disabled/Enable button. If the Enabled/Disable button is green, the timer for the wireless network is enabled. If the Disabled/Enable button is grey, the timer for the wireless network is disabled. Once the timer for the wireless network is enabled, you can set up to 10 rules. To enable a rule, click on the relevant box in the Enable column. In the relevant row, select the desired day or Everyday for every day. Then specify the period of time when the wireless network is to be switched on. Click on the Apply button to confirm changed settings. The wifi range extender requires an Internet connection for the Schedule option. Also note a possible overlap with a timer on your router, that is, that this can only switch off the wireless network after the repeater. In the "Time zone settings" menu of the wifi range extender, check whether the time and date are set correctly English
65 Network SilverCrest SWV 300 C1 The IP address used, the set DHCP Mode and the MAC address of the wifi range extender are displayed directly here. Click on the "Network" icon to adjust the network settings. IP address You can change the IP address of the wifi range extender here. DHCP You can set the DHCP Mode here. The following options can be selected: Disable, Server and Auto. The Auto option is enabled in the original condition of the device. With the Auto option, IP addresses are assigned automatically. The assignments are permanent here and are not removed. The English - 63
66 advantage here is that an end device always has the same IP address. The disadvantage is that new end devices do not receive an IP address if the address range is completely assigned, even if IP addresses are no longer actively used. This is in contrast to the Server option where IP addresses are assigned automatically and recorded in a table. The assignment is not permanent here, however, and end devices may be assigned another IP address. Click on the Apply button to confirm changed settings or on Cancel to discard the changed settings English
67 Management SilverCrest SWV 300 C1 Here, you can make additional settings or install a new firmware version. Click on the "Management" icon or directly on the desired option: English - 65
68 Password Here, you can change the preset password (admin) for the login to the wifi range extender. To do so, enter a user name and then enter the new password twice. To confirm the changed password, click on the Apply button or on Cancel to cancel it. Take particular note of the user name and password or keep it in a safe place! 66 - English
69 Time zone settings You can set the date and time here. To do so, enter the date and time in the relevant fields. SilverCrest SWV 300 C1 English - 67
70 For Time zone, enter the relevant time zone in which you are located. A check mark is set for Enable NTP client update to synchronize the time via an NTP server (Network Time Protocol). The time and date are synchronized here with a server via the Internet. Enable the automatic conversion of summer/winter time by setting a check mark for Automatically adjust daylight saving. Now select a specified NTP server in the NTP server field or specify the address of an NTP server in the Manual NTP setting field. To confirm the changed settings, click on the Apply button. You can refresh the view by clicking on the Refresh button English
71 LED control SilverCrest SWV 300 C1 The LEDs of the wifi range extender can be switched on or off here. However, this has no effect on the Power/WPS LED (2) as it cannot be switched off. Click on the OFF button to switch off the LEDs. To switch on the LEDs again, you must click on the ON button. Please note that the wifi range extender reboots after switching the LEDS on or off. English - 69
72 Save/Reload settings You can save, load and reset the configuration of the wifi range extender here. Click on the Save... button to save the configuration of the wifi range extender to a file on your computer. To select a backed-up configuration, click on the Browse... button and then select the desired configuration file on your computer. Now click on the Upload button to load the previously selected configuration file English
73 Click on the Load default button to reset the wifi range extender to the factory default settings. Confirm the following confirmation prompt with OK to finally load the factory default settings or click Cancel to cancel the process. Note that all previously changed settings are lost when resetting to the factory default settings. English - 71
74 Upgrading firmware If you have received a new firmware version, you can install it. To do so, click on the Browse... button and then select the new firmware version on your computer. Then follow the on-screen instructions to install the firmware version. Note that when upgrading the firmware, the wifi range extender is reset to factory default settings and all previously changed settings are lost English
75 Reboot Device The wifi range extender can be rebooted here. SilverCrest SWV 300 C1 To do so, click on the Reboot button. Confirm the following confirmation prompt with OK to finally reboot the wifi range extender or click Cancel to cancel the process. Status The firmware version used, the operating time since it was last switched on, and the creation date (build time) of the installed firmware version of the wifi range extender are displayed here. Click on the "Status" icon to display additional information. Detailed information on the system, WLAN and LAN is then displayed. English - 73
76 Environmental and disposal information When this symbol appears on a product, this indicates that the product is subject to the European Directive 2012/19/EU. All electrical and electronic devices must be disposed of separately from household waste at designated disposal points. Disposal of old devices in this manner will prevent harm to the environment and human health hazards. For further information regarding disposal of old devices in accordance with the directive, contact your local authorities, waste disposal office or the shop where you bought the device. Dispose of the packaging in an environmentally compatible manner. Cardboard can be put out for municipal paper collections or brought to public collection points for recycling. Films and plastic used for packaging the device are collected by your local disposal services and disposed of in an environmentally compatible manner English
77 Conformity information SilverCrest SWV 300 C1 This device meets the basic requirements and other relevant regulations of the Low Voltage Directive 2006/95/EC, the R&TTE Directive 1999/5/EC, the ErP Directive 2009/125/EC and the RoHS Directive 2011/65/EU. The Declaration of Conformity can be found at the end of this manual. Troubleshooting You can solve most problems yourself using the following table. If the problem still persists after you have worked through these approaches, contact our service hotline (see page 78). Do not perform any repairs personally! The Power/WPS LED (2) does not light up. Check whether the main switch (10) is in the "ON" position. Socket defective or fuse tripped; use another device to check the socket. No wireless connection to the wireless router The distance to the wireless router is too great, thus reduce it. The router's wireless function is disabled; enable the wireless function. English - 75
78 No LAN connection Check whether the network cable is inserted correctly into the WAN/LAN socket (6) or LAN socket (7) of the wifi range extender and into the LAN socket of your end device. Connection with the WPS button fails Establish the connection with the WPS button again. Reset the wifi range extender to the factory default settings. Press the Reset button (5) for approximately 10 seconds with a sharp object until the Power/WPS LED (2) goes out. This will reboot the wifi range extender. The wifi range extender requires a certain amount of time (boot time) before it is ready to use. Wait for approximately 30 seconds before using the wifi range extender. Then establish the connection with the WPS button again. Eliminate sources of interference between the wifi range extender and the wireless router. The distance between the wifi range extender and the wireless router is too great, thus reduce it. The configuration menu of the wifi range extender is not shown. The address was entered into the address line of the Internet browser incorrectly; check and correct the entry. The configuration of the wifi range extender is incorrect. Reset the wifi range extender to the factory default settings. To do so, press the Reset button (5) for approximately 10 seconds with a sharp object until the Power/WPS LED (2) goes out. This will reboot the wifi range extender. The wifi range 76 - English
79 extender requires a certain amount of time (boot time) before it is ready to use. Wait for approximately 30 seconds before using the wifi range extender. Warranty and servicing advice Warranty of TARGA GmbH This device is sold with three years warranty from the date of purchase. Please keep the original receipt in a safe place as proof of purchase. Before using your product for the first time, please read the enclosed documentation. Should any problems arise which cannot be solved in this way, please call our hotline. Please have the article number and, if available, the serial number to hand for all enquiries. If it is not possible to solve the problem on the phone, our hotline support staff will initiate further servicing procedures depending on the fault. Within the warranty period the product will be repaired or replaced free of charge as we deem appropriate. No new warranty period commences if the product is repaired or replaced. Consumables such as batteries, rechargeable batteries and lamps are not covered by the warranty. Your statutory rights towards the seller are not affected or restricted by this warranty. English - 77
80 Service Phone: Phone: Phone: Phone: IAN: Manufacturer TARGA GmbH Coesterweg SOEST GERMANY 78 - English
81 Innehåll Inledning Avsedd användning Leveransomfattning Översikt LED-indikatorer Tekniska data Säkerhetsanvisningar Förvaring när den inte används Upphovsrätt Före idrifttagningen Idrifttagning Svenska - 79
82 Ställa in läget Repeater-läge (Repeterare) WPS - det enklaste sättet att konfigurera Manuell konfiguration Klient-läge WPS - det enklaste sättet att konfigurera Manuell konfiguration Access Point-läge (AP) (router-läge) WPS - anslutning till Access Point (router-läge) Manuell anslutning till Access Point WLAN-förstärkarens konfigurationsmeny Guide WLAN-status WiFi Svenska
Beijer Electronics AB 2000, MA00336A, 2000-12
 Demonstration driver English Svenska Beijer Electronics AB 2000, MA00336A, 2000-12 Beijer Electronics AB reserves the right to change information in this manual without prior notice. All examples in this
Support Manual HoistLocatel Electronic Locks
 Support Manual HoistLocatel Electronic Locks 1. S70, Create a Terminating Card for Cards Terminating Card 2. Select the card you want to block, look among Card No. Then click on the single arrow pointing
Quick Start Guide Snabbguide
 Quick Start Guide Snabbguide C Dictionary Quick Start Thank you for choosing C Dictionary and C-Pen as your translation solution. C Dictionary with its C-Pen connection will make translation easy and enable
INSTALLATION INSTRUCTIONS
 INSTALLATION - REEIVER INSTALLATION INSTRUTIONS RT0 RF WIRELESS ROOM THERMOSTAT AND REEIVER MOUNTING OF WALL MOUTING PLATE - Unscrew the screws under the - Pack contains... Installation - Receiver... Mounting
InstalationGuide. English. MODEL:150NHighGain/30NMiniUSBAdapter
 miraclebox miraclewifi InstalationGuide English MODEL:150NHighGain/30NMiniUSBAdapter ENGLISH MIRACLE WIFI 150N & 300N USERMANUAL MIRACLEBOX.SE 1 ENGLISH Table of Contents Package Contents... 3 System Requirements
Boiler with heatpump / Värmepumpsberedare
 Boiler with heatpump / Värmepumpsberedare QUICK START GUIDE / SNABBSTART GUIDE More information and instruction videos on our homepage www.indol.se Mer information och instruktionsvideos på vår hemsida
Instruction Manual. Svenska, English. Power Bank. Model: PRBN
 Instruction Manual Svenska, English Power Bank Model: PRBN Innehåll / Content Innehåll Säkerhetsföreskrifter... 4 Delar... 5 Specifikationer... 6 Miljö / Lag och säkerhet / Förbehåll... 7 Content Safety
Schenker Privpak AB Telefon VAT Nr. SE Schenker ABs ansvarsbestämmelser, identiska med Box 905 Faxnr Säte: Borås
 Schenker Privpak AB Interface documentation for web service packageservices.asmx 2012-09-01 Version: 1.0.0 Doc. no.: I04304b Sida 2 av 7 Revision history Datum Version Sign. Kommentar 2012-09-01 1.0.0
IMPORTANT! RETAIN FOR FUTURE REFERENCE PLEASE READ CAREFULLY VIKTIGT! BEHÅLL FÖR FRAMTIDA REFERENSLÄS IGENOM INSTRUKTIONSMANUALEN NOGGRANT
 13060 Basic Cot One Instruction Manual Instruktion Manual IMPORTANT! RETAIN FOR FUTURE REFERENCE PLEASE READ CAREFULLY VIKTIGT! BEHÅLL FÖR FRAMTIDA REFERENSLÄS IGENOM INSTRUKTIONSMANUALEN NOGGRANT Thank
1. Unpack content of zip-file to temporary folder and double click Setup
 Instruktioner Dokumentnummer/Document Number Titel/Title Sida/Page 13626-1 BM800 Data Interface - Installation Instructions 1/8 Utfärdare/Originator Godkänd av/approved by Gäller från/effective date Mats
2.1 Installation of driver using Internet Installation of driver from disk... 3
 &RQWHQW,QQHKnOO 0DQXDOÃ(QJOLVKÃ'HPRGULYHU )RUHZRUG Ã,QWURGXFWLRQ Ã,QVWDOOÃDQGÃXSGDWHÃGULYHU 2.1 Installation of driver using Internet... 3 2.2 Installation of driver from disk... 3 Ã&RQQHFWLQJÃWKHÃWHUPLQDOÃWRÃWKHÃ3/&ÃV\VWHP
Installation Instructions
 Installation Instructions (Cat. No. 1794-IE8 Series B) This module mounts on a 1794 terminal base unit. 1. Rotate keyswitch (1) on terminal base unit (2) clockwise to position 3 as required for this type
Installationsguide. EG200 Multi WAN Residential Gateway. v
 Installationsguide v. 2018-11-29 1 STATUS 3 5 2 4 WAN INTERNET Ovansida WIFI ETHERNET Baksida 7 TELE 6 8 WPS EXT Den här installationsguiden hjälper dig att installera Inteno. kopplas in i ditt Ethernet-baserade
SAFETY PRECAUTIONS SPECIFICATIONS
 SAFETY PRECAUTIONS Read the instructions carefully before use and save them for future reference. Before you connect the appliance: Ensure that the voltage rating on the type plate corresponds to your
Installationsguide. DG200 Multi WAN Residential Gateway V
 Installationsguide Multi WAN Residential Gateway V. 2018-07-9 Multi WAN Residential Gateway Ovansida 1 3 5 7 STATUS INTERNET TELE 2 4 6 8 WAN WIFI WPS EXT Baksida USB DSL LAN1 LAN2 LAN3 LAN4 WAN TEL2 TEL1
IMPORTANT! RETAIN FOR FUTURE REFERENCE PLEASE READ CAREFULLY VIKTIGT! BEHÅLL FÖR FRAMTIDA REFERENS LÄS IGENOM INSTRUKTIONSMANUALEN
 Heart & Stripes Junior Bed Instructions Manual Instruktions Manual IMPORTANT! RETAIN FOR FUTURE REFERENCE PLEASE READ CAREFULLY VIKTIGT! BEHÅLL FÖR FRAMTIDA REFERENS LÄS IGENOM INSTRUKTIONSMANUALEN Thank
ARC 32. Tvättställsblandare/Basin Mixer. inr.se
 ARC 32 Tvättställsblandare/Basin Mixer inr.se SE Användning och skötsel Manualen är en del av produkten. Bevara den under hela produktens livscykel. Vi rekommenderar er att noggrant läsa igenom manualen
Lösenordsportalen Hosted by UNIT4 For instructions in English, see further down in this document
 Lösenordsportalen Hosted by UNIT4 For instructions in English, see further down in this document Användarhandledning inloggning Logga in Gå till denna webbsida för att logga in: http://csportal.u4a.se/
2.45GHz CF Card Reader User Manual. Version /09/15
 2.45GHz CF Card Reader User Manual Version 2.0 2008/09/15 Install SYRD245-CF Card Reader to PDA: 1. Explorer SYRD245-CF folder of SYRIS Xtive CD-ROM 2. Check your PDA OS (Mobile5 or PPC2003) NETCF V2 currently
SAFETY PRECAUTIONS SPECIFICATIONS
 SAFETY PRECAUTIONS Read the instructions carefully before use and save them for future reference. Before you connect the appliance: Ensure that the voltage rating on the type plate corresponds to your
Quick Start Guide. To switch the TV on. cable to connect the two units together. To select the TV broadcasts. To HDMI connection on.
 Quick Start Guide 1 Insert the batteries into the remote control Lift the cover on the back of the remote upward gently. Install two AAA batteries. Make sure to match the + and - ends of the batteries
Problem som kan uppkomma vid registrering av ansökan
 Problem som kan uppkomma vid registrering av ansökan Om du har problem med din ansökan och inte kommer vidare kan det bero på det som anges nedan - kolla gärna igenom detta i första hand. Problem vid registrering
Komponenter Removed Serviceable
 Komponenter Removed Serviceable Presentatör Jonas Gränge, Flygteknisk Inspektör Sjö- och luftfartsavdelningen Fartygs- och luftfartygsenheten Sektionen för Underhållsorganisationer 1 145.A.50(d): När en
Isolda Purchase - EDI
 Isolda Purchase - EDI Document v 1.0 1 Table of Contents Table of Contents... 2 1 Introduction... 3 1.1 What is EDI?... 4 1.2 Sending and receiving documents... 4 1.3 File format... 4 1.3.1 XML (language
IPCorder KNR-412 Installation manual
 IPCorder KNR-412 Installation manual September 28, 2008 2 Contents 1 Installation 5 1.1 Package contents......................................... 5 1.2 Disk installation.........................................
Användarhandbok. MHL to HDMI Adapter IM750
 Användarhandbok MHL to HDMI Adapter IM750 Innehåll Inledning...3 MHL to HDMI Adapter-översikt...3 Komma igång...4 Smart Connect...4 Uppgradera Smart Connect...4 Använda MHL to HDMI Adapter...5 Ansluta
Information technology Open Document Format for Office Applications (OpenDocument) v1.0 (ISO/IEC 26300:2006, IDT) SWEDISH STANDARDS INSTITUTE
 v1.0 (ISO/IEC 26300:2006, IDT) SWEDISH STANDARDS INSTITUTE") SVENSK STANDARD SS-ISO/IEC 26300:2008 Fastställd/Approved: 2008-06-17 Publicerad/Published: 2008-08-04 Utgåva/Edition: 1 Språk/Language: engelska/english ICS: 35.240.30 Information technology Open Document
SVENSK STANDARD SS-ISO/IEC 26300:2008 Fastställd/Approved: 2008-06-17 Publicerad/Published: 2008-08-04 Utgåva/Edition: 1 Språk/Language: engelska/english ICS: 35.240.30 Information technology Open Document
Windlass Control Panel v1.0.1
 SIDE-POWER Windlass Systems 86-08950 Windlass Control Panel v1.0.1 EN Installation manual Behåll denna manual ombord! S Installations manual SLEIPNER AB Kilegatan 1 452 33 Strömstad Sverige Tel: +46 525
Dokumentnamn Order and safety regulations for Hässleholms Kretsloppscenter. Godkänd/ansvarig Gunilla Holmberg. Kretsloppscenter
 1(5) The speed through the entire area is 30 km/h, unless otherwise indicated. Beware of crossing vehicles! Traffic signs, guardrails and exclusions shall be observed and followed. Smoking is prohibited
Schenker Privpak AB Telefon 033-178300 VAT Nr. SE556124398001 Schenker ABs ansvarsbestämmelser, identiska med Box 905 Faxnr 033-257475 Säte: Borås
 Schenker Privpak AB Interface documentation for web service packageservices.asmx 2010-10-21 Version: 1.2.2 Doc. no.: I04304 Sida 2 av 14 Revision history Datum Version Sign. Kommentar 2010-02-18 1.0.0
Installation av F13 Bråvalla
 Website: http://www.rbdesign.se Installation av F13 Bråvalla RBDESIGN FREEWARE - ESCK Norrköping-Bråvalla 1. Ladda ner och packa upp filerna i en mapp som du har skapat på ett lättöverskådligt ställe utanför
BEAM. Product Manual Produktmanual
 BEAM Product Manual Produktmanual BEAM Technical Specifications Tekniska Specifikationer Description Product number Mode Voltage Current Vehicle interface Cable length Encapsulation Operating temperature
BBT057/ BBC057 BBCD057/ BBT057-NL HOLDEN COLORADO 9/2016+ HOLDEN TRAILBLAZER WD & 4WD Models
 INSTALLATION GUIDE BBT057/ BBC057 BBCD057/ BBT057-NL HOLDEN COLORADO 9/2016+ HOLDEN TRAILBLAZER 2017+ 2WD & 4WD Models Ironman 4x4 BBT/ BBC/ BBCD/BBT057-NL Bull Bars fit to a Holden Colorado 9/2016+ It
81152 TRANSFER CASE SHIFT HANDLE
 Installation Instructions for TRANSFER CASE SHIFT HANDLE for 2007 2018 JEEP JK WRANGLER 1 2 3 ITEM NO. PART NO. DESCRIPTION QTY. 1 4101359 SHIFT KNOB, JEEP WRANGLER JK, MOLDED 1 2 1794720 JAM NUT, 3/8
SkillGuide. Bruksanvisning. Svenska
 SkillGuide Bruksanvisning Svenska SkillGuide SkillGuide är en apparat utformad för att ge summativ återkoppling i realtid om hjärt- och lungräddning. www.laerdal.com Medföljande delar SkillGuide och bruksanvisning.
Wi-Fi travel router for ipad and mobile devices
 Wi-Fi travel router for ipad and mobile devices Product ID: R150WN1X1T This Wireless N travel router lets you create a portable wireless hot-spot from a wired network connection or an existing wireless
BREDBAND MBIT REGISTRERA DIG IDAG. Din guide till Karlshamnsporten
 BREDBAND 1000 MBIT REGISTRERA DIG IDAG Din guide till Karlshamnsporten Hej, Karlshamnsporten är en tjänstevalsportal där du själv väljer och aktiverar leverantör av bredband, telefoni, TV och andra digitala
REGISTRERA DIG IDAG Din guide till Ronnebyporten
 REGISTRERA DIG IDAG Din guide till Ronnebyporten Hej, Ronnebyporten är en tjänstevalsportal där du själv väljer och aktiverar leverantör av bredband, telefoni, TV och andra digitala tjänster. Att få tillgång
Product configurations Produire configuration Produkt konfigurationen Producto configuraciones Produkt konfigurationerna
 Product configurations Produire configuration Produkt konfigurationen Producto configuraciones Produkt konfigurationerna 1 2 3 Ref. 3800 2360, Ver 2005-09 2 1. Keypad K900; includes TOM-Net terminators.
How to format the different elements of a page in the CMS :
 How to format the different elements of a page in the CMS : 1. Typing text When typing text we have 2 possible formats to start a new line: Enter - > is a simple line break. In a paragraph you simply want
electiaprotect GSM SEQURITY SYSTEM Vesta EZ Home Application SMART SECURITY SYSTEMS! SVENSKA ios... 2-4 Android... 5-7
 GSM SEQURITY SYSTEM Vesta EZ Home Application SVENSKA ios... 2-4 Android... 5-7 ENGLISH ios... 8-10 Android... 11-13 electiaprotect SMART SECURITY SYSTEMS! 1.1. Vesta EZ Home för ios Vesta EZ Home för
Alias 1.0 Rollbaserad inloggning
 Alias 1.0 Rollbaserad inloggning Alias 1.0 Rollbaserad inloggning Magnus Bergqvist Tekniskt Säljstöd Magnus.Bergqvist@msb.se 072-502 09 56 Alias 1.0 Rollbaserad inloggning Funktionen Förutsättningar Funktionen
Som ett led i vårt miljötänkande har vi motorvärmarstyrning på parkeringsplatserna. Det sparar energi och värnar om miljön.
 Motorvärmarstyrning Som ett led i vårt miljötänkande har vi motorvärmarstyrning på parkeringsplatserna. Det sparar energi och värnar om miljön. Engine Block Heater Control The control system for engine
Michael Q. Jones & Matt B. Pedersen University of Nevada Las Vegas
 Michael Q. Jones & Matt B. Pedersen University of Nevada Las Vegas The Distributed Application Debugger is a debugging tool for parallel programs Targets the MPI platform Runs remotley even on private
LINC 23. Tvättställsblandare/Basin Mixer. inr.se 130226A
 LINC 23 Tvättställsblandare/Basin Mixer 130226A inr.se S Användande och skötsel Manualen är en del av produkten. Bevara den under hela produktens livscykel. Vi rekommenderar att noggrant läsa igenom manualen
VASSVIK FIXED STAND SE / ENG
 VASSVIK FIXED STAND SE / ENG SE VIKTIGT Läs noga igenom instruktionerna före användning och spar dessa för framtida bruk. VARNING: Barnets huvud bör inte ligga lägre än barnets kropp. Lägg inte till ytterligare
Quick-guide to Min ansökan
 Version 2015-05-12 Quick-guide to Min ansökan Before filling in the application To be able to fill in an application you need to create a user account (instructions on p. 3). If you have already created
SUPPLIER EXTRANET. Manual. Institut für Interaktive Medien GmbH Spitalerstraße 10 D Hamburg T: F:
 SUPPLIER EXTRANET Manual Institut für Interaktive Medien GmbH Spitalerstraße 10 D-20095 Hamburg T: +49 40 33300-123 F: +49 40 3330099-123 info@iam-interactive.de www.iam-interactive.de Geschäftsführer:
Joki Joki Air. JCD70-xx JAD90-xx. lasiesta.com. Manual. Betriebsanleitung. Manuel. Manual. Manuale. Gebruiksaanwijzing.
 lasiesta.com LA SIESTA GmbH Im Wiesenweg 4 55270 Jugenheim Germany Tel: +49 6130 9119-19 LA SIESTA Inc. 7355 S.W. 87 th Ave., Ste. 100 Miami, FL 33173 USA Tel: +1 786 401-1138 EN DE FR ES IT NL DA SV FI
Webbregistrering pa kurs och termin
 Webbregistrering pa kurs och termin 1. Du loggar in på www.kth.se via den personliga menyn Under fliken Kurser och under fliken Program finns på höger sida en länk till Studieöversiktssidan. På den sidan
Följ de enkla stegen i den här handboken, så är du snart igång med ditt mobila bredband och din mobila trådlösa router med en blixtsnabb
 ZTE MF93D Följ de enkla stegen i den här handboken, så är du snart igång med ditt mobila bredband och din mobila trådlösa router med en blixtsnabb 4G-anslutning. Genom att använda ZTE MF93D och mobilt
Your No. 1 Workout. MANUAL pro
 Your No. 1 Workout MANUAL pro Innehåll/Contents Svenska Viktigt om säkerhet Specifikationer & delar Rekommenderade övningar 3 5 6-7 2 English Safety instructions Specifications & parts Recommended exercises
HANTERING AV UPS CX
 HANTERING AV UPS CX2100-0904 Hantering av UPS-modulen CX2100-0904. I WES7 och TwinCAT 2. Inställning av UPS:en i WES7 UPS:ens konfigurationsflik Inställningsmöjligheterna för hur UPS:en beter sig finns
Adress 15. August 2014
 , Zollerstr. 1, 78567 Fridingen, Germany Adress 15. August 2014 Brådskande Säkerhetsmeddelande Urgent Safety Notice Bästa kund, Dear valued customer, med anledning av en incident på marknaden fick vi kännedom
Användarhandbok. USB Charging Dock DK52
 Användarhandbok USB Charging Dock DK52 Innehåll Inledning...3 Om DK52 USB Charging Dock...3 Använda DK52 USB Charging Dock...4 Använda tillbehören...4 Ladda...4 Juridisk information...6 Declaration of
DC-DC CONVERTER ISOLATED
 DC-DC CONVERTER ISOLATED SVENSK MANUAL VIKTIG INFORMATION De tekniska uppgifter, information och illustrationer har noggrant sammanställts och motsvarar produktens status vid tidpunkten för tryckning.
802.11b Wireless router w. 4 port switch. StarTech ID: BR411BWDC
 802.11b Wireless router w. 4 port switch StarTech ID: BR411BWDC Share your Internet connection without being constrained by cables with StarTech.com s 802.11b wireless router. The BR411BWDC lets you share
Får endast utföras av behörig personal. May only be carried out by authorized electrician
 Instruktion för DMIS Instruction for DMIS FLE400FC, FLE850MP, W3400H, W4400H/W4600H (-980/1287) W3850H/W31100H, W4850/W41100H (-1220/636) Clarus Control 471 1530-75 2016.05.04 Får endast utföras av behörig
MBIT BREDBAND VI ÄGS AV INVÅNARNA I KARLSHAMN REGISTRERA DIG IDAG. Din lokala elleverantör. Starka på hemmaplan. Din guide till Karlshamnsporten
 1000 MBIT BREDBAND VI ÄGS AV INVÅNARNA I KARLSHAMN REGISTRERA DIG IDAG Din guide till Karlshamnsporten Din lokala elleverantör Starka på hemmaplan Hej, Karlshamnsporten är en tjänstevalsportal där du själv
FÖRBERED UNDERLAG FÖR BEDÖMNING SÅ HÄR
 FÖRBERED UNDERLAG FÖR BEDÖMNING SÅ HÄR Kontrollera vilka kurser du vill söka under utbytet. Fyll i Basis for nomination for exchange studies i samråd med din lärare. För att läraren ska kunna göra en korrekt
Remote control Fjärrströmbrytare / Fjernstrømbryter
 Manual / Bruksanvisning / Bruksanvisning Remote control Fjärrströmbrytare / Fjernstrømbryter ENG SE NO Item. No. 9220-1070 ENG Thank you for choosing to purchase a product from Rusta! Read through the
Quick Start. English Svenska PRIMACY. Printing settings and winsign
 Quick Start English Svenska PRIMACY Printing settings and winsign 2016-05-26 Before Printing Quick Start Primacy Install the printer according to the supplier s instructions, please see the PRIMACY user
DCDC converter 24V-12V 5A, 10A, 20A, 30A
 DCDC converter 24V-12V 5A, 10A, 20A, 30A SVENSK MANUAL VIKTIG INFORMATION De tekniska uppgifter, information och illustrationer har noggrant sammanställts och motsvarar produktens status vid tidpunkten
Vässa kraven och förbättra samarbetet med hjälp av Behaviour Driven Development Anna Fallqvist Eriksson
 Vässa kraven och förbättra samarbetet med hjälp av Behaviour Driven Development Anna Fallqvist Eriksson Kravhantering På Riktigt, 16 maj 2018 Anna Fallqvist Eriksson Agilista, Go See Talents linkedin.com/in/anfaer/
Installation Instructions
 Installation Instructions (Catalog Number 1771-IL Series D) Use this document as a guide when installing the catalog number 1771-IL/D analog input module. The isolated analog input module is sensitive
Spotlight Set Spotlightset / Spotlightsett
 Manual / Bruksanvisning / Bruksanvisning Spotlight Set Spotlightset / Spotlightsett ENG SE NO Item. No/Art. nr./art. nr. 995-9 ENG Thank you for choosing to purchase a product from Rusta! Read through
Presenter SNP6000. Register your product and get support at SV Användarhandbok
 Register your product and get support at www.philips.com/welcome Presenter SNP6000 SV Användarhandbok 1 a b c d e 2 3 4 Federal Communication Commission Interference Statement This equipment has been tested
RADIATION TEST REPORT. GAMMA: 30.45k, 59.05k, 118.8k/TM1019 Condition D
 RADIATION TEST REPORT PRODUCT: OP47AYQMLL Die Type: 147X FILE: OP47_LDR.xlsx DATE CODE: 95 GAMMA: 3.45k, 59.5k, 118.8k/TM119 Condition D GAMMA SOURCE: Co6 DOSE RATE: 8.6mRad(si)/s FACILITIES: University
 BÄNKVÅG / BENCH SCALE Modell : SW-III / Model : SW-III ANVÄNDARMANUAL / USER MANUAL SW-III WWW.LIDEN-WEIGHING.SE 2014-03-26 OBS! Under vågen sitter en justerbar skruv (se bild). Standardinställning är
Om oss DET PERFEKTA KOMPLEMENTET THE PERFECT COMPLETION 04 EN BINZ ÄR PRECIS SÅ BRA SOM DU FÖRVÄNTAR DIG A BINZ IS JUST AS GOOD AS YOU THINK 05
 Om oss Vi på Binz är glada att du är intresserad av vårt support-system för begravningsbilar. Sedan mer än 75 år tillverkar vi specialfordon i Lorch för de flesta olika användningsändamål, och detta enligt
Schenker Privpak AB Telefon 033-178300 VAT Nr. SE556124398001 Schenker ABs ansvarsbestämmelser, identiska med Box 905 Faxnr 033-257475 Säte: Borås
 Schenker Privpak AB Interface documentation for Parcel Search 2011-10-18 Version: 1 Doc. no.: I04306 Sida 2 av 5 Revision history Datum Version Sign. Kommentar 2011-10-18 1.0.0 PD First public version.
English Svenska. Installation. Guide. XG6846 Broadband Switch
 English Svenska Installation Guide Broadband Switch 2 Installation Guide English Svenska Broadband Switch Language Page English... 4 Svenska... 8 3 Broadband Switch USB (OPTIONAL) (OPTIONAL) Back/side
CVUSD Online Education. Summer School 2010
 CVUSD Online Education Summer School 2010 A New Frontier for Education This is an exciting time for CVUSD First opportunity for the Online US History course and second time for the Online Health course
Multifunktions-Detector Multi detector
 Multifunktions-Detector Multi detector... 7 Numeric Display Low Battery Alert Wood Alternating Current Metal Sensor Range Metal Metal Object Sensor Range Alternating Current Battery Compartment Bar Graph-Display
IRAB Mottagare sida 2-5 Tele Radio AB Mottagare sida 6
 IRAB Mottagare sida -5 Tele Radio AB Mottagare sida 6 Installation of receiver type smd 700 4 RELAY FUNCTIONS / -4 VAC/DC PCB TYPE NO: LWEG 4L Rev: 95-09 Installation: Install the receivers in a protected
BBT042/ BBC042/ BBCD042 NISSAN NAVARA D40 V STX & PATHFINDER R WD & 4WD Models
 INSTALLATION GUIDE BBT042/ BBC042/ BBCD042 NISSAN NAVARA D40 V6 2010+ STX & PATHFINDER R51 2010+ 2WD & 4WD Models Ironman 4x4 BBT/ BBC/ BBCD042 Bull Bars fit to a Nissan Navara D40 STX & Pathfinder R51.
 BÄNKVÅG / BENCH SCALE ANVÄNDARMANUAL / USER MANUAL SW-III www.liden-weighing.com Svenska OBS! Under vågen sitter en justerbar skruv (se bild). Standardinställning är den för vägning. Om ni vill rengöra
DC-DC CONVERTER IP67
 DC-DC CONVERTER IP67 SVENSK MANUAL VIKTIG INFORMATION De tekniska uppgifter, information och illustrationer har noggrant sammanställts och motsvarar produktens status vid tidpunkten för tryckning. Tillverkaren
Här kan du checka in. Check in here with a good conscience
 Här kan du checka in med rent samvete Check in here with a good conscience MÅNGA FRÅGAR SIG hur man kan göra en miljöinsats. Det är egentligen väldigt enkelt. Du som har checkat in på det här hotellet
SOLAR LIGHT SOLUTION. Giving you the advantages of sunshine. Ningbo Green Light Energy Technology Co., Ltd.
 2017 SOLAR LIGHT SOLUTION Address:No.5,XingYeMiddleRoad,NingboFreeTradeZone,China Tel:+86-574-86812925 Fax:+86-574-86812905 Giving you the advantages of sunshine SalesServiceE-mail:sales@glenergy.cn Tech.ServiceE-mail:service@glenergy.cn
Resurser. Visa sidan Hjälpguide. Menykarta. Phaser 4400 laserskrivare
 Phaser 4400 laserskrivare Resurser En stor mängd information finns samlad i skrivaren som utskrivbara sidor. På följande sidor visas Hjälpguiden, en utskrivbar sida över resurser för att få hjälp. P4400-77
Viktig information för transmittrar med option /A1 Gold-Plated Diaphragm
 Viktig information för transmittrar med option /A1 Gold-Plated Diaphragm Guldplätering kan aldrig helt stoppa genomträngningen av vätgas, men den får processen att gå långsammare. En tjock guldplätering
Webbreg öppen: 26/ /
 Webbregistrering pa kurs, period 2 HT 2015. Webbreg öppen: 26/10 2015 5/11 2015 1. Du loggar in på www.kth.se via den personliga menyn Under fliken Kurser och under fliken Program finns på höger sida en
SAFETY PRECAUTIONS SPECIFICATIONS
 SAFETY PRECAUTIONS Read the instructions carefully before use and save them for future reference. Before you connect the appliance: Ensure that the voltage rating on the type plate corresponds to your
English Svenska. Installation. Guide. XG6846 Broadband Switch
 Guide CE Declaration of Conformity For the following equipment: Ethernet Switch Product name: Hereby, Inteno Broadband Technology AB declares that the radio equipment type Ethernet Switch is in compliance
Quick Start. English Svenska. Moca
 Quick Start English Svenska Moca 2015-08-20 Before Printing Install the printer according to the supplier s instructions, please see the Moca user guide (chapter 3-1) at the installation CD. Choose Moca
Datasäkerhet och integritet
 Chapter 4 module A Networking Concepts OSI-modellen TCP/IP This module is a refresher on networking concepts, which are important in information security A Simple Home Network 2 Unshielded Twisted Pair
Workplan Food. Spring term 2016 Year 7. Name:
 Workplan Food Spring term 2016 Year 7 Name: During the time we work with this workplan you will also be getting some tests in English. You cannot practice for these tests. Compulsory o Read My Canadian
This manual should be saved! EcoFlush Manual. Wostman 2018:2
 This manual should be saved! EcoFlush Manual Wostman 2018:2 ENGLISH Important! This manual should be saved by the owner! It s important to read the whole manual before installation. EcoFlush gives the
PRESS FÄLLKONSTRUKTION FOLDING INSTRUCTIONS
 PRESS FÄLLKONSTRUKTION FOLDING INSTRUCTIONS Vänd bordet upp och ner eller ställ det på långsidan. Tryck ner vid PRESS och fäll benen samtidigt. OBS! INGA STORA KRAFTER KRÄVS!! Om benen sitter i spänn tryck
Installationsguide och beskrivning av Gewa Amplifier. Installation guide and description of Gewa Amplifier
 Installationsguide och beskrivning av Gewa Amplifier Installation guide and description of Gewa Amplifier INNEHÅLL/CONTENTS SVENSKA...3 Inledning... 3 Installera Progress PC... 3 Beskrivning av olika delar...
District Application for Partnership
 ESC Region Texas Regional Collaboratives in Math and Science District Application for Partnership 2013-2014 Applying for (check all that apply) Math Science District Name: District Contacts Name E-mail
Questionnaire for visa applicants Appendix A
 Questionnaire for visa applicants Appendix A Business Conference visit 1 Personal particulars Surname Date of birth (yr, mth, day) Given names (in full) 2 Your stay in Sweden A. Who took the initiative
Användarhandbok. Xperia P TV Dock DK21
 Användarhandbok Xperia P TV Dock DK21 Innehåll Inledning...3 TV Dock baksida, översikt...3 Komma igång...4 LiveWare -hanteraren...4 Uppgradera LiveWare -hanteraren...4 Använda TV Dock...5 Ladda telefonen...5
Application Note SW
 TWINSAFE DIAGNOSTIK TwinSAFE är Beckhoffs safety-lösning. En översikt över hur TwinSAFE är implementerat, såväl fysiskt som logiskt, finns på hemsidan: http://www.beckhoff.se/english/highlights/fsoe/default.htm?id=35572043381
VH110 Användarhandbok
 VH110 Användarhandbok Innehåll Översikt över headsetet...5 Introduktion...6 Laddning...7 Starta och stänga av enheten...8 Koppla ihop headsetet...9 Koppla ihop headsetet med telefonen...9 Sätta på sig
1.1 Invoicing Requirements
 1.1 Invoicing Requirements Document name The document should clearly state INVOICE, DOWNPAYMENT REQUEST or CREDIT NOTE. Invoice lines and credit lines cannot be sent in the same document. Invoicing currency.
FORTA M315. Installation. 218 mm.
 1 Installation 2 1 2 1 218 mm. 1 2 4 5 6 7 8 9 2 G, G0= Max 100 m 1.5 mm² (AWG 15) X1, MX, Y, VH, VC = Max 200 m 0.5 mm² (AWG 20) Y X1 MX VH VC G1 G0 G 0 V 24 V~ IN 0-10 0-5, 2-6 60 s OP O 1 2 4 5 6 7
manual Facial spa Art nr: 48682 Rubicson 2016-06-08
 manual Facial spa Art nr: 8682 EN NO SV 2016-06-08 Rubicson ENGLISH Overview Use Fill the container ENGLISH 1. Make sure that the power cord is not connected to a wall socket. 1 2 2. Remove the funnel
Plain A262. För T16 (T5) lysrör. Innehåll. Monteringsanvisning. A. Instruktion för rampmontering
 lysrör. Innehåll. Monteringsanvisning. A. Instruktion för rampmontering") Plain A262 För T16 (T5) lysrör Innehåll Ramparmatur: ändmodul En stängd gavel/ en öppen gavel Plint i båda ändarna Överkopplingssladd 1 rampgavel 1 lysrörsbytare Ramparmatur: mellanmodul Plint i en ände
Plain A262 För T16 (T5) lysrör Innehåll Ramparmatur: ändmodul En stängd gavel/ en öppen gavel Plint i båda ändarna Överkopplingssladd 1 rampgavel 1 lysrörsbytare Ramparmatur: mellanmodul Plint i en ände