Croma Showerpipe (20)
|
|
|
- Stig Svensson
- för 8 år sedan
- Visningar:
Transkript
1 EN Table of contents 1 Instructions for use / assembly instructions 2 Troubleshooting 3 Assembly 6-9 Adjustment 10 Safety Function 11 Operation Maintenance Cleaning Dimensions 18 Flow diagram 18 Spare parts 19 Contact information 20 SV Innehållsförtäckning 1 Bruksanvisning / Monteringsanvisning 4 Felsökning 5 Montering 6-9 Inställning av maxtemperatur 10 Safety Function 11 Hantering Skötsel Rengöring Måttskiss 18 Flödesschema 18 Reservdelar 19 Kontaktinformation 20 Denna produkt är anpassad till branchregler Säkervatteninstallation. Hansgrohe AB garanterar produktens funktion om branchreglerna och monteringsanvisningen följs. Croma Showerpipe (RSK: ) 1 (20)

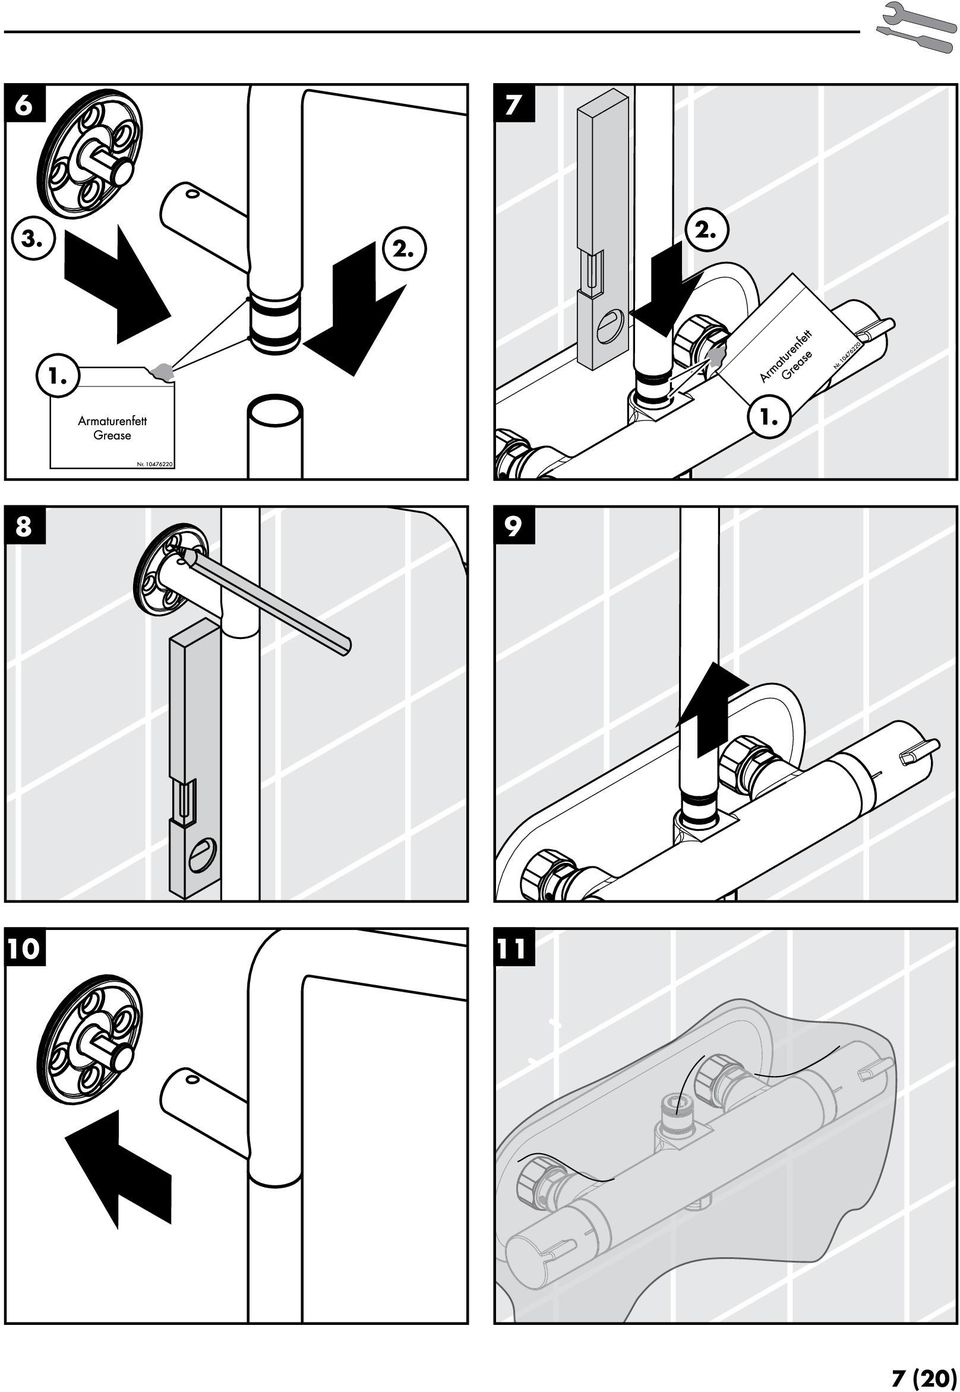
2 English Safety Notes Gloves should be worn during installation to prevent crushing and cutting injuries. The arm of the shower head is intended only to hold the shower head. Do not load it down with other objects! Children as well as adults with physical, mental and/ or sensoric impairments must not use this shower system without proper supervision. Persons under the influence of alcohol or drugs are prohibited from using this shower system. Do not allow the streams of the shower touch sensitive body parts (such as your eyes). An adequate distance must be kept between the shower and you. The product may not be used as a holding handle. A separate handle must be installed. The shower system may only be used for bathing, hygienic and body cleaning purposes. The hot and cold supplies must be of equal pressures. Installation Instructions Prior to installation, inspect the product for transport damages. After it has been installed, no transport or surface damage will be honoured. The product is not designed to be used with steam baths! The pipes and the fixture must be installed, flushed and tested as per the applicable standards. The plumbing codes applicable in the respective countries must be oberserved. The installation dimensions stated in these installation instructions are ideal for people of approximately 1800 mm in body height. The dimensions can be altered if required. In this case, pay attention to the fact that a change of installation height will also change the minimum height, and that the altered mounting dimensions must be taken into consideration. Where the contractor mounts the product, he should ensure that the entire area of the wall to which the mounting plate is to be fitted, is flat (no projecting joints or tiles sticking out), that the structure of the wall is suitable for the installation of the product and has no weak points. The enclosed screws and dowels are only suitable for concrete. For another wall constructions the manufacturer's indications of the dowel manufacturer have to be taken into account. The filter insert must be use to protect the shower against incoming dirt by pipework. Incoming dirt leads to defects or/and can damage parts of the shower; such caused faults voids all liability and guarantee claims. If required, the bottom part of the pipe between the fixture and the shower head can be shortened with a fine-toothed saw. Assembly (see page 6) Pressure and permeability test The connections of the thermostatic mixer should be tested regular after installation. Technical Data Operating pressure: max. 1 MPa Recommended operating pressure: 0,15-0,5 MPa Test pressure: 1,6 MPa (1 MPa = 10 bar = 147 PSI) Hot water temperature: max. 80 C Recommended hot water temp.: 65 C Centre distance: 160 mm Connections M 26x1,5: cold right - hot left Thermal disinfection: max. 70 C / 4 min Safety against backflow The product is exclusively designed for drinking water! 2

3 English Symbol description Do not use silicone containing acetic acid! Adjustment (see page 10) After the installation, the output temperature of the fitting must be tested and set to the temperate desired by the customer. Correction is necessary if the temperature measured at the take off point differs from the temperature set on the scale. Safety Function (see page 11) The desired maximum temperature for example max. 42º C can be pre-set thanks to the safety function. Operation (see page 12) To empty the overhead shower after use, hold it in a slightly inclined position. Cleaning (see page 16 and enclosed brochure) Maintenance (see page 14) The check valves must be checked regularly according to DIN EN 1717 in accordance with national or regional regulations (at least once a year). To guarantee the smooth running of the thermostat, it is necessary from time to time to turn the thermostat from total hot to total cold. Dimensions (see page 18) Flow diagram (see page 18) overhead shower Hand shower Spare parts (see page 19) Special accessories (order as an extra) # tile-matching-disk chrome plated Troubleshooting Fault Cause Remedy Insufficient water --Supply pressure inadequate --Check water pressure (If a pump has been installed check to see if the pump is working). --Filters are dirty ( ) --Cleaning the filter in the water connection and at the thermostat cartridge ( ) --Shower filter seal dirty --Clean filter seal between shower and hose Crossflow, hot water being forced into cold water pipe, or vice versa, --Backflow preventers dirty or leaking --Clean backflow preventers, exchange if necessary when mixer is closed Spout temperature does not correspond --Thermostat has not been adjusted --Adjust thermostat with temperature set --Hot water temperature too low --Increase hot water temperature to 42 ºC to 65 ºC Temperature regulation not possible --thermo cartridge calcified --Exchange thermo cartridge Instantaneous heater didn't work with --Filters are dirty --Clean the filter / exchange filter thermostat --check valve hasn't moved back --Exchange check valves Assembly see page 6 3
 To empty the overhead shower after use, hold it in a slightly inclined position.")
4 Svenska Säkerhetsanvisningar Handskar ska bäras under monteringsarbetet så att man kan undvika kläm- och skärskadorgen werden. Armen som håller huvudduschen är bara konstruerad för detta; den får inte belastas med andra föremål! Barn samt vuxna med fysiska, psykiska eller sensoriska funktionshinder får inte använda duschsystemet ensamma. Personer som är påverkade av alkohol- eller droger får inte använda duschsystemet. Undvik att rikta duschstrålarna mot känsliga kroppsdelar (t. ex. ögonen. Det måste finnas ett tillräckligt stort avstånd mellan duschen och kroppen. Produkten får inte användas som handtag. Ett separat handtag måste monteras. Duschsystemet får bara användas till kroppshygien med bad och dusch. Stora tryckskillnader mellan anslutningarna för varmt och kallt vatten måste utjämnas. Monteringsanvisningar Det måste undersökas om produkten har transportskador innan den monteras. Efter monteringen accepteras inga transport- eller ytskiktskador. Produkten är inte avsedd att användas tillsammans med ett ångbad! Ledningarna och blandaren måste monteras, spolas igenom och kontrolleras enligt de gällande normerna. De installationsriktlinjer som gäller i länderna ska följas. De monteringsmått som anges i monteringsanvisningen passar 1,80 m långa personer och måste eventuellt anpassas. Det är då viktigt att tänka på att den minsta höjden ändras när monteringshöjden blir en annan och att hänsyn måste tas till de ändrade anslutningsmåtten. När kvalificerad fackpersonal monterar produkten är det viktigt att tänka på att monteringsytan är plan i alla delar av arbetsytan (inga fogar som sticker ut eller klinkerförskjutningar), att väggkonstruktionen passar till montering av produkten samt att den inte har svaga punkter. Medföljande skruvar och plugg är endast avsedda för betong. Vid andra väggkonstruktioner skall anvisningarna från pluggtillverkaren beaktas. Silpackningen som följer med duschen måste monteras för att undvika att smuts från ledningsnätet tränger in. Smuts som spolas in kan påverka funktionerna och/eller leda till skador på funktionsdelar i duschen. Hansgrohe frånsäger sig allt ansvar för skador som kan härledas till detta. Om det behövs kan röret mellan blandare och huvuddusch kortas i den nedre delen med en fintandad såg. Montering (se sidan 6) Tryck och täthetsprov Termostatblandarens anslutningar skall täthetskontrolerasefter installationen. Tekniska data Driftstryck: max. 1 MPa Rek. driftstryck: 0,15-0,5 MPa Tryck vid provtryckning: 1,6 MPa (1 MPa = 10 bar = 147 PSI) Varmvattentemperatur: max. 80 C Rek. varmvattentemp.: 65 C Anslutningsmått: 160 mm Anslutningar M 26x1,5: kallt höger varmt vänster Termisk desinfektion: max. 70 C / 4 min Självspärr mot återflöde Produkten är enbart avsedd för dricksvatten! 4

5 Svenska Symbolförklaring Använd inte silikon som innehåller ättiksyra! Inställning av maxtemperatur (se sidan 10) Efter monteringen måste blandarens uttemperatur kontrolleras och ställas in på den temperatur som kunden vill ha. En korrigering krävs när den uppmätta temperaturen vid tappstället avviker från den temperatur som är inställd på termostaten. Safety Function (se sidan 11) Med hjälp av Safety Function kan du ställa in den önskade maximaltemperaturen till exempelvis 42ºC och så förhindra skållningsrisk för barn. Hantering (se sidan 12) Ställ huvudduschen lätt lutande efter användningen för att tömma den. Rengöring (se sidan 16 och medföljande broschyr) Skötsel (se sidan 14) Backventilers funktion måste kontrolleras regelbundet enligt nationella eller regionala bestämmelser (DIN 1988 en gång per år) i enlighet med DIN EN För att garantera att termostaten ej kalkar igen, ska den regelbundet, en gång per vecka, konditioneras. Det sker genom att man några gånger snabbt slås om temperaturen från hett till kallt och tillbaka. Måtten (se sidan 18) Flödesschema (se sidan 18) Huvuddusch Handdusch Reservdelar (se sidan 19) Specialtillbehör (medföljer ej leveransen) # Kakelutjämningsbricka krom Felsökning Störning Orsak Åtgärd För lite vatten --Vattentrycket är för lågt --Kontrollera ledningstryck --Smutsfiltren är igensmutsade ( ) --Rengör smutsfilter i anslutningarna och på styrenheten ( ) --Silfiltret i duschen smutsigt --Rengör silfiltret mellan slangen och termostaten Korsflöde varmt vatten pressas vid avstängd ermostat in i kallvatten- --Backventil är igensmutsad eller otät --Rengör backventil, byt ut om nödvändigt inloppet, och vice versa Den faktiska vatten- temperaturen --Termostaten ställdes inte in --Justera termostaten stämmer Inte överens med den Inställda --Varmvattentemperaturen är för låg --Höj varmvattentemperaturen til mellan 42ºC och 65ºC Temperaturen kan ej ställas in --Termosensorn är igenkalkad --Byt termosensorn Varmvattenberedare slår ej på vid --Smutsfiltren är igensmutsade --Rengör / byt smutsfilter användning av termostaten --Backventil är defekt --Byt backventil Montering se sidan 6 5
 Med hjälp av Safety Function kan du ställa in den önskade maximaltemperaturen till exempelvis 42ºC och så förhindra skållningsrisk för barn.")
6 1 2 2,5 mm 3 4 2,5 mm 5 The nuts of the installation plate must be tightened to the manufacturer's instructions. Muttrarna dras åt enligt monteringsanvisningen från leverantören av blandarfäste. 23 mm 6 (20)

7 (20)
8 12 Ø 6 mm Tätskikt Kakellim Kakel Betong Ø 6 mm 50 mm Ø 6 mm Silicone 3. Silicone 4. Trä Tätskikt Kakellim Kakel Ø 6 mm When installing on a stud wall, the wall must always be strengthened. All screws must be fixed to solid structures, such as concrete, studs or special structural components. Screws must not be fixed to flooring or wall sheets alone. Requirements for sealing apply in wet zones 1 and Sealing materials must be fixed to the underlying layer and must be waterproof, mould-resistant and age-resistant. Silicone Vid montering på regelvägg måste väggen alltid förstärkas. Alla skruvinfästningar skall ske i massiv konstruktion, t.ex betong, i reglar eller särskild konstruktionsdetalj. Skruvinfästning får inte göras enbart i golv-, eller väggskiva. Krav på tätning gäller både i våtzon 1 och Material för tätning ska fästa mot underlaget och vara vattenbeständigt, mögelresistent och åldersbeständigt. 13a 13b (20)

9 mm mm 9 (20)

10 Justierung (20)

11 Safety Function mm 3 4 for example 42 C till exempel 42 C! 5 6 3mm 2 Nm (20)

12 open / öppna open / öppna close / stänga cold / kallt hot / varmt 12 (20)

13 Croma 100 Vario (20)

14 Wartung mm SW 6 mm 3. SW 2,5 mm 14 (20)

15 6 7 6 mm 3. 2,5 mm mm 23 mm (20)
")
16 1 2 max. 10 min 20 mm 3 > 1 min (20)

17 1 2 > 1 min (20)

18 Ø Ø Ø Ø G1/ M 26x1, G1/ (20)

19 (50x2) (M6x12) (20x2) (M6x5) (16x1,25) (1000 mm) (1200 mm) (1450 mm) (15x2,5) (9x1) (12x2,25) (17x1,5) (26x1,5) (14x2) (26x1,5) 19 (20)
 95927000 95836000 98282000 98129000 (14x2) 98058000 28276000 95839000 98390000")
20 20 Hansgrohe AB Svangatn 2B Göteborg Tele: +46(0) Fax: +46(0) E-post: Internet: 03/

Ecostat 1001 CL 13218000. Ecostat 1001 CL 13217000 1 (16)
") EN Table of contents 1 Instructions for use / assembly instructions 2 Troubleshooting 3 Assembly 6 Adjustment 7 Safety Function 8 EcoStop 9 Maintenance 10-11 Operation 12-13 Dimensions 14 Flow diagram
EN Table of contents 1 Instructions for use / assembly instructions 2 Troubleshooting 3 Assembly 6 Adjustment 7 Safety Function 8 EcoStop 9 Maintenance 10-11 Operation 12-13 Dimensions 14 Flow diagram
Ecostat Comfort (RSK: ) Ecostat Comfort (RSK: ) 1 (16)
 Ecostat Comfort (RSK: ) 1 (16)") EN Table of contents 1 Instructions for use / assembly instructions 2 Troubleshooting 3 Assembly 6 Adjustment 7 Safety Function 8 Maintenance 9-10 Operation 11-12 Dimensions 13 Flow diagram 13 Spare parts
EN Table of contents 1 Instructions for use / assembly instructions 2 Troubleshooting 3 Assembly 6 Adjustment 7 Safety Function 8 Maintenance 9-10 Operation 11-12 Dimensions 13 Flow diagram 13 Spare parts
Ecostat 1001 SL (RSK: ) Ecostat 1001 SL (RSK: ) 1 (16)
 Ecostat 1001 SL (RSK: ) 1 (16)") EN Table of contents 1 Instructions for use / assembly instructions 2 Troubleshooting 3 Assembly 6 Adjustment 7 Safety Function 8 EcoStop 9 Maintenance 10-11 Operation 12-13 Dimensions 14 Flow diagram
EN Table of contents 1 Instructions for use / assembly instructions 2 Troubleshooting 3 Assembly 6 Adjustment 7 Safety Function 8 EcoStop 9 Maintenance 10-11 Operation 12-13 Dimensions 14 Flow diagram
Accepterad monteringsanvisning 2016:1. Metris (RSK: ) Metris S (RSK: ) Metris (RSK: )
 Metris S (RSK: ) Metris (RSK: )") EN Table of contents 1 Instructions for use / assembly instructions 2 Assembly 4-5 Adjustment 6 Operation 7 Dimensions 8-9 Flow diagram 8-9 Spare parts 10-12 Cleaning 13 Test certificate 14 Contact information
EN Table of contents 1 Instructions for use / assembly instructions 2 Assembly 4-5 Adjustment 6 Operation 7 Dimensions 8-9 Flow diagram 8-9 Spare parts 10-12 Cleaning 13 Test certificate 14 Contact information
Accepterad monteringsanvisning 2016:1. Focus (RSK: ) 1 (12)
 1 (12)") EN Table of contents 1 Instructions for use / assembly instructions 2 Assembly 4 Adjustment 5 Dimensions 6 Flow diagram 6 Operation 7 Spare parts 8 Cleaning 9 Test certificate 10 Contact information 12
EN Table of contents 1 Instructions for use / assembly instructions 2 Assembly 4 Adjustment 5 Dimensions 6 Flow diagram 6 Operation 7 Spare parts 8 Cleaning 9 Test certificate 10 Contact information 12
Accepterad monteringsanvisning 2016:1
 EN Table of contents 1 Instructions for use / assembly instructions 2 Assembly 4-6 Adjustment 7 Dimensions 8 Flow diagram 9 Test certificate 9 Operation 10 Spare parts 11 Cleaning 12 Contact information
Accepterad monteringsanvisning 2016:1. Ecos M CoolStart (RSK: ) Ecos L CoolStart (RSK: ) 1 (12)
 Ecos L CoolStart (RSK: ) 1 (12)") EN Table of contents 1 Instructions for use / assembly instructions 2 Assembly 4-5 Adjustment 6 Dimensions 7 Flow diagram 7 Operation 8 Spare parts 9 Cleaning 10 Test certificate 11 Contact information
EN Table of contents 1 Instructions for use / assembly instructions 2 Assembly 4-5 Adjustment 6 Dimensions 7 Flow diagram 7 Operation 8 Spare parts 9 Cleaning 10 Test certificate 11 Contact information
Accepterad monteringsanvisning 2016:1. Talis S (RSK: ) Talis S 100 CoolStart (RSK: )
 Talis S 100 CoolStart (RSK: )") EN Table of contents 1 Instructions for use / assembly instructions 2 Assembly 4-5 Adjustment 6 Dimensions 7 Flow diagram 7 Operation 8 Spare parts 9 Cleaning 10 Test certificate 11 Contact information
EN Table of contents 1 Instructions for use / assembly instructions 2 Assembly 4-5 Adjustment 6 Dimensions 7 Flow diagram 7 Operation 8 Spare parts 9 Cleaning 10 Test certificate 11 Contact information
Accepterad monteringsanvisning 2016:1. Talis S (RSK: ) Talis S (RSK: ) 1 (12)
 Talis S (RSK: ) 1 (12)") EN Table of contents 1 Instructions for use / assembly instructions 2 Assembly 4-5 Adjustment 6 Dimensions 7 Flow diagram 7 Operation 8 Spare parts 9 Cleaning 10 Test certificate 11 Contact information
EN Table of contents 1 Instructions for use / assembly instructions 2 Assembly 4-5 Adjustment 6 Dimensions 7 Flow diagram 7 Operation 8 Spare parts 9 Cleaning 10 Test certificate 11 Contact information
Accepterad monteringsanvisning 2016:1. Focus (RSK: ) Focus 100 CoolStart (RSK: ) (RSK: )
 Focus 100 CoolStart (RSK: ) (RSK: )") EN Table of contents 1 Instructions for use / assembly instructions 2 Assembly 4-5 Adjustment 6 Dimensions 7 Flow diagram 7 Operation 8 Spare parts 9-10 Cleaning 11 Test certificate 12 Contact information
EN Table of contents 1 Instructions for use / assembly instructions 2 Assembly 4-5 Adjustment 6 Dimensions 7 Flow diagram 7 Operation 8 Spare parts 9-10 Cleaning 11 Test certificate 12 Contact information
Accepterad monteringsanvisning 2016:1. Focus (RSK: ) Talis S² Variarc (RSK: ) Metris (RSK: )
 Talis S² Variarc (RSK: ) Metris (RSK: )") EN Table of contents 1 Instructions for use / assembly instructions 2 Assembly 3-8 Adjustment 9 Dimensions 10-11 Flow diagram 12 Operation 13 Spare parts 14-17 Cleaning 18 Test certificate 19 Contact information
EN Table of contents 1 Instructions for use / assembly instructions 2 Assembly 3-8 Adjustment 9 Dimensions 10-11 Flow diagram 12 Operation 13 Spare parts 14-17 Cleaning 18 Test certificate 19 Contact information
Accepterad monteringsanvisning 2016:1. Talis E ( ) ( ) Talis E 110 CoolStart ( )
 ( ) Talis E 110 CoolStart ( )") EN Table of contents 1 Instructions for use / assembly instructions 2 Assembly 4-6 Test certificate 6 Adjustment 7 Dimensions 8 Flow diagram 8 Operation 9 Spare parts 10-11 Cleaning 12 Contact information
EN Table of contents 1 Instructions for use / assembly instructions 2 Assembly 4-6 Test certificate 6 Adjustment 7 Dimensions 8 Flow diagram 8 Operation 9 Spare parts 10-11 Cleaning 12 Contact information
SV Bruksanvisning / Monteringsanvisning. Croma Showerpipe
 SV Bruksanvisning / Monteringsanvisning Croma Showerpipe 27234000 Svenska Säkerhetsanvisningar Handskar ska bäras under monteringsarbetet så att man kan undvika kläm- och skärskadorgen werden. Armen som
Raindance Showerpipe (20)
") EN Table of contents 1 Instructions for use / assembly instructions 2 Troubleshooting 3 Assembly 6-10 Adjustment 11 Safety Function 12 Operation 13-14 Maintenance 15-16 Cleaning 17-18 Dimensions 19 Flow
EN Table of contents 1 Instructions for use / assembly instructions 2 Troubleshooting 3 Assembly 6-10 Adjustment 11 Safety Function 12 Operation 13-14 Maintenance 15-16 Cleaning 17-18 Dimensions 19 Flow
Ecostat 1001 SL 13242000 (RSK: 8310066) Ecostat 1001 SL 13274000 (RSK: 8310067) 1 (16)
 Ecostat 1001 SL 13274000 (RSK: 8310067) 1 (16)") EN Table of contents 1 Instructions for use / assembly instructions 2 Troubleshooting 3 Assembly 6 Adjustment 7 Safety Function 8 EcoStop 9 Maintenance 10-11 Operation 12-13 Dimensions 14 Flow diagram
EN Table of contents 1 Instructions for use / assembly instructions 2 Troubleshooting 3 Assembly 6 Adjustment 7 Safety Function 8 EcoStop 9 Maintenance 10-11 Operation 12-13 Dimensions 14 Flow diagram
Raindance Showerpipe (20)
") EN Table of contents 1 Instructions for use / assembly instructions 2 Troubleshooting 3 Assembly 6-10 Adjustment 11 Safety Function 12 Operation 13-14 Maintenance 15-16 Cleaning 17-18 Dimensions 19 Flow
EN Table of contents 1 Instructions for use / assembly instructions 2 Troubleshooting 3 Assembly 6-10 Adjustment 11 Safety Function 12 Operation 13-14 Maintenance 15-16 Cleaning 17-18 Dimensions 19 Flow
Accepterad monteringsanvisning 2016:1. Raindance Showerpipe (RSK: ) 1 (20)
 1 (20)") EN Table of contents 1 Instructions for use / assembly instructions 2 Troubleshooting 3 Assembly 6-10 Adjustment 10 Safety Function 11 Operation 12-13 Test certificate 13 Maintenance 14-15 Cleaning 16-18
EN Table of contents 1 Instructions for use / assembly instructions 2 Troubleshooting 3 Assembly 6-10 Adjustment 10 Safety Function 11 Operation 12-13 Test certificate 13 Maintenance 14-15 Cleaning 16-18
Raindance Showerpipe (RSK: ) 1 (20)
 1 (20)") EN Table of contents 1 Instructions for use / assembly instructions 2 Troubleshooting 3 Assembly 6-10 Adjustment 10 Safety Function 11 Operation 12-13 Test certificate 13 Maintenance 14-15 Cleaning 16-18
EN Table of contents 1 Instructions for use / assembly instructions 2 Troubleshooting 3 Assembly 6-10 Adjustment 10 Safety Function 11 Operation 12-13 Test certificate 13 Maintenance 14-15 Cleaning 16-18
Marin² Showerpipe (20)
") EN Table of contents 1 Instructions for use / assembly instructions 2 Troubleshooting 3 Assembly 6-9 Adjustment 10 Safety Function 11 Operation 12-13 Maintenance 14-15 Cleaning 16-17 Dimensions 18 Flow
EN Table of contents 1 Instructions for use / assembly instructions 2 Troubleshooting 3 Assembly 6-9 Adjustment 10 Safety Function 11 Operation 12-13 Maintenance 14-15 Cleaning 16-17 Dimensions 18 Flow
MySelect S 240 Showerpipe (20)
") EN Table of contents 1 Instructions for use / assembly instructions 2 Troubleshooting 3 Assembly 6-9 Adjustment 10 Safety Function 11 Operation 12-13 Maintenance 14-15 Cleaning 16-18 Dimensions 19 Flow
EN Table of contents 1 Instructions for use / assembly instructions 2 Troubleshooting 3 Assembly 6-9 Adjustment 10 Safety Function 11 Operation 12-13 Maintenance 14-15 Cleaning 16-18 Dimensions 19 Flow
Logis 70 71070000 (RSK: 8227588) 71071000 (RSK: 8227601) 71077000 (RSK: 8227594) Logis 70 CoolStart 71073000 (RSK: 8227589)
 71071000 (RSK: 8227601) 71077000 (RSK: 8227594) Logis 70 CoolStart 71073000 (RSK: 8227589)") EN Table of contents 1 Instructions for use / assembly instructions 2 Assembly 4-6 Adjustment 7 Dimensions 8 Flow diagram 9 Operation 10 Spare parts 11 Contact information 12 SV Innehållsförtäckning 1
EN Table of contents 1 Instructions for use / assembly instructions 2 Assembly 4-6 Adjustment 7 Dimensions 8 Flow diagram 9 Operation 10 Spare parts 11 Contact information 12 SV Innehållsförtäckning 1
Original 600 SILICONE. 1 x. 3 x. 3 x
 Original 600 a 1 x b 3 x c 3 x 2012-01-25 1 1 x a 2 3 Vid montering på regelvägg på ett avstånd av 1 m från badkar eller dusch måste väggen alltid förstärkas. Alla skruvinfästningar skall ske i massiv
East 600. x 33. x 33 x 7 x 7. x 6. x 6 2015-04-01. www.hafa.se www.hafa.dk www.hafabad.no www.hafa.se www.hafabathroom.ru www.hafa.
 East 600 x 33 x 33 x 7 x 7 x 6 x 6 Garanti/Warranty. Service, reservdelar/spare parts Sweden: Tel: +46 (0)35 15 44 75 Norway: Tel: +47 (0)69 31 02 30 Finland: Puh: +358 (0)9 61500940 www.hafa.dk www.hafabad.no
ARC 32. Tvättställsblandare/Basin Mixer. inr.se
 ARC 32 Tvättställsblandare/Basin Mixer inr.se SE Användning och skötsel Manualen är en del av produkten. Bevara den under hela produktens livscykel. Vi rekommenderar er att noggrant läsa igenom manualen
Nathi Skötbord Changing unit Table à langer murale Wickeltisch Verschoontafel Puslebord Cambiador de pared Přebalovací pult Fasciatoio
 Nathi Skötbord Changing unit Table à langer murale Wickeltisch Verschoontafel Puslebord Cambiador de pared Přebalovací pult Fasciatoio Пеленальный стол Tested and approved according to SS-EN 12221:2008+A1_2013
BOW. Art.nr
 190412 BOW Art.nr 80000637-80000642 SE INNEHÅLL Komponenter 3 Produktfakta 3 Montering 4 Kontakt 8 EN CONTENTS Components 3 Product facts 3 Installation 4 Contact 8 KOMPONENTER COMPONENTS x 3 x 3 PRODUKTFAKTA
Raindance Select Showerpipe
 DE Gebrauchsanleitung / Montageanleitung 2 FR Mode d'emploi / Instructions de montage 3 EN Instructions for use / assembly instructions 4 IT Istruzioni per l'uso / Istruzioni per Installazione 5 ES Modo
BRIC MODELL A
 BRIC MODELL 3 150123A 2,5 & 4mm 1 2a 3 4 x 2 x 2 5a 2b 6 5b 5c 5d 5e x 1 x 1 x 1 x 1 1 x 1 x 1 x 4 x 1 x 3 x 4 ~20mm Alternativ placering av mittenstöd. Alternative placement of centre support 75-95mm
LINC Modell 17 130624A
 LINC Modell 17 130624A Denna produkt är anpassad till Branschregler Säker Vatteninstallation. INR garanterar produktens funktion om branschregler och monteringsanvisning följs. INR SVERIGE AB Kosterögatan
INSTALLATION INSTRUCTIONS
 INSTALLATION - REEIVER INSTALLATION INSTRUTIONS RT0 RF WIRELESS ROOM THERMOSTAT AND REEIVER MOUNTING OF WALL MOUTING PLATE - Unscrew the screws under the - Pack contains... Installation - Receiver... Mounting
BATH MIXER 160 LINC 21. incl. HAND SHOWER. inr.se
 LINC 21 BATH MIXER 150 BATH MIXER 160 incl. HAND SHOWER 110309 inr.se Innan montering Vi förordar en sakkunnig VVS-installatör vid installation och service. Ledningarna ska renspolas innan installation.
Plain A262. För T16 (T5) lysrör. Innehåll. Monteringsanvisning. A. Instruktion för rampmontering
 lysrör. Innehåll. Monteringsanvisning. A. Instruktion för rampmontering") Plain A262 För T16 (T5) lysrör Innehåll Ramparmatur: ändmodul En stängd gavel/ en öppen gavel Plint i båda ändarna Överkopplingssladd 1 rampgavel 1 lysrörsbytare Ramparmatur: mellanmodul Plint i en ände
Plain A262 För T16 (T5) lysrör Innehåll Ramparmatur: ändmodul En stängd gavel/ en öppen gavel Plint i båda ändarna Överkopplingssladd 1 rampgavel 1 lysrörsbytare Ramparmatur: mellanmodul Plint i en ände
LINC MODELL 13. INR SVERIGE AB Kosterögatan 15 SE-211 24 Malmö 13 EN 1428:2005+A1:2008
 LINC MODELL 13 151005 Produkten är anpassad till branschregler Säker Vatteninstallation. INR garanterar produktens funktion om branschreglerna och monteringsanvisningen följs. INR SVERIGE AB Kosterögatan
Shower cabins / Steam cabins
 Installation manual for Shower cabins / Steam cabins Arrow Skandinavien AB Tel: +46 (0)31 330 00 10 www.arrowshower.com Models: 6030 6130 2 3 (SE) Lås upp brunnen. (UK) Unlock. 4 (SE) På karets undersida,
(SV) Installationsmanual för duschkabiner och ångbastukabiner (EN) Installation manual for shower cabins and steam cabins
 Installationsmanual för duschkabiner och ångbastukabiner (EN) Installation manual for shower cabins and steam cabins") Arrow Skandinavien AB Tel: +46 (0)31 330 00 10 www.arrowshower.com (SV) Installationsmanual för duschkabiner och ångbastukabiner (EN) Installation manual for shower cabins and steam cabins 6004 6005 6006
Arrow Skandinavien AB Tel: +46 (0)31 330 00 10 www.arrowshower.com (SV) Installationsmanual för duschkabiner och ångbastukabiner (EN) Installation manual for shower cabins and steam cabins 6004 6005 6006
(SV) Installationsmanual för duschkabiner och ångbastukabiner (EN) Installation manual for shower cabins and steam cabins
 Installationsmanual för duschkabiner och ångbastukabiner (EN) Installation manual for shower cabins and steam cabins") Arrow Skandinavien AB Tel: +46 (0)31 330 00 10 www.arrowshower.com (SV) Installationsmanual för duschkabiner och ångbastukabiner (EN) Installation manual for shower cabins and steam cabins 6030 6130 Ver:
Arrow Skandinavien AB Tel: +46 (0)31 330 00 10 www.arrowshower.com (SV) Installationsmanual för duschkabiner och ångbastukabiner (EN) Installation manual for shower cabins and steam cabins 6030 6130 Ver:
Your No. 1 Workout. MANUAL pro
 Your No. 1 Workout MANUAL pro Innehåll/Contents Svenska Viktigt om säkerhet Specifikationer & delar Rekommenderade övningar 3 5 6-7 2 English Safety instructions Specifications & parts Recommended exercises
IMPORTANT! RETAIN FOR FUTURE REFERENCE PLEASE READ CAREFULLY VIKTIGT! BEHÅLL FÖR FRAMTIDA REFERENS LÄS IGENOM INSTRUKTIONSMANUALEN
 Heart & Stripes Junior Bed Instructions Manual Instruktions Manual IMPORTANT! RETAIN FOR FUTURE REFERENCE PLEASE READ CAREFULLY VIKTIGT! BEHÅLL FÖR FRAMTIDA REFERENS LÄS IGENOM INSTRUKTIONSMANUALEN Thank
Spotlight Set Spotlightset / Spotlightsett
 Manual / Bruksanvisning / Bruksanvisning Spotlight Set Spotlightset / Spotlightsett ENG SE NO Item. No/Art. nr./art. nr. 995-9 ENG Thank you for choosing to purchase a product from Rusta! Read through
Bathtub Filler CN EN. TBP02201 Type / TBP02202 Type. Installation Manual. Continued on the back cover
 03N74E Installation Manual 207.8 Bathtub Filler TBP0220 Type / TBP02202 Type For best results, install the product correctly according to the instructions in this Installation Manual. After installation,
Rev No. Magnetic gripper 3
 Magnetic gripper 1 Magnetic gripper 2 Magnetic gripper 3 Magnetic gripper 4 Pneumatic switchable permanent magnet. A customized gripper designed to handle large objects in/out of press break/laser cutting
LINC 23. Tvättställsblandare/Basin Mixer. inr.se 130226A
 LINC 23 Tvättställsblandare/Basin Mixer 130226A inr.se S Användande och skötsel Manualen är en del av produkten. Bevara den under hela produktens livscykel. Vi rekommenderar att noggrant läsa igenom manualen
VASSVIK FIXED STAND SE / ENG
 VASSVIK FIXED STAND SE / ENG SE VIKTIGT Läs noga igenom instruktionerna före användning och spar dessa för framtida bruk. VARNING: Barnets huvud bör inte ligga lägre än barnets kropp. Lägg inte till ytterligare
INKOPPLINGSANVISNING ELTRYCKSLÅS WIRING DIAGRAM SOLENOID LOCK
 INKOPPLINGSANVISNING ELTRYCKSLÅS WIRING DIAGRAM SOLENOID LOCK SE EN S. 2-4 P. 5-7 SL 510/511 SL 520/521 SL 530-50/531-50 2013 11 07 SE TEKNISK SPECIFIKATION Driftspänning. Ström. Reed relä. Drifttemperatur.
00-1595. Fiat 500 2007» Fiat Panda / 4x4 2003» Fiat Panda 4x4 Climbing / 4x4 Cross 20033» 619-0300
 00-1595 120 Fiat 500 2007» Fiat Panda / 4x4 2003» Fiat Panda 4x4 Climbing / 4x4 Cross 20033» 619-0300 rev. 2014-04-04 DC Congratulations on purchasing an ATS towbar Alexo Towbars Sweden offer quality towbars
STRICT Art.nr ,
 170209 STRICT Art.nr 800 004 91, 800 005 66 SE INNEHÅLLSFÖRTECKNING Produktöversikt Sida 3 Innan montering Sida 4 Montering Sida 5-6 Skötselråd Sida 7 Kontakt Sida 8 TABLE OF CONTTS Product overview Page
Windlass Control Panel v1.0.1
 SIDE-POWER Windlass Systems 86-08950 Windlass Control Panel v1.0.1 EN Installation manual Behåll denna manual ombord! S Installations manual SLEIPNER AB Kilegatan 1 452 33 Strömstad Sverige Tel: +46 525
Installation. Twice Nisch. Twice Corner SVENSKA ENGLISH
 Installation Arrow Skandinavien AB Tel: +46 (0)31 330 00 10 www.arrowshower.com Twice Corner Twice Nisch SVENSKA (SV) Installationsanvisning för Arrow duschvägg. Vi förbättrar ständigt våra installationsanvisningar.
INSTALLATION. (SE) Duschkabin och ångbastu (UK) Shower cabins and steam cabins. Model
 Duschkabin och ångbastu (UK) Shower cabins and steam cabins. Model") 1 INSTALLATION (SE) Duschkabin och ångbastu (UK) Shower cabins and steam cabins Model 6004 6005 6006 6007 6015 6016 6025 6026 6030 6036 6106 6116 6126 6130 Arrow Skandinavien AB www.arrowshower.com Tel.
1 INSTALLATION (SE) Duschkabin och ångbastu (UK) Shower cabins and steam cabins Model 6004 6005 6006 6007 6015 6016 6025 6026 6030 6036 6106 6116 6126 6130 Arrow Skandinavien AB www.arrowshower.com Tel.
POSH. Art.nr
 POSH Art.nr 80000628 190412 SE INNEHÅLL Produktöversikt 3 Innan montering 4 Montering 5 Skötselråd 7 Kontakt 8 CONTTS Product overview 3 Before installation 4 Installation 5 Maintenance 7 Contact 8 PRODUKTÖVERSIKT
IMPORTANT! RETAIN FOR FUTURE REFERENCE PLEASE READ CAREFULLY VIKTIGT! BEHÅLL FÖR FRAMTIDA REFERENSLÄS IGENOM INSTRUKTIONSMANUALEN NOGGRANT
 13060 Basic Cot One Instruction Manual Instruktion Manual IMPORTANT! RETAIN FOR FUTURE REFERENCE PLEASE READ CAREFULLY VIKTIGT! BEHÅLL FÖR FRAMTIDA REFERENSLÄS IGENOM INSTRUKTIONSMANUALEN NOGGRANT Thank
EPIC MODELL 150721A. INR guarantees product function if the industry regulations and the installation instruction are followed.
 EPIC MODELL 3 507A INR guarantees product function if the industry regulations and the installation instruction are followed. Produkten är anpassad till branschregler Säker Vatteninstallation. INR garanterar
Anvisning för Guide for
 Anvisning för Guide for PRISMA SENSOR 1 96243235zPC Montering i tak/installation in the ceiling Byte av kupa/change of diffuser 2 Installation Installation från gavel / Installation from the end Installationskabel
SAFETY PRECAUTIONS SPECIFICATIONS
 SAFETY PRECAUTIONS Read the instructions carefully before use and save them for future reference. Before you connect the appliance: Ensure that the voltage rating on the type plate corresponds to your
CASUAL. Art.nr
 180116 CASUAL Art.nr 80000398 SE INNEHÅLLSFÖRTECKNING Produktöversikt Sida 3 Innan montering Sida 4 Montering Sida 5-6 Skötselråd Sida 7 Kontakt Sida 8 TABLE OF CONTTS Product overview Page 3 Before installation
P650 - Takscreen. Installationsguide EN
 P650 - Takscreen Installationsguide 1309-150507EN V650-Tallinn Installation manual Montera främre linhjul 12 13 Placera linan över linhjulet och skruva tillbaka täcklocket på linhjulhuset (7). Öppna linhjulshuset
GOLD SD 14-40. Med styrenhet/with control unit. Fläkt/ Fan. Utan filter/ Without filter. Fläkt/Fan. Fläkt/ Fan. Med filter/ With filter.
 GOLD SD 4-40 Med styrenhet/with control unit Skiss visar styrenhet för aggregat med inspektionssida vänster, styrenhet för aggregat med inspektionssida höger ser något annorlunda ut, men principen är lika./
Monteringsanvisning Nödutrymningsbeslag ASSA 179E
 Monteringsanvisning Nödutrymningsbeslag ASSA 179E Denna monteringsanvisning avser nödutrymningsbeslag ASSA 179E med artikelnummer 364371 i kombination med låshus Abloy EL580 med artikelnummer EL580100011.
Bruksanvisning Directions for use
 Bruksanvisning Directions for use KOMBIDON OUTSIDE WALL HOOD SVENSK/ENGLISH VERSION SVENSKA Denna montageanvisning omfattar produkten KOMBIDON. BESKRIVNING/ ANVÄNDNING Kombidon från AB C.A. Östberg är
Boiler with heatpump / Värmepumpsberedare
 Boiler with heatpump / Värmepumpsberedare QUICK START GUIDE / SNABBSTART GUIDE More information and instruction videos on our homepage www.indol.se Mer information och instruktionsvideos på vår hemsida
STANDARD. UTM Ingegerd Annergren UTMS Lina Orbéus. UTMD Anders Johansson UTMS Jan Sandberg
 1(7) Distribution: Scania, Supplier Presskruvar med rundat huvud - Metrisk gänga med grov delning Innehåll Sida Orientering... 1 Ändringar från föregående utgåva... 1 1 Material och hållfasthet... 1 2
Molift Raiser 75135G Etac Box 203, Anderstorp Sweden Tel Fax
 7G 8-0-07 SE SE EN EN Till och med serienummer 0900 Från serienummer 0900 Up to serial number 0900 From serial number 0900.... Etac Box 0, Anderstorp Sweden Tel + 7 8 7 00 Fax + 7 8 7 90 www.etac.com Svenska
Installation Instructions
 Installation Instructions (Cat. No. 1794-IE8 Series B) This module mounts on a 1794 terminal base unit. 1. Rotate keyswitch (1) on terminal base unit (2) clockwise to position 3 as required for this type
Spjäll m.m. Louvre slats etc. Byggnadssystem i aluminium Building Systems in Aluminium
 Spjäll m.m. Louvre slats etc. Byggnadssystem i aluminium Building Systems in Aluminium Spjäll m.m. Purso Oy ansvarar för att detaljerna i denna produktmapp fungerar, men för övriga tillämpningar endast
LINC 22 SHOWER MIXER 150 SHOWER MIXER 160. inr.se
 LINC 22 SHOWER MIXER 150 SHOWER MIXER 160 110309 inr.se Innan montering Vi förordar en sakkunnig VVS-installatör vid installation och service. Ledningarna ska renspolas innan installation. LINC 22 DUSCHBLANDARE
SUZUKI GRAND VITARA 3P CITY 2011»
 00-2082 120 SUZUKI GRAND VITARA 3P CITY 2011» 661-0830 rev. 2014-04-04 DC Congratulations on purchasing an ATS towbar Alexo Towbars Sweden offer quality towbars produced as a result of direct market research.
Köksblandare 9000E II Pip, spärrbar i 4 lägen Med diskmaskinsavstängning
 Köksblandare 9000E II Pip, spärrbar i 4 lägen Med diskmaskinsavstängning Köksblandare Pip, spärrbar i 9000E 4 lägen II Med diskmaskinsavstängning EcoSafe blandare Kallstartsfunktion Mjukstängande med keramisk
Technical description with installation and maintenance instructions
 www.euronom.se Technical description with installation and maintenance instructions VPS 300 / 500 BXU 0710-102 EXOTANK VPS 300/500 BXU Technical description Installation and maintenance instructions Installation...2
Metodprov för kontroll av svetsmutterförband Kontrollbestämmelse Method test for inspection of joints of weld nut Inspection specification
 Stämpel/Etikett Security stamp/lable Metodprov för kontroll av svetsmutterförband Kontrollbestämmelse Method test for inspection of joints of weld nut Inspection specification Granskad av Reviewed by Göran
LINC 23 TVÄTTSTÄLLSBLANDARE
 LINC 23 TVÄTTSTÄLLSBLANDARE Art.nr 800 00X XX 161018 Godkendelse VA 1.42/20058 INNEHÅLLSFÖRTECKNING Produktöversikt Sida 3 Innan montering Sida 4 Montering Sida 5-6 Skötselråd Sida 7 Kontakt Sida 8 TABLE
GOLD SD 50-80. Fläkt 2/ Fan 2. Fläkt 1/ Fan 1. Fläkt/ Fan. Utan filter/ Without filter. Fläkt 1/ Fan 1. Fläkt 2/ Fan 2. Med filter/ With filter Filter
 SE/G.ELSD5080.0803 GOLD SD 50-80 Med styrenhet/with control unit Skiss visar styrenhet för aggregat med inspektionssida vänster, styrenhet för aggregat med inspektionssida höger ser något annorlunda ut,
Joki Joki Air. JCD70-xx JAD90-xx. lasiesta.com. Manual. Betriebsanleitung. Manuel. Manual. Manuale. Gebruiksaanwijzing.
 lasiesta.com LA SIESTA GmbH Im Wiesenweg 4 55270 Jugenheim Germany Tel: +49 6130 9119-19 LA SIESTA Inc. 7355 S.W. 87 th Ave., Ste. 100 Miami, FL 33173 USA Tel: +1 786 401-1138 EN DE FR ES IT NL DA SV FI
Dokumentnamn Order and safety regulations for Hässleholms Kretsloppscenter. Godkänd/ansvarig Gunilla Holmberg. Kretsloppscenter
 1(5) The speed through the entire area is 30 km/h, unless otherwise indicated. Beware of crossing vehicles! Traffic signs, guardrails and exclusions shall be observed and followed. Smoking is prohibited
 BÄNKVÅG / BENCH SCALE Modell : SW-III / Model : SW-III ANVÄNDARMANUAL / USER MANUAL SW-III WWW.LIDEN-WEIGHING.SE 2014-03-26 OBS! Under vågen sitter en justerbar skruv (se bild). Standardinställning är
FORTA M315. Installation. 218 mm.
 1 Installation 2 1 2 1 218 mm. 1 2 4 5 6 7 8 9 2 G, G0= Max 100 m 1.5 mm² (AWG 15) X1, MX, Y, VH, VC = Max 200 m 0.5 mm² (AWG 20) Y X1 MX VH VC G1 G0 G 0 V 24 V~ IN 0-10 0-5, 2-6 60 s OP O 1 2 4 5 6 7
Beijer Electronics AB 2000, MA00336A, 2000-12
 Demonstration driver English Svenska Beijer Electronics AB 2000, MA00336A, 2000-12 Beijer Electronics AB reserves the right to change information in this manual without prior notice. All examples in this
ELENOR. Svensk generalagent H&G / Gesta Gård Strängnäs SWEDEN Tel
 ELENOR Svensk generalagent H&G-850.00.02/100... Gesta Gård 645 94 Strängnäs SWEDEN Tel +46 70 25 48 187 jakttorn@gestaab.se 1 4x 2 1x 3 1x 4 3x 5 4x 6 5x 14 2x 15 9x 16 2x 17 1x 18 1x 19 3x 7 3x 8 1x 9
SAFETY PRECAUTIONS SPECIFICATIONS
 SAFETY PRECAUTIONS Read the instructions carefully before use and save them for future reference. Before you connect the appliance: Ensure that the voltage rating on the type plate corresponds to your
ASSEMBLY INSTRUCTIONS SCALE - SYSTEM
 ASSEMBLY INSTRUCTIONS 60 mm 00 mm 600 mm 000 mm R50 mm ALL COMPONENTS Metal profile 60 mm (start and end of system) Metal profile connection Wire Felt square Metal profile 00 mm Metal profile connection
 BÄNKVÅG / BENCH SCALE ANVÄNDARMANUAL / USER MANUAL SW-III www.liden-weighing.com Svenska OBS! Under vågen sitter en justerbar skruv (se bild). Standardinställning är den för vägning. Om ni vill rengöra
BBT057/ BBC057 BBCD057/ BBT057-NL HOLDEN COLORADO 9/2016+ HOLDEN TRAILBLAZER WD & 4WD Models
 INSTALLATION GUIDE BBT057/ BBC057 BBCD057/ BBT057-NL HOLDEN COLORADO 9/2016+ HOLDEN TRAILBLAZER 2017+ 2WD & 4WD Models Ironman 4x4 BBT/ BBC/ BBCD/BBT057-NL Bull Bars fit to a Holden Colorado 9/2016+ It
ASSEMBLY INSTRUCTIONS SCALE SQUARE - STANDARD
 ASSEMBLY INSTRUCTIONS ALL COMPONENTS Metal profile 0 mm Gripper Ceiling attachments Screws for ceiling attachements (not included) Wires Metal profile 60 mm Metal profile 00 mm Felt - Full Felt - Half
ASSEMBLY INSTRUCTIONS SCALE CIRCLE - STANDARD
 ASSEMBLY INSTRUCTIONS ALL COMPONENTS Metal profile 0 mm Gripper Ceiling attachments Screws for ceiling attachements (not included) Wires Metal profile 60 mm Metal profile 00 mm Felt - Full Felt - Half
GOLD SD 80-2. Med styrenhet/with control unit. Fläkt 1A/B/ Fan 1A/B. Fläkt 2A/B/ Fan 2A/B. Fläkt/ Fan. Utan filter/ Without filter
 SE/G.ELS80E.3095 GOL S 80- Med styrenhet/with control unit Skiss visar styrenhet för vänster, styrenhet för höger ser något annorlunda ut, men principen är lika./ The sketch shows control unit for HU with
Verktyg som behövs. LX HD Sit-Stand Desk Mount LCD Arm SVENSKA. 20" (508 mm) 14-30 lbs (6.35-13.61 kg)
 14-30 lbs (6.35-13.61 kg)") ASSEMBLY INSTRUCTIONS LX HD Sit-Stand Desk Mount LCD Arm 14-30 lbs (6.35-13.61 kg) Maximal skärmstorlek * = 46 * Begränsat till max 30 lbs (13,61 kg) 0.78"-2.56" (20-65mm) 0.78-2.25 (20-57mm) 0.5"-2.5"
ASSEMBLY INSTRUCTIONS LX HD Sit-Stand Desk Mount LCD Arm 14-30 lbs (6.35-13.61 kg) Maximal skärmstorlek * = 46 * Begränsat till max 30 lbs (13,61 kg) 0.78"-2.56" (20-65mm) 0.78-2.25 (20-57mm) 0.5"-2.5"
manual Facial spa Art nr: 48682 Rubicson 2016-06-08
 manual Facial spa Art nr: 8682 EN NO SV 2016-06-08 Rubicson ENGLISH Overview Use Fill the container ENGLISH 1. Make sure that the power cord is not connected to a wall socket. 1 2 2. Remove the funnel
PRESS FÄLLKONSTRUKTION FOLDING INSTRUCTIONS
 PRESS FÄLLKONSTRUKTION FOLDING INSTRUCTIONS Vänd bordet upp och ner eller ställ det på långsidan. Tryck ner vid PRESS och fäll benen samtidigt. Om benen sitter i spänn tryck benen mot kortsidan före de
Företagsnamn: Grundfos Skapad av: Magnus Johansson Tel: +46(0) Datum:
 Datum:") Position Antal Beskrivning 1 HYDRO MULTI-E CRIE5-1 Art.nr.: 9913311 OBS! Bilden på produkten kan avvika från aktuell produkt GRUNDFOS Hydro Multi-E booster sets are designed for the transfer and pressure
Position Antal Beskrivning 1 HYDRO MULTI-E CRIE5-1 Art.nr.: 9913311 OBS! Bilden på produkten kan avvika från aktuell produkt GRUNDFOS Hydro Multi-E booster sets are designed for the transfer and pressure
CANALKLER 250S. Gänga i tum Thread in inch
 Skruvkoppling/Reusable coupling CANALKLER kopplingar används under högt tryck. Använd endast kopplingar som rekommenderas av Trelleborg och följ monteringsanvisningarna noggrant. Kontrollera så att slangen
This manual should be saved! EcoFlush Manual
 This manual should be saved! EcoFlush Manual ENGLISH Important! This manual should be saved by the owner! Read the whole manual before installation. The flush volumes are factory set at 2.5 / 0.3 liters.
Installation Wall. Art. #
 Arrow Skandinavien AB Tel: +46 (0)31 330 00 10 www.arrowshower.com Accepterad monteringsanvisning 2016:1 Installation Wall SVENSKA ENGLISH Art. # 522x-50 500 mm (460-480 mm) 522x-60 600 mm (560-580 mm)
00-0718. Mitsubishi Montero io 10/1999» Pajero Pinin 3-5 platser 642-0200
 00-0718 120 Mitsubishi Montero io 10/1999» Pajero Pinin 3-5 platser 642-0200 rev. 2014-04-04 DC Congratulations on purchasing an ATS towbar Alexo Towbars Sweden offer quality towbars produced as a result
Contents / Innehållsförteckning
 Contents / Innehållsförteckning Copyright This manual is the copyright of CI no 55650-4137. No part of this manual may be revised, copied or transmitted in any way without written permission from CI no
SkillGuide. Bruksanvisning. Svenska
 SkillGuide Bruksanvisning Svenska SkillGuide SkillGuide är en apparat utformad för att ge summativ återkoppling i realtid om hjärt- och lungräddning. www.laerdal.com Medföljande delar SkillGuide och bruksanvisning.
CompactAIR Center Ventilation - Filtrering - Uppvärmning CompactAIR Center Ventilation - Filtration - Heating
 CompactAIR / CompactAIR CompactAIR Center Ventilation - Filtrering - Uppvärmning CompactAIR Center Ventilation - Filtration - Heating Typenschlüssel / Type Code Beteckning / Type code Compact AIR / CompactAIR
Z-LYFTEN PRODUKTION AB MONTERINGSANVISNING INSTALLATION INSTRUCTIONS
 Z-LYFTEN PRODUKTION AB 55430 MONTERINGSANVISNING INSTALLATION INSTRUTIONS Monteringssats / Mounting kit 53926 MB Sprinter 300 series, VW rafter 35 Hjulbas / Wheel base = 4325mm (Enkel och dubbelhytt /
Montageanvisning Airway system 1000/1500 Assembly instruction Airway system 1000/1500
 S.Det är lämpligt att denna information överlämnas till användaren av anläggningen. GB. It is appropriate that this information is passed on to the user of the installation. D. Diese informationen sind
Remote control Fjärrströmbrytare / Fjernstrømbryter
 Manual / Bruksanvisning / Bruksanvisning Remote control Fjärrströmbrytare / Fjernstrømbryter ENG SE NO Item. No. 9220-1070 ENG Thank you for choosing to purchase a product from Rusta! Read through the
BBT042/ BBC042/ BBCD042 NISSAN NAVARA D40 V STX & PATHFINDER R WD & 4WD Models
 INSTALLATION GUIDE BBT042/ BBC042/ BBCD042 NISSAN NAVARA D40 V6 2010+ STX & PATHFINDER R51 2010+ 2WD & 4WD Models Ironman 4x4 BBT/ BBC/ BBCD042 Bull Bars fit to a Nissan Navara D40 STX & Pathfinder R51.
Diskant Yta eller Vikelfäste montering Mount
 Installation och Bruksanvisning Inledning Välj fästpunkterna för dina dome TW250 Silk diskanter. Kom ihåg att för bästa prestanda bör diskanterna monteras så nära mitten av bas som möjligt, med fri, direkt